
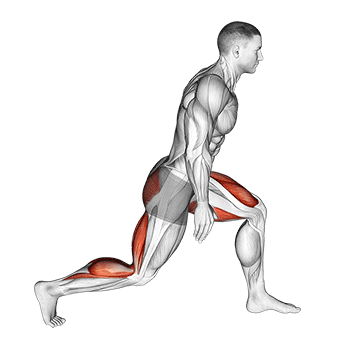
The World's Greatest Stretch, also known as the Spiderman Lunge, is a dynamic stretching exercise that targets multiple muscle groups simultaneously. It is designed to increase flexibility, mobility, and stability throughout the entire body. This exercise involves a combination of lunges, rotations, and stretches, making it an effective warm-up or cool-down exercise for various activities. ## Instructions 1. Start in a standing position with your feet hip-width apart. 2. Take a big step forward with your right foot into a lunge position. Bend your right knee to approximately 90 degrees, keeping it aligned with your ankle. 3. Place your hands on the ground inside your right foot, next to the arch of your foot. 4. Rotate your torso to the right side, extending your right arm upwards towards the ceiling. 5. Keep your left hand on the ground to support your balance, or raise it to the ceiling, following the line of your right arm. 6. Hold this position for a few seconds, feeling the stretch in your hips, groin, and thoracic spine. 7. Return your right hand to the ground and rotate your torso back to the center. 8. Step your right foot back to meet your left foot, returning to a standing position. 9. Repeat the same sequence on the opposite side, stepping forward with your left foot into a lunge and rotating to the left side. 10. Continue alternating sides for the desired number of repetitions. ## Variations - Modified World's Greatest Stretch: If you have difficulty reaching the ground with your hands, use yoga blocks or a sturdy elevated surface to support your upper body during the lunge. - Dynamic World's Greatest Stretch: Instead of holding each position, perform the movement dynamically, flowing smoothly from one side to the other in a continuous motion. - Deepened Lunge: To increase the intensity of the stretch, sink deeper into the lunge position by bending your knee further or lowering your hips closer to the ground. ## Muscles Worked - Hip flexors - Hamstrings - Glutes - Quadriceps - Groin muscles - Thoracic spine (upper back) - Core muscles (stabilization) ## Common Mistakes - Collapsing the knee: Avoid allowing the front knee to collapse inward during the lunge. Keep your knee aligned with your ankle to prevent strain on the knee joint. - Lack of stability: Engage your core muscles throughout the exercise to maintain stability and balance. Avoid excessive wobbling or leaning. - Insufficient depth: Aim to sink into a deep lunge position to maximize the stretch. If you feel any discomfort or tightness, decrease the depth or modify the stretch accordingly. - Overarching the lower back: Keep your lower back in a neutral position and avoid excessive arching. Engage your core muscles to maintain a stable and supported spine. ## Safety Precautions - Be mindful of your body's limitations and avoid pushing beyond your comfortable range of motion. - If you have any pre-existing injuries or conditions, consult with a healthcare professional or qualified trainer before attempting this exercise. - Perform the World's Greatest Stretch on a stable surface to ensure proper balance and minimize the risk of slips or falls. - Focus on maintaining proper form and alignment throughout the exercise to prevent strain or injury. - Listen to your body and adjust the depth and intensity of the stretch as needed. Discontinue the exercise if you experience any pain or discomfort.
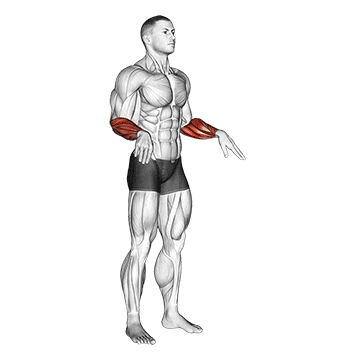
Wrist circles are a simple and effective exercise that targets the muscles and joints of the wrists and forearms. This exercise involves rotating the wrists in circular motions, promoting mobility, flexibility, and strength in the wrists. It is commonly used as a warm-up or to alleviate stiffness and tension in the wrists. ## Instructions 1. Start by extending your arms straight in front of you at shoulder height. 2. Make a loose fist with both hands, keeping your fingers relaxed. 3. Begin rotating your wrists in a circular motion. Start with small circles and gradually increase the size as you feel more comfortable. 4. Perform the circles in a clockwise direction for a set number of repetitions or duration. 5. After completing the desired number of clockwise circles, switch to counterclockwise circles. 6. Continue the wrist circles in the counterclockwise direction for the same number of repetitions or duration as the clockwise direction. 7. Focus on maintaining a smooth and controlled motion throughout the exercise. 8. Perform the wrist circles at a comfortable pace, neither too fast nor too slow. 9. After completing the set, relax your wrists and shake them out gently to release any tension. ## Variations - Finger Wrist Circles: Instead of keeping your fingers in a loose fist, extend your fingers fully and perform the wrist circles while actively engaging your finger muscles. - Resistance Band Wrist Circles: Wrap a resistance band around your fingers and hold the ends with your palms facing up. Perform the wrist circles while experiencing resistance from the band, providing an additional challenge for the muscles. - Wrist Circles with Objects: Hold lightweight objects, such as small dumbbells or therapy balls, in your hands while performing the wrist circles. This adds resistance and further engages the muscles of the wrists and forearms. ## Muscles Worked - Wrist flexors - Wrist extensors - Forearm muscles ## Common Mistakes - Tension in the wrists: Keep your wrists relaxed throughout the exercise and avoid excessive gripping or squeezing. - Poor form: Ensure that the movement is initiated from the wrists rather than the elbows or shoulders. Focus on isolating the wrist joint. - Overexertion: Start with smaller circles and gradually increase the range of motion as your wrists become more flexible and warmed up. Avoid pushing beyond your comfort zone and causing discomfort or pain. - Neglecting both clockwise and counterclockwise circles: Perform wrist circles in both directions to maintain balance and symmetry in the muscles and joints of the wrists. ## Safety Precautions - If you have any pre-existing wrist injuries, conditions, or pain, consult with a healthcare professional before attempting this exercise. - Perform the wrist circles in a pain-free range of motion. If you experience any pain or discomfort, reduce the size of the circles or discontinue the exercise. - Avoid forcefully jerking or twisting the wrists during the circles. Keep the movements smooth and controlled. - If you feel any numbness, tingling, or persistent discomfort in your wrists, stop the exercise and seek medical advice. - Gradually increase the intensity and duration of the exercise over time to avoid straining the muscles and joints.
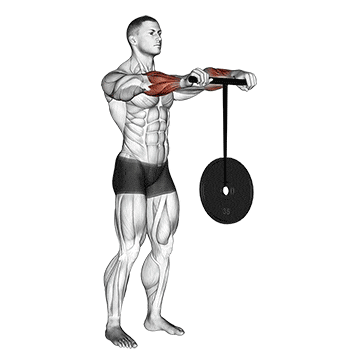
The wrist roller is a forearm strengthening exercise that targets the muscles of the wrists and forearms. It involves using a cylindrical device with a rope or handle attached to it, and through a rolling motion, it engages the muscles responsible for wrist flexion and extension. The wrist roller is a popular exercise among athletes, climbers, and individuals seeking to improve grip strength and forearm endurance. ## Instructions 1. Attach a weighted plate or load to the rope or handle of the wrist roller. 2. Hold the wrist roller with both hands, palms facing down, and arms fully extended in front of you. 3. Stand with your feet shoulder-width apart and maintain a neutral posture. 4. Start by rolling the wrist roller upwards, winding the rope around the roller, and lifting the weight off the ground. 5. Continue rolling until the weight reaches the top, keeping your wrists straight and maintaining control throughout the movement. 6. Once the weight reaches the top, slowly reverse the motion and lower the weight back down by unwinding the rope. 7. Repeat the rolling motion for the desired number of repetitions or for a specific amount of time. 8. Take short breaks as needed to maintain proper form and prevent excessive fatigue. 9. Perform the exercise with a slow and controlled pace, avoiding any sudden or jerky movements. 10. Once you have completed the set, carefully unload the weight from the wrist roller. ## Variations - One-Arm Wrist Roller: Perform the exercise using only one hand, allowing for a unilateral forearm workout. - Reverse Grip Wrist Roller: Instead of the palms facing down, grip the wrist roller with your palms facing up. This variation targets the muscles responsible for wrist extension. - Fat Grip Wrist Roller: Use a wrist roller with a thicker handle or wrap a towel around the handle to increase grip strength and forearm activation. - Towel Wrist Roller: Attach a towel or band to the wrist roller instead of a rope or handle. Grasp the towel with an overhand grip and perform the rolling motion, engaging the forearm muscles in a different way. ## Muscles Worked - Forearm flexors - Forearm extensors - Wrist flexors - Wrist extensors ## Common Mistakes - Using excessive weight: Start with a manageable weight that allows you to maintain proper form and control throughout the exercise. Gradually increase the weight as your forearm strength improves. - Allowing the wrists to bend: Keep your wrists straight and in a neutral position throughout the exercise. Avoid bending the wrists excessively in either direction. - Relying on momentum: Maintain a slow and controlled pace throughout the exercise. Avoid using momentum to move the weight up or down, as it reduces the effectiveness of the exercise. - Poor grip: Ensure a secure grip on the wrist roller handle to prevent it from slipping out of your hands. Use chalk or grip-enhancing products if necessary. - Neglecting proper form: Maintain proper posture and alignment throughout the exercise. Avoid hunching the shoulders or straining the neck. ## Safety Precautions - Start with lighter weights and gradually progress to heavier loads to prevent strain or injury. - If you have any pre-existing wrist or forearm injuries, consult with a healthcare professional before attempting this exercise. - Use caution when handling and loading the weight onto the wrist roller to avoid dropping or pinching your fingers. - Maintain control of the weight throughout the exercise to prevent it from swinging or hitting objects or body parts. - Listen to your body and stop the exercise if you experience any pain or discomfort in your wrists or forearms.
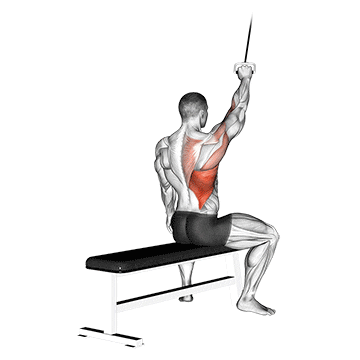
The alternate lateral pulldown is an upper body exercise that primarily targets the latissimus dorsi (lats), the large muscles of the back. It also engages the muscles of the shoulders, biceps, and forearms. This exercise helps improve upper body strength and stability while promoting better posture. ## Instructions 1. Begin by sitting on a lat pulldown machine with your knees positioned under the thigh pads. Adjust the seat height and leg support accordingly. 2. Grasp the wide bar attachment with an overhand grip, keeping your hands slightly wider than shoulder-width apart. 3. Sit with an upright posture, chest lifted, and shoulders relaxed. 4. Start with one arm extended overhead, while the other arm is bent at the elbow, pulling the bar towards the side of your body. 5. Keep your core engaged and your back straight throughout the movement. 6. Initiate the movement by pulling the bar down towards your upper chest while simultaneously extending the bent arm overhead. 7. As you lower the bar, switch the position of your arms so that the previously extended arm is now bent, and the bent arm is now extended overhead. 8. Alternate the arm positions with each repetition, ensuring a controlled and smooth motion. 9. Repeat the exercise for the desired number of repetitions. ## Variations - Resistance Band Pulldown: If you don't have access to a lat pulldown machine, you can attach a resistance band to an anchor point above you and perform the same alternating pulldown motion. - Assisted Pulldown: If you are unable to perform the exercise with your body weight, you can use an assisted pulldown machine or have a partner provide assistance by lightly supporting your legs or knees during the movement. ## Muscles Worked - Latissimus dorsi (lats) - Rhomboids - Trapezius - Posterior deltoids (shoulders) - Biceps brachii - Forearm muscles ## Common Mistakes - Using excessive momentum: Avoid using momentum to pull the bar down. Focus on controlled movements and engage the targeted muscles throughout the exercise. - Rounding the back: Keep your back straight and maintain proper spinal alignment. Avoid rounding your back or excessively arching it during the exercise. - Pulling with the arms only: Instead of solely relying on your arms, initiate the movement by engaging the muscles of your back and shoulders. Focus on squeezing your shoulder blades together as you pull the bar down. ## Safety Precautions - Ensure that the lat pulldown machine is set up correctly, and the weight is appropriate for your fitness level. - If you experience any discomfort or pain during the exercise, stop immediately and consult with a fitness professional or healthcare provider. - Maintain proper form throughout the exercise to prevent strain or injury to the muscles and joints. - If you have any pre-existing shoulder or back conditions, it is advisable to consult with a healthcare professional before attempting the alternate lateral pulldown. - Start with a weight that allows you to maintain proper form and gradually increase the resistance as your strength and technique improve.
The assisted lying leg raise with throw down is an exercise that primarily targets the abdominal muscles, particularly the lower abdominals. It also engages the hip flexors and lower back muscles. This exercise helps strengthen the core, improve hip mobility, and enhance overall stability. ## Instructions 1. Lie down on your back on a mat or a flat surface. 2. Extend your legs fully and keep them together. 3. Position your arms straight above your head and hold onto a stable object, such as a bench or a sturdy bar. 4. Keep your shoulders relaxed and pressed against the ground throughout the exercise. 5. Engage your core muscles by drawing your navel towards your spine. 6. While keeping your legs straight and together, slowly raise them towards the ceiling until they are perpendicular to the ground. This is the starting position. 7. Lower your legs in a controlled manner towards the floor, but stop a few inches above the ground. 8. With a controlled motion, bring your legs back up to the starting position. 9. Repeat the movement for the desired number of repetitions. ## Variations - Beginners or individuals with limited core strength can perform the exercise with bent knees instead of straight legs. - To increase the intensity, ankle weights can be added. - Advanced practitioners can perform the exercise using a stability ball by placing it between their legs and squeezing it while raising and lowering the legs. ## Muscles Worked - Rectus abdominis (lower abdominals) - Hip flexors - Lower back muscles ## Common Mistakes - Using momentum or swinging the legs instead of maintaining control throughout the movement. Focus on a slow and controlled motion. - Allowing the lower back to lift off the ground. Keep your lower back pressed against the floor to avoid straining the back. - Raising the legs too high, which can lead to excessive arching of the lower back. Lift your legs only until they are perpendicular to the ground. ## Safety Precautions - Ensure that the stable object you hold onto is secure and can bear your weight. - If you experience any discomfort or pain in your lower back, modify the exercise or consult a fitness professional. - If you have any pre-existing conditions or injuries, it's advisable to consult a healthcare professional before attempting this exercise.

The Assisted Motion Russian Twist is an exercise that targets the core muscles, particularly the obliques. It involves rotational movement of the torso, helping to strengthen the abdominal muscles and improve core stability. ## Instructions 1. Start by sitting on the floor with your knees bent and your feet flat on the ground. You can anchor your feet under a stable object or have a partner hold them to provide assistance. 2. Lean back slightly, keeping your back straight and your chest lifted. 3. Interlace your fingers and extend your arms straight out in front of you. 4. Engage your core muscles to stabilize your spine and maintain proper alignment throughout the exercise. 5. Slowly rotate your torso to the right, keeping your arms straight and parallel to the floor. Aim to touch the floor or mat beside your hip with your fingertips. 6. Pause briefly, then rotate your torso to the left, again aiming to touch the floor or mat beside your hip with your fingertips. 7. Continue alternating sides in a controlled manner for the desired number of repetitions. ## Variations - To increase the difficulty, you can hold a medicine ball, dumbbell, or kettlebell in your hands while performing the exercise. - Another variation is to lift your feet off the ground, creating a more challenging balance component. ## Muscles Worked - Obliques (side abdominal muscles) - Rectus abdominis (front abdominal muscles) - Transverse abdominis (deep core muscles) - Erector spinae (lower back muscles) - Hip flexors ## Common Mistakes - Twisting too forcefully: Avoid using excessive momentum or forceful movements, as this can strain the spine and lead to injury. Focus on controlled and deliberate rotation. - Hunching the back: Maintain an upright posture throughout the exercise, avoiding rounding or hunching the back. Keep the chest lifted and the core engaged. - Not fully rotating the torso: Ensure that you are twisting your entire torso and reaching as far as comfortably possible to each side, engaging the oblique muscles fully. ## Safety Precautions - If you have any pre-existing back or spine conditions, it is advisable to consult with a healthcare professional before attempting this exercise. - Start with a weight or resistance level that is appropriate for your fitness level and gradually increase as you become stronger and more comfortable with the movement. - Listen to your body and stop the exercise if you experience any pain or discomfort. - Engage your core muscles and maintain proper form to protect your lower back during the exercise.
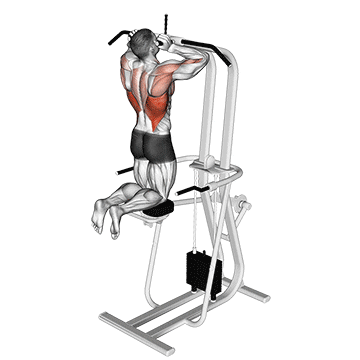
The assisted parallel close grip pull-up is an exercise that primarily targets the muscles of the upper body, including the back, biceps, and shoulders. This exercise helps develop upper body strength, particularly in the pulling muscles, and improves grip strength. ## Instructions 1. Position yourself underneath a parallel pull-up bar or a set of parallel bars. Adjust the height of the bar or bars so that you can comfortably reach them while standing. 2. Stand facing the bar or bars and grab onto them with a close grip, with your palms facing inward (towards you). Your hands should be shoulder-width apart. 3. Lift your feet off the ground, bending your knees and crossing your ankles. This will be your starting position. 4. Engage your core and retract your shoulder blades as you begin to pull your body upwards towards the bar or bars. 5. Continue pulling until your chin reaches or slightly clears the bar or bars. 6. Slowly lower yourself back down to the starting position in a controlled manner. 7. Repeat the movement for the desired number of repetitions. ## Variations - If you have difficulty performing the exercise with your full body weight, you can use an assisted pull-up machine or resistance bands to provide assistance. - Another variation is to use a close grip triangle handle instead of a regular bar grip. This can further target the muscles of the back and biceps. ## Muscles Worked - Latissimus dorsi (back muscles) - Biceps brachii (front of upper arm) - Rhomboids (upper back) - Trapezius (upper back and shoulders) - Brachialis (underneath biceps) - Forearm muscles ## Common Mistakes - Using excessive momentum or swinging the body to complete the movement. Maintain control and focus on using the targeted muscles. - Allowing the shoulders to hunch or shrug during the exercise. Keep your shoulders down and back, and maintain good posture throughout. - Not fully extending the arms at the bottom of the movement. Ensure that your arms are fully straightened before initiating the next repetition. ## Safety Precautions - Make sure the pull-up bar or parallel bars are stable and can support your body weight. - If you are using an assisted pull-up machine or resistance bands, ensure they are securely attached and provide adequate assistance. - If you have any shoulder or back issues, consult a healthcare professional or fitness trainer before attempting this exercise. - Start with a weight or resistance level that you can comfortably handle to avoid strain or injury. Gradually increase the intensity as your strength improves.
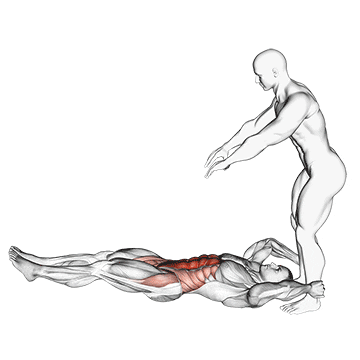
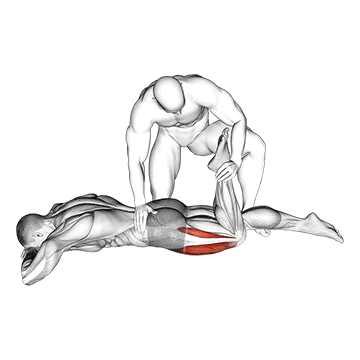
The Assisted Prone Hamstring exercise is a lower body exercise that primarily targets the hamstring muscles. It involves the controlled movement of flexing the knees against resistance, which helps strengthen and tone the back of the thighs. ## Instructions 1. Start by lying face down on an exercise mat or padded surface. 2. Position yourself with your hips slightly off the edge of a bench or stability ball, while keeping your upper body supported with your forearms resting on the ground. 3. Have a partner or use an exercise band to provide resistance. The band should be securely anchored to a stable object, such as a weight machine or post. 4. Hook the band around your ankles, ensuring it is snug but not too tight. 5. Engage your core muscles and keep your upper body relaxed throughout the exercise. 6. Slowly and in a controlled manner, flex your knees and bring your heels towards your glutes, against the resistance of the band. 7. Pause briefly at the top of the movement, then slowly extend your legs back to the starting position. 8. Repeat for the desired number of repetitions, maintaining a smooth and controlled motion. ## Variations - To increase the difficulty, you can use a stronger resistance band or ask your partner to apply more tension. - If you don't have a resistance band or partner, you can perform a similar exercise using a leg curl machine at the gym. ## Muscles Worked - Hamstrings (biceps femoris, semitendinosus, semimembranosus) - Glutes (to a lesser extent) - Calves (gastrocnemius and soleus) ## Common Mistakes - Using momentum: Avoid swinging or jerking your legs during the exercise. Focus on slow, controlled movements to engage the targeted muscles effectively. - Not maintaining proper form: Keep your hips stationary and avoid lifting them excessively or arching your lower back. This ensures that the tension remains on the hamstrings. - Allowing the band to go slack: Keep tension on the band throughout the entire range of motion by actively resisting against it. This ensures constant engagement of the hamstrings. ## Safety Precautions - If you have any pre-existing knee or hamstring injuries, consult with a healthcare professional before attempting this exercise. - Start with a light resistance band or tension and gradually increase as you become stronger and more comfortable with the movement. - Avoid locking your knees during the exercise. Maintain a slight bend in the knees to prevent excessive stress on the joint. - If using a stability ball, ensure it is properly inflated and stable before performing the exercise. - Listen to your body and stop the exercise if you experience any pain or discomfort, particularly in the knees or lower back.
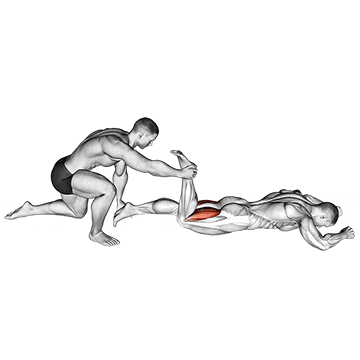
The Assisted Prone Lying Quad Stretch is an exercise that targets the quadriceps muscles located at the front of the thighs. It involves stretching these muscles to improve flexibility and reduce muscle tightness. ## Instructions 1. Begin by lying face down on an exercise mat or padded surface. 2. Extend your legs straight out behind you, keeping your feet together. 3. Have a partner or use a resistance band for assistance. If using a resistance band, securely anchor it to a stable object. 4. Bend one knee and reach back with your hand or grasp the resistance band with that hand. 5. Gently pull your heel toward your glutes, feeling a stretch in the front of your thigh. 6. Ensure that your hips remain in contact with the ground and avoid arching your lower back. 7. Hold the stretch for 20-30 seconds, while maintaining a relaxed breathing pattern. 8. Release the stretch slowly and switch sides to stretch the other leg. ## Variations - If you don't have a partner or resistance band, you can perform a similar stretch by lying on your side and using your hand to grasp your ankle or foot, pulling it towards your glutes. - You can also perform a standing quad stretch by bending one knee and bringing your heel towards your glutes while standing and balancing with the support of a wall or chair. ## Muscles Worked - Quadriceps (rectus femoris, vastus lateralis, vastus intermedius, vastus medialis) ## Common Mistakes - Hyperextending the lower back: Avoid arching the lower back excessively during the stretch. Keep the pelvis neutral and engage your core muscles to maintain proper alignment. - Holding the breath: Remember to breathe naturally throughout the stretch. Avoid holding your breath, as it can create tension in the body. - Pulling too forcefully: Use a gentle and controlled pull to stretch the quadriceps. Avoid pulling with excessive force, as it may cause discomfort or strain. ## Safety Precautions - If you have any knee or hip injuries or conditions, it is advisable to consult with a healthcare professional before attempting this stretch. - Be mindful of your body's limitations and avoid pushing the stretch to the point of pain. A gentle stretch sensation is sufficient. - Take caution when using a resistance band to ensure it is securely anchored and does not snap back unexpectedly. - If you experience any sharp or intense pain during the stretch, release it immediately and seek medical advice if necessary.