
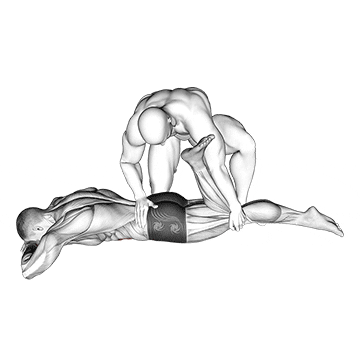
The Assisted Prone Rectus Femoris Stretch is an exercise that targets the rectus femoris muscle, one of the quadriceps muscles located at the front of the thigh. This stretch specifically focuses on stretching the rectus femoris, which can help improve flexibility and reduce muscle tightness in the front of the hip and thigh. ## Instructions 1. Begin by lying face down on an exercise mat or padded surface. 2. Position your body so that your legs are straight and extended behind you. 3. Have a partner or use a resistance band for assistance. If using a resistance band, securely anchor it to a stable object. 4. Bend one knee and reach back with your hand or grasp the resistance band with that hand. 5. Gently pull your heel towards your glutes, while maintaining a neutral spine and keeping your hips in contact with the ground. 6. As you pull your heel towards your glutes, focus on keeping your knee pointing downward and in line with your body. 7. You should feel a stretch in the front of your hip and thigh. 8. Hold the stretch for 20-30 seconds, while maintaining a relaxed breathing pattern. 9. Slowly release the stretch and switch sides to stretch the other leg. ## Variations - If you don't have a partner or resistance band, you can perform a similar stretch by standing and using your hand to grasp your ankle or foot, pulling it towards your glutes while maintaining proper posture. - Another variation is to perform a kneeling rectus femoris stretch, where you kneel on one knee, lean forward, and reach back to grasp your ankle or foot to stretch the front of the hip and thigh. ## Muscles Worked - Rectus Femoris (one of the quadriceps muscles) ## Common Mistakes - Allowing the knee to flare outward: Keep your knee pointing downward and in line with your body during the stretch. Avoid letting the knee turn outward, as this can reduce the effectiveness of the stretch. - Arching the lower back: Maintain a neutral spine position and avoid excessive arching of the lower back. Engage your core muscles to support proper alignment. - Pulling too forcefully: Use a gentle and controlled pull to stretch the rectus femoris. Avoid pulling with excessive force, as it may cause discomfort or strain. ## Safety Precautions - If you have any knee or hip injuries or conditions, it is advisable to consult with a healthcare professional before attempting this stretch. - Be mindful of your body's limitations and avoid pushing the stretch to the point of pain. A gentle stretch sensation is sufficient. - Take caution when using a resistance band to ensure it is securely anchored and does not snap back unexpectedly. - If you experience any sharp or intense pain during the stretch, release it immediately and seek medical advice if necessary.
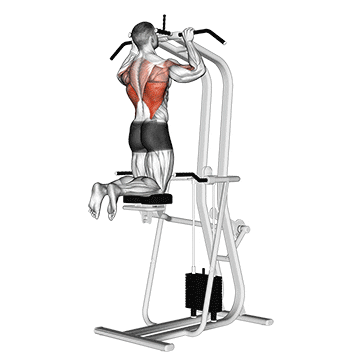
The Assisted Pull-Up is an exercise that targets the muscles of the upper body, particularly the back, shoulders, and arms. It is a variation of the traditional pull-up exercise that uses assistance to make it more accessible for individuals who are working on building strength to perform unassisted pull-ups. ## Instructions 1. Find an assisted pull-up machine or use a resistance band for assistance. If using a resistance band, securely anchor it above you. 2. Stand on the machine platform or place one or both feet in the resistance band, depending on the setup. 3. Grab the pull-up bar with an overhand grip, slightly wider than shoulder-width apart. Your palms should be facing away from you. 4. Engage your core, retract your shoulder blades, and keep your chest lifted. 5. Begin by hanging from the bar with your arms fully extended and your feet off the ground or supported by the resistance band. 6. Initiate the pull-up by bending your elbows and pulling your body up towards the bar. 7. Keep pulling until your chin reaches or clears the bar. 8. Slowly lower yourself back down to the starting position with control, fully extending your arms. 9. Repeat the movement for the desired number of repetitions. ## Variations - Resistance Band Assisted Pull-Up: Loop a resistance band around the pull-up bar and place one or both feet in the band to provide assistance. - Assisted Pull-Up Machine: Adjust the weight on the machine to provide the necessary assistance based on your strength level. - Partner Assisted Pull-Up: Have a partner hold your legs or hips to provide assistance as you perform the pull-up. ## Muscles Worked - Latissimus dorsi (lats) - Rhomboids - Biceps brachii - Brachialis - Forearm muscles - Upper back muscles - Shoulder muscles (deltoids) ## Common Mistakes - Using momentum: Avoid swinging or using momentum to perform the exercise. Maintain control throughout the movement, focusing on the muscles being targeted. - Not fully extending the arms: Ensure that you fully extend your arms at the bottom of each repetition to achieve the full range of motion. - Overarching the lower back: Keep your core engaged and maintain a neutral spine throughout the exercise. Avoid excessive arching of the lower back. ## Safety Precautions - If you have any shoulder, elbow, or wrist injuries or conditions, consult with a healthcare professional before attempting this exercise. - Start with a resistance or assistance level that is appropriate for your current strength level. Gradually reduce the assistance as you become stronger. - Use a controlled and smooth motion throughout the exercise to prevent any sudden jerking or straining. - If using a resistance band, ensure it is securely anchored and positioned to provide the desired level of assistance. - Listen to your body and stop the exercise if you experience any pain or discomfort.
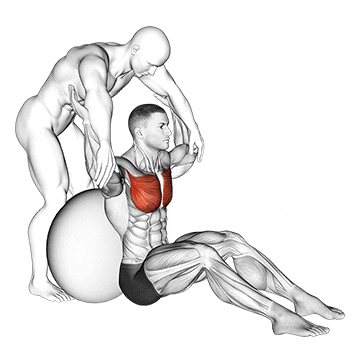
The Assisted Seated Pectoralis Major Stretch with Stability Ball is an exercise that targets the pectoralis major muscles, commonly known as the pecs. This stretch aims to increase flexibility and relieve tension in the chest muscles. ## Instructions 1. Start by sitting on a stability ball with your feet flat on the floor, hip-width apart, and your back straight. 2. Walk your feet forward and roll your body down the stability ball until your upper back and head are supported by the ball. Your hips should be slightly above knee level. 3. Extend your arms out to the sides, parallel to the floor, with your elbows slightly bent and palms facing forward. 4. Have a partner or use a resistance band for assistance. If using a resistance band, securely anchor it behind you. 5. Slowly and in a controlled manner, move your arms back towards the floor, allowing your chest to stretch and open up. 6. Continue the movement until you feel a comfortable stretch in your chest muscles. Hold this position for 20-30 seconds. 7. Return your arms back to the starting position and repeat the stretch for the desired number of repetitions. ## Variations - Single-Arm Stretch: Perform the stretch one arm at a time by keeping the opposite arm by your side while stretching the other arm across the body. - Standing Pectoralis Major Stretch: Stand facing a wall or doorway, place your forearm against the wall or doorway at shoulder height, and gently turn your body away from the wall to stretch the chest muscles. ## Muscles Worked - Pectoralis Major (chest muscles) - Anterior Deltoids (front of the shoulder) ## Common Mistakes - Shrugging the shoulders: Keep your shoulders relaxed and away from your ears throughout the stretch. Avoid shrugging or tensing the muscles around your neck and shoulders. - Overstretching: Stretch until you feel a comfortable pull in your chest muscles, but avoid pushing the stretch to the point of pain. It should be a gentle stretch sensation. - Arching the lower back excessively: Maintain a neutral spine position throughout the stretch. Avoid excessive arching of the lower back, as it may reduce the effectiveness of the stretch and potentially strain the lower back. ## Safety Precautions - If you have any shoulder or neck injuries or conditions, consult with a healthcare professional before attempting this stretch. - Use a stability ball that is appropriately sized for your body and is in good condition. - Perform the stretch in a controlled manner and avoid any sudden or jerky movements. - Be mindful of your body's limitations and do not push the stretch beyond a comfortable range of motion. - If using a resistance band, ensure it is securely anchored and positioned to provide the desired level of assistance. - Stop the stretch if you experience any pain or discomfort, particularly in the shoulders or chest.
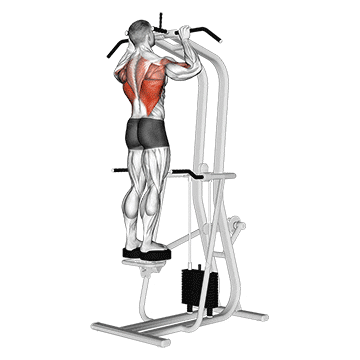
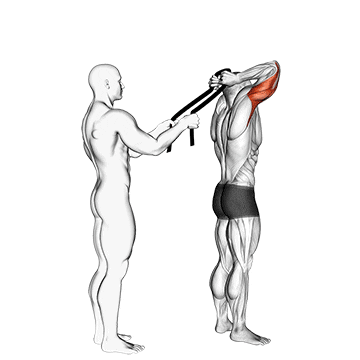
The assisted standing pull-up is an exercise that targets the muscles of the upper body, particularly the back, biceps, and shoulders. It is performed using an assistive machine or resistance bands to provide support during the movement. ## Instructions 1. Stand facing the pull-up bar or the appropriate equipment for assisted pull-ups. 2. Position your hands slightly wider than shoulder-width apart on the bar, with an overhand grip (palms facing away from you). 3. Keep your feet flat on the floor and maintain a straight posture. 4. Engage your core muscles and slightly lean back. 5. Start the movement by pulling your body upward, focusing on squeezing your shoulder blades together. 6. Continue pulling until your chest is close to the bar or until you reach a comfortable position. 7. Hold for a brief moment at the top, then slowly lower yourself back down with control. 8. Repeat for the desired number of repetitions. ## Variations - Resistance band assisted pull-up: Attach a resistance band to the pull-up bar and place one or both feet into the band to provide assistance during the exercise. - Machine-assisted pull-up: Use an assisted pull-up machine that has a counterweight to support a portion of your body weight. ## Muscles Worked - Primary muscles: Latissimus dorsi (back muscles), biceps brachii (upper arm muscles), and brachialis (forearm muscles). - Secondary muscles: Rhomboids (mid-back muscles), deltoids (shoulder muscles), and lower trapezius (back muscles). ## Common Mistakes - Using momentum: Avoid swinging or using your legs to generate momentum. Focus on controlled movement using your upper body strength. - Incomplete range of motion: Ensure that you perform the full range of motion by pulling yourself up until your chest is close to the bar or a comfortable position. - Rounded shoulders: Maintain proper posture throughout the exercise by keeping your shoulders pulled back and down. ## Safety Precautions - When using resistance bands, choose a band with appropriate tension that allows you to perform the exercise with control and without compromising form. - Ensure that the pull-up bar or equipment is securely mounted and can support your body weight. - If you have any pre-existing shoulder or back injuries, consult with a qualified fitness professional or healthcare provider before attempting this exercise.
The assisted standing triceps extension with a towel is an exercise that targets the triceps muscles, located at the back of the upper arms. It involves using a towel or resistance band to assist in performing the triceps extension movement. ## Instructions 1. Stand upright with your feet shoulder-width apart. 2. Hold the towel with both hands, shoulder-width apart and palms facing down. 3. Extend your arms straight overhead, keeping your elbows close to your ears. 4. Keep your core engaged and maintain a stable posture throughout the exercise. 5. Slowly bend your elbows, lowering the towel behind your head. 6. Continue bending until you feel a stretch in your triceps, but avoid any discomfort or pain. 7. Pause briefly at the bottom of the movement, then straighten your arms back up to the starting position. 8. Repeat for the desired number of repetitions. ## Variations - Resistance band assisted triceps extension: Attach a resistance band to a stable anchor point above you and hold the ends of the band with your hands. Perform the triceps extension movement as described above, with the resistance band providing assistance. ## Muscles Worked - Primary muscles: Triceps brachii (back of the upper arm). - Secondary muscles: Deltoids (shoulder muscles), pectoralis major (chest muscle), and core muscles for stability. ## Common Mistakes - Swinging the arms: Avoid using momentum or swinging the arms to lift the towel. Focus on controlled and smooth movements. - Flaring the elbows: Keep your elbows close to your ears throughout the exercise. Avoid letting them flare out to the sides. - Hyperextending the lower back: Maintain a neutral spine position and avoid excessive arching or leaning backward during the movement. ## Safety Precautions - Choose a towel or resistance band with an appropriate level of tension to match your strength and fitness level. - If you have any shoulder or elbow injuries or conditions, consult with a qualified fitness professional or healthcare provider before attempting this exercise. - If you experience pain or discomfort in your elbows or shoulders during the exercise, stop immediately and seek guidance from a professional.
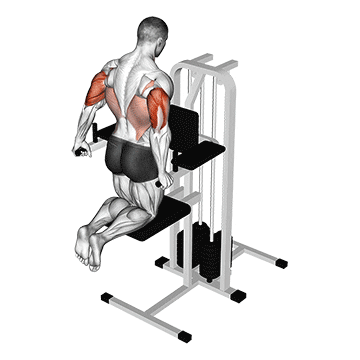
The assisted triceps dip (kneeling) is an exercise that targets the triceps muscles, located at the back of the upper arms. It involves using an assistive machine or resistance bands to provide support during the movement. ## Instructions 1. Position an assistive machine or set up resistance bands to assist with the exercise. 2. Kneel on the floor facing the machine or anchor point of the resistance bands. 3. Place your hands shoulder-width apart on the machine handles or grab onto the resistance bands. 4. Ensure your knees are directly under your hips and your back is straight. 5. Keep your core engaged and maintain proper alignment throughout the exercise. 6. Lower your body by bending your elbows, allowing your forearms to move backward. 7. Continue lowering until your upper arms are parallel to the floor or you reach a comfortable depth. 8. Pause briefly at the bottom of the movement, then push through your palms to extend your arms and return to the starting position. 9. Repeat for the desired number of repetitions. ## Variations - Machine-assisted triceps dip: Utilize an assisted dip machine that has a counterweight to support a portion of your body weight. - Resistance band assisted triceps dip: Attach resistance bands to a stable anchor point above you and hold the ends of the bands while performing the dip. The resistance bands provide assistance during the exercise. ## Muscles Worked - Primary muscles: Triceps brachii (back of the upper arm). - Secondary muscles: Pectoralis major (chest muscle), deltoids (shoulder muscles), and core muscles for stability. ## Common Mistakes - Letting the shoulders shrug: Keep your shoulders down and away from your ears throughout the movement. Avoid allowing them to shrug up. - Allowing the elbows to flare out: Keep your elbows close to your sides throughout the exercise. Avoid letting them flare out to the sides. - Using excessive momentum: Avoid using momentum or swinging to perform the exercise. Focus on controlled movements. ## Safety Precautions - Adjust the assistive machine or resistance bands to a suitable level of support based on your strength and fitness level. - If you have any shoulder, elbow, or wrist injuries or conditions, consult with a qualified fitness professional or healthcare provider before attempting this exercise. - Start with a comfortable range of motion and gradually increase the depth of the dip as your strength and flexibility improve. - If you experience pain or discomfort in your shoulders, elbows, or wrists during the exercise, stop immediately and seek guidance from a professional.
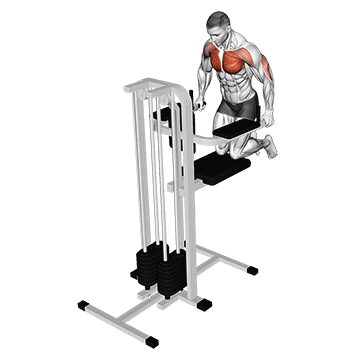
The assisted wide-grip chest dip (kneeling) is an exercise that primarily targets the muscles of the chest, particularly the pectoralis major, while also engaging the triceps and shoulders. It involves using an assistive machine or resistance bands to provide support during the movement. ## Instructions 1. Position an assistive machine or set up resistance bands to assist with the exercise. 2. Kneel on the floor facing the machine or anchor point of the resistance bands. 3. Place your hands on the machine handles or grab onto the resistance bands with a wide grip. 4. Ensure your knees are directly under your hips and your back is straight. 5. Keep your core engaged and maintain proper alignment throughout the exercise. 6. Lower your body by bending your elbows, allowing your chest to move forward. 7. Continue lowering until your upper arms are parallel to the floor or you reach a comfortable depth. 8. Pause briefly at the bottom of the movement, then push through your palms to extend your arms and return to the starting position. 9. Repeat for the desired number of repetitions. ## Variations - Machine-assisted wide-grip chest dip: Utilize an assisted dip machine that has a counterweight to support a portion of your body weight. - Resistance band assisted wide-grip chest dip: Attach resistance bands to a stable anchor point above you and hold the ends of the bands while performing the dip. The resistance bands provide assistance during the exercise. ## Muscles Worked - Primary muscles: Pectoralis major (chest muscles), anterior deltoids (front shoulder muscles), and triceps brachii (back of the upper arm). - Secondary muscles: Rhomboids (mid-back muscles), trapezius (upper back muscles), and core muscles for stability. ## Common Mistakes - Shrugging the shoulders: Keep your shoulders down and away from your ears throughout the movement. Avoid allowing them to shrug up. - Allowing the elbows to flare out excessively: Maintain a controlled movement with your elbows pointing slightly out to the sides, but avoid excessive flaring. - Using excessive momentum: Avoid using momentum or swinging to perform the exercise. Focus on controlled movements. ## Safety Precautions - Adjust the assistive machine or resistance bands to a suitable level of support based on your strength and fitness level. - If you have any shoulder, elbow, or wrist injuries or conditions, consult with a qualified fitness professional or healthcare provider before attempting this exercise. - Start with a comfortable range of motion and gradually increase the depth of the dip as your strength and flexibility improve. - If you experience pain or discomfort in your shoulders, elbows, or wrists during the exercise, stop immediately and seek guidance from a professional.
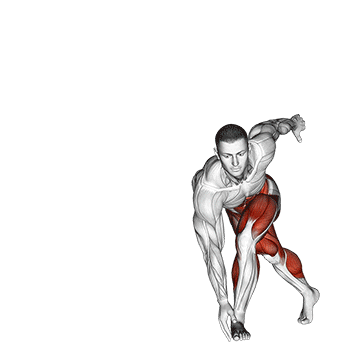
Astride jumps are plyometric exercises that involve jumping forward and backward with one leg extended forward and the other leg extended backward. This exercise targets the lower body, specifically the quadriceps, hamstrings, glutes, and calf muscles. It helps improve leg power, explosiveness, and coordination. ## Instructions 1. Start in a standing position with your feet shoulder-width apart. 2. Take a large step forward with your right foot, extending it in front of you, while simultaneously taking a large step backward with your left foot, extending it behind you. 3. Lower your body into a lunge position, bending your front knee to approximately 90 degrees and keeping your back knee slightly above the ground. 4. Explosively jump upward, pushing off the ground with both feet. 5. While in the air, quickly switch the position of your legs, bringing your left leg forward and your right leg backward. 6. Land softly and immediately go into the next jump, repeating the same movement pattern. 7. Continue alternating the leg positions with each jump for the desired number of repetitions or a specific duration. ## Variations - Single-Leg Astride Jumps: Perform the exercise with one leg at a time, jumping forward and backward with each leg individually. - Box Astride Jumps: Use an elevated box or step to jump onto and off of during the exercise, adding an extra challenge to the movement. ## Muscles Worked - Primary muscles: Quadriceps (front thigh muscles), hamstrings (back thigh muscles), glutes (buttocks muscles), and calf muscles. - Secondary muscles: Core muscles for stabilization and coordination. ## Common Mistakes - Allowing the knees to collapse inward: Keep your knees aligned with your toes throughout the movement. Avoid inward collapsing of the knees. - Landing with stiff or locked knees: Land with soft knees to absorb the impact and reduce stress on the joints. - Insufficient depth in the lunge position: Lower your body into a deep lunge, aiming for a 90-degree bend in the front knee to fully engage the muscles. ## Safety Precautions - Ensure that you have proper footwear with adequate cushioning and support. - Start with a lower box height or lower-intensity variations if you are new to plyometric exercises or have any existing knee or ankle issues. - Perform the exercise on a non-slip surface and make sure there is enough space to safely jump forward and backward. - Listen to your body and avoid pushing through pain or discomfort. If you experience any pain, stop the exercise and consult with a healthcare professional.
The back and forth step exercise is a cardiovascular exercise that targets the lower body muscles, primarily the quadriceps, hamstrings, glutes, and calves. It involves stepping forward and backward in a rhythmic motion to elevate the heart rate and improve cardiovascular endurance. ## Instructions 1. Stand with your feet hip-width apart, maintaining an upright posture. 2. Step forward with your right foot, bending your right knee and lowering your body into a lunge position. 3. Push off with your right foot, bringing it back to the starting position. 4. Immediately step backward with your right foot, bending your right knee and lowering your body into a reverse lunge. 5. Push off with your right foot, bringing it back to the starting position. 6. Repeat the same sequence on the opposite side, stepping forward and backward with your left foot. 7. Continue alternating the forward and backward steps in a fluid motion, maintaining a steady pace. 8. Perform the exercise for a specific duration or a desired number of repetitions. ## Variations - Weighted Back and Forth Step: Hold dumbbells or a weighted vest while performing the exercise to increase the intensity and add resistance. - Speed Back and Forth Step: Perform the exercise at a faster pace to challenge your cardiovascular system and increase the calorie burn. ## Muscles Worked - Primary muscles: Quadriceps (front thigh muscles), hamstrings (back thigh muscles), glutes (buttocks muscles), and calf muscles. - Secondary muscles: Core muscles for stability and balance. ## Common Mistakes - Allowing the knees to collapse inward: Keep your knees aligned with your toes throughout the movement. Avoid inward collapsing of the knees. - Leaning too far forward or backward: Maintain an upright posture throughout the exercise, avoiding excessive leaning in any direction. - Taking excessively large steps: Take controlled and moderate-sized steps to maintain balance and stability. ## Safety Precautions - Start with a comfortable range of motion and gradually increase the depth of the lunge as your strength and flexibility improve. - Use proper footwear with adequate cushioning and support to minimize the impact on your joints. - If you have any knee or hip injuries or conditions, consult with a qualified fitness professional or healthcare provider before attempting this exercise. - Listen to your body and work within your limits. If you experience pain or discomfort, modify the exercise or stop and seek guidance from a professional.