
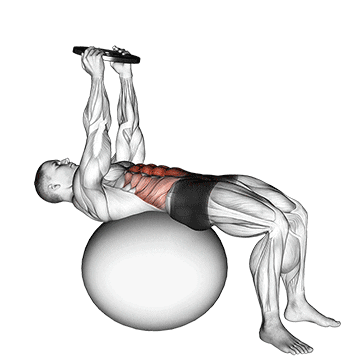
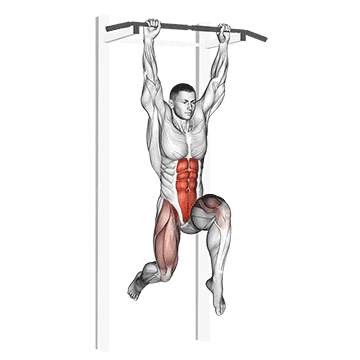
The weighted overhead crunch on a stability ball is an exercise that targets the abdominal muscles, particularly the rectus abdominis (six-pack muscles) and the obliques. By adding weight and performing the exercise on an unstable surface, such as a stability ball, you challenge your core muscles even further, enhancing strength and stability. ## Instructions 1. Choose an appropriate weight, such as a dumbbell or a weighted plate, that you can comfortably hold overhead while lying on the stability ball. 2. Sit on the stability ball and slowly walk your feet forward, rolling down until your lower back is supported by the ball. Your knees should be bent at a 90-degree angle, feet flat on the floor, and hips slightly higher than your knees. 3. Hold the weight with both hands and extend your arms straight up toward the ceiling, keeping your wrists in a neutral position. 4. Engage your core muscles by drawing your navel toward your spine. 5. Slowly begin the movement by curling your upper body forward, initiating the crunch motion. Focus on using your abdominal muscles to lift your shoulder blades off the ball. 6. Continue the movement until you feel a strong contraction in your abs, then slowly lower yourself back to the starting position with control. 7. Repeat the exercise for the desired number of repetitions. ## Variations - **Unweighted Overhead Crunch**: If using weights is too challenging, you can perform the exercise without additional weight, focusing on proper form and engaging your core muscles. - **Russian Twist**: After completing each crunch, rotate your torso to one side, engaging your oblique muscles. Alternate sides with each repetition to target the obliques more specifically. - **Weighted Overhead Crunch with Leg Extension**: Perform the same movement as described above but, as you crunch up, extend your legs out straight, engaging your lower abdominal muscles. ## Muscles Worked The weighted overhead crunch primarily targets the following muscles: - Rectus abdominis (six-pack muscles) - Obliques (side abdominal muscles) - Transverse abdominis (deep core muscles) - Hip flexors (during the leg extension variation) ## Common Mistakes - Using excessive momentum: Avoid using momentum to swing your upper body. Focus on controlled movements and engage your abdominal muscles throughout the exercise. - Straining the neck: Avoid pulling on your neck or placing excessive strain on it. Keep your neck relaxed and in a neutral position throughout the exercise. - Not fully engaging the core: Ensure that you engage your core muscles by drawing your navel toward your spine and maintaining a stable torso throughout the movement. - Overarching the lower back: Keep your lower back in contact with the stability ball and avoid excessive arching during the crunch. This helps protect your lower back and maximizes the effectiveness of the exercise. ## Safety Precautions - Choose a stable and properly inflated stability ball that suits your body size. - Use an appropriate weight that challenges your abdominal muscles but allows you to maintain proper form and control. - If you have any pre-existing back or neck conditions, consult with a healthcare professional before attempting this exercise. - Start with lighter weights and gradually increase the weight as your core strength improves. - Maintain slow and controlled movements throughout the exercise to avoid strain or injury. - If you experience any pain or discomfort, stop the exercise and consult with a healthcare professional.
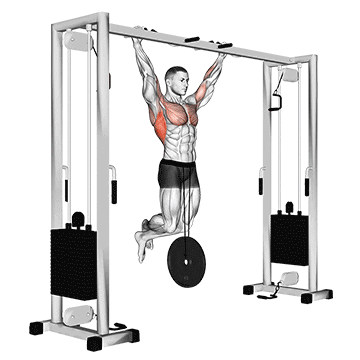
The weighted pull-up is a compound exercise that primarily targets the muscles of the upper body, including the back (specifically the latissimus dorsi), biceps, and shoulders. It involves pulling your body weight upward while wearing additional weight, such as a weight plate or a weighted vest. The exercise helps build strength and muscle mass in the upper body, particularly the back muscles, while also improving grip strength. ## Instructions 1. Attach a weight plate securely to a weight belt or wear a weighted vest. Ensure the weight is properly fastened and won't shift during the exercise. 2. Stand facing a pull-up bar with your feet shoulder-width apart. 3. Reach up and grip the bar with an overhand grip, slightly wider than shoulder-width apart. 4. Hang from the bar with your arms fully extended, engaging your shoulders and maintaining a straight body position. 5. Begin the movement by initiating the pull-up. Drive your elbows down and back while pulling your body upward toward the bar. 6. Continue pulling until your chin is above the bar, maintaining a controlled motion. 7. Lower yourself back down in a controlled manner until your arms are fully extended. 8. Repeat the movement for the desired number of repetitions. ## Variations - **Assisted Weighted Pull-Up**: If performing a weighted pull-up is too challenging, you can use a resistance band or an assisted pull-up machine to provide assistance and gradually build strength. - **Negative Weighted Pull-Up**: Start from the top position of a weighted pull-up and lower yourself down slowly, focusing on the eccentric portion of the exercise. This helps build strength for the full movement. - **Neutral Grip Weighted Pull-Up**: Perform the exercise using a neutral grip (palms facing each other) instead of an overhand grip. This variation targets the muscles slightly differently and may be more comfortable for some individuals. ## Muscles Worked The weighted pull-up primarily targets the following muscles: - Latissimus dorsi (back muscles) - Biceps brachii (arm muscles) - Rhomboids (mid-back muscles) - Rear deltoids (shoulder muscles) - Forearm muscles for grip strength. ## Common Mistakes - Using momentum: Avoid using excessive swinging or kipping movements to generate momentum. Focus on controlled and strict movements for maximum muscle engagement. - Neglecting proper form: Maintain proper body alignment throughout the exercise. Avoid twisting or kicking your legs excessively. - Insufficient shoulder engagement: Ensure that you engage your shoulder muscles and maintain stability throughout the movement. This helps prevent injury and maximizes the effectiveness of the exercise. - Insufficient grip strength: Develop grip strength through exercises like farmer's carries or grip-specific training to improve your ability to hold on during the exercise. ## Safety Precautions - Ensure that the pull-up bar is secure and can support your body weight and the additional weight. Use a reliable and sturdy setup. - Gradually increase the weight used for the exercise as your strength improves, ensuring you can maintain proper form and control. - If you're new to the exercise or unsure about your ability to perform it safely, consider working with a qualified fitness professional for guidance and instruction. - Warm up adequately before attempting the exercise to prepare your muscles and joints. - Listen to your body and stop the exercise if you experience any pain or discomfort. If necessary, consult with a healthcare professional.
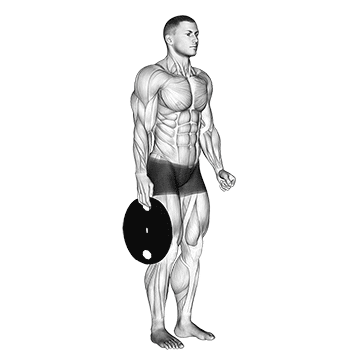
The weighted standing hand squeeze is an exercise that targets the muscles of the hands, forearms, and grip strength. It involves squeezing a weighted object, such as a hand gripper or a stress ball, using the muscles of the hand and forearm. ## Instructions 1. Stand up straight with your feet shoulder-width apart. 2. Hold a weighted object, such as a hand gripper or a stress ball, in your hand. 3. Position your arm comfortably by your side, allowing it to hang naturally. 4. Start by squeezing the weighted object with your hand, applying pressure to engage the muscles of your hand and forearm. 5. Hold the squeeze for a few seconds, then release the pressure. 6. Repeat the squeeze and release motion for a predetermined number of repetitions or for a specific duration. 7. Switch to the other hand and repeat the exercise. ## Variations - **Resistance Level**: You can use a hand gripper with different levels of resistance to adjust the difficulty of the exercise. Start with a lighter resistance and gradually increase as your grip strength improves. - **Finger Extensions**: Instead of squeezing, you can perform finger extensions by using a rubber band or resistance band. Place the band around your fingertips and open your hand against the resistance, working the muscles responsible for finger extension. - **Thumb Squeeze**: Use a soft stress ball and focus on squeezing it with your thumb against the rest of your fingers, targeting the muscles responsible for thumb strength. ## Muscles Worked - **Hand Muscles**: The exercise primarily targets the muscles of the hand, including the flexor and extensor muscles. - **Forearm Muscles**: The muscles of the forearm, such as the flexor digitorum profundus, flexor digitorum superficialis, and extensor carpi radialis longus, are engaged during the exercise. - **Grip Strength**: By strengthening the hand and forearm muscles, the exercise helps improve overall grip strength. ## Common Mistakes - **Gripping Too Tightly**: Avoid gripping the weighted object too tightly, as it can lead to excessive strain and fatigue. Maintain a firm but comfortable grip. - **Using Incorrect Form**: Make sure to maintain proper posture throughout the exercise. Avoid slouching or leaning excessively. - **Neglecting Both Hands**: It's essential to work both hands equally to maintain balanced strength and prevent muscle imbalances. ## Safety Precautions - **Start with Light Resistance**: If you're a beginner or have any hand or wrist issues, start with a lighter resistance and gradually increase the intensity as your strength improves. - **Listen to Your Body**: If you experience any pain, discomfort, or excessive fatigue during the exercise, stop immediately and consult with a healthcare professional. - **Warm-Up**: Prior to performing the weighted standing hand squeeze, it's advisable to warm up your hands and forearms with gentle stretching exercises or by using a warm towel to promote blood circulation. Note: It's always recommended to consult with a qualified fitness professional or healthcare provider before starting any new exercise program, especially if you have pre-existing medical conditions or injuries.
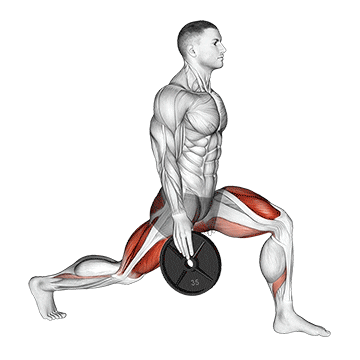
The weighted stretch lunge is an exercise that targets the muscles of the lower body, specifically the quadriceps, hamstrings, glutes, and calves. It involves performing a lunge while holding weights, which adds resistance to the exercise and increases the challenge. ## Instructions 1. Stand up straight with your feet hip-width apart. 2. Hold a pair of dumbbells or kettlebells in your hands, allowing them to hang at your sides. 3. Take a step forward with your right leg, extending it far enough to create a 90-degree angle between your right thigh and lower leg. 4. Simultaneously, lower your body down by bending both knees, keeping your back straight and chest lifted. 5. As you lower yourself into the lunge position, allow the weights to lower naturally alongside your body. 6. Hold the lunge position for a brief moment, ensuring your front knee is aligned with your ankle and your back knee is hovering just above the ground. 7. Push through your front heel and return to the starting position by extending your front leg. 8. Repeat the lunge on the opposite side by stepping forward with your left leg. 9. Continue alternating lunges for the desired number of repetitions. ## Variations - **Reverse Lunges**: Instead of stepping forward, you can perform reverse lunges by stepping backward. This variation may place less stress on the knees and emphasize the glutes and hamstrings. - **Walking Lunges**: Perform the lunges in a walking motion by taking a step forward with each lunge, alternating between legs. This variation adds a dynamic component to the exercise and increases cardiovascular demands. - **Weighted Barbell Lunges**: If you have access to a barbell, you can perform the weighted stretch lunges by holding the barbell on your upper back, similar to a back squat. This variation allows for heavier loads and greater overall muscle activation. ## Muscles Worked - **Quadriceps**: The primary muscles targeted during the weighted stretch lunge are the quadriceps (front of the thigh). - **Hamstrings**: The hamstrings (back of the thigh) act as stabilizers during the exercise. - **Glutes**: The gluteal muscles (buttocks) are engaged to support the movement. - **Calves**: The calf muscles are also involved as stabilizers during the lunge. ## Common Mistakes - **Leaning Forward**: Avoid leaning the upper body too far forward during the lunge. Keep your torso upright and engage your core for stability. - **Knee Overextension**: Ensure that your front knee does not extend beyond your toes when lunging forward. Maintain proper alignment by keeping your knee in line with your ankle. - **Neglecting Proper Form**: Pay attention to proper form and technique throughout the exercise. Avoid rushing or sacrificing form for additional repetitions or weight. ## Safety Precautions - **Choose Appropriate Weights**: Select weights that are challenging but manageable for your fitness level. Gradually increase the weight as your strength and technique improve. - **Maintain Balance**: Ensure a stable and balanced stance throughout the exercise. Be cautious when stepping forward to avoid tripping or losing balance. - **Protect the Knees**: If you have knee issues or concerns, perform the exercise with caution. Listen to your body and consult with a healthcare professional if needed. - **Warm-Up**: Prior to performing weighted stretch lunges, warm up your lower body with dynamic exercises such as leg swings, hip circles, or light cardio to increase blood flow and prepare the muscles for the exercise. Remember, it's important to consult with a qualified fitness professional or healthcare provider before starting any new exercise program, especially if you have pre-existing
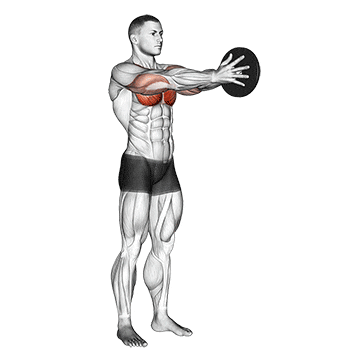
The weighted Svend press is an exercise that primarily targets the muscles of the chest, specifically the pectoralis major. It involves squeezing a pair of weighted plates together while pressing them out in front of your chest. This exercise helps to strengthen the chest muscles and improve overall upper body strength. ## Instructions 1. Stand up straight with your feet shoulder-width apart. 2. Hold a weight plate in each hand, gripping them with your palms facing inward (towards each other). 3. Bring the weight plates up to chest level, positioning them parallel to the ground. 4. Squeeze the weight plates together forcefully, engaging the muscles of your chest. 5. While maintaining the squeeze, extend your arms forward, pressing the weight plates away from your body. 6. Hold the extended position briefly, feeling the tension in your chest muscles. 7. Slowly bring the weight plates back to the starting position, maintaining the squeeze. 8. Repeat the pressing motion for the desired number of repetitions. ## Variations - **Dumbbell Press**: If weight plates are not available, you can perform a similar pressing motion using dumbbells. Hold a dumbbell in each hand with your palms facing inward, then press them together in front of your chest. - **Resistance Band Press**: Attach a resistance band to a sturdy object or anchor point at chest height. Hold the ends of the band in each hand and press them together, maintaining tension throughout the movement. - **Machine Press**: If you have access to a chest press machine, you can perform a similar movement by adjusting the handles to chest level and pressing them together. ## Muscles Worked - **Pectoralis Major**: The main muscle targeted during the weighted Svend press is the pectoralis major, the large muscle of the chest. - **Anterior Deltoids**: The front portion of the shoulder muscles, called the anterior deltoids, are also engaged during the pressing motion. - **Triceps**: The triceps muscles located at the back of the upper arm are involved in assisting the pressing movement. ## Common Mistakes - **Lack of Squeeze**: One common mistake is not fully squeezing the weight plates together during the exercise. Focus on creating tension in the chest muscles by actively squeezing the plates throughout the movement. - **Overextension of the Elbows**: Avoid overextending or locking out your elbows during the pressing motion. Keep a slight bend in the elbows to maintain muscle engagement and joint stability. - **Using Excessive Weight**: It's important to use a weight that allows you to maintain proper form and control throughout the exercise. Using excessively heavy weights may compromise your technique and increase the risk of injury. ## Safety Precautions - **Choose Appropriate Weight**: Select a weight that challenges your chest muscles without sacrificing proper form. Start with lighter weights and gradually increase the resistance as your strength improves. - **Maintain Proper Posture**: Keep your back straight, shoulders down and back, and engage your core throughout the exercise. Avoid rounding your shoulders or hunching forward. - **Controlled Movement**: Perform the exercise in a slow and controlled manner to ensure proper muscle engagement and reduce the risk of strain or injury. - **Warm-Up**: Prior to performing the weighted Svend press, warm up your chest, shoulders, and arms with dynamic stretches or light cardio to increase blood flow and prepare the muscles for the exercise. As always, if you have any pre-existing medical conditions or injuries, it's advisable to consult with a qualified fitness professional or healthcare provider before starting any new exercise program.
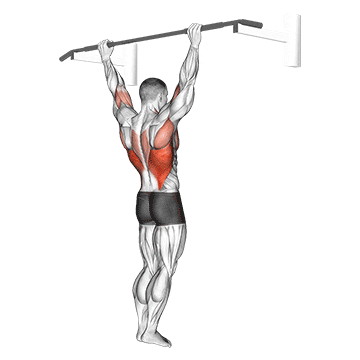
The wide grip rear pull-up is an upper-body exercise that primarily targets the muscles of the back, particularly the latissimus dorsi (lats), rhomboids, and rear deltoids. This exercise is performed using a wide grip on a pull-up bar with the palms facing away from the body. It involves pulling the body upward until the chin reaches or clears the bar, emphasizing the muscles in the upper back. ## Instructions 1. Stand beneath a pull-up bar and reach up to grip the bar with your palms facing away from you. Position your hands wider than shoulder-width apart. 2. Hang from the bar with your arms fully extended and your feet off the ground. This is the starting position. 3. Engage your core and squeeze your shoulder blades together. 4. Pull yourself upward by driving your elbows down towards the ground and pulling your chest towards the bar. 5. Continue pulling until your chin reaches or clears the bar, and your upper back muscles are fully contracted. 6. Pause briefly at the top of the movement, then slowly lower yourself back to the starting position, maintaining control. 7. Repeat the exercise for the desired number of repetitions. ## Variations - Assisted Wide Grip Rear Pull-Up: Use an assisted pull-up machine or resistance bands to provide assistance and reduce the amount of body weight you're lifting. - Wide Grip Pull-Down: Perform the same movement on a lat pulldown machine using a wide grip handle attachment. - Close Grip Rear Pull-Up: Perform the exercise with a close grip, bringing your hands closer together on the bar. ## Muscles Worked - Latissimus dorsi (lats) - Rhomboids - Rear deltoids (posterior deltoids) - Biceps (secondary muscles) - Forearms (secondary muscles) ## Common Mistakes - Using momentum: Avoid using momentum or swinging your body to complete the exercise. Focus on using controlled strength to perform the movement. - Shrugging the shoulders: Keep your shoulders pulled down and back throughout the exercise. Avoid shrugging or hunching them up towards your ears. - Partial range of motion: Aim to perform the exercise through a full range of motion, ensuring that your chin reaches or clears the bar. Avoid only performing partial reps. - Arching the lower back: Maintain a neutral spine position throughout the exercise. Avoid excessive arching or overarching of the lower back. ## Safety Precautions - Ensure that the pull-up bar is securely mounted and can support your body weight. - Warm up adequately before attempting the exercise to prepare your muscles and joints. - If you're a beginner or lack sufficient upper body strength, start with assisted variations or gradually progress to performing full wide grip rear pull-ups. - Listen to your body and avoid any exercise that causes pain or discomfort. If you have any pre-existing injuries or conditions, consult with a healthcare professional or qualified trainer before attempting this exercise.
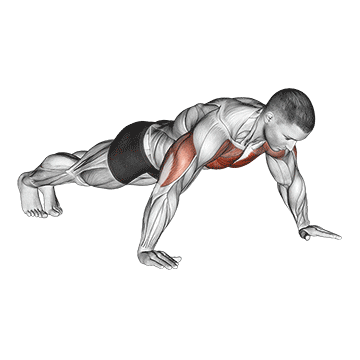
The wide hand push-up is a variation of the traditional push-up exercise that targets the muscles of the chest, shoulders, and triceps. In this exercise, the hands are positioned wider than shoulder-width apart, which increases the emphasis on the chest muscles and engages the shoulders to a greater extent. Wide hand push-ups help improve upper body strength, muscular endurance, and stability. ## Instructions 1. Start by assuming a high plank position on the floor with your hands positioned wider than shoulder-width apart. 2. Extend your arms fully and position your hands so that they are slightly turned outwards. 3. Keep your body in a straight line from head to heels, engaging your core muscles. 4. Lower your body by bending your elbows and keeping them flared out to the sides. 5. Descend until your chest is just above the ground, or as low as you can comfortably go while maintaining proper form. 6. Pause briefly in the bottom position, then push through your hands to extend your elbows and return to the starting position. 7. Keep your body straight throughout the movement, avoiding sagging or lifting your hips. 8. Repeat the exercise for the desired number of repetitions. ## Variations - Incline Wide Hand Push-Up: Perform the exercise with your hands on an elevated surface, such as a bench or step, to reduce the amount of bodyweight you're lifting. - Decline Wide Hand Push-Up: Position your feet on an elevated surface, such as a bench or step, to increase the difficulty and target the upper chest. - Close Grip Push-Up: Place your hands closer together, slightly narrower than shoulder-width apart, to shift the emphasis to the triceps. ## Muscles Worked - Pectoralis major (chest muscles) - Anterior deltoids (front shoulders) - Triceps brachii (back of the upper arm) - Core muscles (engaged to stabilize the body) ## Common Mistakes - Elbows flaring out too wide: While performing wide hand push-ups, be cautious not to allow your elbows to excessively flare out to the sides. This can put strain on the shoulder joints. Instead, aim to keep your elbows at a comfortable angle, roughly 45 degrees from your body. - Sagging or lifting hips: Maintain a straight line from your head to your heels throughout the exercise. Avoid sagging your hips towards the ground or lifting your hips too high. - Insufficient range of motion: Lower your body until your chest is just above the ground, or as low as you can comfortably go, to ensure a full range of motion and maximize the benefits of the exercise. - Lack of core engagement: Keep your core muscles engaged throughout the movement to maintain stability and prevent your lower back from sagging. ## Safety Precautions - Ensure that you have sufficient upper body strength before attempting wide hand push-ups. If you're a beginner, start with regular push-ups and gradually progress to wider hand positions. - Maintain proper form and avoid excessive strain on your joints. If you experience any pain or discomfort, modify the exercise or seek guidance from a fitness professional. - If you have any pre-existing shoulder or wrist injuries or conditions, consult with a healthcare professional or qualified trainer before attempting this exercise. - Warm up adequately before performing wide hand push-ups to prepare your muscles and joints for the exercise. - Listen to your body and rest if needed. Push yourself within your limits, gradually increasing the difficulty over time.
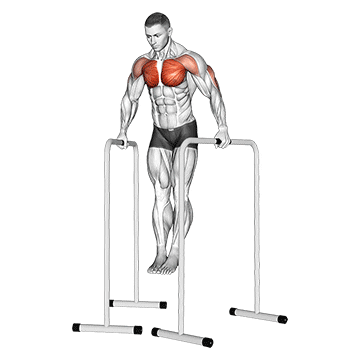
The wide-grip chest dip on high parallel bars is an advanced upper-body exercise that primarily targets the muscles of the chest, triceps, and shoulders. It involves lowering and raising your body between two parallel bars while maintaining a wide hand placement. This exercise helps develop upper body strength, muscular endurance, and stability in the chest and triceps. ## Instructions 1. Stand between two parallel bars that are taller than your height. Grasp each bar with an overhand grip, wider than shoulder-width apart. 2. Lift yourself up off the ground, supporting your body weight with your arms, and straighten your arms fully. This is the starting position. 3. Lean your torso slightly forward and engage your core muscles for stability. 4. Lower your body by bending your elbows and keeping them flared out to the sides. Aim to descend until your shoulders are below your elbows or until you feel a stretch in your chest muscles. 5. Pause briefly in the bottom position, then push through your hands to extend your elbows and raise your body back to the starting position. 6. Keep your body straight throughout the movement, avoiding excessive leaning or swinging. 7. Repeat the exercise for the desired number of repetitions. ## Variations - Assisted Wide-Grip Chest Dip: Use a dip machine or resistance bands to provide assistance and reduce the amount of body weight you're lifting. - Weighted Wide-Grip Chest Dip: Once you have built sufficient strength, you can add additional weight using a weight belt or a dumbbell held between your legs. ## Muscles Worked - Pectoralis major (chest muscles) - Anterior deltoids (front shoulders) - Triceps brachii (back of the upper arm) - Core muscles (engaged to stabilize the body) ## Common Mistakes - Leaning too far forward: Maintain a slight forward lean to engage the chest muscles, but avoid excessive leaning, as it can place excessive stress on the shoulder joints. - Insufficient range of motion: Lower your body until your shoulders are below your elbows or until you feel a stretch in your chest muscles. Avoid only performing partial reps. - Elbows flaring out too wide: While performing wide-grip chest dips, be cautious not to allow your elbows to excessively flare out to the sides. This can strain the shoulder joints. Instead, aim to keep your elbows at a comfortable angle, roughly 45 degrees from your body. - Lack of control: Maintain control throughout the exercise. Avoid swinging or using momentum to complete the movement. ## Safety Precautions - Ensure that the parallel bars are sturdy and securely mounted before attempting the exercise. - Warm up adequately before performing wide-grip chest dips to prepare your muscles and joints for the exercise. - If you're a beginner or lack sufficient upper body strength, start with assisted variations or gradually progress to performing full wide-grip chest dips. - Listen to your body and avoid any exercise that causes pain or discomfort. If you have any pre-existing injuries or conditions, consult with a healthcare professional or qualified trainer before attempting this exercise. - Engage your core muscles throughout the exercise to maintain stability and protect your lower back. - Be mindful of your shoulder health. If you have any shoulder issues, consult with a professional to ensure the exercise is suitable for you and to learn proper form and modifications if necessary.
Wind sprints, also known as interval sprints or speed sprints, are a form of high-intensity interval training (HIIT) that involves short bursts of maximum effort sprinting followed by brief recovery periods. This exercise targets the cardiovascular system, helping to improve aerobic capacity, speed, and explosive power. Wind sprints are an effective way to burn calories, enhance overall athletic performance, and boost cardiovascular fitness. ## Instructions 1. Find an open space, such as a track, field, or clear path, where you can safely sprint. 2. Start with a proper warm-up, including dynamic stretches and a light jog to prepare your muscles and joints for the intense sprints. 3. Choose a distance or duration for your sprints. For example, you can sprint at maximum effort for 20-30 seconds or cover a specific distance like 100 meters. 4. Begin the sprint by pushing off explosively with your legs and pumping your arms vigorously. 5. Focus on maintaining proper sprinting form, keeping your body tall, shoulders relaxed, and driving your knees high. 6. Sprint at maximum effort for the predetermined distance or time. 7. After completing the sprint, slow down gradually to a walk or light jog to allow for recovery. 8. Take an active recovery period of 1-2 minutes between each sprint, allowing your heart rate to lower before starting the next sprint. 9. Repeat the sprint and recovery cycle for the desired number of repetitions or until you have reached your training goal. 10. After finishing the last sprint, cool down with a light jog or walk and perform static stretches to aid in muscle recovery. ## Variations - Uphill Sprints: Perform the sprints on an incline, such as a hill or treadmill set at an incline, to increase the intensity and target different muscle groups. - Stair Sprints: Instead of sprinting on flat ground, use a set of stairs or bleachers to sprint up and down, adding an extra challenge to your workout. - Tabata Sprints: Follow the Tabata protocol, which involves sprinting at maximum effort for 20 seconds followed by 10 seconds of rest. Repeat for a total of 8 cycles (4 minutes). - Shuttle Sprints: Set up cones or markers at predetermined distances and perform sprints back and forth between them, simulating the movements required in sports like basketball or soccer. ## Muscles Worked - Quadriceps (front of the thighs) - Hamstrings (back of the thighs) - Glutes (buttocks) - Calves - Hip flexors - Core muscles - Cardiovascular system (heart and lungs) ## Common Mistakes - Poor running form: Maintain proper running mechanics during the sprints, including proper posture, arm swing, and knee drive. - Starting too fast: Gradually build up your speed and intensity throughout the workout to prevent injury and allow for better performance. - Neglecting warm-up and cool-down: Always warm up before sprinting to prepare your body and cool down afterward to aid in recovery and prevent muscle soreness. - Overtraining: Avoid excessive frequency or volume of wind sprints to prevent overuse injuries. Allow for adequate rest and recovery between sessions. ## Safety Precautions - Check with your healthcare provider before engaging in high-intensity sprinting if you have any pre-existing health conditions or concerns. - Ensure that the running surface is safe and free of obstacles or hazards that may cause trips or falls. - Wear appropriate footwear with good traction and support to minimize the risk of slipping or injuries. - Listen to your body and start at an appropriate fitness level. Gradually increase the intensity and duration of your sprints over time. - Stay hydrated before, during