
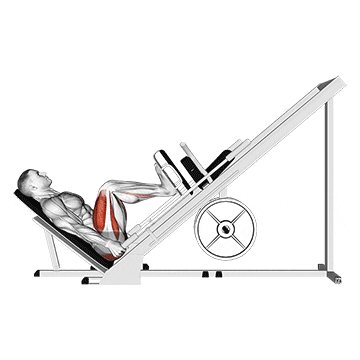
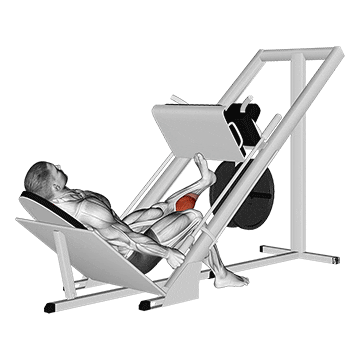
The sled 45° leg press is a lower body exercise that targets the muscles of the quadriceps, hamstrings, and glutes. It involves pushing a weighted sled at a 45-degree angle using your legs. This exercise helps to develop lower body strength, power, and muscular endurance. ## Instructions Here are the step-by-step instructions for performing the sled 45° leg press: 1. Start by positioning yourself on the sled machine with your side against the backrest and your feet on the platform. Adjust the weight on the sled according to your fitness level and capabilities. 2. Place your bottom foot slightly higher on the platform, while the top foot can rest on the lower leg or on the platform for stability. 3. Ensure that your back is pressed firmly against the backrest and maintain a neutral spine throughout the exercise. 4. Release the sled brake and allow it to move away from the starting position, creating tension in your leg muscles. 5. Bend your knees and lower the sled by bringing your bottom thigh toward your chest, keeping your feet flat on the platform. 6. Continue lowering until your bottom knee is bent at approximately a 90-degree angle or until you reach a comfortable range of motion. 7. Pause for a brief moment at the bottom of the movement. 8. Push the sled back up by extending your legs, driving through your bottom foot. Avoid locking out your knee at the top. 9. Repeat the movement for the desired number of repetitions and then switch sides. ## Variations Here are a few variations of the sled 45° leg press: 1. Single-leg variation: Perform the exercise using one leg at a time, alternating between legs. This variation increases the challenge and helps to address any muscle imbalances. 2. Narrow stance leg press: Place your feet closer together on the platform to emphasize the inner thigh muscles (adductors) and the outer glutes. 3. Wide stance leg press: Position your feet wider apart to target the outer thigh muscles (abductors) and the glutes to a greater extent. ## Muscles Worked The sled 45° leg press primarily targets the following muscles: 1. Quadriceps: Located at the front of the thighs, the quadriceps muscles are responsible for knee extension. 2. Hamstrings: Situated at the back of the thighs, the hamstrings muscles assist in knee flexion and hip extension. 3. Glutes: The gluteal muscles, including the gluteus maximus, medius, and minimus, contribute to hip extension and provide overall lower body stability. ## Common Mistakes Here are some common mistakes to avoid while performing the sled 45° leg press: 1. Allowing the knee to cave inward: Keep your knee aligned with your foot throughout the movement. Avoid allowing your knee to collapse inward, as it can put unnecessary stress on the knee joint. 2. Rounding the lower back: Maintain a neutral spine and avoid rounding your lower back during the exercise. This helps to prevent lower back strain. 3. Locking out the knee: Avoid fully locking out your knee at the top of the movement. Keeping a slight bend in the knee maintains tension in the muscles and reduces the risk of joint hyperextension. 4. Using excessive weight: Choose a weight that allows you to maintain proper form and control throughout the exercise. Using excessive weight can compromise your technique and increase the risk of injury. ## Safety Precautions To perform the sled 45° leg press safely and effectively, keep the following precautions in mind: 1. Start with a conservative amount of weight and gradually increase it as your strength and proficiency improve. 2. Make sure the sled machine is in good working condition
The sled 45° wide leg press is a lower body exercise that targets the muscles of the quadriceps, hamstrings, and glutes. It involves pushing a weighted sled at a 45-degree angle using your legs with a wider stance. This exercise helps to develop lower body strength, power, and muscular endurance. ## Instructions Here are the step-by-step instructions for performing the sled 45° wide leg press: 1. Start by positioning yourself on the sled machine with your back against the backrest and your feet on the platform. Adjust the weight on the sled according to your fitness level and capabilities. 2. Place your feet wider than shoulder-width apart, with your toes pointed slightly outward. 3. Ensure that your back is pressed firmly against the backrest and maintain a neutral spine throughout the exercise. 4. Release the sled brake and allow it to move away from the starting position, creating tension in your leg muscles. 5. Bend your knees and lower the sled by bringing your thighs toward your chest, keeping your feet flat on the platform. 6. Continue lowering until your knees are bent at approximately a 90-degree angle or until you reach a comfortable range of motion. 7. Pause for a brief moment at the bottom of the movement. 8. Push the sled back up by extending your legs, driving through your heels. Avoid locking out your knees at the top. 9. Repeat the movement for the desired number of repetitions. ## Variations Here are a few variations of the sled 45° wide leg press: 1. Narrow stance leg press: Place your feet closer together on the platform to emphasize the inner thigh muscles (adductors) and the outer glutes. 2. Single-leg variation: Perform the exercise using one leg at a time, alternating between legs. This variation increases the challenge and helps to address any muscle imbalances. ## Muscles Worked The sled 45° wide leg press primarily targets the following muscles: 1. Quadriceps: Located at the front of the thighs, the quadriceps muscles are responsible for knee extension. 2. Hamstrings: Situated at the back of the thighs, the hamstrings muscles assist in knee flexion and hip extension. 3. Glutes: The gluteal muscles, including the gluteus maximus, medius, and minimus, contribute to hip extension and provide overall lower body stability. ## Common Mistakes Here are some common mistakes to avoid while performing the sled 45° wide leg press: 1. Allowing the knees to cave inward: Keep your knees aligned with your feet throughout the movement. Avoid allowing your knees to collapse inward, as it can put unnecessary stress on the knee joint. 2. Rounding the lower back: Maintain a neutral spine and avoid rounding your lower back during the exercise. This helps to prevent lower back strain. 3. Locking out the knees: Avoid fully locking out your knees at the top of the movement. Keeping a slight bend in the knees maintains tension in the muscles and reduces the risk of joint hyperextension. 4. Using excessive weight: Choose a weight that allows you to maintain proper form and control throughout the exercise. Using excessive weight can compromise your technique and increase the risk of injury. ## Safety Precautions To perform the sled 45° wide leg press safely and effectively, keep the following precautions in mind: 1. Start with a conservative amount of weight and gradually increase it as your strength and proficiency improve. 2. Make sure the sled machine is in good working condition, with the safety locks properly engaged. 3. If you have any pre-existing knee or hip conditions, consult with a healthcare professional before performing this exercise.
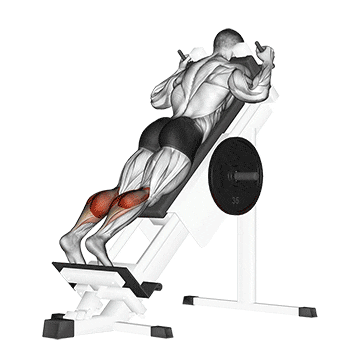
The sled calf press on the leg press machine is an exercise that specifically targets the calf muscles, including the gastrocnemius and soleus. It involves pushing a weighted sled using the balls of your feet, focusing on the calf muscles' contraction and extension. This exercise helps to strengthen and tone the calves, improving lower leg strength and stability. ## Instructions Here are the step-by-step instructions for performing the sled calf press on the leg press machine: 1. Adjust the seat of the leg press machine so that your feet can comfortably reach the sled platform. 2. Sit on the machine with your back flat against the backrest and place your feet shoulder-width apart on the sled platform, with your toes pointing forward or slightly outward. 3. Ensure that your knees are slightly bent and not fully locked out. 4. Release the sled brake and allow it to move away from the starting position, creating tension in your calf muscles. 5. Push the sled forward by extending your ankles, using the balls of your feet. Focus on contracting your calf muscles as you press. 6. Continue pushing until your ankles are fully extended, flexing your calf muscles at the top of the movement. 7. Slowly return the sled back to the starting position by bending your ankles, allowing your calves to stretch. 8. Repeat the movement for the desired number of repetitions. ## Variations Here are a few variations of the sled calf press on the leg press: 1. Single-leg calf press: Perform the exercise using one leg at a time, alternating between legs. This variation increases the challenge and helps to address any muscle imbalances. 2. Toe pointing variation: Change the position of your toes to target different parts of the calf muscles. Try pointing your toes inward (medial position) or outward (lateral position) during the exercise. ## Muscles Worked The sled calf press primarily targets the following muscles: 1. Gastrocnemius: The gastrocnemius is the larger, more visible muscle of the calf that helps with plantarflexion of the foot (pointing the toes downward). 2. Soleus: The soleus is a deeper calf muscle that assists the gastrocnemius in plantarflexion and provides stability to the ankle joint. ## Common Mistakes Here are some common mistakes to avoid while performing the sled calf press on the leg press: 1. Using excessive weight: Start with a manageable weight that allows you to maintain proper form and control throughout the exercise. Using too much weight can compromise your technique and increase the risk of injury. 2. Not fully extending the ankles: Make sure to fully extend your ankles at the top of the movement to maximize the contraction of the calf muscles. Avoid cutting the range of motion short. 3. Rounding the back or leaning forward: Maintain a neutral spine and avoid rounding your back or leaning forward during the exercise. This helps to prevent strain on the lower back and maintains proper alignment. ## Safety Precautions To perform the sled calf press on the leg press safely and effectively, keep the following precautions in mind: 1. Start with a warm-up to prepare your calves and lower body for the exercise. 2. Adjust the weight and seat position according to your comfort and fitness level. 3. Maintain proper form throughout the exercise, keeping your back against the backrest and your knees slightly bent. 4. If you have any pre-existing ankle or calf injuries, consult with a healthcare professional before performing this exercise. 5. If you experience pain or discomfort during the exercise, stop immediately and seek medical advice if needed.
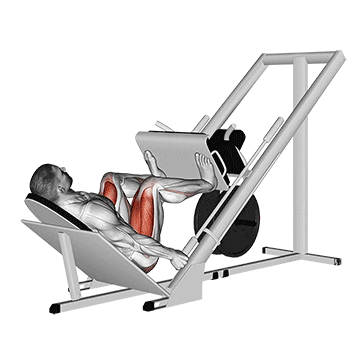
The sled closer hack squat is a variation of the traditional hack squat exercise that targets the muscles of the lower body, including the quadriceps, hamstrings, and glutes. This exercise involves using a sled machine with a narrower stance, which places greater emphasis on the quads while still engaging the other leg muscles. The sled closer hack squat helps to develop lower body strength, power, and muscular endurance. ## Instructions Here are the step-by-step instructions for performing the sled closer hack squat: 1. Position yourself on the sled machine with your back against the backrest and your feet on the platform. Adjust the weight on the sled according to your fitness level and capabilities. 2. Place your feet closer together than shoulder-width apart, with your toes pointed slightly outward. 3. Ensure that your back is pressed firmly against the backrest and maintain a neutral spine throughout the exercise. 4. Release the sled brake and allow it to move away from the starting position, creating tension in your leg muscles. 5. Bend your knees and lower the sled by bringing your thighs toward your chest, keeping your feet flat on the platform. 6. Continue lowering until your knees are bent at approximately a 90-degree angle or until you reach a comfortable range of motion. 7. Pause for a brief moment at the bottom of the movement. 8. Push the sled back up by extending your legs, driving through your heels. Avoid locking out your knees at the top. 9. Repeat the movement for the desired number of repetitions. ## Variations Here are a few variations of the sled closer hack squat: 1. Single-leg variation: Perform the exercise using one leg at a time, alternating between legs. This variation increases the challenge and helps to address any muscle imbalances. 2. Dumbbell or barbell hack squat: Instead of using a sled machine, you can perform a hack squat using dumbbells or a barbell. This allows for a greater range of loading options. ## Muscles Worked The sled closer hack squat primarily targets the following muscles: 1. Quadriceps: Located at the front of the thighs, the quadriceps muscles are responsible for knee extension. 2. Hamstrings: Situated at the back of the thighs, the hamstrings muscles assist in knee flexion and hip extension. 3. Glutes: The gluteal muscles, including the gluteus maximus, medius, and minimus, contribute to hip extension and provide overall lower body stability. ## Common Mistakes Here are some common mistakes to avoid while performing the sled closer hack squat: 1. Allowing the knees to cave inward: Keep your knees aligned with your feet throughout the movement. Avoid allowing your knees to collapse inward, as it can put unnecessary stress on the knee joint. 2. Rounding the lower back: Maintain a neutral spine and avoid rounding your lower back during the exercise. This helps to prevent lower back strain. 3. Locking out the knees: Avoid fully locking out your knees at the top of the movement. Keeping a slight bend in the knees maintains tension in the muscles and reduces the risk of joint hyperextension. 4. Using excessive weight: Choose a weight that allows you to maintain proper form and control throughout the exercise. Using excessive weight can compromise your technique and increase the risk of injury. ## Safety Precautions To perform the sled closer hack squat safely and effectively, keep the following precautions in mind: 1. Start with a conservative amount of weight and gradually increase it as your strength and proficiency improve. 2. Make sure the sled machine is in good working condition, with the safety locks properly engaged. 3. If you have any pre-existing knee or hip conditions, consult with a healthcare professional before performing this exercise.
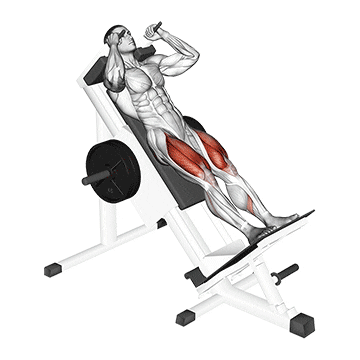
The sled forward angled calf raise is an exercise that targets the calf muscles, specifically the gastrocnemius and soleus. It involves using a sled machine with a forward angle to perform calf raises, which helps to develop strength, size, and definition in the calves. This exercise primarily targets the muscles of the lower leg and can contribute to improved ankle stability and athletic performance. ## Instructions Here are the step-by-step instructions for performing the sled forward angled calf raise: 1. Position yourself in front of the sled machine, facing away from it. 2. Adjust the sled angle according to your comfort and fitness level. The sled should be angled slightly forward. 3. Place the balls of your feet on the sled platform, with your heels hanging off the edge. 4. Hold onto the handles or any available support for balance and stability. 5. Start with your calves in a stretched position, allowing your heels to drop as far as possible. 6. Push through the balls of your feet and raise your heels as high as you can, contracting your calf muscles. 7. Hold the contraction briefly at the top of the movement. 8. Slowly lower your heels back down to the starting position, allowing your calves to stretch. 9. Repeat the movement for the desired number of repetitions. ## Variations Here are a few variations of the sled forward angled calf raise: 1. Single-leg calf raise: Perform the exercise using one leg at a time, alternating between legs. This variation increases the challenge and helps to address any muscle imbalances. 2. Toe pointing variation: Change the position of your toes to target different parts of the calf muscles. Try pointing your toes inward (medial position) or outward (lateral position) during the exercise. ## Muscles Worked The sled forward angled calf raise primarily targets the following muscles: 1. Gastrocnemius: The gastrocnemius is the larger, more visible muscle of the calf that helps with plantarflexion of the foot (pointing the toes downward). 2. Soleus: The soleus is a deeper calf muscle that assists the gastrocnemius in plantarflexion and provides stability to the ankle joint. ## Common Mistakes Here are some common mistakes to avoid while performing the sled forward angled calf raise: 1. Using excessive weight: Start with a manageable weight that allows you to maintain proper form and control throughout the exercise. Using too much weight can compromise your technique and increase the risk of injury. 2. Not fully extending the ankles: Make sure to fully raise your heels as high as possible at the top of the movement to maximize the contraction of the calf muscles. Avoid cutting the range of motion short. 3. Rounding the back or leaning forward: Maintain a neutral spine and avoid rounding your back or leaning forward during the exercise. This helps to prevent strain on the lower back and maintains proper alignment. ## Safety Precautions To perform the sled forward angled calf raise safely and effectively, keep the following precautions in mind: 1. Start with a warm-up to prepare your calves and lower body for the exercise. 2. Adjust the sled angle according to your comfort and fitness level. Begin with a moderate angle and adjust as needed. 3. Use proper footwear with good traction to prevent slipping on the sled platform. 4. If you have any pre-existing ankle or calf injuries, consult with a healthcare professional before performing this exercise. 5. If you experience pain or discomfort during the exercise, stop immediately and seek medical advice if needed.
The sled hack squat is an exercise that targets the muscles of the lower body, including the quadriceps, hamstrings, and glutes. It is performed using a sled machine that allows for a more controlled and guided squatting motion. The sled hack squat helps to develop lower body strength, power, and muscular endurance, making it an effective exercise for building leg muscles and enhancing overall lower body performance. ## Instructions Here are the step-by-step instructions for performing the sled hack squat: 1. Position yourself on the sled machine with your back against the backrest and your feet shoulder-width apart on the platform. 2. Adjust the weight on the sled according to your fitness level and capabilities. 3. Grasp the handles or any available support for stability. 4. Release the sled brake and allow it to move away from the starting position, creating tension in your leg muscles. 5. Bend your knees and lower your body by pushing your hips back and down, keeping your chest up and maintaining a neutral spine. 6. Continue descending until your thighs are parallel to the ground or slightly below, or until you reach a comfortable range of motion. 7. Pause briefly at the bottom of the squat, then push through your heels and extend your legs to return to the starting position. 8. Repeat the movement for the desired number of repetitions. ## Variations Here are a few variations of the sled hack squat: 1. Single-leg variation: Perform the exercise using one leg at a time, alternating between legs. This variation increases the challenge and helps to address any muscle imbalances. 2. Wide stance hack squat: Place your feet wider than shoulder-width apart on the platform to emphasize the inner thighs (adductors) and glutes. ## Muscles Worked The sled hack squat primarily targets the following muscles: 1. Quadriceps: Located at the front of the thighs, the quadriceps muscles are responsible for knee extension. 2. Hamstrings: Situated at the back of the thighs, the hamstrings muscles assist in knee flexion and hip extension. 3. Glutes: The gluteal muscles, including the gluteus maximus, medius, and minimus, contribute to hip extension and provide overall lower body stability. ## Common Mistakes Here are some common mistakes to avoid while performing the sled hack squat: 1. Allowing the knees to cave inward: Keep your knees aligned with your feet throughout the movement. Avoid allowing your knees to collapse inward, as it can put unnecessary stress on the knee joint. 2. Rounding the lower back: Maintain a neutral spine and avoid rounding your lower back during the exercise. This helps to prevent lower back strain. 3. Locking out the knees: Avoid fully locking out your knees at the top of the movement. Keeping a slight bend in the knees maintains tension in the muscles and reduces the risk of joint hyperextension. 4. Using excessive weight: Choose a weight that allows you to maintain proper form and control throughout the exercise. Using excessive weight can compromise your technique and increase the risk of injury. ## Safety Precautions To perform the sled hack squat safely and effectively, keep the following precautions in mind: 1. Start with a conservative amount of weight and gradually increase it as your strength and proficiency improve. 2. Make sure the sled machine is in good working condition, with the safety locks properly engaged. 3. If you have any pre-existing knee or hip conditions, consult with a healthcare professional before performing this exercise.
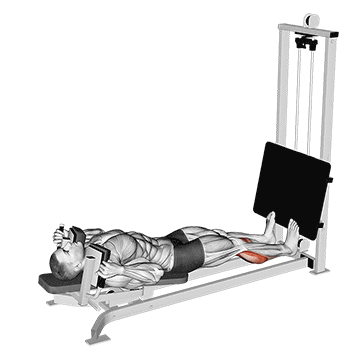
The sled lying calf press is an exercise that targets the calf muscles, specifically the gastrocnemius and soleus. It is performed by lying on your back and using a sled machine to press the weight with your calves. This exercise helps to develop strength, size, and definition in the calves, leading to improved lower leg stability and athletic performance. ## Instructions Here are the step-by-step instructions for performing the sled lying calf press: 1. Position yourself on the sled machine with your back lying flat on the backrest and your feet extended forward. 2. Adjust the sled angle and footplate position according to your comfort and fitness level. 3. Place the balls of your feet on the footplate, with your heels extending off the edge. 4. Grasp the handles or any available support for stability. 5. Release the sled brake and allow it to move away from the starting position, creating tension in your calf muscles. 6. Start with your calves in a stretched position, allowing your heels to drop as far as possible. 7. Push through the balls of your feet and raise your heels as high as you can, contracting your calf muscles. 8. Hold the contraction briefly at the top of the movement. 9. Slowly lower your heels back down to the starting position, allowing your calves to stretch. 10. Repeat the movement for the desired number of repetitions. ## Variations Here are a few variations of the sled lying calf press: 1. Single-leg calf press: Perform the exercise using one leg at a time, alternating between legs. This variation increases the challenge and helps to address any muscle imbalances. 2. Toes pointing variation: Change the position of your toes to target different parts of the calf muscles. Try pointing your toes inward (medial position) or outward (lateral position) during the exercise. ## Muscles Worked The sled lying calf press primarily targets the following muscles: 1. Gastrocnemius: The gastrocnemius is the larger, more visible muscle of the calf that helps with plantarflexion of the foot (pointing the toes downward). 2. Soleus: The soleus is a deeper calf muscle that assists the gastrocnemius in plantarflexion and provides stability to the ankle joint. ## Common Mistakes Here are some common mistakes to avoid while performing the sled lying calf press: 1. Using excessive weight: Start with a manageable weight that allows you to maintain proper form and control throughout the exercise. Using too much weight can compromise your technique and increase the risk of injury. 2. Not fully extending the ankles: Make sure to fully raise your heels as high as possible at the top of the movement to maximize the contraction of the calf muscles. Avoid cutting the range of motion short. 3. Raising the hips off the backrest: Keep your hips and lower back in contact with the backrest throughout the exercise. Avoid lifting your hips or arching your back, as it reduces the effectiveness of the exercise and can strain the lower back. ## Safety Precautions To perform the sled lying calf press safely and effectively, keep the following precautions in mind: 1. Start with a warm-up to prepare your calves and lower body for the exercise. 2. Adjust the sled angle and footplate position according to your comfort and fitness level. Begin with a moderate angle and adjust as needed. 3. Use proper footwear with good traction to prevent slipping on the footplate. 4. If you have any pre-existing ankle or calf injuries, consult with a healthcare professional before performing this exercise. 5. If you experience pain or discomfort during the exercise, stop immediately and seek medical advice if needed.

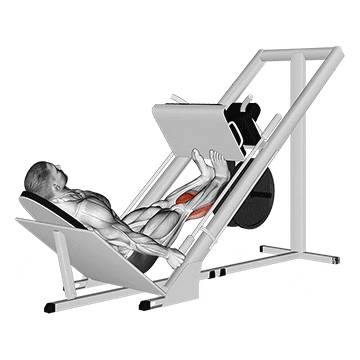
The sled lying squat is a lower body exercise that targets the muscles of the legs, particularly the quadriceps, hamstrings, and glutes. It involves pushing or pulling a weighted sled while lying on your back, simulating a squatting motion. This exercise can be performed using a sled apparatus or by attaching a sled-like device to your body. ## Instructions 1. Start by lying flat on your back on a sled or a sled-like device. Your feet should be facing up and positioned against the sled's footplate. 2. Grip the handles or any available attachment points on the sled to stabilize your upper body. 3. Engage your core and legs by pushing through your feet and driving the sled away from you, as if performing a squatting motion. 4. Maintain control and keep your body aligned as you extend your legs, pushing the sled as far as you can while maintaining proper form. 5. Once you have reached the end of your range of motion or are unable to push the sled any further, slowly reverse the motion and bring the sled back to the starting position. 6. Repeat the exercise for the desired number of repetitions or as instructed by your fitness professional. ## Variations - **Weighted Sled Lying Squat**: Increase the resistance by adding weight plates or other weighted objects to the sled. - **Assisted Sled Lying Squat**: If the sled's resistance is too challenging, use a lighter weight or ask a partner to assist you by providing a slight push or pull. - **Single-Leg Sled Lying Squat**: Perform the exercise with one leg at a time by lifting the opposite leg off the footplate. This variation adds an additional stability and balance challenge. ## Muscles Worked - Quadriceps (front of the thigh) - Hamstrings (back of the thigh) - Glutes (buttocks) ## Common Mistakes - Allowing the lower back to arch excessively: Maintain a neutral spine throughout the exercise and avoid overarching the lower back. - Using too much upper body assistance: Focus on using your leg muscles to push or pull the sled, rather than relying heavily on your arms and shoulders. - Failing to maintain control: Control the sled's movement throughout the exercise to prevent jerky or uncontrolled motions. ## Safety Precautions - Prioritize using proper form and technique to avoid strain or injury. - Start with a lighter weight or resistance and gradually increase as you become comfortable and proficient with the exercise. - If you have any pre-existing medical conditions or injuries, consult with a qualified fitness professional or healthcare provider before attempting this exercise. - Ensure that the sled or sled-like device is in good condition and stable before use. - Listen to your body and stop the exercise if you experience any pain or discomfort.
The sled one leg calf press on the leg press machine is an exercise that targets the calf muscles. It involves using a sled attachment on a leg press machine to press with one leg at a time, focusing on the calves. This exercise helps to develop strength and size in the calf muscles. ## Instructions 1. Adjust the leg press machine to the appropriate settings. Position the sled attachment so that it rests against your lower leg, just above the ankles. 2. Stand in front of the leg press machine and place one foot on the sled, positioning the ball of your foot on the sled's footplate. The heel should extend off the edge of the footplate. 3. Hold onto the machine's handles or any available support for stability. 4. Push through the ball of your foot, extending your ankle and raising your heel as high as possible. 5. Pause for a moment at the top of the movement, feeling a strong contraction in your calf muscle. 6. Slowly lower your heel back down, allowing your calf muscle to stretch. 7. Repeat the movement for the desired number of repetitions on one leg before switching to the other leg. ## Variations - **Weighted Sled One Leg Calf Press**: Increase the resistance by adding weight plates or other weighted objects to the sled. - **Both Legs Calf Press**: Perform the exercise with both legs simultaneously, using both feet on the sled's footplate. - **Calf Press on Smith Machine**: If a leg press machine is not available, a similar calf press exercise can be performed on a Smith machine using a similar motion and setup. ## Muscles Worked - Calves (gastrocnemius and soleus muscles) ## Common Mistakes - Rounding the back or using excessive upper body force: Maintain proper posture throughout the exercise and focus on using the calf muscles to perform the movement. - Not achieving a full range of motion: Make sure to fully extend the ankle and raise the heel as high as possible during the upward phase of the movement. - Bouncing or using momentum: Avoid using momentum to lift the weight. Control the movement throughout the exercise to maximize muscle engagement. ## Safety Precautions - Start with a lighter weight or resistance and gradually increase as you become comfortable and proficient with the exercise. - Ensure that the leg press machine and sled attachment are in good working condition before use. - Maintain proper form and alignment throughout the exercise to avoid strain or injury. - If you have any pre-existing medical conditions or injuries, consult with a qualified fitness professional or healthcare provider before attempting this exercise. - Listen to your body and stop the exercise if you experience any pain or discomfort.