
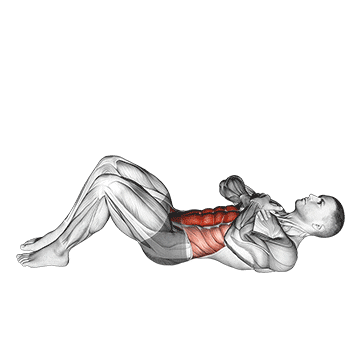
The sit-up with arms on chest is a variation of the classic sit-up exercise that targets the muscles of the core, specifically the rectus abdominis (six-pack muscles), and engages the hip flexors. By placing the arms on the chest, this variation eliminates the involvement of the arms and shoulders, allowing for a more focused work on the abdominal muscles. ## Instructions 1. Lie on your back on a mat or a comfortable surface with your knees bent and your feet flat on the ground. Keep your arms crossed over your chest, with your hands resting on opposite shoulders. 2. Engage your core muscles by drawing your navel toward your spine and pressing your lower back into the ground. 3. Slowly lift your upper body off the ground, curling forward and bringing your chest towards your knees. 4. Exhale as you come up and focus on using your abdominal muscles to initiate the movement. 5. Continue the upward motion until your shoulder blades are off the ground and you feel a contraction in your abdominal muscles. 6. Pause briefly at the top of the movement, then slowly lower your upper body back down to the starting position. 7. Inhale as you lower yourself down, maintaining control and engaging your core throughout the descent. 8. Repeat the movement for the desired number of repetitions. ## Variations - Modified Sit-Up with Arms on Chest: If you have difficulty performing the full sit-up, you can start by performing a modified version with your feet anchored or held down by a partner. - Decline Sit-Up with Arms on Chest: Perform the sit-up on a decline bench, with your head positioned lower than your feet, while keeping your arms on your chest. This variation increases the difficulty and engages the abdominal muscles to a greater extent. - Weighted Sit-Up with Arms on Chest: Hold a weight plate or a dumbbell against your chest while performing the sit-up to add resistance and increase the challenge. ## Muscles Worked - Rectus Abdominis (six-pack muscles) - Hip Flexors ## Common Mistakes - Rounding the lower back: Maintain proper form by pressing your lower back into the ground throughout the movement to protect your spine. - Pulling on the neck: Avoid pulling your head or neck forward with your hands. Instead, focus on using your abdominal muscles to lift your upper body. - Using momentum: Perform the sit-up in a controlled manner, avoiding any swinging or jerking motions. Use your abdominal muscles to initiate and control the movement. - Not fully engaging the core: Prioritize engaging your core throughout the exercise. Imagine drawing your navel toward your spine and maintaining tension in the abdominal muscles. ## Safety Precautions - If you have any pre-existing back or neck conditions, consult with a healthcare professional before attempting this exercise. - Perform the sit-up on a comfortable and stable surface to prevent slipping or injury. - Start with proper form and progress gradually to more challenging variations or adding weights. - Avoid straining your neck or holding your breath during the exercise. Breathe naturally throughout the movement. - If you experience any sharp pain or discomfort, stop the exercise and consult with a healthcare professional.
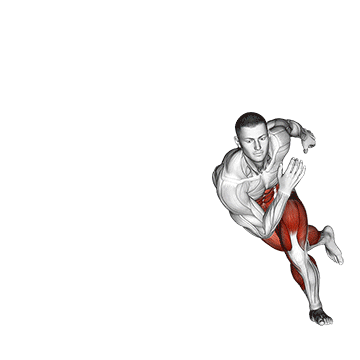
Skater hops, also known as lateral jumps or lateral bounds, are a plyometric exercise that targets the lower body, specifically the quadriceps, hamstrings, glutes, and calves. This dynamic movement mimics the side-to-side motion of a skater and helps to improve lower body strength, power, agility, and balance. ## Instructions 1. Start by standing with your feet shoulder-width apart, knees slightly bent, and arms by your sides. 2. Take a lateral (sideways) jump to the right, pushing off with your left foot and landing softly on your right foot. 3. As you land on your right foot, swing your left leg behind your body and extend your right arm out to the side for balance. 4. Immediately reverse the movement and jump to the left, pushing off with your right foot and landing softly on your left foot. 5. Swing your right leg behind your body and extend your left arm out to the side for balance. 6. Continue jumping from side to side, alternating your leading leg and swinging your arms for momentum. 7. Maintain a quick and fluid motion, focusing on explosiveness and lateral speed. 8. Repeat the movement for the desired number of repetitions or for a set amount of time. ## Variations - Modified Skater Hops: If you're new to the exercise or have limited mobility, perform smaller lateral steps instead of jumps. Focus on the side-to-side movement and gradually increase the intensity as you progress. - Skater Bounds: Instead of landing on one foot, perform the skater hops with a greater emphasis on distance. Push off with one foot and leap laterally, landing on the opposite foot. Aim for longer and more powerful jumps. - Skater Hops with Obstacle: Place a small object, such as a cone or a gym mat, on the ground. Jump over the obstacle as you perform the skater hops, adding an extra challenge and requiring greater coordination. ## Muscles Worked - Quadriceps (front of the thigh) - Hamstrings (back of the thigh) - Glutes (buttocks) - Calves ## Common Mistakes - Collapsing knees: Keep your knees aligned with your toes throughout the movement and avoid letting them collapse inward. - Landing with a stiff leg: Bend your knees and aim for a soft landing to absorb the impact and protect your joints. - Leaning forward or backward: Maintain an upright posture and a slight forward lean to engage the muscles of the lower body effectively. - Not utilizing the arms: Swing your arms in coordination with the jumps to generate momentum and improve balance. ## Safety Precautions - Ensure that you have sufficient space around you to perform the skater hops without any obstructions. - Start with shorter jumps and gradually increase the intensity and distance as you become more comfortable and proficient with the exercise. - Land softly to minimize the impact on your joints. Bend your knees upon landing and focus on maintaining control throughout the movement. - If you have any knee or ankle issues, perform the exercise with caution or consult with a healthcare professional before attempting it. - Engage your core muscles to stabilize your body during the movement and protect your lower back. - Warm up adequately before performing skater hops to prepare your muscles and joints for the dynamic nature of the exercise. - Listen to your body and stop if you experience any pain or discomfort.
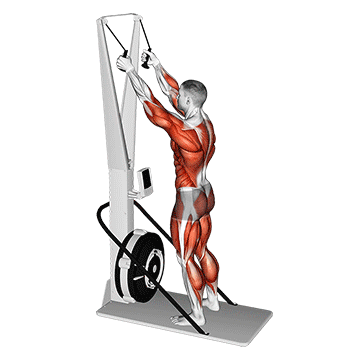
The ski ergometer, also known as a ski erg or ski machine, is a cardio and strength training exercise equipment that simulates the upper body motion of cross-country skiing. It consists of a vertical handlebar and a flywheel with adjustable resistance. The ski erg targets the muscles of the upper body, including the shoulders, back, arms, and core, providing a low-impact, full-body workout. ## Instructions 1. Stand facing the ski erg with your feet hip-width apart. 2. Grasp the handlebar with an overhand grip, keeping your hands shoulder-width apart. 3. Engage your core and maintain an upright posture throughout the exercise. 4. Start the movement by extending your arms forward, leaning slightly forward from the hips, and pushing off with your legs. 5. As you push off with your legs, simultaneously pull the handlebar towards your body, bending your elbows and driving them back. 6. Imagine the motion of cross-country skiing, with your arms alternating between extending forward and pulling back as you drive with your legs. 7. Exhale as you pull the handlebar towards your body, and inhale as you extend your arms forward. 8. Maintain a fluid and controlled motion, focusing on engaging the muscles of the upper body. 9. Continue the skiing motion for the desired duration or as instructed. ## Variations - Intensity: Adjust the resistance on the ski erg to increase or decrease the difficulty level according to your fitness level. - Single Arm Skiing: Perform the exercise with one arm at a time, alternating between arms. This variation allows for greater focus on each side of the upper body and can be beneficial for rehabilitating or strengthening one arm at a time. - Interval Training: Incorporate intervals of higher intensity and lower intensity periods into your ski erg workout to increase cardiovascular fitness and calorie burning. ## Muscles Worked - Shoulders (deltoids) - Upper back (rhomboids and trapezius) - Biceps and triceps - Core muscles (abdominals and lower back) - Forearms ## Common Mistakes - Poor posture: Maintain an upright posture throughout the exercise, avoiding excessive leaning or rounding of the back. - Gripping too tightly: Hold the handlebar with a firm, but not overly tight, grip to prevent unnecessary strain on the wrists and forearms. - Using only the arms: Remember to engage your legs and drive through your lower body as you pull the handlebar towards your body. - Not using a full range of motion: Fully extend your arms forward and pull the handlebar towards your body, achieving a full range of motion for maximum muscle engagement. ## Safety Precautions - Start with a warm-up to prepare your muscles for the exercise. - If you have any existing shoulder or back issues, consult with a healthcare professional before using the ski ergometer. - Use smooth and controlled movements to reduce the risk of injury. - If you experience any pain or discomfort, stop the exercise and consult with a healthcare professional. - Adjust the resistance level according to your fitness level and gradually increase it as you progress. - Stay hydrated during your workout and listen to your body's signals. Take breaks as needed. - Follow the manufacturer's guidelines and instructions for proper use and safety precautions specific to the ski ergometer model you are using.
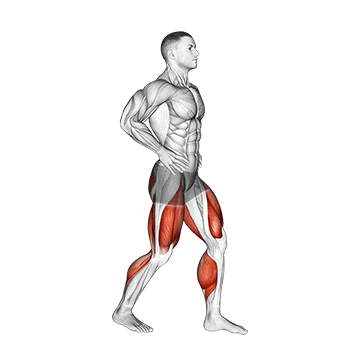
The ski step exercise is a dynamic cardiovascular and lower body exercise that mimics the movements of skiing. It targets the muscles of the lower body, including the quadriceps, hamstrings, glutes, and calves. The ski step exercise helps improve lower body strength, endurance, balance, and coordination. ## Instructions 1. Stand with your feet hip-width apart, arms by your sides, and knees slightly bent. 2. Imagine skiing in place by lifting your right foot off the ground and bending your left knee slightly. 3. Simultaneously, swing your right arm forward and your left arm back, as if you are using ski poles. 4. Lower your right foot back down to the ground as you lift your left foot, bending your right knee slightly. 5. Continue alternating the movement, lifting one foot at a time while swinging the opposite arm forward and back. 6. Maintain a brisk and rhythmic pace, simulating the motion of skiing. 7. Keep your core engaged and maintain an upright posture throughout the exercise. 8. Continue the ski step for the desired duration or as instructed. ## Variations - High-Intensity Ski Steps: Increase the intensity of the exercise by performing the ski steps at a faster pace or adding small jumps while alternating your feet. This variation adds an extra challenge and increases the cardiovascular demand. - Ski Step with Resistance Bands: Place a resistance band around your ankles or above the knees to add resistance and engage the outer hip muscles (abductors) during the exercise. This variation helps strengthen the hip muscles and enhances the overall lower body workout. ## Muscles Worked - Quadriceps (front of the thigh) - Hamstrings (back of the thigh) - Glutes (buttocks) - Calves ## Common Mistakes - Leaning forward or backward: Maintain an upright posture throughout the exercise, avoiding excessive leaning in any direction. - Not engaging the core: Keep your core muscles engaged to stabilize your body and maintain balance. - Allowing knees to collapse inward: Keep your knees aligned with your toes and avoid letting them collapse inward during the exercise. - Not using full range of motion: Bend your knees and lift your feet as high as comfortable to fully engage the leg muscles. ## Safety Precautions - Start with a warm-up to prepare your muscles for the exercise. - Choose a surface that provides good traction to avoid slipping. - Listen to your body and work at your own pace. Start with a slower tempo and gradually increase the speed and intensity as you become comfortable and proficient with the exercise. - If you have any knee or ankle issues, perform the exercise with caution or consult with a healthcare professional before attempting it. - Stay hydrated and take breaks as needed during your workout. - If you experience any pain or discomfort, stop the exercise and consult with a healthcare professional. - Ensure you have enough space around you to perform the ski step without any obstructions. - If you're new to the exercise, start with shorter durations and gradually increase the time as your fitness level improves.
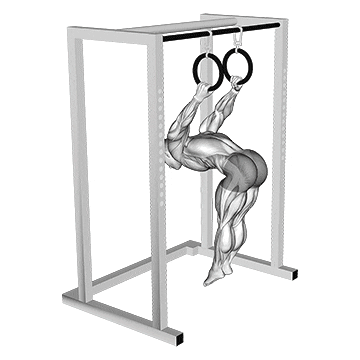
Skin the Cat is a challenging gymnastics exercise that primarily targets the muscles of the upper body and core. It involves hanging from a bar and transitioning into an inverted position while rotating the body. This exercise requires flexibility, strength, and control. Skin the Cat helps improve shoulder mobility, upper body strength, core stability, and body awareness. ## Instructions 1. Stand facing a high bar or rings, with your feet hip-width apart. 2. Reach your arms up and grab the bar or rings with an overhand grip, slightly wider than shoulder-width apart. 3. Jump up or use a spotter to assist you in getting your legs up and over the bar, lifting your knees towards your chest and tucking your body into a tucked hang position. 4. As you lift your legs, lean back and extend your body, allowing your hips to rise above the bar while keeping your arms straight. 5. Continue rotating your body, passing your legs underneath the bar and into a fully inverted position, with your body perpendicular to the ground. 6. Once inverted, continue the movement by reversing the motion, bringing your legs back up and over the bar as you roll your body back into a tucked hang position. 7. Control the descent as you return to the starting position, keeping your arms straight and maintaining control throughout the entire movement. 8. Repeat the exercise for the desired number of repetitions or as instructed. ## Variations - Assisted Skin the Cat: If you're new to the exercise or still developing the required strength and flexibility, you can use a spotter or resistance band to assist you in the movement. The spotter can help guide your legs and provide support as you rotate your body. - Advanced Skin the Cat: Once you have mastered the basic skin the cat, you can challenge yourself by performing the exercise on rings or attempting more advanced variations such as straight-leg skin the cat or adding additional rotations. ## Muscles Worked - Latissimus dorsi (back muscles) - Shoulders (deltoids) - Core muscles (abdominals and lower back) - Biceps and forearms ## Common Mistakes - Swinging: Avoid using excessive momentum or swinging during the exercise. Focus on controlled movements and use your muscles to maintain control throughout the entire range of motion. - Lack of shoulder mobility: If you find it challenging to fully rotate your body, work on improving your shoulder flexibility and mobility before attempting the full skin the cat exercise. - Not engaging the core: Keep your core muscles engaged throughout the movement to maintain stability and control. - Rushing the movement: Take your time and perform the exercise with proper form and control. Avoid rushing or jerky movements that can increase the risk of injury. ## Safety Precautions - Perform a thorough warm-up before attempting skin the cat to prepare your muscles and joints for the exercise. - If you're new to the exercise, start with a spotter or seek guidance from a qualified coach or trainer to ensure proper technique and safety. - Listen to your body and progress at a pace that is suitable for your fitness level and flexibility. - If you experience pain or discomfort in the shoulders, wrists, or any other area, stop the exercise and consult with a healthcare professional. - Be cautious of any pre-existing shoulder or back injuries. Consult with a healthcare professional before attempting skin the cat. - Ensure that the bar or rings you are using are secure and can safely support your body weight. - Practice the exercise in a clear and open space to avoid any obstructions or hazards. - Stay hydrated and take breaks as needed during your workout. - Focus on maintaining proper form and technique throughout the exercise to minimize the risk of injury.
The sled 45 degrees one-leg press is a lower body exercise that primarily targets the quadriceps, hamstrings, and glutes. It involves pushing a sled loaded with weights using one leg at a 45-degree angle. This exercise helps improve lower body strength, power, and stability. ## Instructions 1. Set up a sled with weights according to your fitness level. 2. Stand facing the sled at a 45-degree angle, with your feet shoulder-width apart. 3. Choose one leg to start with and position it slightly behind your body. 4. Bend your knee and hip of the selected leg to a comfortable depth, creating a loaded position. 5. Keep your upper body upright with your core engaged and shoulders back. 6. Push the sled away from you by extending your knee and hip, driving through the heel of the selected leg. 7. Maintain control throughout the movement and aim to fully extend your leg, pushing the sled as far as comfortable. 8. Slowly return to the starting position by bending your knee and hip, controlling the sled's descent. 9. Repeat the movement for the desired number of repetitions on one leg, then switch to the other leg. ## Variations - Weight Variation: Adjust the weight loaded on the sled to increase or decrease the resistance according to your strength and fitness level. - Depth Variation: Modify the depth of the knee and hip bend to adjust the range of motion. You can perform a full-depth press or a partial range of motion based on your capabilities. - Tempo Variation: Change the tempo of the movement by performing slow and controlled presses or incorporating explosive and powerful movements for different training effects. ## Muscles Worked - Quadriceps (front of the thigh) - Hamstrings (back of the thigh) - Glutes (buttocks) - Calves (gastrocnemius and soleus) - Core muscles for stability ## Common Mistakes - Poor posture: Avoid leaning forward or rounding the back. Maintain an upright position with your shoulders back and core engaged throughout the exercise. - Incomplete range of motion: Ensure that you fully extend your leg and push the sled as far as comfortably possible. - Insufficient control: Maintain control throughout the movement and avoid using momentum to push the sled. Focus on a controlled and deliberate press. - Unequal distribution of weight: Ensure that the weight on the sled is balanced and evenly distributed to prevent any imbalances or strain on one side of the body. ## Safety Precautions - Start with a lighter weight on the sled and gradually increase the resistance as you become comfortable and proficient with the exercise. - Maintain proper form and technique throughout the exercise to minimize the risk of injury. - Listen to your body and work within your limits. If you experience pain or discomfort, stop the exercise and consult with a healthcare professional. - Warm up adequately before performing the sled press to prepare your muscles and joints for the exercise. - Use appropriate footwear with good traction to ensure stability and prevent slipping while pushing the sled. - If you have any pre-existing knee or hip injuries, consult with a healthcare professional before attempting this exercise. - Keep the sled and the exercise area clear of any obstacles or hazards. - Stay hydrated and take breaks as needed during your workout. - If you're new to the exercise, it may be helpful to seek guidance from a qualified trainer or coach to ensure proper form and safety.
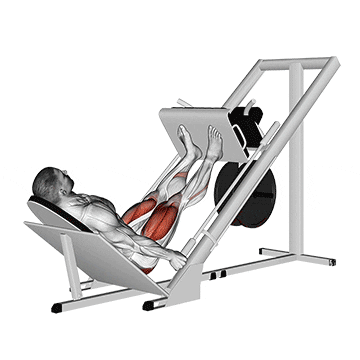
The sled 45° calf press is a lower body exercise that specifically targets the calf muscles. It involves pushing against a weighted sled at a 45-degree angle, primarily engaging the gastrocnemius and soleus muscles of the calves. This exercise helps to develop strength, size, and definition in the calf muscles. ## Instructions Here are the step-by-step instructions for performing the sled 45° calf press: 1. Start by positioning yourself in front of a sled machine. Adjust the weight on the sled according to your fitness level and capabilities. 2. Place your shoulders under the shoulder pads of the sled and position your feet shoulder-width apart on the platform. 3. Your toes should be pointing straight ahead, and the balls of your feet should be firmly planted on the platform. 4. Engage your core and keep your back straight throughout the exercise. 5. Release the sled brake and allow it to move away from the starting position, creating tension in your calf muscles. 6. Slowly push the sled forward by extending your ankles, driving through the balls of your feet. Maintain control and avoid using excessive momentum. 7. Continue pushing until your calves are fully contracted and you are on your tiptoes. 8. Hold the contraction for a brief moment, then slowly release the tension and return to the starting position by flexing your ankles and allowing the sled to move back. 9. Repeat the movement for the desired number of repetitions. ## Variations Here are a few variations of the sled 45° calf press: 1. Single-leg variation: Perform the exercise using one leg at a time, alternating between legs. This variation provides a greater challenge and helps to address any muscle imbalances. 2. Calf press on a leg press machine: If a sled machine is not available, you can perform a similar exercise on a leg press machine. Adjust the foot placement to target the calves specifically. ## Muscles Worked The sled 45° calf press primarily targets the following muscles: 1. Gastrocnemius: Located in the upper portion of the calf, this muscle is responsible for ankle plantar flexion. 2. Soleus: Situated beneath the gastrocnemius, the soleus assists in ankle plantar flexion and provides stability to the lower leg. ## Common Mistakes Here are some common mistakes to avoid while performing the sled 45° calf press: 1. Using excessive momentum: Avoid using jerky or fast movements to push the sled. Focus on controlled and deliberate motions to effectively target the calf muscles. 2. Rounding the back: Keep your back straight and maintain proper posture throughout the exercise. Avoid rounding the shoulders or arching the back. 3. Neglecting the full range of motion: Ensure that you fully extend your ankles and go up on your tiptoes to achieve a complete contraction of the calf muscles. 4. Placing the feet incorrectly: Position your feet shoulder-width apart with the toes pointing straight ahead. Avoid turning the toes inward or outward. ## Safety Precautions To perform the sled 45° calf press safely and effectively, keep the following precautions in mind: 1. Start with a conservative amount of weight and gradually increase it as your strength and proficiency improve. 2. Warm up adequately before performing the exercise to prepare your calf muscles. 3. If you have any pre-existing injuries or conditions affecting your calves, consult with a qualified fitness professional or healthcare provider before attempting this exercise. 4. Listen to your body and stop the exercise immediately if you experience any sharp pain or discomfort. Remember, it's always a good idea to consult with a fitness professional or trainer if you're new to this exercise or have any concerns about its suitability for your individual
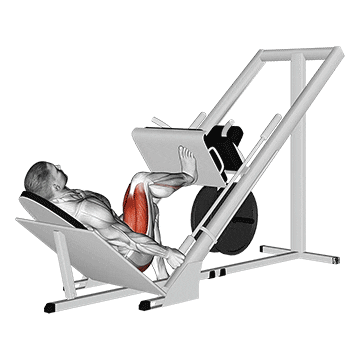
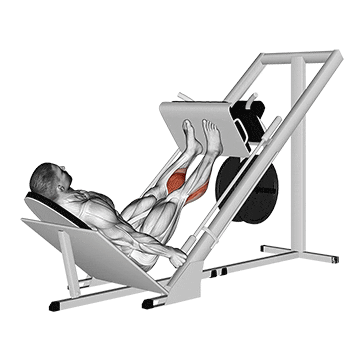
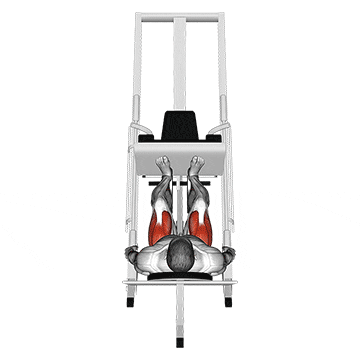
The sled 45° leg press is a lower body exercise that primarily targets the muscles of the quadriceps, hamstrings, and glutes. It involves pushing a weighted sled at a 45-degree angle using your legs. This exercise helps to develop lower body strength, power, and muscular endurance. ## Instructions Here are the step-by-step instructions for performing the sled 45° leg press: 1. Start by positioning yourself in front of a sled machine. Adjust the weight on the sled according to your fitness level and capabilities. 2. Place your feet on the platform, slightly wider than shoulder-width apart. Your toes should be pointed slightly outward. 3. Adjust the seat position so that your knees are aligned with your feet when your knees are bent at a 90-degree angle. 4. Engage your core and maintain a neutral spine throughout the exercise. 5. Release the sled brake and allow it to move away from the starting position, creating tension in your leg muscles. 6. Bend your knees and lower the sled by bringing your thighs toward your chest, keeping your feet flat on the platform. 7. Continue lowering until your knees are bent at approximately a 90-degree angle or until you reach a comfortable range of motion. 8. Pause for a brief moment at the bottom of the movement. 9. Push the sled back up by extending your legs, driving through your heels. Avoid locking out your knees at the top. 10. Repeat the movement for the desired number of repetitions. ## Variations Here are a few variations of the sled 45° leg press: 1. Single-leg variation: Perform the exercise using one leg at a time, alternating between legs. This variation increases the challenge and helps to address any muscle imbalances. 2. Narrow stance leg press: Place your feet closer together on the platform to emphasize the inner thigh muscles (adductors) and the outer glutes. 3. Wide stance leg press: Position your feet wider apart to target the outer thigh muscles (abductors) and the glutes to a greater extent. ## Muscles Worked The sled 45° leg press primarily targets the following muscles: 1. Quadriceps: Located at the front of the thighs, the quadriceps muscles are responsible for knee extension. 2. Hamstrings: Situated at the back of the thighs, the hamstrings muscles assist in knee flexion and hip extension. 3. Glutes: The gluteal muscles, including the gluteus maximus, medius, and minimus, contribute to hip extension and provide overall lower body stability. ## Common Mistakes Here are some common mistakes to avoid while performing the sled 45° leg press: 1. Allowing the knees to cave inward: Keep your knees aligned with your feet throughout the movement. Avoid allowing your knees to collapse inward, as it can put unnecessary stress on the knee joint. 2. Rounding the lower back: Maintain a neutral spine and avoid rounding your lower back during the exercise. This helps to prevent lower back strain. 3. Locking out the knees: Avoid fully locking out your knees at the top of the movement. Keeping a slight bend in the knees maintains tension in the muscles and reduces the risk of joint hyperextension. 4. Using excessive weight: Choose a weight that allows you to maintain proper form and control throughout the exercise. Using excessive weight can compromise your technique and increase the risk of injury. ## Safety Precautions To perform the sled 45° leg press safely and effectively, keep the following precautions in mind: 1. Start with a conservative amount of weight and gradually increase it as your strength and proficiency improve. 2. Make sure the sled machine is in good working condition, with the safety locks
The sled 45° leg press is a lower body exercise that targets the muscles of the quadriceps, hamstrings, and glutes. It involves pushing a weighted sled at a 45-degree angle using your legs. This exercise helps to develop lower body strength, power, and muscular endurance. ## Instructions Here are the step-by-step instructions for performing the sled 45° leg press: 1. Start by positioning yourself on the sled machine with your back against the backrest and your feet on the platform. Adjust the weight on the sled according to your fitness level and capabilities. 2. Place your feet slightly wider than shoulder-width apart, with your toes pointed slightly outward. 3. Ensure that your back is pressed firmly against the backrest and maintain a neutral spine throughout the exercise. 4. Release the sled brake and allow it to move away from the starting position, creating tension in your leg muscles. 5. Bend your knees and lower the sled by bringing your thighs toward your chest, keeping your feet flat on the platform. 6. Continue lowering until your knees are bent at approximately a 90-degree angle or until you reach a comfortable range of motion. 7. Pause for a brief moment at the bottom of the movement. 8. Push the sled back up by extending your legs, driving through your heels. Avoid locking out your knees at the top. 9. Repeat the movement for the desired number of repetitions. ## Variations Here are a few variations of the sled 45° leg press: 1. Single-leg variation: Perform the exercise using one leg at a time, alternating between legs. This variation increases the challenge and helps to address any muscle imbalances. 2. Narrow stance leg press: Place your feet closer together on the platform to emphasize the inner thigh muscles (adductors) and the outer glutes. 3. Wide stance leg press: Position your feet wider apart to target the outer thigh muscles (abductors) and the glutes to a greater extent. ## Muscles Worked The sled 45° leg press primarily targets the following muscles: 1. Quadriceps: Located at the front of the thighs, the quadriceps muscles are responsible for knee extension. 2. Hamstrings: Situated at the back of the thighs, the hamstrings muscles assist in knee flexion and hip extension. 3. Glutes: The gluteal muscles, including the gluteus maximus, medius, and minimus, contribute to hip extension and provide overall lower body stability. ## Common Mistakes Here are some common mistakes to avoid while performing the sled 45° leg press: 1. Allowing the knees to cave inward: Keep your knees aligned with your feet throughout the movement. Avoid allowing your knees to collapse inward, as it can put unnecessary stress on the knee joint. 2. Rounding the lower back: Maintain a neutral spine and avoid rounding your lower back during the exercise. This helps to prevent lower back strain. 3. Locking out the knees: Avoid fully locking out your knees at the top of the movement. Keeping a slight bend in the knees maintains tension in the muscles and reduces the risk of joint hyperextension. 4. Using excessive weight: Choose a weight that allows you to maintain proper form and control throughout the exercise. Using excessive weight can compromise your technique and increase the risk of injury. ## Safety Precautions To perform the sled 45° leg press safely and effectively, keep the following precautions in mind: 1. Start with a conservative amount of weight and gradually increase it as your strength and proficiency improve. 2. Make sure the sled machine is in good working condition, with the safety locks properly engaged. 3. If you have any pre-existing knee