
The side-to-side chin exercise is a stretching movement that targets the muscles and connective tissues around the neck and jaw. This exercise helps to increase flexibility, release tension, and improve range of motion in the neck and jaw area. ## Instructions 1. Begin in a comfortable seated or standing position with your spine straight and shoulders relaxed. 2. Tilt your head to one side, bringing your ear closer to your shoulder on that side. 3. Slowly and gently roll your head forward, allowing your chin to move across your chest towards the opposite shoulder. 4. Continue the movement, rolling your head upward and to the other side until your ear is close to the other shoulder. 5. Reverse the movement and roll your head back in the same side-to-side pattern. 6. Repeat the exercise for several repetitions, moving at a slow and controlled pace. 7. Take deep breaths and relax your facial and neck muscles throughout the exercise. ## Variations - Seated Neck Stretch: Perform the exercise while seated, placing one hand on the top of your head and applying gentle pressure to deepen the stretch. - Chin Tucks: Instead of moving from side to side, focus on tucking your chin in towards your chest, and then slowly lifting it upwards. This variation targets the front of the neck and helps improve posture. ## Muscles Worked The main muscles targeted during the side-to-side chin exercise include: - Sternocleidomastoid - Scalene muscles - Trapezius - Platysma (neck muscles) - Temporomandibular joint (TMJ) ## Common Mistakes - Jerking or forcing the movement: Avoid sudden or abrupt movements when rolling your head from side to side. Move in a smooth, controlled manner to prevent strain or injury. - Tilting the head too far: Be mindful of your neck's range of motion and avoid excessive tilting or rotation. Move within a comfortable range that doesn't cause pain or discomfort. - Tension in the jaw or shoulders: Relax your facial muscles and shoulders during the exercise. Tension in these areas can restrict the movement and reduce the effectiveness of the stretch. ## Safety Precautions - Perform the exercise with slow and controlled movements to avoid strain or injury. - If you have any existing neck or jaw issues, such as TMJ disorder, consult with a healthcare professional or a qualified physical therapist before attempting this exercise. - If you experience any pain, discomfort, or dizziness during the exercise, stop immediately and consult with a professional. - Start with a gentle stretch and gradually increase the range of motion as your flexibility improves. - If you have any concerns or uncertainties about performing this stretch, it's recommended to consult with a qualified healthcare professional or a physical therapist. They can provide personalized guidance and ensure the exercise is suitable for your specific needs.
The side-to-side toe touch exercise is a dynamic stretching movement that targets the muscles of the lower back, hamstrings, and hips. It involves bending sideways to touch the toes, promoting flexibility, and enhancing the range of motion in the torso and lower body. ## Instructions 1. Stand with your feet slightly wider than shoulder-width apart, toes pointing forward. 2. Engage your core muscles by drawing your belly button towards your spine. 3. Raise your right arm straight overhead, reaching towards the left side. 4. Begin bending your torso to the left side, keeping your legs straight and focusing on the stretch in your right side. 5. Allow your left arm to slide down your left leg as you bend to the side, aiming to touch your left foot with your hand. 6. Hold the stretch for a few seconds, feeling the elongation along the right side of your body. 7. Slowly return to the starting position and repeat the movement on the opposite side, raising your left arm overhead and bending towards the right side. 8. Continue alternating between the left and right sides for the desired number of repetitions or duration. ## Variations - Standing Oblique Stretch: Instead of reaching for the toes, focus on reaching the hand towards the knee or shin. This variation reduces the intensity of the stretch and makes it more accessible for individuals with limited flexibility. - Seated Side Bend: Perform the exercise while seated on a chair or stability ball. Sit up tall and bend your torso to the side, reaching towards the floor or ankle. This variation allows for a seated position, providing stability and support. ## Muscles Worked The main muscles targeted during the side-to-side toe touch exercise include: - Obliques (side abdominal muscles) - Latissimus dorsi (back muscles) - Hamstrings - Gluteus medius and minimus (hip muscles) - Quadratus lumborum (lower back muscles) ## Common Mistakes - Rounding the back: Maintain a straight and aligned spine throughout the exercise. Avoid rounding the back or hunching the shoulders. - Bending forward instead of sideways: Focus on bending to the side rather than leaning forward. The goal is to elongate the sides of the body. - Overreaching or straining: Reach only as far as your flexibility allows without forcing or overstretching. It's better to perform the exercise with proper form and a smaller range of motion than to compromise your technique. ## Safety Precautions - Perform the exercise in a controlled manner to avoid any sudden or jerky movements. - If you have any existing back or hip issues, consult with a healthcare professional or a qualified fitness trainer before attempting this exercise. - Start with a gentle stretch and gradually increase the range of motion as your flexibility improves. - Listen to your body and work within your limits. Do not push beyond what feels comfortable or causes pain. - If you have any concerns or uncertainties about performing this stretch, it's recommended to consult with a qualified healthcare professional or a fitness trainer. They can provide personalized guidance and ensure the exercise is suitable for your specific needs.
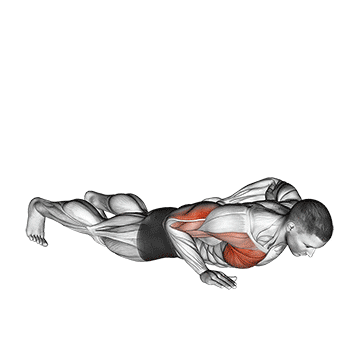
The single arm push-up is an advanced variation of the traditional push-up exercise that targets the chest, shoulders, triceps, and core muscles. It involves performing a push-up while supporting the body weight on one arm, challenging stability, strength, and coordination. ## Instructions 1. Start in a push-up position with your hands slightly wider than shoulder-width apart. 2. Shift your weight to one side and place one hand firmly on the ground, positioning it slightly closer to the center of your body. 3. Extend the other arm straight out to the side or place it behind your back. 4. Engage your core muscles to maintain a straight line from your head to your heels. 5. Lower your body by bending your elbow, keeping it close to your side, until your chest is just above the ground. 6. Push through the palm of your working arm, extending your elbow and returning to the starting position. 7. Complete the desired number of repetitions, then switch to the other arm. ## Variations - Assisted Single Arm Push-Up: Perform the exercise with one hand elevated on a step, box, or bench. This variation reduces the amount of body weight you need to lift, making it easier to build strength and stability before progressing to the full single arm push-up. - Single Arm Push-Up Progression: Start by practicing the exercise with your knees on the ground, gradually working towards performing it with full body weight on the toes. This progression helps build strength and control in the upper body and core. ## Muscles Worked The main muscles targeted during the single arm push-up include: - Pectoralis major and minor (chest muscles) - Deltoids (shoulder muscles) - Triceps brachii (back of the upper arm) - Rectus abdominis and obliques (abdominal muscles) - Serratus anterior (muscles along the sides of the chest and ribs) - Stabilizer muscles in the shoulders, back, and core ## Common Mistakes - Arching or sagging back: Maintain a straight line from your head to your heels throughout the exercise. Avoid arching or sagging the lower back. - Flaring elbow: Keep your working arm's elbow close to your body, pointing backward rather than out to the side. This helps engage the triceps and reduces stress on the shoulder joint. - Lack of core engagement: Keep your core muscles engaged throughout the movement to provide stability and prevent excessive movement in the hips or lower back. ## Safety Precautions - Ensure you have sufficient upper body strength and stability before attempting the single arm push-up. - Perform the exercise on a stable surface to avoid slipping or losing balance. - If you have any pre-existing shoulder, wrist, or back injuries, consult with a healthcare professional or a qualified fitness trainer before attempting this exercise. - Start with proper form and a smaller range of motion, gradually increasing the depth of the push-up as your strength improves. - If you experience any pain or discomfort during the exercise, stop immediately and seek professional advice. - It's recommended to warm up your upper body and perform regular push-ups to build strength and stability before attempting the single arm variation. - If you have any concerns or uncertainties about performing this exercise, it's best to consult with a qualified fitness trainer or a healthcare professional. They can provide personalized guidance and ensure the exercise is suitable for your specific needs.
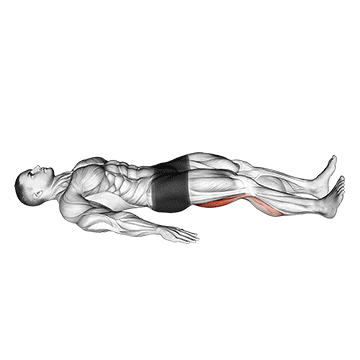
The single leg bridge with outstretched leg is an exercise that targets the glutes, hamstrings, and core muscles. It involves lifting the hips off the ground while keeping one leg extended straight in the air, challenging stability, strength, and balance. ## Instructions 1. Lie on your back with your knees bent and feet flat on the ground, hip-width apart. 2. Extend one leg straight up towards the ceiling, keeping it in line with your hip. 3. Engage your core muscles and press through the heel of your grounded foot to lift your hips off the ground, forming a straight line from your knee to your shoulder. 4. At the top of the movement, your body weight should be supported by your grounded foot and shoulder blades. 5. Hold the position for a few seconds, then slowly lower your hips back down to the starting position. 6. Complete the desired number of repetitions, then switch to the other leg. ## Variations - Supported Single Leg Bridge: If the exercise is challenging, place your arms on the ground by your sides for added support and stability. - Single Leg Bridge with Knee Flexion: Instead of fully extending the outstretched leg, keep the knee bent at a 90-degree angle throughout the exercise. This variation reduces the difficulty and intensity of the movement. ## Muscles Worked The main muscles targeted during the single leg bridge with outstretched leg include: - Gluteus maximus (butt muscles) - Hamstrings (back of the thighs) - Core muscles (including the rectus abdominis, obliques, and transverse abdominis) - Erector spinae (back muscles) ## Common Mistakes - Arching the lower back: Keep your core muscles engaged and your lower back flat against the ground throughout the exercise. Avoid excessive arching or overarching of the spine. - Letting the knee cave inward: Maintain proper alignment of the knee with the hip and ankle. Avoid allowing the knee of the grounded leg to collapse inward. - Raising the hips too high: Lift your hips until your body forms a straight line from your knee to your shoulder. Avoid hyperextending the lower back or over-arching the spine. ## Safety Precautions - Pay attention to your body and start with a comfortable range of motion. Avoid forcing your leg to straighten if you feel any discomfort or strain. - If you have any pre-existing hip, knee, or lower back injuries, consult with a healthcare professional or a qualified fitness trainer before attempting this exercise. - Perform the exercise on a mat or padded surface to provide cushioning and support for your back. - Focus on maintaining stability and control throughout the movement to prevent any sudden or jerky motions. - If you experience pain or discomfort during the exercise, stop immediately and seek professional advice. - It's recommended to warm up your glutes, hamstrings, and core muscles before attempting the single leg bridge with outstretched leg. - If you have any concerns or uncertainties about performing this exercise, it's best to consult with a qualified fitness trainer or a healthcare professional. They can provide personalized guidance and ensure the exercise is suitable for your specific needs.
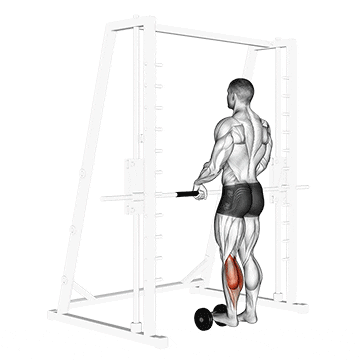
The single leg calf raise on a dumbbell is an exercise that targets the calf muscles, specifically the gastrocnemius and soleus. It involves raising the heel of one foot while balancing on a dumbbell, challenging stability and strength in the lower legs. ## Instructions 1. Stand upright with a dumbbell placed on the floor in front of you. 2. Lift one foot off the ground and position the ball of your foot on top of the dumbbell, with the heel hanging off the edge. 3. Engage your core and maintain a straight posture throughout the exercise. 4. Slowly lower your heel toward the ground, allowing your calf to stretch. 5. Push through the ball of your foot and raise your heel as high as you can, lifting your body weight onto the toes of your working leg. 6. Pause briefly at the top of the movement, feeling the contraction in your calf muscles. 7. Slowly lower your heel back down to the starting position. 8. Complete the desired number of repetitions, then switch to the other leg. ## Variations - Bodyweight Single Leg Calf Raise: If using a dumbbell is too challenging, you can perform the exercise without any additional weight, simply using your bodyweight for resistance. - Smith Machine Single Leg Calf Raise: Instead of using a dumbbell, you can use a Smith machine or a calf raise machine to perform the exercise. This variation provides more stability and allows for easier progression. ## Muscles Worked The main muscles targeted during the single leg calf raise include: - Gastrocnemius (calf muscle) - Soleus (calf muscle) - Tibialis anterior (front of the shin, supporting muscle) ## Common Mistakes - Using momentum: Avoid relying on momentum to lift your body weight. Instead, focus on a slow and controlled movement, emphasizing the contraction of the calf muscles. - Leaning forward or backward: Maintain an upright posture throughout the exercise. Avoid leaning forward or backward, as it can compromise balance and reduce the effectiveness of the exercise. - Neglecting full range of motion: Lower your heel as far as you can comfortably go to stretch the calf muscles fully. Aim for a full range of motion in each repetition. ## Safety Precautions - Start with a lighter dumbbell or no weight at all if you are a beginner or if you have any existing calf or ankle injuries. - Use a stable and flat surface to perform the exercise, ensuring the dumbbell is secure and won't roll or move during the movement. - If you have any chronic or acute ankle or calf injuries, consult with a healthcare professional or a qualified fitness trainer before attempting this exercise. - Maintain proper balance and stability throughout the movement. If needed, use a wall or a stable object for support until you develop enough strength and balance to perform the exercise unassisted. - Listen to your body and avoid pushing through pain or discomfort. If you experience any sharp or persistent pain, stop the exercise and seek professional advice. - It's recommended to warm up your calf muscles with dynamic stretches or light cardio before performing the single leg calf raise. - If you have any concerns or uncertainties about performing this exercise, it's best to consult with a qualified fitness trainer or a healthcare professional. They can provide personalized guidance and ensure the exercise is suitable for your specific needs.
The single leg platform slide is a lower body exercise that targets the muscles of the legs, including the quadriceps, hamstrings, glutes, and calves. It also engages the core muscles for stability and balance. This exercise involves sliding one leg forward while keeping the other leg stable on a platform or slide board. It is an effective exercise for improving leg strength, stability, and coordination. ## Instructions 1. Start by standing with one foot on a stable platform or slide board and the other foot slightly raised off the ground. 2. Engage your core muscles to maintain balance and stability throughout the exercise. 3. Slowly slide the raised leg forward, extending it in front of you as far as comfortable. 4. Keep your standing leg slightly bent and maintain an upright posture. 5. Hold the extended position briefly, focusing on maintaining control and balance. 6. Slowly slide the extended leg back to the starting position. 7. Repeat the movement for the desired number of repetitions. 8. Switch legs and repeat the exercise on the other side. ## Variations - Beginners can perform the exercise with a shorter range of motion, sliding the leg only a short distance. - For an added challenge, incorporate resistance by using a resistance band around the sliding leg. - If a slide board is not available, a towel or paper plates can be used on a smooth surface to mimic the sliding motion. ## Muscles Worked - Quadriceps (front of the thigh) - Hamstrings (back of the thigh) - Glutes (buttocks) - Calves - Core muscles for stability and balance ## Common Mistakes - Allowing the sliding leg to collapse inward or outward. Keep the knee in line with the foot throughout the movement. - Leaning too far forward or backward. Maintain an upright posture with the chest lifted and shoulders relaxed. - Using momentum instead of controlled movement. Focus on smooth and controlled slides, avoiding jerky motions. - Neglecting the standing leg. Keep the standing leg slightly bent and engaged for stability and balance. ## Safety Precautions - Start with a stable and secure platform or slide board to avoid slipping or instability. - If using a slide board, ensure it is placed on a non-slip surface for safety. - If you have any knee or ankle issues, consult with a healthcare professional before attempting this exercise. - Start with a small range of motion and gradually increase it as you become more comfortable and stable. - Listen to your body and stop the exercise if you experience pain or discomfort.
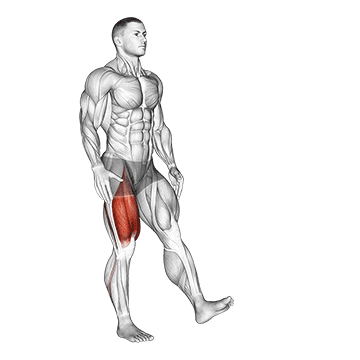
The single leg squat, also known as the pistol squat, is a challenging lower body exercise that primarily targets the muscles of the legs, including the quadriceps, hamstrings, and glutes. It also engages the core muscles for stability and balance. This exercise requires strength, mobility, and balance, making it an effective movement for building lower body strength and improving overall athleticism. ## Instructions 1. Stand with your feet shoulder-width apart. 2. Lift one leg off the ground, extending it in front of you. 3. Keep your arms extended in front of you for balance. 4. Slowly lower your body down by flexing the standing leg's knee and hip joints, as if sitting back into a chair. 5. As you lower, keep your extended leg straight and parallel to the ground. 6. Descend as far as you can while maintaining control and balance. 7. Pause briefly at the bottom of the squat. 8. Push through the heel of the standing leg and extend your hip and knee to return to the starting position. 9. Repeat the movement for the desired number of repetitions. 10. Switch legs and repeat the exercise on the other side. ## Variations - Assisted Pistol Squat: Hold onto a stable object, such as a pole or TRX straps, for support and assistance during the movement. - Partial Pistol Squat: Perform the squat by descending only partially, allowing for a smaller range of motion until you build the strength and flexibility for a full pistol squat. - Box Pistol Squat: Perform the squat by squatting onto a box or bench to reduce the range of motion and make the exercise more manageable. - Weighted Pistol Squat: Hold a dumbbell or kettlebell in front of your chest or use a weighted vest to increase the resistance and difficulty of the exercise. ## Muscles Worked - Quadriceps (front of the thigh) - Hamstrings (back of the thigh) - Glutes (buttocks) - Calves - Core muscles for stability and balance ## Common Mistakes - Leaning too far forward or backward. Maintain an upright posture throughout the movement, keeping your chest lifted and shoulders back. - Allowing the knee to collapse inward or outward. Keep the knee aligned with the foot throughout the exercise. - Losing balance or stability. Focus on engaging your core muscles and keeping your gaze fixed on a point in front of you to help with balance. - Rushing the movement or using momentum. Perform the exercise in a controlled manner, emphasizing the eccentric (lowering) phase and maintaining control throughout. ## Safety Precautions - If you have any knee or ankle issues, consult with a healthcare professional before attempting this exercise. - Start with the variations or modifications that suit your current fitness level and gradually progress to the full pistol squat. - Use a spotter or support if needed, especially when attempting the exercise for the first time or when training with heavy weights. - Avoid forcing yourself into a deep squat if it causes pain or discomfort. Work within your range of motion and gradually improve flexibility over time. - Warm up adequately before performing the exercise to prepare your muscles and joints for the demands of the movement. - Listen to your body and stop the exercise if you experience sharp pain, instability, or any unusual discomfort.
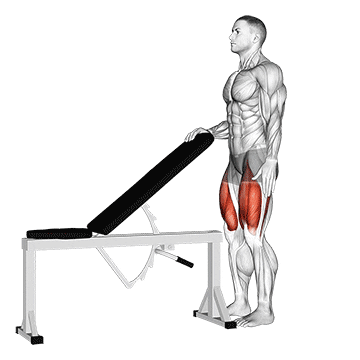
The sissy squat is a challenging bodyweight exercise that primarily targets the muscles of the quadriceps while also engaging the glutes and the muscles of the lower leg. This exercise helps to develop strength and muscular endurance in the front of the thighs and can contribute to improved lower body strength and stability. ## Instructions 1. Stand with your feet shoulder-width apart and your arms extended in front of you for balance. 2. Position your body so that your torso is leaning slightly backward, and your weight is on your heels. 3. Lift one leg slightly off the ground and keep it raised throughout the exercise. 4. Slowly descend by flexing at the knee joints, leaning backward, and allowing your body to move downward. 5. Lower your body until your knees are fully bent, and your thighs are almost parallel to the ground. 6. At the bottom of the movement, your knees should be behind your toes, and your heels should be elevated. 7. Engage your quadriceps and push through your heels to extend your knees and return to the starting position. 8. Repeat the movement for the desired number of repetitions. 9. Switch legs and repeat the exercise on the other side. ## Variations - Assisted Sissy Squat: Hold onto a stable object, such as a pole or TRX straps, for support and assistance during the movement. - Weighted Sissy Squat: Hold a dumbbell or kettlebell against your chest or use a weighted vest to increase the resistance and difficulty of the exercise. - Sissy Squat on a Decline: Perform the exercise on a decline bench to increase the range of motion and intensify the challenge. ## Muscles Worked - Quadriceps (front of the thigh) - Glutes (buttocks) - Calves - Core muscles for stability and balance ## Common Mistakes - Leaning too far forward. Maintain an upright posture throughout the movement, focusing on keeping your torso slightly tilted backward. - Allowing the knees to collapse inward. Keep your knees aligned with your toes, preventing them from buckling inward. - Rounding the back. Keep your core engaged and maintain a neutral spine throughout the exercise. - Using momentum or bouncing at the bottom of the movement. Perform the exercise in a controlled manner, avoiding any sudden or jerky movements. ## Safety Precautions - If you have any knee or ankle issues, consult with a healthcare professional before attempting this exercise. - Start with the variations or modifications that suit your current fitness level and gradually progress to the full sissy squat. - Use a spotter or support if needed, especially when attempting the exercise for the first time or when training with added weights. - Avoid forcing yourself into a deep squat if it causes pain or discomfort. Work within your range of motion and gradually improve flexibility over time. - Warm up adequately before performing the exercise to prepare your muscles and joints for the demands of the movement. - Listen to your body and stop the exercise if you experience sharp pain, instability, or any unusual discomfort.
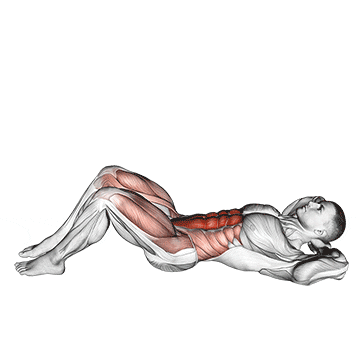
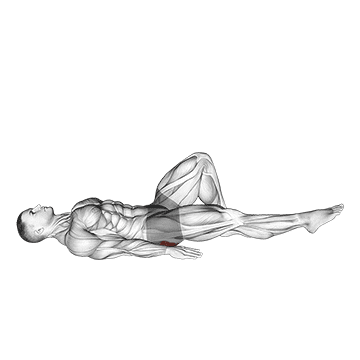
The sit-up is a classic abdominal exercise that targets the muscles of the core, specifically the rectus abdominis (six-pack muscles). It also engages the hip flexors and the muscles of the chest and shoulders to a lesser extent. This exercise helps to strengthen and tone the abdominal muscles, improve core stability, and enhance overall core strength. ## Instructions 1. Start by lying on your back on a mat or a comfortable surface with your knees bent and your feet flat on the ground. Place your hands behind your ears or cross them over your chest. 2. Engage your core muscles by drawing your navel toward your spine and pressing your lower back into the ground. 3. Slowly lift your upper body off the ground, curling forward and bringing your chest towards your knees. 4. Keep your chin slightly lifted and maintain a straight line from your head to your tailbone. 5. Exhale as you come up and focus on using your abdominal muscles to initiate the movement. 6. Continue the upward motion until your shoulder blades are off the ground and you feel a contraction in your abdominal muscles. 7. Pause briefly at the top of the movement, then slowly lower your upper body back down to the starting position. 8. Inhale as you lower yourself down, maintaining control and engaging your core throughout the descent. 9. Repeat the movement for the desired number of repetitions. ## Variations - Modified Sit-Up: If you have difficulty performing the full sit-up, you can start by performing a modified version. Anchor your feet under a stable object or have a partner hold them down to provide support as you lift your upper body off the ground. - Decline Sit-Up: Perform the sit-up on a decline bench, with your head positioned lower than your feet. This variation increases the difficulty and engages the abdominal muscles to a greater extent. - Weighted Sit-Up: Hold a weight plate or a dumbbell against your chest or perform the sit-up on an incline bench while holding a weight to add resistance and increase the challenge. ## Muscles Worked - Rectus Abdominis (six-pack muscles) - Hip Flexors - Obliques (side abdominal muscles) - Muscles of the chest and shoulders (to a lesser extent) ## Common Mistakes - Rounding the lower back: Maintain proper form by pressing your lower back into the ground throughout the movement to protect your spine. - Pulling on the neck: Avoid pulling your head or neck forward with your hands. Instead, focus on using your abdominal muscles to lift your upper body. - Using momentum: Perform the sit-up in a controlled manner, avoiding any swinging or jerking motions. Use your abdominal muscles to initiate and control the movement. - Not fully engaging the core: Prioritize engaging your core throughout the exercise. Imagine drawing your navel toward your spine and maintaining tension in the abdominal muscles. ## Safety Precautions - If you have any pre-existing back or neck conditions, consult with a healthcare professional before attempting this exercise. - Perform the sit-up on a comfortable and stable surface to prevent slipping or injury. - Start with proper form and progress gradually to more challenging variations or adding weights. - Avoid straining your neck or holding your breath during the exercise. Breathe naturally throughout the movement. - If you experience any sharp pain or discomfort, stop the exercise and consult with a healthcare professional.