
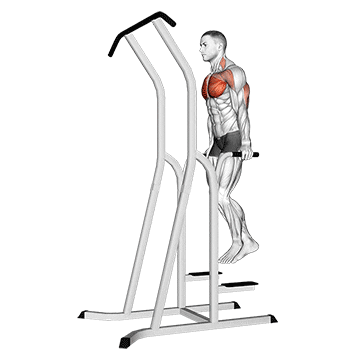
The chest dip performed on a dip-pull-up cage is an exercise that primarily targets the muscles in the chest, triceps, and shoulders. It is a compound movement that helps build upper body strength and muscle mass. ## Instructions 1. Stand between the parallel bars of the dip-pull-up cage. 2. Reach up and grasp the parallel bars with an overhand grip, slightly wider than shoulder-width apart. Ensure your grip is secure. 3. Lift yourself up by straightening your arms, so your body is fully extended. This is your starting position. 4. Lean forward slightly to engage the chest muscles. 5. Lower your body by bending your elbows and lowering your chest between the parallel bars. Maintain control and keep your body stable. 6. Continue descending until your chest is slightly below your elbows or you feel a stretch in your chest muscles. 7. Pause for a moment at the bottom position, then push through your hands and extend your elbows to raise your body back to the starting position. 8. Repeat the exercise for the desired number of repetitions. ## Variations - Assisted Chest Dip: If you need assistance or find the exercise too challenging, you can use a dip assist machine or resistance bands to support some of your body weight. - Weighted Chest Dip: Once you have mastered the basic chest dip, you can add additional resistance by using a weight belt with plates or holding a dumbbell between your legs. - Close Grip Chest Dip: Bring your hands closer together, forming a diamond shape with your fingers, to place more emphasis on the triceps. ## Muscles Worked - Pectoralis major (chest muscles) - Triceps brachii (back of the upper arm) - Anterior deltoid (front of the shoulder) - Rhomboids and lower traps (back muscles, to stabilize the shoulders) ## Common Mistakes - Swinging or using momentum: Avoid using momentum or swinging your body during the exercise. Focus on controlled movements to engage the targeted muscles effectively. - Dropping the shoulders: Keep your shoulders down and stable throughout the exercise. Avoid shrugging or hunching up. - Insufficient range of motion: Lower your body until your chest is slightly below your elbows or until you feel a stretch in the chest muscles. Avoid shallow dips that limit the effectiveness of the exercise. ## Safety Precautions - Ensure that the dip-pull-up cage is stable and can safely support your body weight. - Start with a suitable level of difficulty based on your strength and gradually increase intensity as you progress. - Keep your core engaged and maintain proper form throughout the exercise. - If you have any shoulder, elbow, or wrist injuries or conditions, consult with a healthcare professional before attempting this exercise. - Listen to your body and avoid any movement that causes pain or discomfort. - Use a spotter if necessary, especially when attempting weighted dips or pushing close to your maximum strength.
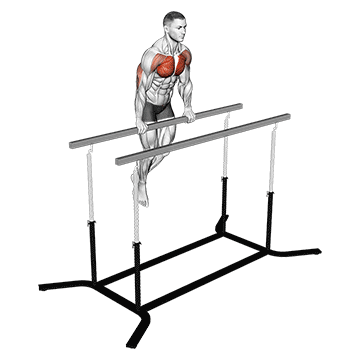
The chest dip performed on a straight bar is an exercise that primarily targets the muscles in the chest, triceps, and shoulders. It is an effective compound movement for developing upper body strength, muscle mass, and stability. ## Instructions 1. Find a straight bar that is securely attached and can support your body weight. 2. Stand facing the bar and grip it with an overhand grip, slightly wider than shoulder-width apart. Your palms should be facing down. 3. Lift yourself up by straightening your arms, so your body is fully extended. This is your starting position. 4. Lean your torso slightly forward to engage the chest muscles. 5. Lower your body by bending your elbows and lowering your chest toward the bar. Keep your body stable and maintain control throughout the movement. 6. Descend until your chest is slightly below the level of the bar or until you feel a stretch in your chest muscles. 7. Pause for a moment at the bottom position, then push through your hands and extend your elbows to raise your body back to the starting position. 8. Repeat the exercise for the desired number of repetitions. ## Variations - Assisted Chest Dip: If you need assistance or find the exercise too challenging, you can use a dip assist machine or resistance bands to support some of your body weight. - Weighted Chest Dip: Once you have mastered the basic chest dip, you can add additional resistance by using a weight belt with plates or holding a dumbbell between your legs. - Close Grip Chest Dip: Bring your hands closer together on the bar, forming a narrow grip, to emphasize the triceps. ## Muscles Worked - Pectoralis major (chest muscles) - Triceps brachii (back of the upper arm) - Anterior deltoid (front of the shoulder) - Rhomboids and lower traps (back muscles, to stabilize the shoulders) ## Common Mistakes - Swinging or using momentum: Avoid using momentum or swinging your body during the exercise. Maintain controlled movements to target the desired muscles effectively. - Dropping the shoulders: Keep your shoulders down and stable throughout the exercise. Avoid shrugging or hunching up. - Insufficient range of motion: Lower your body until your chest is slightly below the level of the bar or until you feel a stretch in the chest muscles. Avoid shallow dips that limit the effectiveness of the exercise. ## Safety Precautions - Ensure that the straight bar is securely attached and can safely support your body weight. - Start with an appropriate level of difficulty based on your strength and gradually increase intensity as you progress. - Keep your core engaged and maintain proper form throughout the exercise. - If you have any shoulder, elbow, or wrist injuries or conditions, consult with a healthcare professional before attempting this exercise. - Listen to your body and avoid any movement that causes pain or discomfort. - Use a spotter if necessary, especially when attempting weighted dips or pushing close to your maximum strength.
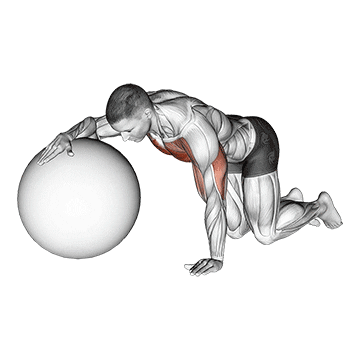
The chest stretch with an exercise ball is a stretching exercise that targets the muscles in the chest, shoulders, and upper back. It helps improve flexibility, relieve tension, and counteract the effects of poor posture. ## Instructions 1. Sit on the exercise ball and walk your feet forward until your lower back is resting on the ball. Your knees should be bent at a 90-degree angle, and your feet should be firmly planted on the floor. 2. Position your feet slightly wider than hip-width apart for stability. 3. Extend your arms out to the sides, parallel to the floor, with your palms facing up. 4. Slowly and with control, squeeze your shoulder blades together as you bring your arms back toward the floor. 5. Continue the movement until you feel a stretch in your chest and shoulders. Hold the stretch for 20-30 seconds. 6. Return to the starting position by bringing your arms back up to shoulder height, maintaining the squeeze in your shoulder blades. 7. Repeat the stretch for 2-3 sets. ## Variations - Standing Chest Stretch: Stand facing a wall or sturdy surface. Place your forearm against the wall at shoulder height and gently rotate your body away from the wall, feeling a stretch in your chest and shoulders. - Doorway Chest Stretch: Stand in a doorway with your arms out to the sides and bent at 90 degrees. Place your forearms on the door frame and lean forward, feeling a stretch in your chest and shoulders. ## Muscles Worked - Pectoralis major (chest muscles) - Anterior deltoid (front of the shoulder) - Rhomboids and lower traps (back muscles, to stabilize the shoulders) ## Common Mistakes - Overarching the lower back: Maintain a neutral spine position throughout the stretch. Avoid arching your lower back excessively. - Tensing the neck and shoulders: Keep your neck and shoulders relaxed during the stretch. Avoid tensing or shrugging them up. - Not engaging the shoulder blades: Focus on squeezing your shoulder blades together to fully engage the muscles of the upper back and maximize the stretch. ## Safety Precautions - Use an exercise ball that is appropriate for your height and weight, and ensure it is properly inflated and stable. - Start with gentle movements and gradually increase the intensity of the stretch. - If you have any shoulder, neck, or back injuries or conditions, consult with a healthcare professional before attempting this stretch. - Stop the stretch if you feel any pain or discomfort. Listen to your body and adjust the range of motion accordingly. - Breathe deeply and maintain relaxed breathing throughout the exercise. - If you feel dizzy or lightheaded, stop the stretch and rest.

The chest tap push-up is a variation of the traditional push-up exercise that targets the muscles in the chest, shoulders, triceps, and core. It involves tapping the chest with one hand during the push-up movement, adding an extra challenge and coordination element to the exercise. ## Instructions 1. Start in a high plank position with your hands slightly wider than shoulder-width apart and your toes on the ground. 2. Keep your body in a straight line from head to toe, engaging your core muscles. 3. Lower your body toward the ground by bending your elbows, while maintaining control and keeping your elbows tucked close to your sides. 4. As you push back up to the starting position, lift one hand off the ground and tap the opposite side of your chest with it. 5. Return the hand to the ground and repeat the push-up, this time tapping the other side of your chest with the opposite hand. 6. Continue alternating the chest taps with each repetition. 7. Perform the exercise for the desired number of repetitions. ## Variations - Knee Chest Tap Push-Up: Perform the exercise with your knees on the ground instead of your toes. This modification can be helpful if you're working on building strength or have difficulty performing the exercise with full body weight. - Elevated Chest Tap Push-Up: Place your hands on an elevated surface, such as a bench or step, to decrease the difficulty level and work on building strength before progressing to the standard version. - Decline Chest Tap Push-Up: Elevate your feet on a stable surface, such as a step or bench, to increase the challenge and engage the upper chest muscles to a greater extent. ## Muscles Worked - Pectoralis major (chest muscles) - Anterior deltoid (front of the shoulder) - Triceps brachii (back of the upper arm) - Core muscles for stabilization ## Common Mistakes - Sagging or arching the lower back: Maintain a straight line from head to toe throughout the exercise. Avoid letting your hips drop or your lower back sag. - Flaring the elbows out: Keep your elbows tucked close to your sides as you lower your body. This helps engage the chest muscles more effectively and reduces stress on the shoulder joints. - Not fully extending the arms at the top: Make sure to fully extend your elbows and lockout your arms at the top of each repetition. This ensures that you're achieving the full range of motion. ## Safety Precautions - Start with a level of difficulty that suits your fitness level. If needed, begin with the modified versions of the exercise and gradually progress. - Maintain proper form and alignment throughout the exercise to minimize the risk of injury. - If you have any shoulder, wrist, or lower back issues, consult with a healthcare professional before attempting this exercise. - Listen to your body and avoid pushing through pain or discomfort. If you experience any pain, modify the exercise or stop and seek professional advice. - Warm up adequately before performing the exercise to prepare your muscles and joints for the movement. - Stay hydrated and breathe properly during the exercise.
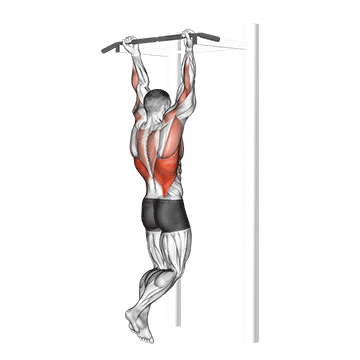
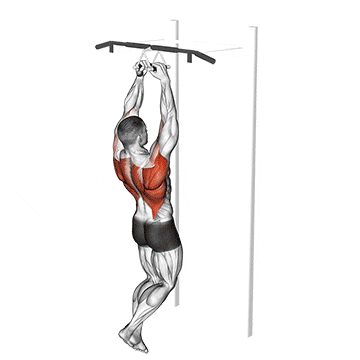
The chin-up is an upper body exercise that primarily targets the muscles in the back, biceps, and shoulders. It involves lifting your body weight by pulling yourself up to a bar while keeping your palms facing towards you (underhand grip). Chin-ups are an effective compound exercise for building upper body strength and developing the muscles of the back and arms. ## Instructions 1. Stand in front of a pull-up bar or a sturdy overhead bar. The bar should be high enough that you can hang from it with your arms fully extended without your feet touching the ground. 2. Grab the bar with an underhand grip (palms facing towards you) and hands slightly wider than shoulder-width apart. 3. Hang from the bar, fully extending your arms, and engage your core muscles. 4. Begin the exercise by pulling yourself up towards the bar, focusing on squeezing your shoulder blades together and using your back and biceps muscles to lift your body. 5. Continue pulling until your chin is above the bar or as close to the bar as possible. 6. Pause for a moment at the top, then slowly lower yourself back down to the starting position with controlled movements. 7. Repeat the exercise for the desired number of repetitions. ## Variations - Assisted Chin-Up: If you are unable to perform a full chin-up, you can use an assisted chin-up machine, resistance bands, or have a partner assist you by providing support from your lower body. - Neutral Grip Chin-Up: Perform the exercise using a neutral grip (palms facing each other) instead of an underhand grip. This variation shifts the focus to the muscles in the middle back and biceps. - Wide Grip Chin-Up: Place your hands wider than shoulder-width apart on the bar. This variation emphasizes the muscles in the outer back and biceps. - Weighted Chin-Up: Once you have mastered the bodyweight chin-up, you can add additional resistance by using a weight belt with plates or holding a dumbbell between your legs. ## Muscles Worked - Latissimus dorsi (back muscles) - Rhomboids and lower traps (back muscles, to stabilize the shoulders) - Biceps brachii (front of the upper arm) - Brachialis (deep muscle underneath the biceps) - Forearm muscles (grip strength) - Upper back and shoulder muscles for stabilization ## Common Mistakes - Using momentum: Avoid swinging or using momentum to lift yourself up. Focus on controlled and smooth movements throughout the exercise. - Not achieving full range of motion: Lower your body fully to a dead hang position and aim to lift until your chin is above the bar. Avoid shortening the range of motion by only partially lifting or not fully extending your arms. - Shrugging the shoulders: Keep your shoulders down and engaged. Avoid shrugging or hunching up during the movement. ## Safety Precautions - Ensure that the bar is securely attached and can support your body weight. - Start with an appropriate level of difficulty based on your strength and gradually progress to more challenging variations. - Warm up adequately before performing chin-ups to prepare your muscles and joints. - Maintain proper form and alignment throughout the exercise to minimize the risk of injury. - If you have any shoulder, elbow, or wrist injuries or conditions, consult with a healthcare professional before attempting this exercise. - Listen to your body and avoid pushing through pain or discomfort. If you experience any pain, modify the exercise or stop and seek professional advice. - Use a spotter if necessary, especially when attempting weighted chin-ups or pushing close to your maximum strength.
Chin-ups with a narrow parallel grip, also known as close-grip chin-ups or supine grip chin-ups, are an upper body exercise that primarily targets the muscles in the back, biceps, and shoulders. The exercise involves lifting your body weight by pulling yourself up to a bar while keeping your palms facing towards you with a closer grip. Narrow parallel grip chin-ups provide a challenging variation of the standard chin-up and help develop strength and muscular definition in the upper body. ## Instructions 1. Stand in front of a pull-up bar or a sturdy overhead bar. The bar should be high enough that you can hang from it with your arms fully extended without your feet touching the ground. 2. Position your hands on the bar with an underhand grip, placing them closer together than shoulder-width apart. Your palms should be facing towards you. 3. Hang from the bar, fully extending your arms, and engage your core muscles. 4. Initiate the exercise by pulling yourself up towards the bar, using your back and biceps muscles to lift your body. 5. Continue pulling until your chin is above the bar or as close to the bar as possible. 6. Pause for a moment at the top, then slowly lower yourself back down to the starting position with controlled movements. 7. Repeat the exercise for the desired number of repetitions. ## Variations - Assisted Narrow Parallel Grip Chin-Up: If you are unable to perform a full chin-up with a narrow parallel grip, you can use an assisted chin-up machine, resistance bands, or have a partner assist you by providing support from your lower body. - Weighted Narrow Parallel Grip Chin-Up: Once you have mastered the bodyweight narrow parallel grip chin-up, you can add additional resistance by using a weight belt with plates or holding a dumbbell between your legs. ## Muscles Worked - Latissimus dorsi (back muscles) - Rhomboids and lower traps (back muscles, to stabilize the shoulders) - Biceps brachii (front of the upper arm) - Brachialis (deep muscle underneath the biceps) - Forearm muscles (grip strength) - Upper back and shoulder muscles for stabilization ## Common Mistakes - Using momentum: Avoid swinging or using momentum to lift yourself up. Focus on controlled and smooth movements throughout the exercise. - Not achieving full range of motion: Lower your body fully to a dead hang position and aim to lift until your chin is above the bar. Avoid shortening the range of motion by only partially lifting or not fully extending your arms. - Shrugging the shoulders: Keep your shoulders down and engaged. Avoid shrugging or hunching up during the movement. ## Safety Precautions - Ensure that the bar is securely attached and can support your body weight. - Start with an appropriate level of difficulty based on your strength and gradually progress to more challenging variations. - Warm up adequately before performing narrow parallel grip chin-ups to prepare your muscles and joints. - Maintain proper form and alignment throughout the exercise to minimize the risk of injury. - If you have any shoulder, elbow, or wrist injuries or conditions, consult with a healthcare professional before attempting this exercise. - Listen to your body and avoid pushing through pain or discomfort. If you experience any pain, modify the exercise or stop and seek professional advice. - Use a spotter if necessary, especially when attempting weighted narrow parallel grip chin-ups or pushing close to your maximum strength.
Circles knee stretch is a stretching exercise that targets the muscles in the hips, glutes, and lower back. It involves performing circular movements with your knees, which helps increase flexibility, improve joint mobility, and release tension in the hip area. ## Instructions 1. Start by standing upright with your feet hip-width apart and your arms relaxed by your sides. 2. Soften your knees slightly and engage your core muscles. 3. Begin the exercise by lifting your right knee up towards your chest, keeping your foot flexed. 4. From the top position, start rotating your knee in a circular motion. Imagine drawing circles with your knee. 5. Complete several circles in one direction, then reverse the movement and perform circles in the opposite direction. 6. Repeat the same steps with your left knee, performing circles in both directions. 7. Continue alternating between your right and left knees, performing controlled circular movements for the desired number of repetitions. ## Variations - Standing Hip Circles: Instead of focusing on the knees, perform circular movements with your hips. Stand with your feet shoulder-width apart, place your hands on your hips, and rotate your hips in circles, both clockwise and counterclockwise. - Seated Knee Circles: Sit on the floor with your legs extended in front of you. Lift one knee and perform circular movements with your knee, both clockwise and counterclockwise. Switch to the other knee and repeat. ## Muscles Worked - Hip flexors - Gluteal muscles - Quadriceps - Hamstrings - Lower back muscles ## Common Mistakes - Rounding the back: Maintain an upright posture throughout the exercise and avoid rounding or arching your back. - Holding the breath: Remember to breathe naturally and avoid holding your breath during the circles. - Overextending the knees: Keep a slight bend in your knees to prevent hyperextension and maintain control during the movements. - Using momentum: Perform the circles in a slow and controlled manner, avoiding swinging or using momentum to move the knees. ## Safety Precautions - Start with gentle movements and gradually increase the range of motion as your muscles warm up. - If you have any knee or hip injuries or conditions, consult with a healthcare professional before attempting this exercise. - Do not force the range of motion or perform any movements that cause pain or discomfort. - Modify the exercise or reduce the range of motion if you experience any discomfort in the knees or hips. - If you feel any sharp or intense pain, stop the exercise and seek medical advice.
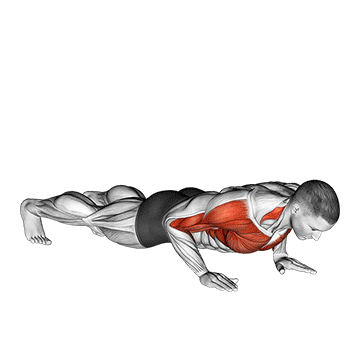
The clap push-up is an advanced variation of the traditional push-up exercise. It targets the chest, shoulders, triceps, and core muscles. The main feature of the clap push-up is the explosive push-off from the ground, allowing you to clap your hands together before landing back on your hands. This exercise helps build upper body power, explosive strength, and overall muscular development. ## Instructions 1. Start in a high plank position with your hands slightly wider than shoulder-width apart and your toes on the ground. 2. Engage your core, glutes, and leg muscles to maintain a straight line from your head to your heels. 3. Lower your body towards the ground by bending your elbows, keeping them close to your sides. 4. Once your chest is just above the ground, explosively push off the ground with enough force to lift your hands off the ground. 5. While in the air, quickly clap your hands together before extending your arms to prepare for landing. 6. Land with your hands in the starting position, shoulder-width apart, and immediately absorb the impact by bending your elbows to lower your body back into the push-up position. 7. Repeat the exercise for the desired number of repetitions. ## Variations - Modified Clap Push-Up: If you're unable to perform a full clap push-up, you can modify the exercise by performing a regular push-up with an explosive push-off, leaving the hands off the ground for a brief moment before landing back on them. - Incline Clap Push-Up: Perform the clap push-up with your hands elevated on a sturdy surface such as a bench or step. This variation reduces the amount of body weight you need to push and makes the exercise slightly easier. - Decline Clap Push-Up: Place your feet on an elevated surface such as a bench or step while performing the clap push-up. This variation increases the level of difficulty by shifting more body weight onto your upper body. ## Muscles Worked - Pectoralis major (chest muscles) - Deltoids (shoulder muscles) - Triceps brachii (back of the upper arm) - Core muscles for stabilization ## Common Mistakes - Poor form: Maintain a straight line from your head to your heels throughout the exercise. Avoid sagging or raising your hips. - Insufficient depth: Lower your chest all the way down to the ground or as close as possible to ensure a full range of motion. - Lack of explosiveness: Focus on generating enough force to lift your hands off the ground and perform the clap. - Inadequate core engagement: Keep your core muscles tight throughout the exercise to maintain stability and prevent your lower back from sagging. ## Safety Precautions - Master proper push-up form before attempting clap push-ups. - Ensure you have sufficient upper body strength and stability to perform the exercise safely. - Perform the exercise on a suitable surface that provides enough grip to prevent slipping. - Gradually increase the intensity and speed of the clap push-up as your strength and coordination improve. - Avoid performing clap push-ups on hard surfaces to minimize the impact on your wrists and joints. - Listen to your body and stop if you experience any pain or discomfort. - If you have any shoulder, wrist, or elbow injuries or conditions, consult with a healthcare professional before attempting this exercise.
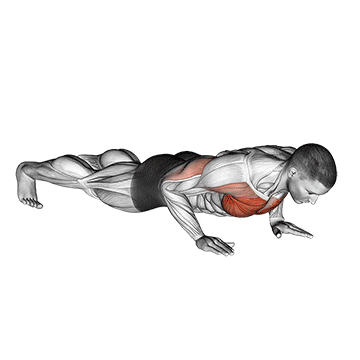
The clock push-up is a challenging variation of the traditional push-up exercise. It targets the chest, shoulders, triceps, and core muscles. This exercise requires stability, strength, and coordination. ## Instructions 1. Start in a high plank position with your hands slightly wider than shoulder-width apart and your body in a straight line from head to toe. 2. Lower your body by bending your elbows, keeping them close to your sides. Lower yourself as far as you can while maintaining proper form. 3. As you push back up, lift one hand off the ground and rotate your body in a clockwise direction. Extend your lifted arm overhead and keep your body straight. 4. Place your hand back on the ground and continue the push-up movement. 5. Repeat the push-up and rotation, this time rotating counterclockwise with the opposite hand lifted overhead. 6. Continue alternating the rotation with each push-up repetition. ## Variations - Modified Clock Push-Up: Perform the exercise from a modified push-up position with your knees on the ground. This variation reduces the load and is suitable for beginners or those with limited upper body strength. - Incline Clock Push-Up: Perform the exercise with your hands elevated on an elevated surface, such as a bench or step. This variation reduces the intensity and is suitable for individuals looking for a less challenging option. - Decline Clock Push-Up: Perform the exercise with your feet elevated on an elevated surface, such as a bench or step. This variation increases the intensity and engages the muscles to a greater extent. ## Muscles Worked - Chest (pectoralis major and minor) - Shoulders (deltoids) - Triceps - Core muscles (abdominals, obliques) ## Common Mistakes - Arching the back: Maintain a straight line from head to toe throughout the exercise. Avoid sagging the hips or lifting the buttocks too high. - Elbows flaring out: Keep your elbows close to your sides throughout the movement. This helps engage the chest and triceps effectively. - Insufficient range of motion: Aim to lower your body as far as you can while maintaining proper form. Ensure that your chest is close to or slightly touches the ground in the bottom position. ## Safety Precautions - If you have any shoulder, wrist, or lower back injuries or conditions, consult with a healthcare professional before attempting this exercise. - Warm up properly before performing the clock push-up to prepare your muscles and joints. - Start with the modified or incline variations if you're a beginner and gradually progress to the full clock push-up as you gain strength and stability. - Focus on maintaining proper form and technique throughout the exercise to avoid strain or injury. - If you experience any pain or discomfort during the exercise, stop immediately and consult a fitness professional or healthcare provider.