
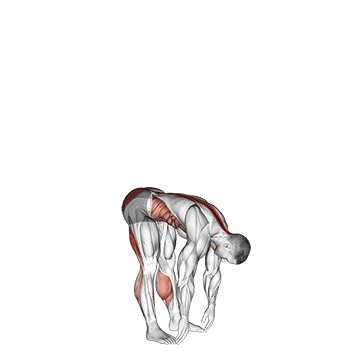
The basic toe touch is a simple exercise that helps improve flexibility in the hamstrings and lower back. It involves bending forward from a standing position and reaching towards the toes, aiming to increase the range of motion in the posterior chain muscles. ## Instructions 1. Stand with your feet hip-width apart, keeping your knees slightly bent. 2. Engage your core muscles by pulling your navel towards your spine. 3. Slowly bend forward at the hips, allowing your upper body to lower towards the ground. 4. Reach your hands towards your toes, aiming to touch them. If you can't reach your toes comfortably, go as far as you can without straining. 5. Hold the stretched position for a few seconds, feeling the gentle stretch in your hamstrings and lower back. 6. Slowly rise back up to the starting position, keeping your back straight. 7. Repeat the movement for the desired number of repetitions. ## Variations - Standing Forward Bend with Bent Knees: If you have tight hamstrings, you can perform the toe touch with slightly bent knees. This modification allows you to focus more on stretching the lower back while still engaging the hamstrings. - Seated Toe Touch: Instead of standing, you can sit on the floor with your legs extended in front of you. Reach forward and aim to touch your toes while keeping your legs straight. ## Muscles Worked - Hamstrings: The primary muscles targeted in the basic toe touch are the hamstrings, located at the back of the thighs. - Lower Back: The exercise also engages and stretches the muscles of the lower back, including the erector spinae. ## Common Mistakes 1. Rounding the back: Avoid rounding your back as you bend forward. Keep your spine in a neutral position to prevent strain or injury. 2. Locking the knees: Keep a slight bend in your knees throughout the movement. Locking the knees can place excessive stress on the joint. 3. Straining to touch the toes: Do not force yourself to touch your toes if you cannot do so comfortably. Focus on gradually increasing your flexibility over time. 4. Holding the breath: Remember to breathe continuously during the exercise. Inhale as you prepare to bend forward and exhale as you reach towards your toes. ## Safety Precautions 1. Perform the exercise on a flat, non-slip surface to ensure stability. 2. Avoid jerky or fast movements. Perform the toe touch slowly and with control. 3. If you have any pre-existing lower back or hamstring injuries, consult with a healthcare professional before attempting the exercise. 4. Stop immediately if you experience any sharp pain or discomfort and seek advice from a fitness professional or healthcare provider.
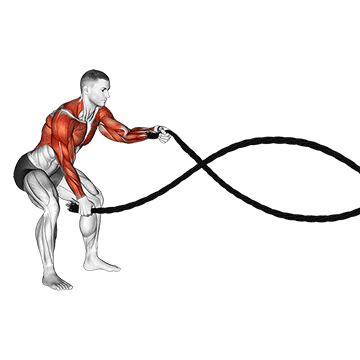
Battling ropes, also known as battle ropes, are a dynamic and intense exercise that involves vigorously waving heavy ropes in various patterns. This exercise targets the upper body, including the arms, shoulders, back, and core muscles. Battling ropes provide a high-intensity cardiovascular workout while also enhancing muscular endurance and power. ## Instructions 1. Anchor the battling ropes securely to an immovable object or use a rope anchor specifically designed for this exercise. 2. Stand facing the anchor point with your feet shoulder-width apart and knees slightly bent. 3. Grasp each rope firmly with an overhand grip, keeping your hands shoulder-width apart. 4. Start with an upright and tall posture, engaging your core muscles. 5. Generate power from your hips and shoulders to initiate the wave-like motion in the ropes. 6. Begin by making large, alternating waves with the ropes. Whip one arm downward while simultaneously raising the other arm. 7. Continue the rhythmic and vigorous waves, focusing on maintaining a consistent motion and pace. 8. Experiment with different patterns, such as double waves, slams, circles, or snakes, to target different muscle groups and add variety to your workout. 9. Perform the exercise for the desired duration or number of repetitions. ## Variations - Alternating Waves: Perform the battling ropes exercise by creating waves with each arm individually, rather than alternating them. - Rope Slams: Instead of creating waves, lift the ropes overhead and forcefully slam them down to the ground, engaging your upper body and core muscles. - Seated Rope Waves: Sit on a stability ball or bench while performing the waves or slams, targeting the core muscles in a seated position. ## Muscles Worked - Shoulders: The deltoid muscles in the shoulders are heavily engaged to create the waves and maintain control. - Arms: The biceps and triceps are actively involved in generating force and controlling the ropes. - Back and Chest: The muscles of the upper back and chest, including the rhomboids, latissimus dorsi, and pectoralis muscles, are activated to stabilize the body during the exercise. - Core: The abdominal and oblique muscles work dynamically to stabilize the body and transfer force between the upper and lower body. ## Common Mistakes 1. Poor posture: Maintain an upright posture and avoid hunching or rounding your shoulders. Keep your core engaged and your back straight throughout the exercise. 2. Gripping too tightly: Hold the ropes with a firm grip but avoid gripping them too tightly. Excessive grip tension can lead to forearm fatigue and restrict fluid movement. 3. Using only the arms: Generate power from your hips and shoulders, not just your arms. Engage your whole body to maximize the effectiveness of the exercise. 4. Insufficient range of motion: Create large, fluid waves with the ropes to fully engage the targeted muscles. Avoid short, jerky movements that limit the range of motion. ## Safety Precautions 1. Choose an appropriate rope length and weight that matches your fitness level and capabilities. 2. Ensure that the anchor point is secure and can withstand the forces generated during the exercise. 3. Start with shorter workout durations and gradually increase the intensity and duration as your fitness level improves. 4. Maintain proper form and control throughout the exercise to prevent strain or injury. 5. Warm up adequately before starting the exercise to prepare your muscles and joints. 6. If you have any pre-existing shoulder, back, or wrist injuries, consult with a healthcare professional before attempting the exercise. 7. Stay hydrated and listen to your body. If you experience pain or discomfort, stop the exercise and seek guidance from a fitness professional or healthcare provider.
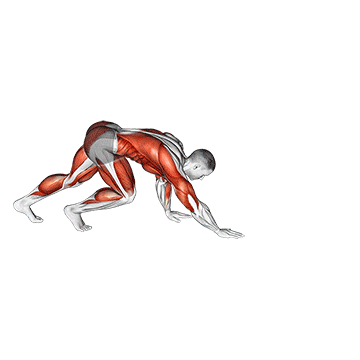
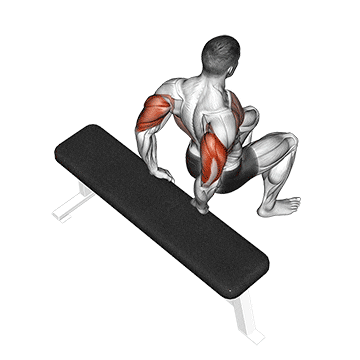
The bear crawl is a compound exercise that mimics the crawling movement of a bear. It is a dynamic and full-body exercise that targets multiple muscle groups simultaneously while also improving coordination and core stability. The bear crawl primarily works the muscles of the upper body, core, and lower body, making it a beneficial exercise for overall strength and conditioning. ## Instructions 1. Start in a quadruped position with your hands directly under your shoulders and your knees under your hips. 2. Lift your knees a few inches off the ground, keeping your back straight and parallel to the floor. 3. Begin by moving your right hand and left foot forward, simultaneously. 4. Follow with your left hand and right foot, alternating the movement. 5. Maintain a steady and controlled pace, moving forward or backward depending on your space and preferences. 6. Keep your core engaged and your hips stable throughout the movement. 7. Continue crawling for the desired distance or time. ## Variations - Bear Crawl with Arm Reach: During the bear crawl, reach one arm forward and extend it as far as possible while keeping your body stable. Alternate the arm reach with each step. - Bear Crawl with Leg Lift: As you crawl forward, lift one leg off the ground and extend it backward. Alternate the leg lift with each step. - Bear Crawl Sideways: Instead of moving forward, crawl sideways by crossing one hand and foot over the other. ## Muscles Worked - Core Muscles: The bear crawl engages the entire core, including the abdominal muscles, obliques, and lower back, to stabilize the body during the crawling movement. - Upper Body Muscles: The muscles of the chest, shoulders, and triceps are activated as you support your body weight and move your arms. - Lower Body Muscles: The quadriceps, hamstrings, glutes, and calf muscles work to propel your body forward and support the crawling motion. ## Common Mistakes 1. Sagging or Rounded Back: Keep your back straight and avoid sagging or rounding your spine. Engage your core muscles to maintain a stable and neutral spine position. 2. Lifting Hips Too High: Avoid lifting your hips too high, as this can shift the focus away from the core and upper body. Maintain a parallel position between your back and the ground. 3. Insufficient Core Engagement: Make sure to actively engage your core muscles throughout the exercise to stabilize your body and maximize the benefits. 4. Rushing the Movement: Maintain a controlled and steady pace rather than rushing through the bear crawl. Focus on proper form and coordination. ## Safety Precautions 1. Perform the bear crawl on a non-slip surface to ensure stability and reduce the risk of slipping. 2. Start with short distances and gradually increase the intensity and duration as your strength and endurance improve. 3. If you have wrist or shoulder issues, modify the exercise by performing it on your fists or using push-up handles to reduce stress on the joints. 4. If you have any pre-existing injuries or conditions, consult with a healthcare professional before attempting the bear crawl or any new exercise. 5. Listen to your body and stop the exercise if you experience pain or discomfort. Seek guidance from a fitness professional or healthcare provider if necessary. 6. Stay hydrated and maintain proper form throughout the exercise to prevent injury.
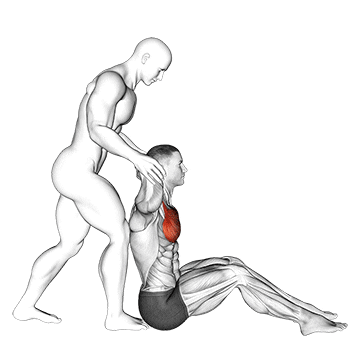
The behind head chest stretch is an exercise that targets the chest muscles and helps improve flexibility and range of motion in the shoulder joints. It involves stretching the chest muscles by extending the arms behind the head. ## Instructions Follow these step-by-step instructions to perform the behind head chest stretch: 1. Stand tall with your feet shoulder-width apart and maintain good posture. 2. Interlace your fingers and place your hands behind your head, with your elbows pointing outward. 3. Gently squeeze your shoulder blades together to open up your chest. 4. Keeping your spine straight, slowly and gradually bring your elbows backward as far as you comfortably can. 5. Hold the stretch for 15 to 30 seconds while maintaining deep breathing. 6. Relax and release the stretch slowly. 7. Repeat the stretch for 2 to 3 sets. ## Variations Here are a few variations of the behind head chest stretch that you can try: 1. Standing Wall Chest Stretch: Stand facing a wall with your feet a few inches away from it. Place your palms and forearms on the wall at shoulder height, elbows bent at a 90-degree angle. Lean forward, allowing your chest to stretch while keeping your body aligned. 2. Seated Behind Head Chest Stretch: Sit on a chair or bench with your feet flat on the floor. Follow the same instructions as the standing version, but instead of standing, perform the stretch while seated. ## Muscles Worked The main muscles targeted during the behind head chest stretch include: 1. Pectoralis Major: The large chest muscle that contributes to shoulder flexion, horizontal adduction, and internal rotation. 2. Pectoralis Minor: A smaller muscle located beneath the pectoralis major that assists in scapular protraction and downward rotation. ## Common Mistakes Be aware of these common mistakes to ensure proper form and effectiveness of the exercise: 1. Excessive arching of the lower back: Maintain a neutral spine and avoid overarching your lower back during the stretch. 2. Shrugging the shoulders: Keep your shoulders relaxed and down throughout the stretch. 3. Pulling the head forward: Avoid pulling or straining your head forward during the stretch. Keep your head aligned with your spine. ## Safety Precautions To perform the behind head chest stretch safely, keep the following precautions in mind: 1. Start with a gentle stretch and gradually increase the intensity. Avoid forcing the stretch beyond your comfort level. 2. If you have any shoulder or neck injuries or discomfort, consult with a healthcare professional before attempting this stretch. 3. If you feel any pain or discomfort during the stretch, stop immediately and reassess your form. 4. It's important to maintain proper breathing throughout the stretch. Avoid holding your breath. Remember, if you have any concerns or underlying health conditions, it's always advisable to consult a qualified fitness professional or healthcare provider before starting a new exercise routine.
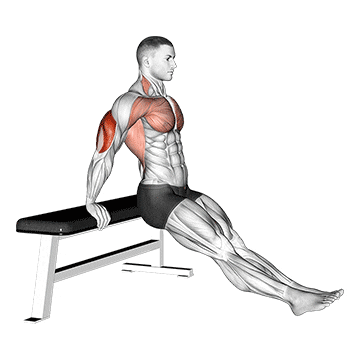
The bench dip is an exercise that primarily targets the triceps, the muscles located on the back of the upper arms. It also engages the chest and shoulder muscles to a lesser extent. This exercise helps to strengthen and tone the arms and improve overall upper body strength. ## Instructions Follow these step-by-step instructions to perform the bench dip with knees bent: 1. Sit on the edge of a sturdy bench or chair with your hands gripping the edge of the bench, fingers pointing forward. 2. Slide your buttocks forward off the bench, supporting your body weight with your arms. 3. Bend your knees at a 90-degree angle, keeping your feet flat on the floor. 4. Keep your back close to the edge of the bench, and your elbows slightly bent. 5. Lower your body by bending your elbows, allowing them to flare out to the sides. 6. Continue descending until your upper arms are parallel to the ground or until you feel a stretch in your shoulders or chest. 7. Push through your hands to extend your arms and return to the starting position. 8. Repeat the movement for the desired number of repetitions. ## Variations Here are a few variations of the bench dip that you can try: 1. Straight Legs: Instead of bending your knees, keep your legs straight and your heels on the floor. This variation increases the difficulty and places more emphasis on the triceps. 2. Weighted Dips: If you want to add more challenge, you can use a weight plate or a dumbbell on your lap while performing the dips. Ensure proper form and start with a manageable weight. 3. Assisted Dips: If you find the bench dip too challenging, you can use a resistance band or have a partner assist you by holding your legs or feet to provide support. ## Muscles Worked The bench dip primarily targets the following muscles: 1. Triceps Brachii: The large muscle on the back of the upper arm responsible for elbow extension. 2. Anterior Deltoid: The front part of the shoulder muscle that assists in shoulder flexion and horizontal shoulder adduction. 3. Pectoralis Major: The chest muscle that aids in shoulder flexion and horizontal shoulder adduction. ## Common Mistakes Be aware of these common mistakes to ensure proper form and maximize the effectiveness of the exercise: 1. Allowing the elbows to flare out excessively: Keep your elbows slightly bent and avoid excessive flare-out to prevent unnecessary stress on the shoulder joints. 2. Not maintaining control during the movement: Avoid using momentum or swinging your legs to push yourself up. Focus on controlled movements and engage your triceps throughout the exercise. 3. Letting the shoulders shrug or elevate: Keep your shoulders down and avoid shrugging them toward your ears. Maintain a relaxed and stable shoulder position. ## Safety Precautions To perform the bench dip (knees bent) safely, keep the following precautions in mind: 1. If you have any pre-existing shoulder, elbow, or wrist injuries, consult with a healthcare professional before attempting this exercise. 2. Start with a suitable bench or chair height to ensure that your knees bend at a comfortable angle and your feet are firmly planted on the floor. 3. Avoid lowering your body too far down, as this can strain your shoulders or cause discomfort. Stop the movement when your upper arms are parallel to the ground or when you feel a stretch in your shoulders or chest. 4. If you experience any pain or discomfort during the exercise, stop immediately and seek guidance from a qualified fitness professional or healthcare provider. Remember to listen to your body, maintain proper form, and adjust the intensity and range of motion according to your fitness level and comfort.
The bench dip on the floor is an exercise that primarily targets the triceps, the muscles located on the back of the upper arms. It also engages the chest and shoulder muscles to a lesser extent. This exercise helps to strengthen and tone the arms and improve overall upper body strength. ## Instructions Follow these step-by-step instructions to perform the bench dip on the floor: 1. Sit on the floor with your legs extended in front of you and your back straight. 2. Place your hands on the floor, slightly behind your hips, with your fingers pointing forward. 3. Position your hands shoulder-width apart and keep your elbows slightly bent. 4. Lift your body off the floor by pressing through your hands and extending your arms. 5. Keep your legs straight or bend your knees slightly for a modified version. 6. Lower your body by bending your elbows, allowing them to flare out to the sides. 7. Continue descending until your upper arms are parallel to the floor or until you feel a stretch in your shoulders or chest. 8. Push through your hands to extend your arms and return to the starting position. 9. Repeat the movement for the desired number of repetitions. ## Variations Here are a few variations of the bench dip on the floor that you can try: 1. Bent Legs: Instead of keeping your legs extended, you can bend your knees and place your feet flat on the floor. This variation provides more stability and can be suitable for beginners or individuals with less upper body strength. 2. Weighted Dips: If you want to add more challenge, you can place a weight plate or a dumbbell on your lap while performing the dips. Ensure proper form and start with a manageable weight. 3. Assisted Dips: If you find the bench dip on the floor too challenging, you can use a resistance band or have a partner assist you by holding your legs or feet to provide support. ## Muscles Worked The bench dip on the floor primarily targets the following muscles: 1. Triceps Brachii: The large muscle on the back of the upper arm responsible for elbow extension. 2. Anterior Deltoid: The front part of the shoulder muscle that assists in shoulder flexion and horizontal shoulder adduction. 3. Pectoralis Major: The chest muscle that aids in shoulder flexion and horizontal shoulder adduction. ## Common Mistakes Be aware of these common mistakes to ensure proper form and maximize the effectiveness of the exercise: 1. Allowing the elbows to flare out excessively: Keep your elbows slightly bent and avoid excessive flare-out to prevent unnecessary stress on the shoulder joints. 2. Not maintaining control during the movement: Avoid using momentum or swinging your legs to push yourself up. Focus on controlled movements and engage your triceps throughout the exercise. 3. Letting the shoulders shrug or elevate: Keep your shoulders down and avoid shrugging them toward your ears. Maintain a relaxed and stable shoulder position. ## Safety Precautions To perform the bench dip on the floor safely, keep the following precautions in mind: 1. If you have any pre-existing shoulder, elbow, or wrist injuries, consult with a healthcare professional before attempting this exercise. 2. Start with proper hand placement and ensure that your fingers are pointing forward and your hands are positioned shoulder-width apart. 3. Avoid lowering your body too far down, as this can strain your shoulders or cause discomfort. Stop the movement when your upper arms are parallel to the floor or when you feel a stretch in your shoulders or chest. 4. If you experience any pain or discomfort during the exercise, stop immediately and seek guidance from a qualified fitness professional or healthcare provider. Remember to listen to your body, maintain proper form, and adjust the intensity and range of motion according
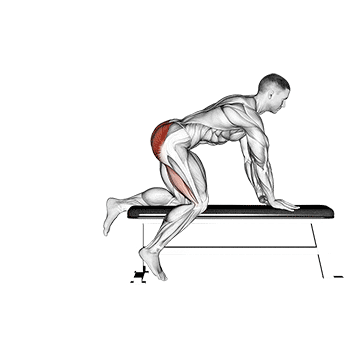
The bench hip extension is an exercise that targets the muscles of the glutes and hamstrings. It involves extending the hip joint to lift the legs off the ground while lying face down on a bench. This exercise helps strengthen the posterior chain and improve hip stability. ## Instructions Follow these step-by-step instructions to perform the bench hip extension: 1. Lie face down on a flat bench, ensuring that your hips are positioned at the edge of the bench. 2. Position your legs straight and slightly wider than hip-width apart. 3. Plant your hands firmly on the bench for support, palms facing down. 4. Engage your core and squeeze your glutes. 5. Lift both legs off the ground by extending your hips, keeping your legs straight. 6. Continue to raise your legs until they are parallel to the ground or until you feel a contraction in your glutes and hamstrings. 7. Pause for a moment at the top of the movement. 8. Slowly lower your legs back down to the starting position in a controlled manner. 9. Repeat the movement for the desired number of repetitions. ## Variations Here are a few variations of the bench hip extension that you can try: 1. Single-Leg Hip Extension: Instead of lifting both legs simultaneously, perform the exercise with one leg at a time. This variation increases the challenge and places more emphasis on each glute and hamstring individually. 2. Weighted Hip Extension: Hold a dumbbell or a weighted plate against the back of your thighs while performing the exercise. This variation adds resistance and increases the intensity of the movement. ## Muscles Worked The bench hip extension primarily targets the following muscles: 1. Gluteus Maximus: The largest muscle of the glutes responsible for hip extension and thigh abduction. 2. Hamstrings: A group of muscles located on the back of the thigh that assist in hip extension and knee flexion. ## Common Mistakes Be aware of these common mistakes to ensure proper form and maximize the effectiveness of the exercise: 1. Arching the lower back excessively: Maintain a neutral spine throughout the exercise and avoid overarching your lower back. Engage your core to stabilize your spine. 2. Lifting the legs too high: Lift your legs until they are parallel to the ground or until you feel a contraction in your glutes and hamstrings. Avoid hyperextension of the hips or excessive arching of the lower back. 3. Allowing the legs to drop quickly: Control the movement and avoid allowing your legs to drop back down to the starting position abruptly. Lower them in a slow and controlled manner. ## Safety Precautions To perform the bench hip extension safely, keep the following precautions in mind: 1. Ensure that the bench you are using is stable and secure. It should be able to support your body weight throughout the exercise. 2. If you have any lower back, hip, or hamstring injuries or discomfort, consult with a healthcare professional before attempting this exercise. 3. Start with a comfortable range of motion and gradually increase the height to parallel as you build strength and flexibility. 4. If you experience any pain or discomfort during the exercise, stop immediately and seek guidance from a qualified fitness professional or healthcare provider. Remember to listen to your body, maintain proper form, and adjust the intensity and range of motion according to your fitness level and comfort.
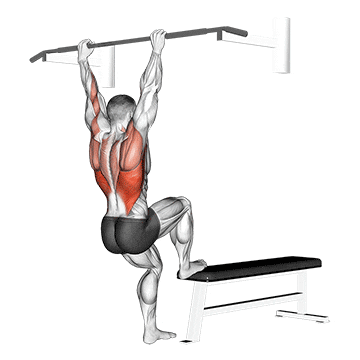
Bench pull-ups, also known as bodyweight rows, are a compound exercise that primarily targets the muscles of the back, including the latissimus dorsi, rhomboids, and trapezius. This exercise is performed using a bench or a low bar and mimics the movement of a traditional pull-up. Bench pull-ups help to strengthen the upper back, improve posture, and enhance overall upper body strength. ## Instructions Follow these step-by-step instructions to perform bench pull-ups: 1. Set up a flat bench or a low bar at a height that allows you to hang underneath it with your arms extended. 2. Stand facing the bench or bar, and place your hands slightly wider than shoulder-width apart on the bench or bar. 3. Step back, extending your arms fully and keeping your body in a straight line from your head to your heels. 4. Position your feet shoulder-width apart and slightly bend your knees. 5. Brace your core and engage your back muscles. 6. Pull your chest toward the bench or bar by bending your elbows and retracting your shoulder blades. 7. Continue pulling until your chest touches the bench or your upper chest reaches the bar. 8. Pause for a moment at the top of the movement, squeezing your back muscles. 9. Slowly lower your body back to the starting position, fully extending your arms. 10. Repeat the movement for the desired number of repetitions. ## Variations Here are a few variations of bench pull-ups that you can try: 1. Inverted Rows: If you have access to a suspension trainer or gymnastic rings, you can perform inverted rows. Set up the suspension trainer or rings at an appropriate height and perform rows while hanging at an angle. 2. Single-Arm Rows: Perform the exercise with one arm at a time, using a dumbbell or a kettlebell. This variation increases the challenge and provides an additional core stabilization component. ## Muscles Worked The bench pull-up primarily targets the following muscles: 1. Latissimus Dorsi: The broad muscles of the back responsible for shoulder extension, adduction, and internal rotation. 2. Rhomboids: Muscles located between the shoulder blades that retract and stabilize the scapulae. 3. Trapezius: The upper, middle, and lower fibers of the trapezius muscles, which assist in shoulder movements and scapular stability. 4. Biceps Brachii: The muscles on the front of the upper arm that assist in elbow flexion. ## Common Mistakes Be aware of these common mistakes to ensure proper form and maximize the effectiveness of the exercise: 1. Using excessive momentum: Avoid swinging your body or using momentum to complete the movement. Focus on controlled and deliberate pulling and lowering. 2. Not engaging the back muscles fully: Concentrate on initiating the movement from your back muscles rather than solely relying on your arms. Squeeze your shoulder blades together as you pull. 3. Allowing the shoulders to shrug: Keep your shoulders down and away from your ears throughout the exercise. Avoid shrugging your shoulders toward your ears. ## Safety Precautions To perform bench pull-ups safely, keep the following precautions in mind: 1. Ensure that the bench or bar you are using is stable and can support your body weight. 2. If you have any pre-existing back, shoulder, or wrist injuries, consult with a healthcare professional before attempting this exercise. 3. Start with a comfortable grip width and gradually progress to wider grips as your strength improves. 4. Maintain proper body alignment throughout the exercise, keeping your body straight from head to heels. 5. If you experience any pain or discomfort during the exercise, stop immediately and seek guidance from a qualified fitness professional
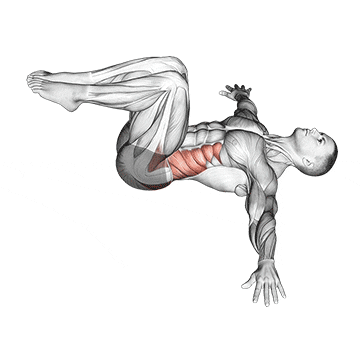
The bent knee lying twist is an exercise that targets the muscles of the core, specifically the obliques. It involves a rotational movement that helps to strengthen the abdominal muscles and improve trunk mobility. This exercise can also help enhance spinal flexibility and promote better posture. ## Instructions Follow these step-by-step instructions to perform the bent knee lying twist: 1. Start by lying flat on your back on a mat or the floor. 2. Bend your knees and bring them toward your chest, keeping your feet flat on the floor. 3. Extend your arms out to the sides, forming a T shape with your body. 4. Engage your core muscles by drawing your navel toward your spine. 5. Keeping your shoulders flat on the ground, slowly lower both knees to one side. 6. Aim to touch or come close to touching the floor with your knees, without forcing the movement. 7. Hold the position for a few seconds, feeling the stretch in your oblique muscles. 8. Return to the starting position by bringing your knees back to the center. 9. Repeat the movement on the other side, lowering your knees to the opposite side. 10. Continue alternating sides for the desired number of repetitions. ## Variations Here are a few variations of the bent knee lying twist that you can try: 1. Straight Legs: Instead of bending your knees, keep your legs straight and lower them to each side while maintaining a slight contraction in your abdominal muscles. This variation increases the challenge and engages the core muscles to a greater extent. 2. Weighted Twist: Hold a light dumbbell or a medicine ball in your hands as you perform the twisting motion. The added weight intensifies the exercise and increases resistance. ## Muscles Worked The bent knee lying twist primarily targets the following muscles: 1. Obliques: The muscles located on the sides of the abdomen that assist in trunk rotation and lateral flexion. 2. Rectus Abdominis: The abdominal muscles that run vertically along the front of the abdomen and aid in spinal flexion and stabilization. ## Common Mistakes Be aware of these common mistakes to ensure proper form and maximize the effectiveness of the exercise: 1. Raising the shoulders off the ground: Keep your shoulders flat on the ground throughout the exercise to maintain stability and focus the movement on the core muscles. 2. Using momentum: Avoid swinging your legs or using momentum to twist from side to side. Control the movement and engage your core muscles to initiate and control the rotation. 3. Over-rotating or forcing the movement: Aim to lower your knees to a comfortable range of motion without straining or forcing the twist. Listen to your body and adjust the movement according to your flexibility and comfort. ## Safety Precautions To perform the bent knee lying twist safely, keep the following precautions in mind: 1. If you have any pre-existing back, hip, or abdominal injuries, consult with a healthcare professional before attempting this exercise. 2. Start with a small range of motion and gradually increase it as your flexibility improves. Avoid any movement that causes pain or discomfort. 3. Engage your core muscles throughout the exercise to provide stability and protect your lower back. 4. Breathe continuously and avoid holding your breath during the movement. 5. If you experience any pain or discomfort during the exercise, stop immediately and seek guidance from a qualified fitness professional or healthcare provider. Remember to listen to your body, maintain proper form, and adjust the intensity and range of motion according to your fitness level and comfort.