

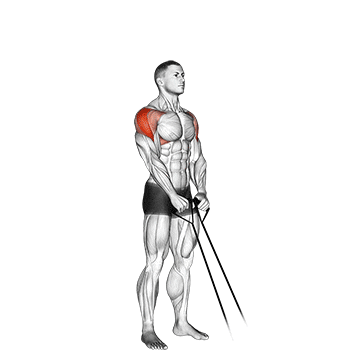
The band shoulder press is an exercise that targets the muscles of the shoulders, specifically the deltoids, along with the triceps and upper back. It involves pressing a resistance band overhead while standing or seated. This exercise helps build strength, stability, and muscular development in the shoulders. ## Instructions 1. Start by standing with your feet shoulder-width apart or sitting on a sturdy chair or bench. 2. Hold the resistance band with an overhand grip, positioning your hands slightly wider than shoulder-width apart. 3. Bring the band to shoulder height, bending your elbows and keeping them pointed forward. 4. Engage your core muscles and maintain a neutral spine throughout the exercise. 5. Begin the movement by pressing the band upward, extending your arms fully overhead. 6. Pause briefly at the top, feeling the contraction in your shoulder muscles. 7. Slowly lower the band back to the starting position under control. 8. Repeat the movement for the desired number of repetitions. ## Variations - Seated Band Shoulder Press: Perform the exercise while seated on a stable chair or bench. This variation can be beneficial for individuals with balance issues or those who prefer a seated position. - Single-Arm Band Shoulder Press: Instead of using both hands to hold the band, perform the shoulder press one arm at a time. This variation helps identify and correct muscle imbalances between the left and right sides. - Resistance Band Push Press: Add a slight leg drive by bending your knees and using your lower body to assist in pressing the band overhead. This variation adds a dynamic element and allows you to handle heavier resistance. ## Muscles Worked - Anterior deltoids (front shoulder muscles) - Lateral deltoids (side shoulder muscles) - Posterior deltoids (rear shoulder muscles) - Triceps brachii (back of the upper arm) - Upper back muscles (rhomboids, trapezius) ## Common Mistakes - Arching the lower back: Avoid excessive arching of the lower back during the movement. Engage your core muscles to maintain a stable and neutral spine throughout. - Shrugging the shoulders: Keep your shoulders down and away from your ears. Focus on pressing the band directly overhead without shrugging or tensing the upper traps. - Using momentum: Do not rely on momentum or jerking motions to lift the band. Maintain control throughout the exercise and perform the movement in a slow and controlled manner. - Locking out the elbows at the top: While extending your arms overhead, avoid locking out the elbows completely. Keep a slight bend in the elbows to maintain tension on the muscles and prevent strain on the joints. ## Safety Precautions - Choose a resistance band with an appropriate level of tension for your strength level. Start with a lighter band and gradually progress to higher tensions as you build strength. - Maintain proper form and technique throughout the exercise to minimize the risk of injury. If you're unsure about the correct form, consider seeking guidance from a fitness professional. - If you have any pre-existing shoulder or upper body injuries, it is advisable to consult with a healthcare professional before attempting this exercise. - Listen to your body and stop immediately if you experience any pain or discomfort.
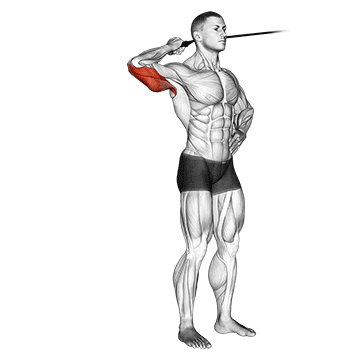
The band side triceps extension is an exercise that targets the triceps muscles, located at the back of the upper arms. It involves using a resistance band to perform an extension movement that primarily works the lateral head of the triceps. This exercise helps strengthen and tone the triceps while improving arm definition and functional upper body strength. ## Instructions 1. Start by standing with your feet shoulder-width apart and hold the resistance band with an overhand grip. 2. Position your hands close together, about shoulder-width apart. 3. Bring the band overhead with your elbows bent and upper arms close to your ears. 4. Keep your core engaged and maintain an upright posture throughout the exercise. 5. Initiate the movement by extending your arms straight up overhead, pushing against the resistance of the band. 6. As you reach the top, focus on squeezing the triceps muscles and maintaining tension on the band. 7. Slowly lower the band back to the starting position under control, bending your elbows. 8. Repeat the movement for the desired number of repetitions. ## Variations - Seated Band Side Triceps Extension: Perform the exercise while seated on a chair or bench. This variation can provide additional stability and is suitable for individuals who prefer a seated position. - Single-Arm Band Side Triceps Extension: Instead of using both hands to hold the band, perform the extension with one arm at a time. This variation helps identify and correct muscle imbalances between the left and right arms. - Resistance Band Overhead Triceps Extension: Stand on the band with one foot and hold the other end of the band with both hands. Extend your arms overhead and then bend your elbows to lower the band behind your head. Extend the arms back up to complete one repetition. This variation emphasizes the long head of the triceps. ## Muscles Worked - Triceps brachii (lateral head) - Triceps brachii (long head, with the overhead variation) ## Common Mistakes - Arching the lower back: Avoid excessive arching of the lower back during the movement. Keep your core engaged and maintain a neutral spine position throughout. - Allowing the elbows to flare out: Throughout the exercise, ensure that your elbows stay close to your ears and pointed forward. Avoid allowing them to flare out to the sides, as this reduces the engagement of the triceps. - Using momentum: Control the movement and avoid using momentum to swing the band up or down. Perform the extension in a slow and controlled manner, focusing on squeezing the triceps at the top of the movement. - Holding the breath: Remember to breathe throughout the exercise. Inhale during the lowering phase and exhale during the lifting phase. ## Safety Precautions - Choose a resistance band with an appropriate level of tension for your strength level. Start with a lighter band and gradually progress to higher tensions as you build strength. - If you have any pre-existing elbow or shoulder injuries, it is advisable to consult with a healthcare professional before attempting this exercise. - Listen to your body and stop immediately if you experience any pain or discomfort. - Maintain proper form and technique to minimize the risk of injury. If you're unsure about the correct form, consider seeking guidance from a fitness professional.
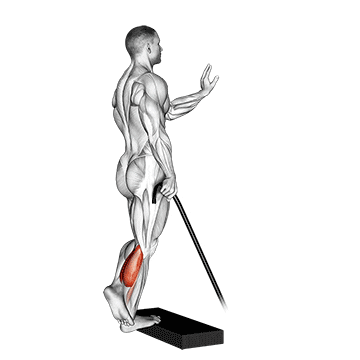
The band single leg calf raise is an exercise that targets the calf muscles, specifically the gastrocnemius and soleus. It involves performing a calf raise while standing on one leg and using a resistance band for added resistance. This exercise helps strengthen and develop the calves, improving lower leg stability, balance, and athletic performance. ## Instructions 1. Begin by placing a resistance band securely under the arch of your foot. Hold the other end of the band firmly with your hands. 2. Stand tall with your feet hip-width apart and engage your core for stability. 3. Shift your weight onto one leg, slightly bending the knee of the supporting leg. 4. Keep your back straight and shoulders relaxed throughout the exercise. 5. Initiate the movement by raising your heel off the ground, pointing your toes and pushing against the resistance of the band. 6. Lift your body as high as you can onto the ball of your foot, squeezing your calf muscles at the top of the movement. 7. Slowly lower your heel back down to the starting position, maintaining control. 8. Repeat the calf raise for the desired number of repetitions on one leg before switching to the other leg. ## Variations - Band-Assisted Single Leg Calf Raise: If you struggle with balance or strength, you can perform the exercise while holding onto a stable object, such as a wall or a chair, for support. This variation reduces the amount of bodyweight you have to lift and allows you to focus on proper form and technique. - Double Leg Calf Raise: If performing the exercise on one leg is too challenging, you can perform the calf raise with both feet on the ground. This variation provides a more stable base of support and allows you to build strength before progressing to the single-leg version. ## Muscles Worked - Gastrocnemius (calf muscle, primarily targeted) - Soleus (calf muscle, secondary target) ## Common Mistakes - Raising the heel too quickly: Avoid rushing through the movement by rapidly lifting the heel. Instead, focus on a slow and controlled motion, emphasizing the contraction of the calf muscles. - Not maintaining balance and stability: Concentrate on maintaining balance throughout the exercise. Engage your core and keep your supporting leg stable and steady. - Allowing the ankle to roll inward or outward: Keep your ankle in a neutral position and avoid excessive pronation (rolling inward) or supination (rolling outward) during the movement. - Not achieving a full range of motion: Aim to raise your heel as high as possible, achieving a full contraction of the calf muscles at the top of the movement. Avoid stopping short and perform the exercise through a complete range of motion. ## Safety Precautions - Start with a resistance band of appropriate tension for your strength level. Begin with a lighter band and gradually progress to higher tensions as your calf strength increases. - If you have any pre-existing foot, ankle, or calf injuries, it is advisable to consult with a healthcare professional before attempting this exercise. - Be cautious if you have issues with balance or stability. Consider performing the exercise near a wall or other stable surface for support. - Listen to your body and stop immediately if you experience any pain or discomfort. - Maintain proper form and technique to minimize the risk of injury. If you're unsure about the correct form, consider seeking guidance from a fitness professional.
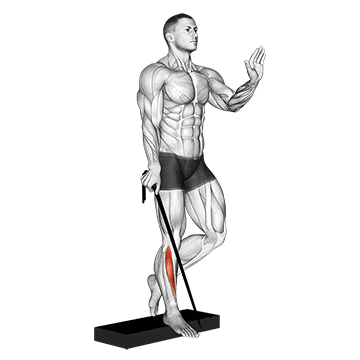
The band single leg reverse calf raise is an exercise that targets the muscles of the calf, particularly the gastrocnemius and soleus, with an emphasis on the soleus. It involves standing on one leg and performing a calf raise while the band provides resistance against the movement. This exercise helps strengthen the calves, improves ankle stability, and enhances lower leg strength and function. ## Instructions 1. Start by placing a resistance band securely under the ball of your foot, holding the other end firmly with your hands. 2. Stand tall with your feet hip-width apart and engage your core for stability. 3. Shift your weight onto one leg, slightly bending the knee of the supporting leg. 4. Keep your back straight and shoulders relaxed throughout the exercise. 5. Initiate the movement by lifting your forefoot off the ground, flexing your ankle and pushing against the resistance of the band. 6. Rise up onto the ball of your foot, lifting your heel as high as you can while maintaining balance and control. 7. Hold the raised position for a brief pause, feeling the contraction in your calf muscles. 8. Slowly lower your heel back down to the starting position, controlling the movement. 9. Repeat the calf raise for the desired number of repetitions on one leg before switching to the other leg. ## Variations - Band-Assisted Single Leg Reverse Calf Raise: If you find it challenging to maintain balance or need assistance, you can perform the exercise while holding onto a stable object, such as a wall or a chair, for support. This variation reduces the amount of bodyweight you have to lift and allows you to focus on proper form and technique. - Double Leg Reverse Calf Raise: If performing the exercise on one leg is too challenging, you can perform the reverse calf raise with both feet on the ground. This variation provides a more stable base of support and allows you to build strength before progressing to the single-leg version. ## Muscles Worked - Soleus (calf muscle, primary target) - Gastrocnemius (calf muscle, secondary target) ## Common Mistakes - Raising the forefoot too quickly: Avoid using momentum to lift the forefoot. Instead, focus on a controlled and deliberate movement, emphasizing the contraction of the soleus muscle. - Not maintaining balance and stability: Concentrate on maintaining balance throughout the exercise. Engage your core and keep your supporting leg stable and steady. - Letting the ankle roll inward or outward: Keep your ankle in a neutral position and avoid excessive pronation (rolling inward) or supination (rolling outward) during the movement. - Not achieving a full range of motion: Strive to lift your forefoot as high as possible, achieving a full contraction of the soleus muscle at the top of the movement. Avoid stopping short and perform the exercise through a complete range of motion. ## Safety Precautions - Choose a resistance band with an appropriate level of tension for your strength level. Begin with a lighter band and gradually progress to higher tensions as your calf strength increases. - If you have any pre-existing foot, ankle, or calf injuries, it is advisable to consult with a healthcare professional before attempting this exercise. - Be cautious if you have issues with balance or stability. Consider performing the exercise near a wall or other stable surface for support. - Listen to your body and stop immediately if you experience any pain or discomfort. - Maintain proper form and technique to minimize the risk of injury. If you're unsure about the correct form, consider seeking guidance from a fitness professional.
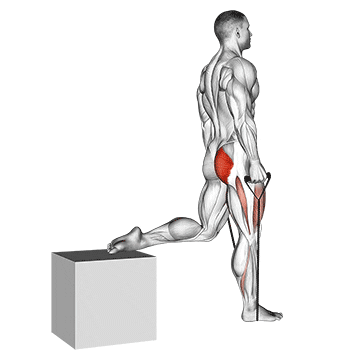
The band single leg split squat, also known as the Bulgarian split squat, is a lower body exercise that targets the muscles of the legs, including the quadriceps, hamstrings, and glutes. It involves standing with one foot elevated behind you on a stable surface while the other leg performs a squatting motion. Adding a resistance band to the exercise increases the challenge and provides additional resistance for muscle strengthening and development. ## Instructions 1. Start by placing a resistance band around your front foot. Hold the other end of the band firmly with your hands. 2. Stand tall with your feet hip-width apart, and take a step forward with one leg, positioning your front foot far enough away from your body to create a 90-degree angle at the knee when you lower into the squat. 3. Engage your core for stability and maintain an upright posture throughout the exercise. 4. Shift your weight onto your front foot, keeping your heel firmly planted on the ground. 5. Bend your front knee and lower your body into a squatting position, allowing your back knee to gently touch or hover just above the ground. 6. Keep your front knee aligned with your toes and avoid letting it extend beyond your toes. 7. Pause briefly in the bottom position, feeling the tension in your leg muscles. 8. Push through your front heel and engage your leg muscles to return to the starting position. 9. Repeat the squat for the desired number of repetitions on one leg before switching to the other leg. ## Variations - Band-Assisted Single Leg Split Squat: If you need assistance with balance or stability, you can hold onto a stable object, such as a wall or a chair, for support. This variation reduces the amount of bodyweight you have to lift and allows you to focus on proper form and technique. - Rear Foot Elevated Split Squat (without band): If you don't have a resistance band or prefer not to use one, you can perform the exercise with your rear foot elevated on a step or bench. This variation targets the same muscles and provides a challenging lower body workout. - Weighted Single Leg Split Squat: Once you have mastered the bodyweight version, you can add additional resistance by holding dumbbells or a barbell in your hands. ## Muscles Worked - Quadriceps (front of the thigh) - Hamstrings (back of the thigh) - Glutes (buttocks) - Calves (gastrocnemius and soleus) ## Common Mistakes - Allowing the front knee to extend beyond the toes: To maintain proper form and prevent excessive stress on the knee joint, ensure that your front knee stays aligned with your toes throughout the movement. Avoid allowing it to extend forward past the toes. - Leaning too far forward: Maintain an upright posture throughout the exercise. Avoid leaning too far forward, as this can place excessive strain on the front knee and compromise balance. - Not engaging the core: Engage your core muscles throughout the exercise to provide stability and maintain proper alignment. - Losing balance or stability: Concentrate on maintaining balance throughout the movement. If needed, use a stable object for support until you improve your stability. ## Safety Precautions - Use a resistance band with an appropriate level of tension for your strength level. Start with a lighter band and gradually progress to higher tensions as you build strength. - Ensure that the surface you are standing on is stable and secure to prevent any slips or falls. - If you have any pre-existing knee or lower body injuries, it is advisable to consult with a healthcare professional before attempting this exercise. - Start with a shorter stride length and gradually increase it as you become more comfortable and stable with the movement. - Listen to your body and
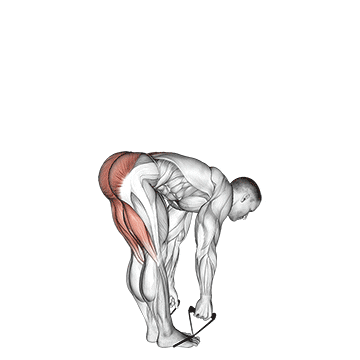
The band straight leg deadlift is an exercise that primarily targets the muscles of the posterior chain, including the hamstrings, glutes, and lower back. It involves hinging at the hips while keeping the legs straight and using a resistance band for added resistance. This exercise helps strengthen the posterior chain, improve hip mobility, and enhance overall lower body strength. ## Instructions 1. Begin by placing a resistance band securely under both feet, holding the other end of the band with your hands. 2. Stand tall with your feet hip-width apart and a slight bend in your knees. 3. Engage your core muscles for stability and maintain a neutral spine throughout the exercise. 4. Keep a slight bend in your knees and maintain a soft but not excessive arch in your lower back. 5. Initiate the movement by hinging at the hips, pushing your hips back while maintaining a straight line from your head to your tailbone. 6. As you hinge forward, allow your torso to lower toward the floor while keeping your back straight. 7. Continue hinging forward until you feel a stretch in your hamstrings, while ensuring your back remains straight. 8. Pause briefly in the stretched position, then engage your glutes and hamstrings to return to the starting position by pushing your hips forward. 9. Squeeze your glutes at the top of the movement to fully engage the muscles. 10. Repeat the movement for the desired number of repetitions. ## Variations - Single-Leg Band Straight Leg Deadlift: For an additional challenge and to focus more on each leg individually, you can perform the exercise while balancing on one leg. This variation increases the demand on the stabilizing muscles and helps address any strength imbalances between the legs. - Band Assisted Straight Leg Deadlift: If you find it challenging to maintain balance or need assistance, you can perform the exercise while holding onto a stable object, such as a wall or a chair, for support. This variation reduces the amount of bodyweight you have to lift and allows you to focus on proper form and technique. ## Muscles Worked - Hamstrings - Glutes (especially the gluteus maximus) - Erector spinae (lower back muscles) - Core muscles for stabilization ## Common Mistakes - Rounding the back: Keep your back straight and maintain a neutral spine throughout the exercise. Avoid rounding or excessively arching your back, as this can lead to strain or injury. - Bending the knees too much: While there should be a slight bend in the knees, avoid bending them excessively during the movement. The primary movement should come from hinging at the hips. - Not engaging the core: Engage your core muscles to maintain stability and support your lower back throughout the exercise. - Using momentum: Perform the exercise in a controlled manner, avoiding any jerky or swinging motions. Focus on the muscles being targeted and maintain tension throughout the movement. ## Safety Precautions - Start with a resistance band of appropriate tension for your strength level. Begin with a lighter band and gradually progress to higher tensions as your strength improves. - If you have any pre-existing lower back or hamstring injuries, it is advisable to consult with a healthcare professional before attempting this exercise. - Maintain proper form and technique throughout the exercise to minimize the risk of injury. If you're unsure about the correct form, consider seeking guidance from a fitness professional. - Listen to your body and stop immediately if you experience any pain or discomfort. - Avoid locking the knees at the top of the movement. Keep a slight bend in the knees to maintain joint integrity. - Perform the exercise on a stable surface to prevent slipping or loss of balance. - If you have any balance or stability issues, consider performing the
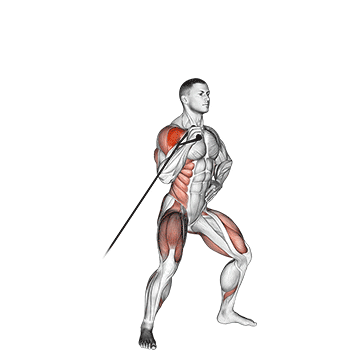
The band twisting overhead press is a compound exercise that targets the shoulders, upper back, and core muscles. It involves pressing a resistance band overhead while adding a twisting motion, which engages the rotational muscles of the core. This exercise helps improve shoulder strength, stability, and overall upper body power. ## Instructions 1. Start by standing with your feet shoulder-width apart and place the center of the resistance band under your feet. 2. Grasp the ends of the band with your hands and bring them up to shoulder height, palms facing forward. 3. Engage your core muscles for stability and maintain an upright posture throughout the exercise. 4. Begin by pressing the band straight overhead, fully extending your arms without locking the elbows. 5. As you reach the top of the movement, initiate a twisting motion by rotating your torso to one side while keeping your arms extended. 6. Pause briefly in the twisted position, feeling the engagement in your core and the resistance in the band. 7. Return to the starting position by rotating your torso back to the center while maintaining the overhead press position. 8. Repeat the twisting motion, this time rotating your torso to the opposite side. 9. Continue alternating the twisting motion with each repetition. ## Variations - Seated Band Twisting Overhead Press: If standing is not comfortable or feasible, you can perform this exercise while seated on a stability ball, bench, or chair. The movement remains the same, with the focus on maintaining an upright posture and proper core engagement. - Single-Arm Band Twisting Overhead Press: For a greater challenge and to focus more on each side individually, you can perform the exercise using only one arm at a time. This variation requires additional core stability and control. ## Muscles Worked - Shoulders (deltoids) - Upper back (rhomboids and trapezius) - Core muscles, including the obliques and rectus abdominis ## Common Mistakes - Using excessive momentum: Avoid using momentum to press the band overhead. Control the movement and focus on engaging the target muscles throughout. - Allowing the back to arch: Maintain a neutral spine and avoid excessive arching of the lower back. Engage your core muscles to stabilize the spine and support proper form. - Neglecting proper shoulder positioning: Keep your shoulders down and back throughout the movement. Avoid shrugging or hunching the shoulders. - Over-rotating the torso: The twisting motion should be controlled and focused on engaging the core muscles. Avoid over-rotating the torso, as this can strain the lower back. ## Safety Precautions - Choose a resistance band with appropriate tension for your strength level. Begin with a lighter band and progress to higher tensions as your strength improves. - Ensure that the band is securely anchored and in good condition before performing the exercise. - If you have any pre-existing shoulder or back injuries, it is advisable to consult with a healthcare professional before attempting this exercise. - Maintain proper form and technique throughout the exercise. If you're unsure about the correct form, consider seeking guidance from a fitness professional. - Listen to your body and stop immediately if you experience any pain or discomfort. - Perform the exercise in a clear and open space to avoid any obstacles or tripping hazards. - Start with controlled movements and gradually increase the speed or intensity as you become more comfortable and confident with the exercise.
The band Y-raise is an exercise that targets the muscles of the shoulders, upper back, and scapular stabilizers. It involves raising the arms in a Y-shaped position against the resistance of a band. This exercise helps improve shoulder strength, posture, and stability. ## Instructions 1. Stand with your feet shoulder-width apart and place the center of the resistance band under your feet. 2. Grasp the ends of the band with your hands, palms facing inward, and allow your arms to hang in front of you. 3. Engage your core muscles and maintain an upright posture throughout the exercise. 4. Start by keeping a slight bend in your elbows and raise your arms upward and outward, forming a Y shape with your body. 5. Focus on squeezing your shoulder blades together as you raise your arms and maintaining tension in the band. 6. At the top of the movement, pause briefly and feel the contraction in your shoulders and upper back. 7. Slowly lower your arms back to the starting position while maintaining control. 8. Repeat the movement for the desired number of repetitions. ## Variations - Seated Band Y-Raise: If standing is not comfortable or feasible, you can perform this exercise while seated on a stability ball, bench, or chair. The movement remains the same, focusing on maintaining proper posture and shoulder engagement. - Single-Arm Band Y-Raise: For a greater challenge and to focus more on each side individually, you can perform the exercise using only one arm at a time. This variation requires additional stability and control. ## Muscles Worked - Shoulders (deltoids) - Upper back (trapezius and rhomboids) - Scapular stabilizers ## Common Mistakes - Using momentum: Avoid swinging your arms or using momentum to lift the band. Focus on controlled movements and engage the target muscles throughout the exercise. - Shrugging the shoulders: Keep your shoulders down and relaxed throughout the movement. Avoid shrugging or tensing the upper traps. - Hyperextending the neck: Maintain a neutral neck position by looking straight ahead and avoiding excessive tilting or extension of the neck. - Allowing the lower back to arch: Engage your core muscles to maintain a neutral spine and avoid excessive arching of the lower back. ## Safety Precautions - Choose a resistance band with appropriate tension for your strength level. Begin with a lighter band and progress to higher tensions as your strength improves. - Ensure that the band is securely anchored and in good condition before performing the exercise. - If you have any pre-existing shoulder or back injuries, it is advisable to consult with a healthcare professional before attempting this exercise. - Maintain proper form and technique throughout the exercise. If you're unsure about the correct form, consider seeking guidance from a fitness professional. - Listen to your body and stop immediately if you experience any pain or discomfort. - Perform the exercise in a clear and open space to avoid any obstacles or tripping hazards. - Start with controlled movements and gradually increase the speed or intensity as you become more comfortable and confident with the exercise.
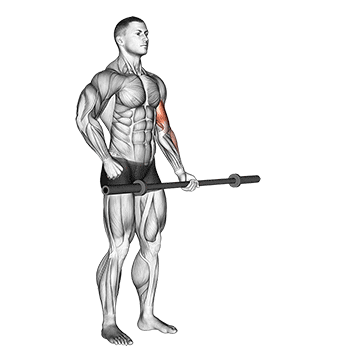
The barbell alternate biceps curl is an exercise that targets the biceps brachii muscles in the upper arms. By curling the barbell with one arm at a time, it helps develop strength and size in the biceps, as well as improving grip strength and forearm stability. ## Instructions 1. Stand up straight with your feet shoulder-width apart and grasp a barbell with an underhand grip (palms facing upward). Your hands should be slightly wider than shoulder-width apart. 2. Let your arms hang straight down in front of you, fully extended. 3. Keep your upper arms stationary and your elbows close to your torso throughout the exercise. 4. Begin by curling the barbell upward using one arm, while keeping the other arm extended. 5. As you curl the barbell, contract your biceps and exhale. 6. Continue lifting until your forearm is fully contracted and the barbell is at shoulder level. 7. Hold the contracted position for a brief moment, squeezing your biceps. 8. Slowly lower the barbell back down to the starting position, inhaling as you do so. 9. Repeat the movement with the opposite arm. 10. Continue alternating arms for the desired number of repetitions. ## Variations - Dumbbell Alternate Biceps Curl: Instead of using a barbell, you can perform the exercise using dumbbells. Hold a dumbbell in each hand with an underhand grip and perform the same curling motion with one arm at a time. - Seated Alternate Biceps Curl: If standing is not comfortable or feasible, you can perform this exercise while seated on a bench or chair. The movement remains the same, focusing on maintaining proper form and performing the curling motion with one arm at a time. ## Muscles Worked - Biceps brachii (main muscle) - Brachialis - Brachioradialis ## Common Mistakes - Using momentum: Avoid swinging or using momentum to lift the barbell. Focus on controlled movements and engage your biceps throughout the exercise. - Leaning backward: Maintain an upright posture throughout the exercise. Avoid leaning backward or using your back to assist in lifting the weight. - Allowing elbows to flare out: Keep your elbows close to your torso and avoid letting them move forward or outward during the movement. This ensures that the biceps are the primary muscles engaged. - Rounding the back: Keep your back straight and avoid rounding or arching your back. Engage your core muscles for stability. ## Safety Precautions - Start with a weight that allows you to maintain proper form and control throughout the exercise. - Ensure that your grip on the barbell is secure, and your hands are positioned evenly on the bar. - Use a weightlifting belt or wrist wraps if necessary to provide additional support and stability. - If you have any pre-existing arm or shoulder injuries, it is advisable to consult with a healthcare professional before attempting this exercise. - Listen to your body and stop immediately if you experience any pain or discomfort. - Perform the exercise in a clear and open space to avoid any obstacles or tripping hazards. - Always use proper weightlifting etiquette and ensure that the barbell is secured with collars or clips to prevent the weights from sliding off. - Gradually increase the weight as your strength improves, but always prioritize maintaining proper form and technique.