
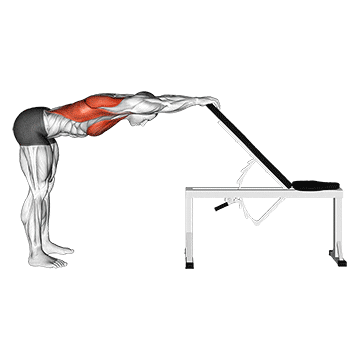
The Back Pec Stretch is an exercise that targets the pectoral muscles (chest muscles) and helps improve shoulder flexibility and posture. It involves stretching the muscles in the front of the chest while extending the upper back, providing relief from tightness and promoting better alignment. ## Instructions 1. Stand tall with good posture, keeping your feet shoulder-width apart. 2. Extend both arms out to your sides at shoulder height, parallel to the floor. 3. Rotate your palms to face forward, with your thumbs pointing up. 4. Begin the movement by squeezing your shoulder blades together and drawing them down your back. 5. Slowly bring your arms backward, aiming to bring your hands as close together behind your body as possible. 6. Keep your chest lifted and avoid arching your lower back excessively. 7. Hold the stretch for 20-30 seconds while breathing deeply and feeling a gentle stretch in the front of your chest. 8. Slowly release the stretch and return your arms to the starting position. 9. Repeat the stretch for the desired number of repetitions. ## Variations - Wall Pec Stretch: Stand facing a wall, with your feet slightly away from the wall. Place your forearm against the wall at shoulder height and gently lean forward to stretch the chest muscles. - Doorway Pec Stretch: Stand in a doorway with your arms extended and placed on either side of the door frame. Step forward with one leg to create a gentle stretch in the chest muscles. ## Muscles Worked - Pectoralis major (chest muscles) - Anterior deltoids (front of the shoulders) - Rhomboids (upper back muscles) ## Common Mistakes - Shrugging the shoulders: Avoid lifting the shoulders toward the ears during the stretch. Keep the shoulders relaxed and down. - Overarching the lower back: Maintain a neutral spine position and avoid excessive arching of the lower back. Engage the core muscles to support proper alignment. - Holding the breath: Remember to breathe deeply and naturally throughout the stretch to promote relaxation and enhance the effectiveness of the stretch. ## Safety Precautions - If you have any shoulder or chest injuries or conditions, consult with a healthcare professional before attempting this stretch. - Start with a gentle stretch and gradually increase the intensity as your flexibility improves. - Do not force your arms backward beyond a comfortable range of motion. The stretch should be felt in the chest, not in the joints. - If you feel any pain or discomfort during the stretch, stop and reassess your form.
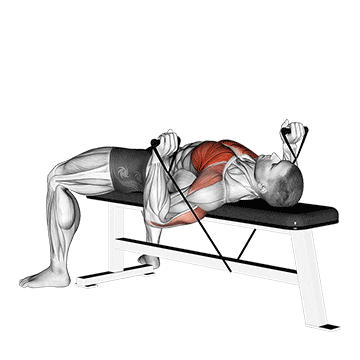
The band bench press is a variation of the traditional bench press exercise that incorporates resistance bands. It targets the muscles of the chest, shoulders, and triceps while also engaging the stabilizer muscles in the upper body. The resistance bands add an extra challenge to the exercise by increasing the tension throughout the movement. ## Instructions 1. Begin by setting up a flat bench and securing the resistance bands to an anchor point behind the bench. Make sure the bands are evenly stretched and stable. 2. Sit on the bench and position yourself with your feet firmly planted on the floor. 3. Grab the ends of the resistance bands, one in each hand, and lie back on the bench. 4. Position yourself so that the resistance bands are positioned just below your chest, with your arms fully extended and your elbows slightly bent. 5. Take a deep breath, engage your core, and maintain a slight arch in your lower back throughout the exercise. 6. Lower the bands towards your chest by bending your elbows, keeping them at a 45-degree angle from your body. 7. Pause for a moment when the bands are close to your chest, and then press the bands back up by extending your arms until they are fully straight. 8. Repeat the movement for the desired number of repetitions. ## Variations - Resistance Level: You can adjust the difficulty of the exercise by using different resistance bands with varying levels of tension. Thicker bands provide more resistance, while thinner bands offer less resistance. - Band Placement: Experiment with different band placements to target specific areas of the chest and shoulders. For example, you can attach the bands higher or lower on the bench or adjust the angle of the bands for different muscle emphasis. ## Muscles Worked The band bench press primarily targets the following muscles: - Pectoralis major (chest muscles) - Anterior deltoids (front shoulder muscles) - Triceps brachii (back of the upper arm) ## Common Mistakes - Arching the Lower Back: Avoid excessive arching of the lower back, as it can strain the spine. Maintain a slight natural arch throughout the exercise. - Flaring the Elbows: Keep your elbows at a 45-degree angle from your body to engage the chest muscles properly. Avoid allowing your elbows to flare out to the sides. - Using Excessive Momentum: Maintain control throughout the exercise and avoid using momentum to push the bands up. Focus on a slow and controlled movement. ## Safety Precautions - Choose the appropriate resistance band tension based on your strength and fitness level. Start with lighter resistance bands if you're a beginner and gradually increase the tension as you progress. - Ensure that the resistance bands are securely anchored to avoid any slippage or snapping during the exercise. - If you have any shoulder or chest injuries or conditions, consult with a qualified fitness professional or healthcare provider before attempting the band bench press. - If you experience any pain or discomfort during the exercise, stop immediately and seek guidance from a fitness professional.
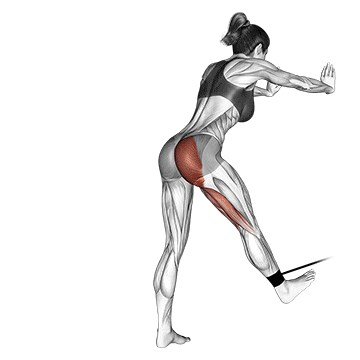
The band bent-over hip extension, also known as the standing hip extension with bands, is an exercise that targets the muscles of the glutes (especially the gluteus maximus) and the hamstrings. This exercise involves using resistance bands to add tension and resistance to the movement, helping to strengthen and tone the posterior chain. ## Instructions 1. Begin by placing a resistance band around your ankles and standing with your feet hip-width apart. Ensure that the band is securely wrapped around your ankles. 2. Keep your back straight and engage your core for stability. 3. Soften your knees slightly and maintain a slight bend throughout the exercise. 4. While maintaining a neutral spine, hinge forward at your hips, pushing your glutes backward. Keep your chest lifted and your gaze forward. 5. As you hinge forward, simultaneously extend one leg straight back, pressing against the resistance of the band. Keep your foot flexed and your toes pointing downward. 6. Squeeze your glutes and drive your extended leg backward until it is in line with your torso or slightly higher. 7. Pause briefly at the top of the movement, then slowly lower your leg back to the starting position. 8. Repeat the movement with the opposite leg, alternating between legs for the desired number of repetitions. ## Variations - Band Resistance: You can use bands with different resistance levels to adjust the intensity of the exercise. Thicker bands offer more resistance, while thinner bands provide less resistance. - Band Placement: Experiment with placing the band around different areas, such as above the knees or around the mid-thighs, to vary the muscle engagement and challenge. ## Muscles Worked The band bent-over hip extension primarily targets the following muscles: - Gluteus maximus (the largest muscle in the buttocks) - Hamstrings (back of the thigh) - Gluteus medius (side of the buttocks) ## Common Mistakes - Arching or rounding the back: Maintain a neutral spine throughout the exercise to avoid excessive stress on the lower back. Avoid rounding or arching the back. - Using momentum: Focus on controlled movements and avoid using momentum to lift the leg. Keep the emphasis on the glutes and hamstrings. - Allowing the knee to collapse inward: Ensure that your knee stays aligned with your toes and doesn't cave inward during the movement. This helps engage the glute muscles effectively. ## Safety Precautions - Choose a resistance band with an appropriate level of tension based on your strength and fitness level. Start with lighter bands if you're a beginner and gradually increase the resistance as you progress. - Maintain proper form and technique throughout the exercise. Be mindful of your posture and avoid any excessive strain on the lower back. - If you have any knee or hip injuries or conditions, consult with a qualified fitness professional or healthcare provider before attempting the band bent-over hip extension. - If you experience any pain or discomfort during the exercise, stop immediately and seek guidance from a fitness professional.
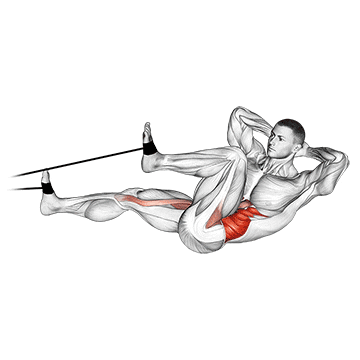
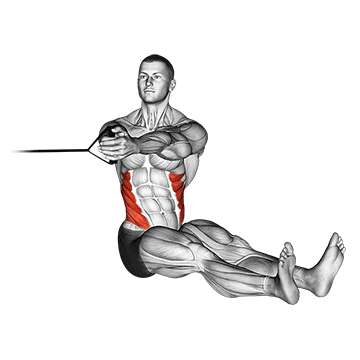
The band bicycle crunch is an abdominal exercise that targets the rectus abdominis (the "six-pack" muscle) and the obliques. It involves a twisting motion, mimicking the movement of pedaling a bicycle, while incorporating resistance bands to add intensity to the exercise. ## Instructions 1. Begin by lying flat on your back on a mat or the floor. Place a resistance band around your feet, holding the ends of the band firmly in your hands. 2. Lift your legs off the ground, bending your knees at a 90-degree angle. Your shins should be parallel to the floor. 3. Bring your hands behind your head, interlacing your fingers, and lift your shoulders off the ground, engaging your core muscles. 4. Start the movement by simultaneously extending your right leg straight out while bringing your left knee toward your chest. As you do this, twist your upper body to the left, bringing your right elbow towards your left knee. 5. Reverse the motion, bringing your left leg straight out while bringing your right knee towards your chest. At the same time, twist your upper body to the right, bringing your left elbow towards your right knee. 6. Continue alternating the twisting motion, mimicking the pedaling motion of a bicycle, while maintaining a controlled and steady pace. 7. Repeat for the desired number of repetitions. ## Variations - Band Resistance: Adjust the resistance level of the band by using bands with different tension levels. Thicker bands provide more resistance, while thinner bands offer less resistance. - Band Placement: Experiment with placing the band around different areas, such as above the knees or around the mid-thighs, to vary the muscle engagement and challenge. - Band-Assisted: If you find the exercise challenging, you can use a lighter resistance band for assistance. Anchor the band to a stationary object and hold onto it while performing the bicycle crunch. ## Muscles Worked The band bicycle crunch primarily targets the following muscles: - Rectus abdominis (six-pack muscles) - External obliques (side abdominal muscles) - Internal obliques (deep abdominal muscles) ## Common Mistakes - Pulling on the neck: Avoid pulling on the neck or using the arms to lift the head. Instead, focus on engaging the core muscles to lift the shoulders off the ground. - Rushing the movement: Maintain control throughout the exercise and avoid rushing through the repetitions. Focus on the quality of the movement rather than the quantity. - Not fully engaging the core: Ensure that you're actively contracting your abdominal muscles throughout the exercise. This helps maximize the effectiveness of the workout. ## Safety Precautions - Choose a resistance band with an appropriate level of tension based on your strength and fitness level. Start with lighter bands if you're a beginner and gradually increase the resistance as you progress. - Maintain proper form and technique throughout the exercise. Avoid any excessive strain on the neck or lower back. - If you have any pre-existing neck or back conditions, consult with a qualified fitness professional or healthcare provider before attempting the band bicycle crunch. - If you experience any pain or discomfort during the exercise, stop immediately and seek guidance from a fitness professional.

The band close-grip pulldown is an exercise that targets the muscles of the back, particularly the latissimus dorsi (lats), and the muscles of the arms, such as the biceps and forearms. It involves pulling a resistance band down towards the chest while maintaining a close grip, simulating the movement of a traditional cable pulldown machine. ## Instructions 1. Begin by attaching a resistance band to a sturdy anchor point above you. Ensure that the band is securely fastened and that it provides adequate tension. 2. Stand facing the anchor point with your feet shoulder-width apart. Grab the resistance band with an underhand grip, placing your hands close together, about shoulder-width apart. 3. Take a step back to create tension in the band. Lean your torso slightly forward, maintaining a straight back and engaging your core. 4. Start with your arms fully extended overhead, keeping a slight bend in your elbows. 5. Initiate the movement by pulling the resistance band down towards your chest, squeezing your shoulder blades together. 6. Keep your elbows close to your sides as you pull the band down. Focus on engaging your back muscles and avoiding excessive involvement of the arms. 7. Continue pulling the band down until your hands reach your chest or slightly below. Pause for a moment and squeeze your back muscles. 8. Slowly release the tension in the band and return to the starting position with your arms fully extended. 9. Repeat the movement for the desired number of repetitions. ## Variations - Band Resistance: You can adjust the difficulty of the exercise by using different resistance bands with varying levels of tension. Thicker bands provide more resistance, while thinner bands offer less resistance. - Grip Variation: Experiment with different grip widths and positions to target different areas of the back and arms. For example, you can try an overhand grip or a neutral grip (palms facing each other) to vary the muscle engagement. ## Muscles Worked The band close-grip pulldown primarily targets the following muscles: - Latissimus dorsi (lats) - Rhomboids - Biceps brachii - Forearm muscles (brachioradialis) ## Common Mistakes - Using momentum: Avoid using momentum to pull the band down. Focus on a controlled and deliberate movement, emphasizing the contraction of the back muscles. - Rounding the back: Maintain a straight and neutral spine throughout the exercise. Avoid rounding or arching the back, as it can lead to strain or injury. - Not fully extending the arms: Make sure to fully extend your arms at the starting position and maintain that extension throughout the exercise. This helps engage the target muscles effectively. ## Safety Precautions - Choose a resistance band with an appropriate level of tension based on your strength and fitness level. Start with lighter bands if you're a beginner and gradually increase the resistance as you progress. - Ensure that the resistance band is securely anchored and that the anchor point is stable. - Maintain proper form and technique throughout the exercise. Avoid any jerking or sudden movements that can strain the muscles or joints. - If you have any shoulder or back injuries or conditions, consult with a qualified fitness professional or healthcare provider before attempting the band close-grip pulldown. - If you experience any pain or discomfort during the exercise, stop immediately and seek guidance from a fitness professional.
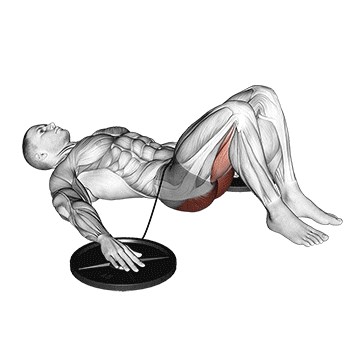
The band hip lift, also known as the glute bridge with a resistance band, is an exercise that targets the glutes (gluteus maximus) and hamstrings. It involves lifting the hips off the ground while using a resistance band to add resistance and intensify the movement. ## Instructions 1. Start by placing a resistance band around your thighs, just above the knees. Lie down on your back on a mat or the floor with your knees bent and your feet flat on the ground. Keep your feet hip-width apart. 2. Relax your arms by your sides, palms facing down for stability. 3. Engage your core muscles by drawing your belly button in towards your spine. 4. Press your heels into the ground, and while keeping your feet grounded, lift your hips off the floor until your knees, hips, and shoulders form a straight line. 5. Squeeze your glutes at the top of the movement and hold the position for a moment. 6. Slowly lower your hips back down to the starting position, maintaining control throughout the movement. 7. Repeat for the desired number of repetitions. ## Variations - Single-Leg Variation: To increase the difficulty and engage each glute individually, you can perform the hip lift with one leg at a time. Extend one leg straight out in front of you while lifting your hips with the other leg. Alternate legs for each repetition. - Band Placement: Experiment with placing the resistance band around different areas, such as just above the knees or around the mid-thighs, to vary the muscle engagement and challenge. ## Muscles Worked The band hip lift primarily targets the following muscles: - Gluteus maximus (the largest muscle in the buttocks) - Hamstrings (back of the thigh) - Erector spinae (muscles along the spine) - Core muscles (abdominals and lower back) for stability ## Common Mistakes - Raising the hips too high: Avoid hyperextending the lower back or raising the hips excessively high. Focus on a controlled and smooth movement, keeping the glutes engaged throughout. - Allowing the knees to cave inward: Keep your knees aligned with your toes throughout the exercise. Be mindful of pushing against the resistance band to engage the glute muscles effectively. - Not maintaining a neutral spine: Keep your spine in a neutral position throughout the exercise. Avoid arching or rounding the lower back. ## Safety Precautions - Choose a resistance band with an appropriate level of tension based on your strength and fitness level. Start with lighter bands if you're a beginner and gradually increase the resistance as you progress. - Ensure that the resistance band is securely placed around your thighs and won't slip or snap during the movement. - If you have any lower back or hip injuries or conditions, consult with a qualified fitness professional or healthcare provider before attempting the band hip lift. - Listen to your body and perform the exercise within a pain-free range of motion. If you experience any discomfort or pain, stop the exercise and seek guidance from a fitness professional.

The band horizontal Pallof press is an exercise that targets the core muscles, particularly the obliques and deep abdominal muscles. It involves resisting rotational forces applied by a resistance band, promoting core stability and strength. ## Instructions 1. Begin by attaching a resistance band to a sturdy anchor point at chest height. Stand perpendicular to the anchor point, with your feet shoulder-width apart. 2. Grasp the band with both hands and step away from the anchor point to create tension in the band. 3. Position yourself so that the band is pulling from the side opposite your hands. 4. Stand tall, engage your core muscles, and bring your hands to the center of your chest, holding the band against your body. 5. From this starting position, press the band straight out in front of you, extending your arms fully. 6. Maintain tension in the band as you hold the position briefly, ensuring that your body remains stable and aligned. 7. Slowly bring your hands back to your chest, resisting the pull of the band. 8. Repeat the movement for the desired number of repetitions, then switch sides to work the other side of your body. ## Variations - Band Resistance: Adjust the resistance level by using different tension bands. Thicker bands provide more resistance, while thinner bands offer less resistance. - Single-Arm Variation: Perform the Pallof press using one arm at a time. This increases the stability challenge and engages the core muscles even more. - Band Placement: Experiment with placing the band at different heights or angles to target different areas of the core and challenge different muscles. ## Muscles Worked The band horizontal Pallof press primarily targets the following muscles: - Internal and external obliques (side abdominal muscles) - Transverse abdominis (deep abdominal muscle) - Rectus abdominis (six-pack muscles) - Erector spinae (muscles along the spine) - Core muscles for stability ## Common Mistakes - Allowing the band to pull you off-balance: Maintain a stable and upright posture throughout the exercise. Resist the rotational force of the band and engage your core muscles to prevent excessive movement or leaning. - Rounding the back: Keep your spine in a neutral position throughout the exercise. Avoid rounding or arching the back, as it can lead to strain or injury. - Using excessive arm strength: Focus on using your core muscles to resist the band's pull, rather than relying on your arms to press the band forward. The arms should remain relatively straight and serve as a conduit for the tension, while the core muscles do the work. ## Safety Precautions - Choose a resistance band with an appropriate level of tension based on your strength and fitness level. Start with lighter bands if you're a beginner and gradually increase the resistance as you progress. - Ensure that the resistance band is securely anchored and that the anchor point is stable. - Maintain proper form and technique throughout the exercise. Avoid any jerking or sudden movements that can strain the muscles or joints. - If you have any pre-existing conditions or injuries, consult with a qualified fitness professional or healthcare provider before attempting the band horizontal Pallof press. - If you experience any pain or discomfort during the exercise, stop immediately and seek guidance from a fitness professional.
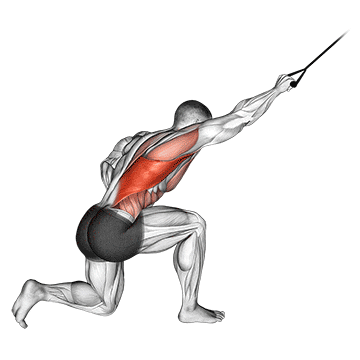
The band kneeling one arm pulldown is an exercise that targets the muscles of the back, particularly the latissimus dorsi (lats) and the muscles of the arms, such as the biceps and forearms. It involves pulling a resistance band downward with one arm while in a kneeling position. ## Instructions 1. Begin by attaching a resistance band to a sturdy anchor point above you. Ensure that the band is securely fastened and that it provides adequate tension. 2. Kneel down on a mat or the floor, facing away from the anchor point. Keep your knees hip-width apart and your spine in a neutral position. 3. Grab the resistance band with one hand, using an underhand grip (palm facing up) or an overhand grip (palm facing down), whichever is more comfortable for you. 4. Extend your arm upward, keeping a slight bend in your elbow and maintaining tension in the band. 5. Initiate the movement by pulling the resistance band downward, leading with your elbow. Keep your elbow close to your side and focus on engaging your back muscles. 6. Continue pulling the band down until your hand reaches the side of your waist, or slightly lower, while squeezing your shoulder blades together. 7. Pause for a moment and focus on feeling the contraction in your back muscles. 8. Slowly release the tension in the band and return to the starting position with your arm fully extended upward. 9. Repeat the movement for the desired number of repetitions, then switch sides to work the other arm. ## Variations - Band Resistance: You can adjust the difficulty of the exercise by using different resistance bands with varying levels of tension. Thicker bands provide more resistance, while thinner bands offer less resistance. - Grip Variation: Experiment with different grip widths and positions to target different areas of the back and arms. You can try a neutral grip (palms facing each other) or a pronated grip (overhand grip with palms facing down) to vary the muscle engagement. ## Muscles Worked The band kneeling one arm pulldown primarily targets the following muscles: - Latissimus dorsi (lats) - Rhomboids - Biceps brachii - Forearm muscles (brachioradialis) ## Common Mistakes - Using momentum: Avoid using momentum to pull the band downward. Focus on a controlled and deliberate movement, emphasizing the contraction of the back muscles. - Rounding the back: Maintain a straight and neutral spine throughout the exercise. Avoid rounding or arching the back, as it can lead to strain or injury. - Not fully extending the arm: Make sure to fully extend your arm at the starting position and maintain that extension throughout the exercise. This helps engage the target muscles effectively. ## Safety Precautions - Choose a resistance band with an appropriate level of tension based on your strength and fitness level. Start with lighter bands if you're a beginner and gradually increase the resistance as you progress. - Ensure that the resistance band is securely anchored and that the anchor point is stable. - Maintain proper form and technique throughout the exercise. Avoid any jerking or sudden movements that can strain the muscles or joints. - If you have any shoulder or back injuries or conditions, consult with a qualified fitness professional or healthcare provider before attempting the band kneeling one arm pulldown. - If you experience any pain or discomfort during the exercise, stop immediately and seek guidance from a fitness professional.
The band seated twist is an exercise that targets the muscles of the core, particularly the obliques. It involves rotating the torso while seated and using a resistance band for added resistance. This exercise helps improve rotational strength, mobility, and stability of the core muscles. ## Instructions 1. Start by sitting on the floor with your legs extended straight in front of you. 2. Place a resistance band around the middle of your feet and hold the ends of the band with both hands. 3. Engage your core muscles by drawing your navel toward your spine and maintaining an upright posture. 4. Begin the exercise by rotating your torso to one side, pulling the band with you. Keep your arms extended and parallel to the floor throughout the movement. 5. Pause briefly at the end range of motion, feeling the contraction in your oblique muscles. 6. Slowly return to the starting position, maintaining control over the movement. 7. Repeat the twist to the opposite side, again pausing at the end range of motion. 8. Continue alternating sides for the desired number of repetitions. ## Variations - Beginners or those with limited flexibility can perform the exercise without using a resistance band initially. - As you progress, you can increase the resistance by using a band with higher tension or by gripping the band closer to the feet. - For an added challenge, you can hold a lightweight dumbbell or medicine ball with both hands while performing the seated twist. ## Muscles Worked - Obliques (internal and external) - Rectus abdominis (primary stabilizer) - Transverse abdominis (stabilizer) - Erector spinae (spinal extensors) ## Common Mistakes - Twisting excessively through the lower back: It's important to initiate the movement from the core and avoid relying on the lower back to generate the twist. Focus on engaging the obliques and rotating from the torso. - Using too much momentum: Avoid jerking or swinging the upper body to create the twist. Instead, perform the movement in a controlled manner, emphasizing the contraction of the obliques. - Allowing the feet to lift off the floor: Keep the feet firmly planted on the floor throughout the exercise to maintain stability and engage the core effectively. - Holding the breath: Remember to breathe continuously throughout the exercise. Inhale before initiating the twist and exhale as you rotate. ## Safety Precautions - If you have any pre-existing back or spine conditions, it is advisable to consult with a healthcare professional before attempting this exercise. - Start with a light resistance band and gradually progress to higher tension levels as your strength and stability improve. - If you experience any pain or discomfort during the exercise, stop immediately and seek guidance from a qualified fitness professional.