
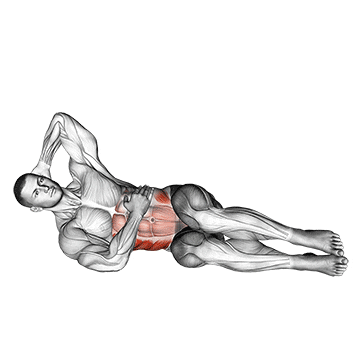
Oblique crunches on the floor are an effective exercise for targeting the oblique muscles, which are located on the sides of the waist. This exercise helps to strengthen and tone the obliques, improving core stability and creating definition in the waistline. ## Instructions 1. Start by lying on your back on a mat or a comfortable surface with your knees bent and feet flat on the floor. Place your hands lightly behind your head, supporting the neck. 2. Engage your abdominal muscles by drawing your navel towards your spine. 3. Lift your shoulder blades slightly off the ground, keeping your elbows wide and your chin lifted. This is the starting position. 4. Slowly and with control, twist your torso to one side, bringing your right elbow towards your left knee. Focus on using your oblique muscles to initiate the movement. 5. Contract your obliques and hold the crunch position for a brief moment, feeling the squeeze in your side. 6. Slowly lower your torso back to the starting position. 7. Repeat the crunch on the other side by twisting your torso to the opposite side, bringing your left elbow towards your right knee. 8. Alternate sides for the desired number of repetitions. ## Variations - Straight-Leg Variation: For an added challenge, you can perform oblique crunches with your legs extended straight out instead of bent. - Weighted Variation: To increase resistance, you can hold a weight plate or dumbbell against your chest while performing the oblique crunches. ## Muscles Worked - Obliques: The primary target of this exercise is the oblique muscles, which run along the sides of the waist. They are responsible for trunk rotation and lateral flexion. ## Common Mistakes - Neck Strain: Avoid pulling on your neck with your hands. Keep your hands lightly supporting your head, but let your obliques do the work. - Using Momentum: It's important to maintain control throughout the exercise and avoid using momentum to swing your body. Focus on slow and controlled movements. - Not Fully Engaging the Obliques: Make sure to actively contract your oblique muscles during the crunch to maximize their involvement and effectiveness. ## Safety Precautions - If you have any pre-existing neck or back issues, it is advisable to consult with a healthcare professional before attempting this exercise. - Start with a range of motion that feels comfortable for your level of strength and flexibility. - If you experience any pain or discomfort in your lower back or neck, discontinue the exercise and consult with a healthcare professional.
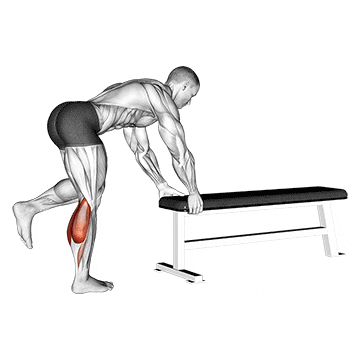
The one leg donkey calf raise is an exercise that primarily targets the calf muscles, specifically the gastrocnemius and soleus. It involves performing calf raises on one leg while using a platform or elevated surface to provide a greater range of motion and stretch for the calf muscles. ## Instructions 1. Position yourself on a calf raise machine or find an elevated surface, such as a step or sturdy block. 2. Stand with the balls of your feet on the edge of the platform, allowing your heels to hang off. 3. Balance yourself using a stable object or handrails for support if necessary. 4. Lift one leg off the platform, bending it at the knee and keeping it behind you. 5. Engage your calf muscles and rise up onto the balls of your standing foot, lifting your heel as high as possible. 6. Hold the peak contraction for a moment, feeling the stretch in your calf muscles. 7. Slowly lower your heel back down to the starting position, allowing your calf to stretch. 8. Repeat the movement for the desired number of repetitions. 9. Switch legs and perform the same steps. ## Variations - If a calf raise machine or elevated platform is not available, you can perform the exercise using a sturdy step or the edge of a weight plate. - For beginners or those with balance issues, the exercise can be performed with both feet on the platform instead of using only one leg. ## Muscles Worked - Gastrocnemius (calf muscles) - Soleus (deep calf muscle) ## Common Mistakes - Using momentum: Avoid using momentum to raise your heel. Instead, focus on a slow and controlled movement, emphasizing the contraction and stretch of the calf muscles. - Not achieving a full range of motion: Aim to lift your heel as high as possible, achieving a full stretch at the bottom and a peak contraction at the top of the movement. - Leaning too far forward: Maintain an upright posture throughout the exercise, avoiding excessive leaning or arching of the back. ## Safety Precautions - If you have any existing calf or foot injuries, consult with a healthcare professional before attempting this exercise. - Start with a lighter resistance or lower platform height if you are new to calf raises or have limited calf strength. - Use a stable support or handrails if needed to maintain balance and stability during the exercise. - If you experience any pain or discomfort, particularly in the Achilles tendon or calf muscles, stop the exercise and seek guidance from a qualified fitness professional.
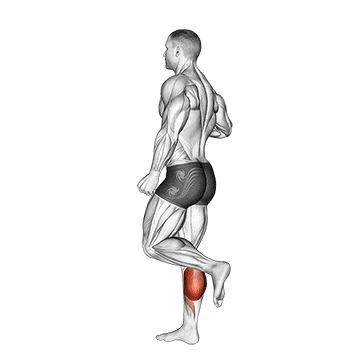
The one leg floor calf raise is an exercise that targets the calf muscles, primarily the gastrocnemius and soleus. It is performed without the use of any equipment or elevated surfaces, making it a convenient exercise that can be done anywhere. This exercise helps to strengthen and develop the calves, improving lower leg strength and stability. ## Instructions 1. Stand on a flat surface with your feet hip-width apart. 2. Shift your weight onto one leg while keeping the other leg slightly off the ground. 3. Engage your core muscles for stability and maintain an upright posture throughout the exercise. 4. Slowly rise up onto the ball of your standing foot, lifting your heel as high as possible. 5. Hold the peak contraction for a moment, feeling the stretch in your calf muscles. 6. Lower your heel back down to the starting position, allowing your calf to stretch. 7. Repeat the movement for the desired number of repetitions. 8. Switch legs and perform the same steps. ## Variations - If you find it challenging to balance on one leg, you can hold onto a stable support, such as a wall or chair, for assistance. - To increase the difficulty, you can hold a dumbbell or other weighted object in the hand opposite to the working leg. ## Muscles Worked - Gastrocnemius (calf muscles) - Soleus (deep calf muscle) ## Common Mistakes - Not achieving a full range of motion: Make sure to lift your heel as high as possible, aiming for a full stretch at the bottom and a peak contraction at the top of the movement. - Leaning or tilting: Maintain an upright posture throughout the exercise, avoiding excessive leaning or tilting to one side. - Using momentum: Focus on a slow and controlled movement, avoiding any bouncing or quick jerking motions. ## Safety Precautions - If you have any existing calf or foot injuries, consult with a healthcare professional before attempting this exercise. - Start with a lower number of repetitions and gradually increase the intensity as your calf strength improves. - Use a stable support, such as a wall or chair, if needed for balance assistance. - If you experience any pain or discomfort, particularly in the Achilles tendon or calf muscles, stop the exercise and seek guidance from a qualified fitness professional.
The one leg squat, also known as the pistol squat, is a challenging exercise that targets the lower body, specifically the quadriceps, hamstrings, glutes, and core muscles. It requires strength, balance, and flexibility. The one leg squat helps improve lower body strength, stability, and overall leg muscle development. ## Instructions 1. Begin by standing tall with your feet together. 2. Lift one foot off the ground, extending it forward and keeping it parallel to the floor. 3. Extend your arms forward for balance, keeping them parallel to the floor as well. 4. Start the squat by pushing your hips back and bending your standing leg. 5. Lower your body down slowly, keeping your chest lifted and your back straight. 6. Continue descending until your thigh is parallel to the ground or as close to parallel as possible. 7. Pause briefly at the bottom of the squat. 8. Push through your heel and engage your glutes and quadriceps to stand back up to the starting position. 9. Repeat the movement for the desired number of repetitions. 10. Switch to the other leg and perform the same steps. ## Variations - Beginner Variation: If the full one leg squat is too challenging, you can start by holding onto a stable support, such as a door frame or TRX straps, for assistance and balance. Gradually reduce the reliance on the support as you gain strength and stability. - Box Squat Variation: Perform the one leg squat by squatting down to a box or bench behind you. This can help with balance and provide a target for depth. - Assisted Variation: Use a resistance band or suspension trainer attached to a sturdy anchor point to assist with the movement by providing some upward assistance as you descend. ## Muscles Worked - Quadriceps - Hamstrings - Glutes - Core muscles (abdominals, obliques) ## Common Mistakes - Leaning too far forward: Maintain an upright posture throughout the movement. Avoid leaning excessively forward or rounding your back. Keep your chest lifted. - Not going low enough: Aim to lower yourself until your thigh is parallel to the ground or as close to parallel as possible while maintaining good form and balance. - Collapsing knee: Keep your knee aligned with your toes throughout the movement. Avoid letting your knee collapse inward or outward. ## Safety Precautions - If you have any knee or hip injuries or limitations, consult with a healthcare professional before attempting this exercise. - Start with a shallower range of motion and gradually increase the depth as your mobility and strength improve. - Maintain control and stability throughout the movement to reduce the risk of falls or injuries. - If necessary, perform the exercise near a sturdy support or wall for balance assistance. - Listen to your body and stop the exercise if you experience pain or discomfort.
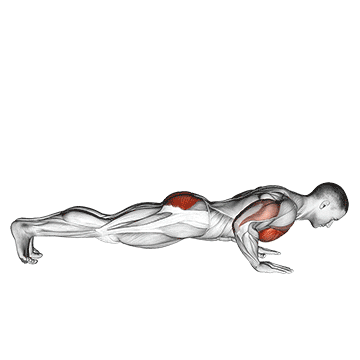
The outside leg kick push-up is a dynamic exercise that combines elements of a push-up and a leg kick. It targets the chest, shoulders, triceps, core, and hip muscles. This exercise improves upper body and core strength, stability, and coordination. ## Instructions 1. Start in a high plank position with your hands slightly wider than shoulder-width apart and your feet together. 2. Engage your core muscles and maintain a straight line from your head to your heels. 3. Lower your body towards the ground by bending your elbows, keeping them close to your body. 4. As you push back up to the starting position, simultaneously lift one leg off the ground and swing it out to the side, performing an outside leg kick. 5. Extend your leg fully to the side, then swing it back in and place it on the ground. 6. Lower your body again for another push-up while keeping your leg on the ground. 7. Repeat the push-up and leg kick sequence, alternating legs with each repetition. 8. Continue for the desired number of repetitions. ## Variations - Modified version: Perform the exercise from a kneeling position instead of a full plank position to reduce the intensity. - Advanced version: To increase the difficulty, you can perform the exercise with your hands on an elevated surface, such as a step or a bench, or by wearing ankle weights. ## Muscles Worked - Chest (pectoralis major and minor) - Shoulders (deltoids) - Triceps - Core muscles (rectus abdominis, transverse abdominis, and obliques) - Hip muscles (glutes and hip flexors) ## Common Mistakes - Sagging or arching the lower back: Maintain a straight line from your head to your heels throughout the exercise and engage your core muscles to stabilize your spine. - Allowing the hips to rotate or twist: Keep your hips square and stable, avoiding excessive rotation or twisting movements. - Raising the leg too high or compromising form: Focus on controlled leg kicks without sacrificing proper push-up form. Keep the leg movement within a comfortable range of motion. ## Safety Precautions - If you have any existing shoulder, wrist, or lower back injuries, it is recommended to consult with a healthcare professional before attempting this exercise. - Start with a modified version or a lower number of repetitions if you are new to this exercise or have limited upper body strength. - Maintain proper form and control throughout the exercise to prevent strain or injury. - If you experience any pain or discomfort, particularly in the shoulders, wrists, or lower back, stop the exercise and seek guidance from a qualified fitness professional.
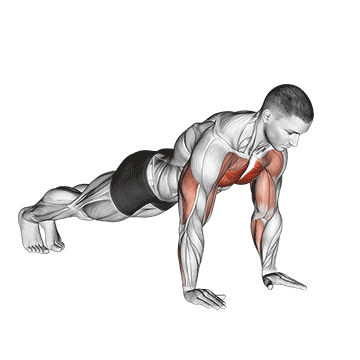
The Plyo Push-Up is an explosive variation of the traditional push-up exercise. It focuses on developing upper body strength, power, and plyometric abilities. This exercise targets the chest, shoulders, triceps, and core muscles while also improving overall athleticism and coordination. ## Instructions 1. Begin in a standard push-up position with your hands slightly wider than shoulder-width apart and your body forming a straight line from head to heels. 2. Lower your chest toward the ground by bending your elbows, keeping them close to your sides. 3. As you push back up, explosively push through your hands and arms with enough force to lift your hands off the ground. 4. During the upward phase of the movement, quickly and softly land with your hands back in the starting position, ready to perform the next repetition. 5. Repeat the exercise for the desired number of repetitions, maintaining a controlled and explosive movement. ## Variations - Modified Plyo Push-Up: If you're new to plyometric exercises or find the regular version too challenging, you can perform the exercise with your knees on the ground. This modification reduces the amount of bodyweight you have to lift, making it more accessible for beginners. - Clap Plyo Push-Up: After pushing off the ground, quickly clap your hands together before landing softly back into the starting position. This variation adds an additional explosive element to the exercise. - Plyo Push-Up with Box: Place your hands on an elevated surface, such as a sturdy box or step, to decrease the range of motion and make the exercise easier. This modification is helpful for individuals who are still building the strength and power required for the regular plyo push-up. ## Muscles Worked - Chest (pectoralis major and minor) - Shoulders (deltoids) - Triceps - Core muscles (abdominals and lower back) - Upper back muscles (rhomboids and trapezius) - Stabilizer muscles throughout the body ## Common Mistakes - Losing proper form: Maintain a straight line from head to heels throughout the movement. Avoid sagging or arching your back. - Neglecting the full range of motion: Lower your chest down as close to the ground as possible before explosively pushing off. This ensures that you are engaging the target muscles effectively. - Failing to land softly: Practice landing with control to prevent unnecessary stress on your wrists and elbows. Focus on absorbing the impact by bending your elbows and wrists slightly upon landing. - Lack of explosiveness: The plyometric nature of the exercise requires an explosive push-off. Be sure to generate enough power to lift your hands off the ground. ## Safety Precautions - Ensure you have sufficient upper body strength and stability before attempting plyo push-ups. - Perform a proper warm-up to prepare your muscles and joints for the explosive movements. - Start with a lower number of repetitions and gradually increase as your strength and technique improve. - Avoid performing the exercise on a hard surface to reduce the impact on your wrists and hands. Use a mat or exercise pad if possible. - If you have any shoulder, wrist, or lower back injuries, it is recommended to consult with a healthcare professional before attempting this exercise. - Listen to your body and stop immediately if you experience any pain or discomfort.
The Posterior Tibialis Stretch is a stretching exercise that targets the posterior tibialis muscle, which is located in the lower leg. This stretch helps to improve flexibility, relieve tension, and prevent or alleviate conditions such as shin splints and plantar fasciitis. It is particularly beneficial for individuals who engage in activities that involve repetitive impact on the lower legs, such as running or jumping. ## Instructions 1. Sit on the edge of a chair or bench with your feet flat on the ground. 2. Extend one leg in front of you while keeping the other foot planted on the ground. 3. Cross the ankle of the extended leg over the knee of the planted leg, creating a figure-four shape. 4. Gently pull the toes of the extended leg back toward your body, flexing the ankle. 5. You should feel a stretch along the inside of the lower leg, specifically in the area of the posterior tibialis muscle. 6. Hold the stretch for 20 to 30 seconds, while maintaining a comfortable level of tension. 7. Release the stretch and repeat on the other side. 8. Perform the stretch 2 to 3 times on each leg. ## Variations - Standing Posterior Tibialis Stretch: Instead of sitting, you can perform this stretch while standing. Cross one leg over the other and gently press the toes of the crossed leg toward the ground, feeling the stretch in the lower leg. - Wall Posterior Tibialis Stretch: Stand facing a wall and place your hands on the wall at shoulder height. Step one foot back and keep the heel of the back foot on the ground. Lean forward, bending the front knee, and feel the stretch in the lower leg. This variation provides a deeper stretch and targets the posterior tibialis muscle from a slightly different angle. ## Muscles Worked - Posterior tibialis muscle ## Common Mistakes - Applying excessive force: It is important to be gentle and gradual when stretching the posterior tibialis muscle. Avoid using excessive force that may cause pain or discomfort. - Bouncing or jerking movements: Maintain a smooth and controlled stretch without any bouncing or jerking motions, which can increase the risk of injury. - Ignoring proper alignment: Keep your back straight and shoulders relaxed during the stretch. Avoid slouching or rounding the spine. - Not holding the stretch long enough: Hold the stretch for an adequate amount of time (20 to 30 seconds) to allow the muscles to lengthen and relax effectively. ## Safety Precautions - If you have any pre-existing foot, ankle, or lower leg injuries, consult with a healthcare professional before attempting this stretch. - Perform the stretch on a stable surface to ensure balance and prevent the risk of falls or accidents. - Avoid pushing the stretch to the point of pain. You should feel a gentle pull or tension, but not sharp pain. - If you experience any discomfort or pain during the stretch, stop immediately and consult with a healthcare professional. - Progress gradually with the stretch, allowing your muscles to adapt and improve flexibility over time.
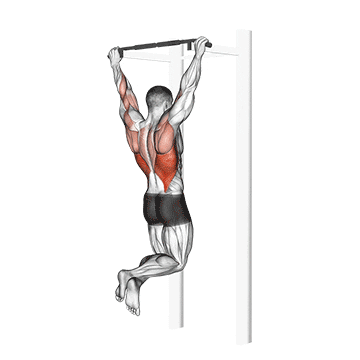
The pull-up with a neutral grip is an upper body exercise that primarily targets the muscles of the back, including the latissimus dorsi (lats), rhomboids, and posterior deltoids. It also engages the biceps, forearms, and core muscles. This variation of the pull-up is performed using parallel handles or bars with palms facing each other (neutral grip), which places less stress on the shoulders compared to other grip variations. ## Instructions 1. Stand beneath the pull-up bar with the neutral grip handles. 2. Position your hands on the handles with palms facing each other and a shoulder-width apart. 3. Step onto a sturdy platform or use a chair to assist you in reaching the starting position. 4. Hang from the bar with your arms fully extended, shoulders relaxed, and feet off the ground. 5. Engage your core and squeeze your shoulder blades together. 6. Pull your body upward by flexing your elbows and driving your elbows down towards your hips. 7. Continue pulling until your chin reaches or clears the bar, and your upper chest is near the handles. 8. Pause for a moment at the top of the movement, maintaining the contraction in your back muscles. 9. Slowly lower your body back to the starting position with control, fully extending your arms. 10. Repeat for the desired number of repetitions. ## Variations 1. Assisted Pull-Ups: If you're unable to perform pull-ups without assistance, you can use an assisted pull-up machine or resistance bands to reduce the resistance and gradually build strength. 2. Weighted Pull-Ups: Once you have mastered the pull-up, you can add additional resistance by using a weight belt, a weighted vest, or holding a dumbbell between your feet. 3. Towel Pull-Ups: Instead of using parallel handles, you can perform pull-ups using towels draped over the bar, holding onto the ends of the towels. This variation further challenges your grip strength. ## Muscles Worked The pull-up with a neutral grip primarily targets the following muscles: - Latissimus dorsi (lats) - Rhomboids - Posterior deltoids - Biceps - Forearms - Core muscles (stabilizers) ## Common Mistakes 1. Using momentum: Avoid swinging or kicking your legs to gain momentum. Focus on controlled and smooth movements throughout the exercise. 2. Not engaging the back muscles: Ensure you initiate the movement by squeezing your shoulder blades together and pulling with your back muscles rather than relying solely on your arms. 3. Partial range of motion: Aim to perform the exercise through a full range of motion, ensuring your chin clears the bar and your chest is near the handles at the top of the movement. 4. Rounded shoulders: Keep your shoulders down and back, maintaining proper posture throughout the exercise. 5. Neglecting core engagement: Remember to engage your core muscles to maintain stability and prevent excessive swinging or arching of the back. ## Safety Precautions 1. Warm up before performing pull-ups to prepare your muscles for the exercise. 2. Use a spotter or a sturdy pull-up bar that can support your body weight. 3. Start with a grip width and resistance level that allows you to maintain proper form and technique. 4. If you have any pre-existing shoulder or back injuries, consult with a healthcare professional or fitness instructor before attempting pull-ups. 5. If you experience pain or discomfort during the exercise, stop immediately and seek guidance from a qualified professional.
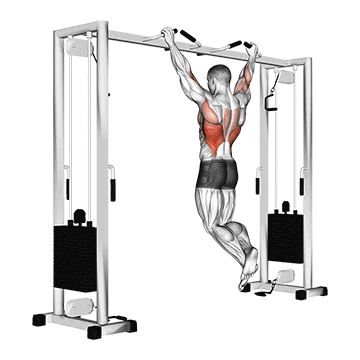
The pull-up is a compound exercise that primarily targets the muscles of the upper body, particularly the back muscles. It involves lifting your bodyweight by pulling yourself up towards a bar while hanging freely. Pull-ups are an excellent exercise for building upper body strength, specifically targeting the lats, biceps, and upper back muscles. ## Instructions 1. Start by gripping an overhead bar with your palms facing away from you (overhand grip), slightly wider than shoulder-width apart. 2. Hang freely from the bar with your arms fully extended and your feet off the ground. Keep your shoulders relaxed. 3. Engage your core muscles and squeeze your shoulder blades together. 4. Initiate the movement by pulling your shoulder blades down and back, driving your elbows towards the floor. 5. Continue pulling until your chin reaches or clears the bar, and your chest is near the bar. 6. Pause for a moment at the top, squeezing your back muscles. 7. Slowly lower your body back to the starting position, fully extending your arms. 8. Repeat for the desired number of repetitions. ## Variations 1. Assisted Pull-Ups: If you're unable to perform full pull-ups, you can use an assisted pull-up machine or resistance bands to reduce the weight and gradually build strength. 2. Chin-Ups: Similar to pull-ups, but with an underhand grip (palms facing you). Chin-ups primarily target the biceps, while still engaging the back muscles. 3. Wide-Grip Pull-Ups: Perform pull-ups with a wider grip, placing more emphasis on the outer portion of the back and shoulders. 4. Close-Grip Pull-Ups: Use a close grip (hands positioned closer together) to focus on the muscles in the middle of the back. 5. Weighted Pull-Ups: Once you have mastered bodyweight pull-ups, you can add additional resistance by using a weight belt, a weighted vest, or holding a dumbbell between your feet. ## Muscles Worked The pull-up primarily targets the following muscles: - Latissimus dorsi (lats) - Biceps brachii - Rhomboids - Trapezius (upper and middle fibers) - Posterior deltoids ## Common Mistakes 1. Using Momentum: Avoid swinging or kicking your legs to generate momentum. Maintain control throughout the movement. 2. Not Initiating with the Back Muscles: Focus on engaging the back muscles and initiating the movement by pulling with your lats and squeezing your shoulder blades together. 3. Partial Range of Motion: Aim to perform pull-ups through a full range of motion, ensuring your chin clears the bar and your chest is near the bar at the top of the movement. 4. Rounded Shoulders: Keep your shoulders down and back, maintaining proper posture throughout the exercise. 5. Neglecting Core Engagement: Engage your core muscles to maintain stability and prevent excessive swinging or arching of the back. ## Safety Precautions 1. Warm up before performing pull-ups to prepare your muscles for the exercise. 2. Use a sturdy and secure pull-up bar that can support your body weight. 3. Start with a grip width and resistance level that allow you to maintain proper form and technique. 4. If you have any pre-existing shoulder or back injuries, consult with a healthcare professional or fitness instructor before attempting pull-ups. 5. If you experience pain or discomfort during the exercise, stop immediately and seek guidance from a qualified professional.