
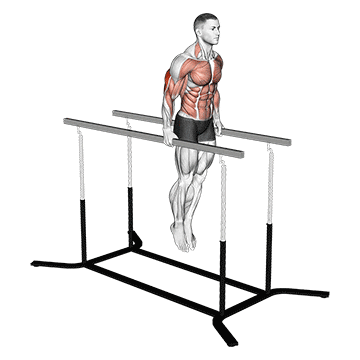
Elbow dips, also known as tricep dips, are a bodyweight exercise that targets the triceps, shoulders, and chest muscles. This exercise involves lowering and raising your body using the strength of your arms, helping to develop upper body strength and tone the triceps. ## Instructions 1. Find a stable surface, such as parallel bars, a bench, or sturdy chair, and position yourself in front of it. 2. Place your hands shoulder-width apart on the surface, gripping the edges firmly. 3. Extend your legs in front of you, keeping your heels on the ground and your knees slightly bent. 4. Lower your body by bending your elbows, allowing them to flare out to the sides. 5. Keep your chest up and your shoulders down as you lower your body until your elbows reach approximately a 90-degree angle. 6. Pause briefly in the bottom position, then push through your hands to straighten your arms and lift your body back to the starting position. 7. Repeat for the desired number of repetitions. ## Variations - Bench Dips: Perform elbow dips using a bench or step behind you instead of parallel bars. - Weighted Elbow Dips: Increase the intensity of the exercise by placing a weight plate or dumbbell on your lap or using a weighted vest. ## Muscles Worked The main muscles targeted during elbow dips are: - Triceps Brachii (all three heads) - Anterior Deltoids (shoulders) - Pectoralis Major (chest) - Rhomboids and Serratus Anterior (scapular stabilizers) ## Common Mistakes - Allowing the elbows to flare out: Keep your elbows close to your body throughout the movement to emphasize the triceps and prevent excessive strain on the shoulders. - Rounding the shoulders: Maintain proper posture and avoid hunching or rounding your shoulders. Keep your chest lifted and your shoulder blades squeezed together. - Not fully extending the arms: Ensure that you fully straighten your arms at the top of the movement to engage the triceps fully. ## Safety Precautions - Use a stable surface and ensure that it can support your body weight. - If you have any shoulder, elbow, or wrist injuries or conditions, consult with a healthcare professional before performing this exercise. - Start with a range of motion and intensity that is comfortable for you. Gradually increase the difficulty as you become stronger and more comfortable with the exercise. - If you experience pain or discomfort during the exercise, stop immediately and consult a qualified fitness professional or healthcare provider. - Keep your movements controlled and avoid using momentum or swinging to perform the exercise.
The elevator exercise is a strength-training exercise that targets the muscles of the shoulders and upper back. It primarily works the deltoids (shoulder muscles) and the trapezius muscles. The exercise involves lifting weights in a controlled manner, mimicking the movement of an elevator going up and down. ## Instructions 1. Start by standing upright with your feet shoulder-width apart and a dumbbell in each hand. You can use light to moderate weights to begin with. 2. Hold the dumbbells at your sides with your palms facing inward. 3. Begin the movement by slowly lifting the dumbbells straight out in front of you, keeping your arms extended and your elbows slightly bent. 4. Continue lifting the dumbbells until they reach shoulder level. Imagine you are lifting an elevator up to the desired floor. 5. Pause briefly at the top and then slowly lower the dumbbells back to the starting position, again maintaining control. 6. Repeat the movement for the desired number of repetitions. ## Variations - If you're a beginner or have limited shoulder strength, you can start with lighter weights or use resistance bands instead of dumbbells. - To increase the challenge, you can use heavier dumbbells or perform the exercise while seated on a stability ball or bench, which engages your core muscles. ## Muscles Worked - Deltoids (shoulder muscles) - Trapezius muscles (upper back muscles) ## Common Mistakes - Using momentum to lift the weights instead of relying on muscle strength. Make sure to control the movement throughout. - Lifting the weights too high or too low. Lift until your arms are parallel to the floor (shoulder level) and avoid excessive shoulder elevation. - Holding your breath. Remember to breathe naturally throughout the exercise to maintain proper oxygen flow. ## Safety Precautions - Start with lighter weights and gradually increase the load as your strength improves. - Maintain proper form and control throughout the exercise to minimize the risk of injury. - If you experience any discomfort or pain, stop the exercise and consult a fitness professional or healthcare provider. - If you have pre-existing shoulder or back issues, it's advisable to consult with a professional before attempting this exercise to ensure it's suitable for your condition.
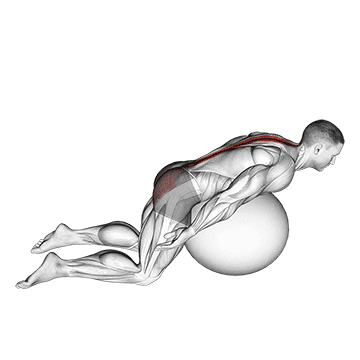
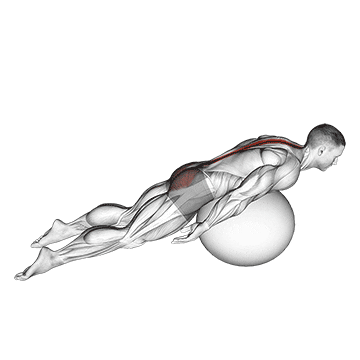
The exercise ball back extension with arms extended is a compound exercise that primarily targets the muscles of the lower back, hamstrings, and glutes. It also engages the core muscles, including the abdominals and obliques. This exercise helps to improve lower back strength, stability, and posture. ## Instructions 1. Start by placing an exercise ball on the floor and lie facedown with your hips resting on the ball and your toes touching the ground for stability. 2. Walk your hands forward on the ground until the exercise ball rolls under your thighs, creating a stable base. 3. Extend your arms straight out in front of you, parallel to the ground. 4. Engage your core muscles and keep your gaze down to maintain a neutral spine. 5. Slowly raise your chest off the exercise ball, lifting your upper body as high as comfortable while maintaining control and stability. 6. Pause briefly at the top of the movement and then slowly lower your chest back down to the starting position. 7. Repeat the movement for the desired number of repetitions. ## Variations - If you're a beginner or have limited lower back strength, you can perform the exercise with your hands placed behind your head for support instead of extending them forward. - To increase the challenge, you can hold a light dumbbell or weight plate against your chest while performing the back extensions. ## Muscles Worked - Erector spinae (lower back muscles) - Hamstrings - Glutes - Core muscles (abdominals, obliques) ## Common Mistakes - Raising the upper body too high, which can strain the lower back. Lift only as high as you can while maintaining proper form and without discomfort. - Using momentum to lift the body instead of relying on muscle strength. Control the movement throughout. - Allowing the head to drop or the neck to strain. Keep your gaze down and your neck in alignment with your spine. ## Safety Precautions - Ensure that the exercise ball is properly inflated and stable before performing the exercise. - Start with a smaller range of motion and gradually increase it as your strength improves. - If you experience any pain or discomfort in the lower back, stop the exercise and consult a fitness professional or healthcare provider. - If you have any pre-existing lower back issues or injuries, it's advisable to consult with a professional before attempting this exercise to ensure it's suitable for your condition.
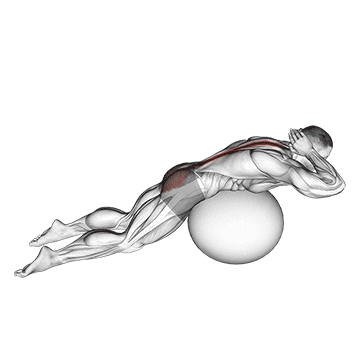
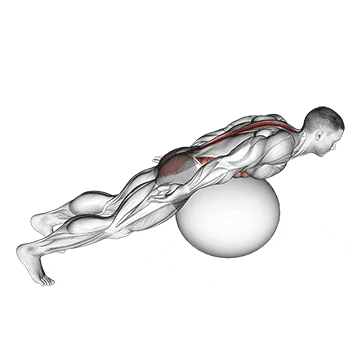
The exercise ball back extension with hands behind the head is a variation of the back extension exercise that targets the muscles of the lower back, hamstrings, and glutes. It also engages the core muscles, including the abdominals and obliques. This exercise helps improve lower back strength, stability, and posture. ## Instructions 1. Start by placing an exercise ball on the floor and lie facedown with your hips resting on the ball and your toes touching the ground for stability. 2. Position your hands behind your head, interlocking your fingers or placing them gently at the base of your skull. Keep your elbows wide and pointing outwards. 3. Engage your core muscles and keep your gaze down to maintain a neutral spine. 4. Slowly raise your chest off the exercise ball, lifting your upper body as high as comfortable while maintaining control and stability. 5. Pause briefly at the top of the movement and then slowly lower your chest back down to the starting position. 6. Repeat the movement for the desired number of repetitions. ## Variations - If you find it challenging to maintain stability or want to decrease the difficulty, you can perform the exercise without an exercise ball. Lie facedown on a mat or the floor, keeping your hips and toes in contact with the ground, and perform back extensions with hands behind your head. - To increase the challenge, you can hold a light dumbbell or weight plate against your chest while performing the back extensions. ## Muscles Worked - Erector spinae (lower back muscles) - Hamstrings - Glutes - Core muscles (abdominals, obliques) ## Common Mistakes - Pulling on your head or neck with your hands. Instead, use your hands to gently support your head without pulling or straining the neck. - Raising the upper body too high, which can strain the lower back. Lift only as high as you can while maintaining proper form and without discomfort. - Using momentum to lift the body instead of relying on muscle strength. Control the movement throughout. ## Safety Precautions - Ensure that the exercise ball is properly inflated and stable before performing the exercise. - Start with a smaller range of motion and gradually increase it as your strength improves. - If you experience any pain or discomfort in the lower back or neck, stop the exercise and consult a fitness professional or healthcare provider. - If you have any pre-existing lower back issues or injuries, it's advisable to consult with a professional before attempting this exercise to ensure it's suitable for your condition.
The exercise ball back extension with knees off the ground is an advanced variation of the back extension exercise that targets the muscles of the lower back, hamstrings, glutes, and core. By lifting the knees off the ground, this exercise increases the challenge and further engages the muscles of the posterior chain. ## Instructions 1. Start by placing an exercise ball on the floor and lie facedown with your hips resting on the ball. Position your toes on the ground and extend your legs straight behind you. 2. Place your hands behind your head, interlocking your fingers or resting them gently at the base of your skull. 3. Engage your core muscles and keep your gaze down to maintain a neutral spine. 4. Lift your knees off the ground, so your lower body is suspended in the air, with your weight supported by the exercise ball and your toes. 5. Slowly raise your chest off the exercise ball, lifting your upper body as high as comfortable while maintaining control and stability. 6. Pause briefly at the top of the movement and then slowly lower your chest back down to the starting position. 7. Repeat the movement for the desired number of repetitions. ## Variations - If you find it challenging to lift both knees off the ground, you can start by lifting one knee at a time, alternating between sides. This modification reduces the overall difficulty. - To increase the challenge, you can hold a light dumbbell or weight plate against your chest while performing the back extensions with knees off the ground. ## Muscles Worked - Erector spinae (lower back muscles) - Hamstrings - Glutes - Core muscles (abdominals, obliques) ## Common Mistakes - Allowing the lower back to sag or hyperextend. Maintain proper form by engaging your core and keeping a neutral spine throughout the exercise. - Raising the upper body too high, which can strain the lower back. Lift only as high as you can while maintaining proper form and without discomfort. - Using momentum to lift the body instead of relying on muscle strength. Control the movement throughout. ## Safety Precautions - Ensure that the exercise ball is properly inflated and stable before performing the exercise. - This variation is more challenging and requires good core and lower back strength. Make sure you have a solid foundation before attempting it. - Start with a smaller range of motion and gradually increase it as your strength improves. - If you experience any pain or discomfort in the lower back or neck, stop the exercise and consult a fitness professional or healthcare provider. - If you have any pre-existing lower back issues or injuries, it's advisable to consult with a professional before attempting this exercise to ensure it's suitable for your condition.
The exercise ball back extension with rotation is a variation of the back extension exercise that targets the muscles of the lower back, obliques, and core. This exercise combines the benefits of back extension with rotational movements, improving spinal mobility and strengthening the muscles involved in trunk rotation. ## Instructions 1. Start by placing an exercise ball on the floor and lie facedown with your hips resting on the ball. Position your toes on the ground and extend your legs straight behind you. 2. Place your hands behind your head, interlocking your fingers or resting them gently at the base of your skull. 3. Engage your core muscles and keep your gaze down to maintain a neutral spine. 4. Lift your chest off the exercise ball, raising your upper body as high as comfortable while maintaining control and stability. 5. Once in the lifted position, rotate your upper body to the right side, bringing your right shoulder towards your left hip. Keep your hips and lower body stable during the rotation. 6. Return to the center position and then rotate your upper body to the left side, bringing your left shoulder towards your right hip. 7. Repeat the rotation, alternating sides with each repetition, for the desired number of repetitions. ## Variations - If you find it challenging to rotate your upper body, you can start with a smaller range of motion. Gradually increase the rotation as your mobility and strength improve. - To increase the challenge, you can hold a light dumbbell or weight plate against your chest while performing the back extensions with rotation. ## Muscles Worked - Erector spinae (lower back muscles) - Obliques (side abdominal muscles) - Core muscles (abdominals, deep stabilizers) ## Common Mistakes - Allowing the lower back to sag or hyperextend. Maintain proper form by engaging your core and keeping a neutral spine throughout the exercise. - Twisting too forcefully or using momentum to rotate. Focus on controlled and deliberate movements to engage the targeted muscles effectively. - Raising the upper body too high, which can strain the lower back. Lift only as high as you can while maintaining proper form and without discomfort. ## Safety Precautions - Ensure that the exercise ball is properly inflated and stable before performing the exercise. - Start with a smaller range of motion and gradually increase it as your strength and mobility improve. - If you experience any pain or discomfort in the lower back or neck, stop the exercise and consult a fitness professional or healthcare provider. - If you have any pre-existing lower back issues or injuries, it's advisable to consult with a professional before attempting this exercise to ensure it's suitable for your condition.

The exercise ball dip is a compound exercise that targets the muscles of the triceps, chest, and shoulders. This exercise is performed using an exercise ball, which adds an element of instability, engaging the core muscles and promoting balance and coordination. ## Instructions 1. Start by placing an exercise ball against a sturdy surface, such as a wall or bench. Make sure the ball is positioned securely and won't roll. 2. Sit on the exercise ball with your feet flat on the ground and your knees bent at a 90-degree angle. Walk your feet forward, rolling the ball under your body until your upper back and head are supported on the ball. 3. Place your hands on the sides of the ball, slightly wider than shoulder-width apart, with your fingers pointing forward. 4. Engage your core muscles and lift your hips off the ball, creating a straight line from your head to your knees. This is the starting position. 5. Bend your elbows and lower your body by slowly descending toward the ground, keeping your elbows close to your sides. Continue the movement until your elbows reach a 90-degree angle. 6. Pause briefly at the bottom of the movement, then push through your palms to extend your arms and return to the starting position. 7. Repeat the movement for the desired number of repetitions. ## Variations - If you find the exercise ball dip too challenging, you can perform the exercise with your feet on the ground instead of elevating them on the ball. This modification provides more stability. - To increase the challenge, you can place your feet on a stable elevated surface, such as a bench, while performing the dips. This variation increases the range of motion and intensifies the exercise. ## Muscles Worked - Triceps (back of the upper arm) - Chest muscles (pectoralis major and minor) - Anterior deltoids (front of the shoulders) - Core muscles (engaged for stability) ## Common Mistakes - Allowing the shoulders to shrug or the elbows to flare out to the sides. Keep your shoulders down and back, and your elbows close to your sides throughout the movement. - Relying too much on momentum or swinging the body during the movement. Focus on controlled and deliberate movements, using the strength of your arms and upper body. - Arching the lower back or allowing the hips to drop. Maintain a straight line from your head to your knees, engaging your core muscles for stability. ## Safety Precautions - Ensure that the exercise ball is properly inflated and stable before performing the exercise. - If you have any shoulder, elbow, or wrist injuries or conditions, consult with a fitness professional or healthcare provider before attempting this exercise. - Start with a smaller range of motion and gradually increase it as your strength and technique improve. - If you experience any pain or discomfort in the shoulders, elbows, or wrists, stop the exercise and seek professional advice. - Use controlled movements and avoid excessive strain or pressure on the joints.
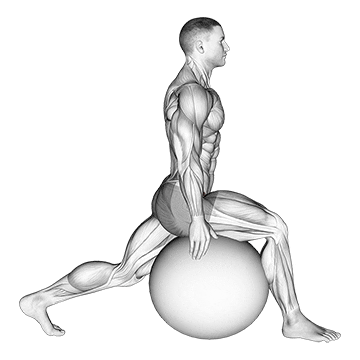
The exercise ball hip flexor stretch is a stretching exercise that targets the hip flexor muscles, particularly the iliopsoas. This stretch helps to improve hip mobility, relieve tightness in the hip flexors, and promote better posture. ## Instructions 1. Start by placing an exercise ball on the floor and position yourself in a kneeling lunge position in front of the ball. 2. Place your right knee on the exercise ball and position your left foot forward, so your left knee is bent at a 90-degree angle and your left foot is flat on the ground. 3. Engage your core muscles and maintain an upright posture with your spine aligned. 4. Slowly shift your weight forward, allowing your right hip to descend towards the ground, until you feel a stretch in the front of your right hip and thigh. 5. Hold the stretch for 20 to 30 seconds while focusing on deep breathing and allowing the muscle to relax and lengthen. 6. Repeat the stretch on the opposite side by switching the position of your legs. ## Variations - If you need additional support or find it difficult to balance on the exercise ball, you can perform the hip flexor stretch with your back knee on a cushion or folded yoga mat instead. - To intensify the stretch, you can raise the arm on the same side as the front leg and lean away from the stretch to increase the hip extension. ## Muscles Worked - Iliopsoas (hip flexor muscles) - Rectus femoris (part of the quadriceps muscle group) - Sartorius (longest muscle in the body, running from the hip to the knee) ## Common Mistakes - Arching the lower back or leaning too far forward. Keep your spine neutral and maintain an upright posture throughout the stretch. - Allowing the front knee to extend beyond the toes. Ensure that your front knee remains directly above your ankle to avoid unnecessary strain on the knee joint. - Holding your breath or tensing other muscles. Remember to breathe deeply and focus on relaxing the hip flexor muscles. ## Safety Precautions - If you have any pre-existing hip or knee injuries or conditions, consult with a fitness professional or healthcare provider before attempting this stretch. - Take your time and ease into the stretch gradually. Do not force or bounce in the stretched position. - If you feel any sharp or intense pain, stop the stretch and consult with a professional. - It's normal to feel a mild to moderate stretch sensation in the front of the hip. However, if you feel any discomfort or pain in the back or joints, adjust the position or intensity of the stretch accordingly.
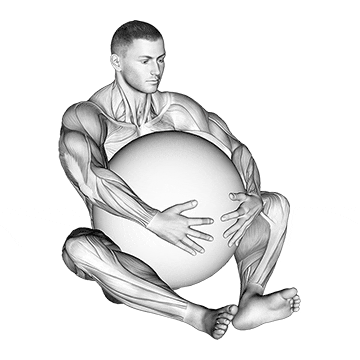
The exercise ball hug is a simple exercise that targets the muscles of the chest, shoulders, and arms. It involves hugging an exercise ball, which provides resistance and engages the muscles of the upper body. This exercise helps to strengthen the chest muscles and improve posture. ## Instructions 1. Start by standing upright with your feet shoulder-width apart and hold an exercise ball in front of your chest. 2. Engage your core muscles and maintain an upright posture with your shoulders back and down. 3. Begin the exercise by squeezing the exercise ball tightly between your hands, using your chest muscles to apply pressure. 4. Hold the squeeze for a few seconds, maintaining tension in the chest muscles. 5. Relax the squeeze and repeat for the desired number of repetitions. ## Variations - If you don't have an exercise ball, you can use a pillow or a soft, inflatable object as an alternative. - To increase the intensity, you can perform the exercise while sitting on an exercise ball or a stability ball. This variation will challenge your balance and engage your core muscles as well. ## Muscles Worked - Pectoralis major (chest muscles) - Anterior deltoids (front of the shoulders) - Biceps (front of the upper arms) ## Common Mistakes - Allowing the shoulders to hunch or round forward. Maintain good posture and keep your shoulders back and down throughout the exercise. - Gripping the exercise ball too tightly. While you want to squeeze the ball, avoid excessive tension in the hands and forearms. Focus on using the chest muscles to generate the pressure. - Holding your breath or tensing other muscles. Remember to breathe naturally and relax the muscles not directly involved in the exercise. ## Safety Precautions - Use an appropriately sized exercise ball that is comfortable to hold and squeeze. - If you have any shoulder or chest injuries or conditions, consult with a fitness professional or healthcare provider before attempting this exercise. - Start with a lighter squeeze and gradually increase the intensity as your strength and comfort allow. - If you experience any pain or discomfort in the shoulders, chest, or arms, stop the exercise and seek professional advice. - Use controlled movements and avoid jerking or sudden motions that could strain the muscles or joints.