
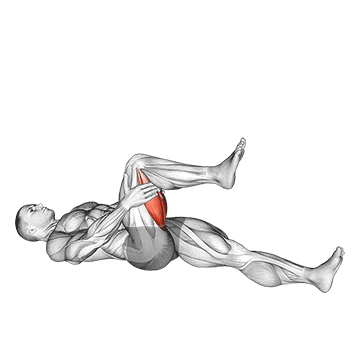
The hamstring stretch is a stretching exercise that targets the muscles at the back of the thigh, known as the hamstrings. This stretch helps improve flexibility, reduce muscle tension, and increase the range of motion in the hamstrings. Regular hamstring stretching can also benefit athletes, runners, and individuals involved in activities that require lower body mobility. ## Instructions 1. Start by sitting on the ground with your legs extended in front of you. 2. Keep your back straight and tall, and engage your core muscles. 3. Bend one knee and slide your foot inward, placing the sole of your foot against the inner thigh of the opposite leg. 4. Extend your arms and reach forward, hinging at the hips, and lean forward. 5. Aim to reach toward your toes or as far as you comfortably can without straining. 6. Keep your spine straight and avoid rounding your back as you lean forward. 7. Hold the stretch for 15 to 30 seconds while maintaining a gentle tension. 8. Breathe deeply and relax into the stretch, allowing your muscles to gradually release. 9. Slowly release the stretch and switch sides, repeating the exercise with the other leg. ## Variations - **Seated Hamstring Stretch with Strap**: If you struggle to reach your toes, you can use a strap or resistance band around the ball of your foot. Hold the ends of the strap and gently pull to deepen the stretch. - **Standing Hamstring Stretch**: Stand upright and place your heel on a slightly elevated surface, such as a step or bench. Keeping your leg straight, lean forward from the hips until you feel a stretch in your hamstring. - **Partner-Assisted Hamstring Stretch**: Lie down on your back with one leg extended and the other leg raised by a partner. The partner gently pulls your raised leg towards them, increasing the stretch on your hamstring. ## Muscles Worked The hamstring stretch primarily targets the following muscles: - Hamstrings (Biceps femoris, Semitendinosus, Semimembranosus) ## Common Mistakes - Rounding the back: Maintain a straight spine throughout the stretch. Avoid rounding your back or hunching forward. - Straining or pulling too hard: The stretch should be gentle and controlled. Avoid bouncing or pulling excessively, as it can lead to injury. - Not relaxing into the stretch: It's important to breathe deeply and relax into the stretch, allowing your muscles to gradually release and lengthen. - Holding the breath: Remember to maintain normal breathing throughout the stretch. Avoid holding your breath, as it can increase tension in your muscles. ## Safety Precautions - Perform the hamstring stretch on a comfortable surface, such as a mat or carpeted floor. - If you have a pre-existing hamstring injury or any other leg-related condition, consult with a healthcare professional or a qualified trainer before attempting this stretch. - Avoid pushing into pain. You should feel a gentle stretch but not sharp or intense pain. - If you experience any pain or discomfort, release the stretch immediately and seek guidance from a healthcare professional. - Progress gradually in the stretch, and do not force your flexibility. Overstretching can lead to strains or injuries.
The hands clasped circular toe touch is a dynamic stretching exercise that targets the hamstrings, lower back, and shoulder muscles. This exercise involves reaching forward and circling your hands around your legs while bending forward, providing a stretch through the posterior chain and improving overall flexibility. ## Instructions 1. Stand tall with your feet hip-width apart and your arms hanging down by your sides. 2. Take a deep breath in and simultaneously raise both arms in front of you. 3. Clasp your hands together, ensuring your palms are facing inward. 4. Slowly exhale and begin to bend forward at the waist, leading with your chest. 5. Continue bending forward until your torso is parallel to the ground, or as far as you comfortably can go. 6. As you reach the bottom of the movement, start to circle your clasped hands around your legs in a smooth, circular motion. 7. Complete one full circle around your legs, gradually increasing the size of the circle. 8. Reverse the direction of the circle and continue for the desired number of repetitions. 9. After the final repetition, slowly roll your spine back up to a standing position while keeping your hands clasped. 10. Release your hands and relax your arms by your sides. ## Variations - **Standing Toe Touch**: If you prefer a static stretch, you can modify this exercise by simply reaching forward with your hands and touching your toes, holding the stretch for a certain period of time. - **Seated Toe Touch**: Perform the toe touch while sitting on the floor with your legs extended in front of you. This variation allows for a deeper stretch and can be helpful for individuals with limited flexibility. - **Single-Leg Toe Touch**: Instead of bending forward with both legs, lift one leg off the ground and perform the toe touch exercise with the other leg extended. This variation increases the focus on the hamstrings and adds a balance challenge. ## Muscles Worked The hands clasped circular toe touch primarily targets the following muscles: - Hamstrings (Biceps femoris, Semitendinosus, Semimembranosus) - Lower back (Erector spinae) - Shoulders (Deltoids and shoulder girdle muscles) ## Common Mistakes - Rounding the back: Maintain a neutral spine throughout the exercise. Avoid rounding your back or hunching forward. Focus on bending from the hips rather than the lower back. - Forcing the stretch: Do not push beyond your comfortable range of motion. Move through the stretch in a controlled manner and avoid any sharp or intense pain. - Using momentum: Ensure that the movement is slow and controlled. Avoid swinging or using momentum to complete the exercise. Emphasize the stretch and engagement of the muscles. - Holding the breath: Remember to breathe steadily throughout the exercise. Inhale deeply before the movement, and exhale as you bend forward and circle your hands. ## Safety Precautions - Perform this exercise on a stable surface to maintain balance and stability. - If you have any pre-existing back, shoulder, or hamstring injuries, consult with a healthcare professional before attempting this exercise. - Start with smaller circles and gradually increase the size as your range of motion improves. - If you experience any pain or discomfort, especially in the lower back, stop the exercise immediately and seek guidance from a healthcare professional. - Be mindful of your surroundings and avoid objects or obstacles that may hinder your movement during the exercise.
The hands reversed clasped circular toe touch is a dynamic stretching exercise that targets the hamstrings, lower back, and shoulder muscles. This exercise involves bending forward at the waist, reaching down with reversed clasped hands, and circling them around your legs. It provides a deep stretch to the posterior chain and promotes flexibility and mobility. ## Instructions 1. Stand tall with your feet shoulder-width apart and your arms hanging down by your sides. 2. Take a deep breath in and simultaneously raise both arms in front of you. 3. Cross your arms at the wrists, bringing your palms to face outward. 4. Clasp your hands together with your fingers interlaced but reversed compared to a regular clasp (i.e., your right thumb should be on top instead of your left). 5. Slowly exhale and begin to bend forward at the waist, leading with your chest. 6. As you bend forward, bring your reversed clasped hands down toward the ground, reaching between your legs. 7. Continue bending forward until your torso is parallel to the ground or as far as you comfortably can go. 8. Once you reach the bottom of the movement, start to circle your reversed clasped hands around your legs in a smooth, circular motion. 9. Complete one full circle around your legs, gradually increasing the size of the circle. 10. Reverse the direction of the circle and continue for the desired number of repetitions. 11. After the final repetition, slowly roll your spine back up to a standing position while keeping your hands clasped. 12. Release your hands and relax your arms by your sides. ## Variations - **Standing Toe Touch**: If you prefer a static stretch, you can modify this exercise by simply reaching forward with your reversed clasped hands and touching your toes, holding the stretch for a certain period of time. - **Seated Toe Touch**: Perform the toe touch while sitting on the floor with your legs extended in front of you. This variation allows for a deeper stretch and can be helpful for individuals with limited flexibility. - **Single-Leg Toe Touch**: Instead of bending forward with both legs, lift one leg off the ground and perform the toe touch exercise with the other leg extended. This variation increases the focus on the hamstrings and adds a balance challenge. ## Muscles Worked The hands reversed clasped circular toe touch primarily targets the following muscles: - Hamstrings (Biceps femoris, Semitendinosus, Semimembranosus) - Lower back (Erector spinae) - Shoulders (Deltoids and shoulder girdle muscles) ## Common Mistakes - Rounding the back: Maintain a neutral spine throughout the exercise. Avoid rounding your back or hunching forward. Focus on bending from the hips rather than the lower back. - Forcing the stretch: Do not push beyond your comfortable range of motion. Move through the stretch in a controlled manner and avoid any sharp or intense pain. - Using momentum: Ensure that the movement is slow and controlled. Avoid swinging or using momentum to complete the exercise. Emphasize the stretch and engagement of the muscles. - Holding the breath: Remember to breathe steadily throughout the exercise. Inhale deeply before the movement, and exhale as you bend forward and circle your hands. ## Safety Precautions - Perform this exercise on a stable surface to maintain balance and stability. - If you have any pre-existing back, shoulder, or hamstring injuries, consult with a healthcare professional before attempting this exercise. - Start with smaller circles and gradually increase the size as your range of motion improves. - If you experience any pain or discomfort, especially in the lower back, stop the exercise immediately and seek
A handstand is an advanced bodyweight exercise that involves balancing your body upside down while supporting yourself with your hands. It primarily targets the shoulders, arms, and core muscles. Handstands require strength, balance, and body control, and they offer numerous benefits such as improved upper body strength, shoulder stability, core stability, and overall body awareness. ## Instructions 1. Find an open space with enough room to extend your body fully and perform the handstand. 2. Begin by kneeling on the ground with your hands placed shoulder-width apart on the floor, fingers pointing forward. 3. Position your hands slightly in front of your shoulders. 4. Lean forward, placing your weight onto your hands, and lift one leg off the ground. 5. Push through your hands and kick your other leg up, using the momentum to lift your body into an inverted position. 6. Extend both legs fully, keeping them together and toes pointed. 7. Engage your core muscles to maintain balance and stability. 8. Look straight ahead or slightly backward to maintain a neutral neck position. 9. Press firmly through your palms, keeping your arms straight and elbows locked. 10. Hold the handstand for the desired duration, aiming to maintain a stable and controlled position. 11. To come out of the handstand, slowly lower one leg down at a time, returning to a kneeling position. ## Variations - **Wall-Assisted Handstand**: Begin by facing a wall and placing your hands on the ground about a foot away from the wall. Kick up into a handstand, using the wall for support and balance. This variation helps build strength and confidence before attempting freestanding handstands. - **Forearm Stand**: Instead of supporting your weight on your hands, lower down onto your forearms while maintaining an inverted position. This variation shifts the focus to the forearms, shoulders, and core muscles. - **Handstand Push-Ups**: Once you have mastered the handstand, you can progress to performing push-ups while in the handstand position. This exercise further challenges the shoulders and upper body strength. ## Muscles Worked The handstand primarily targets the following muscles: - Shoulders (Deltoids) - Arms (Triceps, Biceps, Forearms) - Core Muscles (Abdominals, Obliques) - Upper Back Muscles (Trapezius, Rhomboids) - Chest Muscles (Pectoralis Major) ## Common Mistakes - Lack of proper alignment: Ensure that your hands are positioned shoulder-width apart, slightly in front of your shoulders, and that your body is in a straight line from your hands to your feet. - Arching or sagging lower back: Maintain a neutral spine and engage your core muscles to avoid excessive arching or sagging in the lower back. - Lack of shoulder and wrist mobility: Work on improving shoulder and wrist flexibility and mobility to properly support your weight and maintain stability. - Not practicing against a wall: Utilize a wall for support and practice balance and body alignment before attempting freestanding handstands. - Overarching the neck: Keep your neck in a neutral position, aligned with your spine. Avoid hyperextending or looking excessively forward. ## Safety Precautions - Perform handstands on a soft, non-slip surface, such as a gym mat or grass, to cushion any potential falls. - Warm up your wrists, shoulders, and core muscles before attempting handstands to reduce the risk of injury. - Start with wall-assisted handstands and gradually progress to freestanding handstands as your strength and balance improve. - Practice near a spotter or have someone assist you until you are confident and capable of performing handstands independently. - Do not attempt handstands if you

The handstand push-up is an advanced variation of the push-up exercise that targets the shoulders, arms, and upper body muscles. It involves performing a push-up while in a handstand position, requiring significant upper body strength and stability. Handstand push-ups offer benefits such as increased shoulder and triceps strength, improved shoulder stability, and enhanced overall upper body muscular development. ## Instructions 1. Start by facing a wall and place your hands on the ground slightly wider than shoulder-width apart. 2. Kick up into a handstand position with your feet resting against the wall, ensuring your body is in a straight line. 3. Position your hands shoulder-width apart and fingers pointing toward the wall. 4. Engage your core muscles and maintain a neutral spine throughout the exercise. 5. Slowly bend your elbows and lower your head toward the ground, aiming to bring your shoulders as close to your hands as possible. 6. Descend until your head lightly touches the ground or you reach a comfortable depth. 7. Push through your hands and extend your arms to return to the starting position, fully extending your elbows. 8. Repeat the movement for the desired number of repetitions. ## Variations - **Pike Push-Up**: If a full handstand push-up is too challenging, start with pike push-ups. Assume a push-up position with your hips raised in the air, forming an inverted V shape. Bend your elbows and lower your head toward the ground, focusing on the shoulders. Push back up to the starting position. - **Assisted Handstand Push-Up**: Use a resistance band or have a spotter assist you by holding your legs or providing support as you perform the handstand push-up. - **Elevated Handstand Push-Up**: Perform the handstand push-up with your feet elevated on a stable surface such as parallel bars or parallettes. This variation increases the range of motion and intensifies the exercise. ## Muscles Worked The handstand push-up primarily targets the following muscles: - Shoulders (Deltoids) - Triceps Brachii - Chest (Pectoralis Major) - Upper Back (Trapezius, Rhomboids) - Core Muscles (Abdominals, Obliques) ## Common Mistakes - Improper hand placement: Ensure your hands are positioned correctly, slightly wider than shoulder-width apart, and fingers pointing toward the wall. - Lack of control and stability: Maintain a straight body alignment and engage your core muscles to prevent excessive arching or sagging. - Not lowering enough: Aim to lower your head as close to the ground as possible, achieving a full range of motion to maximize the effectiveness of the exercise. - Flaring elbows: Keep your elbows pointing backward rather than out to the sides to effectively target the shoulders and minimize stress on the joints. - Hyperextending the neck: Maintain a neutral neck position and avoid hyperextending or looking excessively forward during the movement. ## Safety Precautions - Master proper handstand form and develop sufficient upper body and core strength before attempting handstand push-ups. - Perform handstand push-ups on a soft, non-slip surface, such as a gym mat or grass, to cushion any potential falls. - Warm up your wrists, shoulders, and core muscles before attempting handstand push-ups to reduce the risk of injury. - Start with pike push-ups or assisted variations to build strength and gradually progress to full handstand push-ups. - Practice near a spotter or have someone assist you until you are confident and capable of performing handstand push-ups independently. - If you have any pre-existing shoulder or wrist injuries or conditions, consult with a healthcare professional before attempting handstand push-ups.
The hip raise with bent knees is an exercise that primarily targets the muscles of the lower body, particularly the glutes (gluteus maximus), hamstrings, and lower back. This exercise involves lifting the hips off the ground while keeping the knees bent, creating a bridge-like position. It helps improve lower body strength, hip mobility, and core stability. ## Instructions 1. Lie flat on your back on an exercise mat or a comfortable surface with your knees bent and feet flat on the ground, hip-width apart. 2. Place your arms alongside your body, palms facing down. 3. Engage your core muscles by drawing your navel towards your spine. 4. Press your feet into the ground and lift your hips off the floor while maintaining the bend in your knees. 5. Continue lifting until your thighs and torso form a straight line. 6. Squeeze your glutes at the top of the movement and pause briefly to feel the contraction. 7. Lower your hips back down to the starting position with control, allowing your lower back to gently touch the ground. 8. Repeat the exercise for the desired number of repetitions. ## Tips and Precautions - Keep your feet planted firmly on the ground throughout the movement. - Engage your core muscles to maintain stability and prevent excessive arching of the lower back. - Avoid pushing your hips too high, as this can strain the lower back. Aim for a position where your thighs and torso form a straight line. - Focus on squeezing your glutes at the top of the movement to maximize muscle activation. - Breathe steadily throughout the exercise, inhaling during the lowering phase and exhaling during the lifting phase. ## Variations - Single-Leg Hip Raise: Perform the exercise with one leg extended straight while the other knee is bent. This variation increases the difficulty and places more emphasis on the glute muscles. - Weighted Hip Raise: Place a weight such as a dumbbell or a barbell on your hips while performing the exercise to add resistance and further challenge the muscles. - Stability Ball Hip Raise: Position a stability ball under your feet and perform the hip raise with bent knees. The instability of the ball adds an extra challenge to the exercise. ## Muscles Worked - Gluteus Maximus (glutes) - Hamstrings - Lower Back Muscles (Erector Spinae) - Core Muscles (Abdominals, Obliques) ## Common Mistakes - Arching the lower back excessively: Avoid overextending the lower back during the movement. Focus on engaging your core muscles and maintaining a neutral spine. - Allowing the knees to collapse inward: Keep your knees in line with your hips and feet throughout the exercise. This helps maintain proper alignment and prevents undue stress on the knees. - Not fully extending the hips: Aim to lift your hips until your thighs and torso form a straight line. Avoid stopping short of reaching the full range of motion. ## Safety Precautions - If you have any pre-existing conditions or injuries, consult with a healthcare professional or fitness expert before attempting the exercise. - Start with a gentle warm-up before performing hip raises to prepare your muscles for the movement. - If you experience any pain or discomfort during the exercise, particularly in the lower back or knees, stop immediately and seek guidance from a qualified professional.
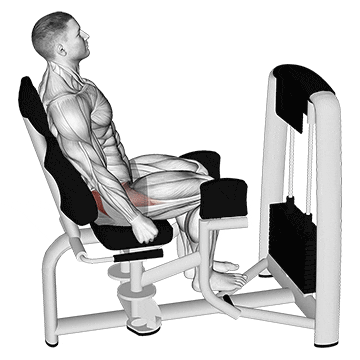
The lever seated hip abduction is an exercise that targets the muscles of the outer hips, specifically the gluteus medius and gluteus minimus. It involves the movement of the legs away from the midline of the body, similar to the motion of spreading the legs apart. ## Instructions 1. Start by sitting upright on a lever machine designed for hip abduction. 2. Adjust the machine's seat and lever arm according to your height and comfort. 3. Place your feet flat on the footrests provided by the machine. 4. Engage your core muscles and sit with proper posture, maintaining a neutral spine. 5. Grasp the handles or the sides of the seat for support and stability. 6. Initiate the movement by pressing your legs outward against the resistance of the machine. 7. Continue to push your legs outward until you reach a comfortable range of motion or feel a stretch in the outer hips. 8. Pause briefly at the end of the movement, focusing on squeezing the muscles of the outer hips. 9. Slowly release the resistance and allow your legs to return to the starting position in a controlled manner. 10. Repeat the movement for the desired number of repetitions. ## Variations - Cable Machine Variation: If a lever machine is not available, the exercise can be performed using a cable machine with an ankle attachment. Stand sideways to the machine, attach the ankle cuff to the far ankle, and perform the abduction motion while maintaining proper alignment. - Resistance Band Variation: Use a resistance band looped around your legs just above the knees and perform the hip abduction motion in a seated or standing position. ## Muscles Worked - Primary Muscles: Gluteus medius, gluteus minimus (outer hip muscles). - Secondary Muscles: Tensor fasciae latae (TFL), hip external rotators. ## Common Mistakes - Leaning or Slouching: Maintain an upright and stable posture throughout the exercise. Avoid leaning or slouching to ensure proper engagement of the targeted muscles. - Excessive Momentum: Perform the exercise in a slow and controlled manner. Avoid using momentum or swinging your legs to complete the movement. Focus on the muscles of the outer hips doing the work. - Insufficient Range of Motion: Strive for a full range of motion while maintaining control. Avoid limiting the movement or not reaching the point where the outer hips are adequately engaged. ## Safety Precautions - Consult with a healthcare professional before starting any new exercise program, especially if you have pre-existing injuries or medical conditions. - Adjust the lever machine or use appropriate equipment to fit your body size and ensure proper alignment. - Start with a light resistance and gradually increase as your strength and technique improve. - Maintain proper form and technique throughout the exercise to avoid strain or injury. - If you experience any pain or discomfort during the exercise, stop immediately and seek medical advice if needed.
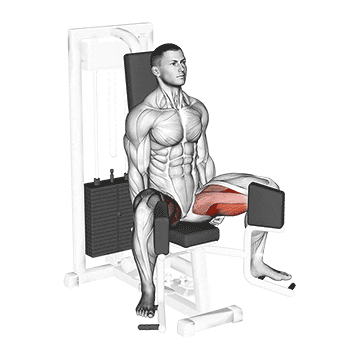
The lever seated hip adduction is an exercise that targets the muscles of the inner thighs (adductor muscles). It involves bringing the legs inward against resistance, simulating the action of squeezing the thighs together. ## Instructions 1. Start by sitting upright on a lever machine designed for hip adduction. 2. Adjust the machine's seat and lever arms according to your height and comfort. 3. Place your feet on the foot pads or the designated platforms provided by the machine. 4. Position your legs in a relaxed and slightly wider-than-shoulder-width stance. 5. Grasp the handles or sides of the seat for stability. 6. Initiate the movement by squeezing your inner thighs and bringing your legs together. 7. Keep your knees slightly bent throughout the exercise. 8. Continue to squeeze your inner thighs as you bring the lever arms toward each other. 9. Pause briefly at the point of maximum contraction. 10. Slowly release the resistance and allow the lever arms to return to the starting position. 11. Repeat the movement for the desired number of repetitions. ## Variations - Machine Variation: If a lever machine is not available, cable machines with adjustable ankle cuffs can be used to perform hip adduction exercises. - Seated Variation: Instead of using a lever machine, the exercise can be performed while seated on a stability ball or a bench. Place a resistance band around your thighs and squeeze inward against the resistance. ## Muscles Worked - Primary Muscles: Adductor muscles (inner thighs). - Secondary Muscles: Glutes, quadriceps. ## Common Mistakes - Using Excessive Weight: It is important to start with a lighter weight and focus on proper form and technique. Using excessive weight can compromise your form and increase the risk of injury. Gradually increase the weight as you become more comfortable and confident. - Leaning or Lifting the Pelvis: Avoid leaning or lifting the pelvis during the exercise. Maintain an upright posture and engage your core muscles for stability. - Lack of Control: Perform the exercise in a slow and controlled manner. Avoid using momentum or jerking motions, as it reduces the effectiveness of the exercise and increases the risk of injury. - Not Squeezing at the Peak: Focus on squeezing your inner thighs together at the peak of the movement. This maximizes the engagement of the adductor muscles. ## Safety Precautions - Consult with a healthcare professional before starting any new exercise program, especially if you have pre-existing injuries or medical conditions. - Adjust the lever machine or use appropriate equipment to fit your body size and ensure proper alignment. - Start with a light weight to familiarize yourself with the exercise and gradually increase the resistance as you become more comfortable and stronger. - Maintain proper form and technique throughout the exercise to avoid strain or injury. - If you experience any pain or discomfort during the exercise, stop immediately and seek medical advice if needed.
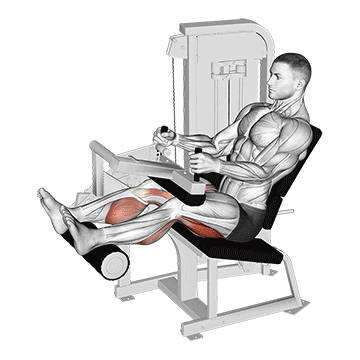
The lever seated leg curl is an exercise that primarily targets the muscles of the posterior thigh, specifically the hamstrings. It involves flexing the knees against resistance while seated, mimicking the motion of curling the legs towards the glutes. ## Instructions 1. Start by sitting upright on a lever machine designed for leg curls. 2. Adjust the machine's seat and lever arms according to your height and comfort. 3. Place your lower legs underneath the padded lever arm, just above the ankles, with your toes pointed forward. 4. Grasp the handles or sides of the seat for stability. 5. Ensure that your thighs are fully supported by the seat and your back is in an upright position. 6. Begin the exercise by flexing your knees and curling your lower legs upward against the resistance of the lever arm. 7. Keep your upper legs stationary throughout the movement. 8. Continue to curl your legs until your hamstrings are fully contracted and you feel a strong contraction in the back of your thighs. 9. Pause briefly at the top of the movement. 10. Slowly release the resistance and extend your legs back to the starting position in a controlled manner. 11. Repeat the movement for the desired number of repetitions. ## Variations - Machine Variation: If a lever machine is not available, a cable machine with ankle cuffs or a lying leg curl machine can be used as alternatives to perform leg curls. - Single-Leg Variation: Perform the exercise with one leg at a time to isolate each leg and increase the focus on each hamstring individually. - Stability Ball Variation: Lie face down on a stability ball with your legs extended and perform the leg curl motion by bending your knees and curling your heels toward your glutes. ## Muscles Worked - Primary Muscles: Hamstrings (biceps femoris, semitendinosus, semimembranosus). - Secondary Muscles: Calves (gastrocnemius, soleus). ## Common Mistakes - Using Excessive Weight: Start with a lighter weight and focus on maintaining proper form and control. Using too much weight can compromise your form and increase the risk of injury. Gradually increase the resistance as you become more comfortable and stronger. - Arching the Back: Avoid arching your back or lifting your hips off the seat. Maintain an upright posture and engage your core muscles for stability throughout the exercise. - Swinging the Legs: Perform the exercise in a slow and controlled manner. Avoid using momentum or swinging the legs, as it reduces the effectiveness of the exercise and can strain the lower back. - Incomplete Range of Motion: Aim to achieve a full range of motion by flexing your knees until your hamstrings are fully contracted. Avoid cutting the movement short to ensure proper engagement of the targeted muscles. ## Safety Precautions - Consult with a healthcare professional before starting any new exercise program, especially if you have pre-existing injuries or medical conditions. - Adjust the lever machine or use appropriate equipment to fit your body size and ensure proper alignment. - Start with a light weight to familiarize yourself with the exercise and gradually increase the resistance as you become more comfortable and stronger. - Maintain proper form and technique throughout the exercise to avoid strain or injury. - If you experience any pain or discomfort during the exercise, stop immediately and seek medical advice if needed.