
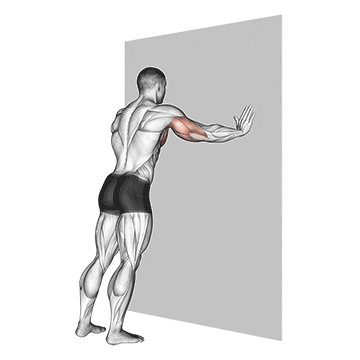
The wall push-up is a modified version of the traditional push-up exercise. It targets the muscles of the chest, shoulders, and arms while providing a beginner-friendly variation that is suitable for individuals with lower upper body strength. This exercise can help improve upper body strength, stability, and muscular endurance. ## Instructions 1. Stand facing a sturdy wall, with your feet shoulder-width apart and approximately two feet away from the wall. 2. Extend your arms and place your palms flat against the wall, slightly wider than shoulder-width apart. Your fingers should be pointing upward. 3. Engage your core muscles by pulling your belly button towards your spine. 4. Lean forward, bending your elbows and bringing your chest closer to the wall. Keep your body straight from head to toe. 5. Lower your chest toward the wall by bending your elbows until your upper arms are parallel to the floor or as far as you comfortably can. 6. Pause for a moment, then push yourself away from the wall by straightening your arms, returning to the starting position. 7. Repeat the movement for the desired number of repetitions. ## Variations Here are some variations of the wall push-up that can be adjusted based on fitness levels and specific needs: 1. **Easier variation**: If wall push-ups are still challenging, you can start by standing closer to the wall, reducing the angle of your body. You can also perform the exercise with your hands placed on a higher surface, such as a sturdy table or bench. 2. **Harder variation**: As you build strength, you can gradually increase the difficulty by stepping farther away from the wall, increasing the angle of your body. You can also perform push-ups with your hands placed on unstable surfaces, such as a stability ball or a Bosu ball, to engage more stabilizer muscles. ## Muscles Worked The wall push-up primarily targets the following muscles: - Chest (pectoralis major and minor) - Shoulders (deltoids) - Triceps (back of the upper arm) ## Common Mistakes Here are some common mistakes people make while performing wall push-ups and how to avoid them: 1. **Arching the back**: Maintain a straight line from your head to your heels throughout the exercise. Avoid arching or sagging your back by engaging your core muscles. 2. **Rounding the shoulders**: Keep your shoulders pulled back and down, away from your ears, to maintain proper alignment and prevent excessive strain on the shoulder joints. 3. **Limited range of motion**: Aim to lower your chest as close to the wall as possible while maintaining good form. Avoid cutting the movement short, as it reduces the effectiveness of the exercise. 4. **Placing hands too high or low**: Position your hands slightly wider than shoulder-width apart and at chest height for optimal engagement of the target muscles. ## Safety Precautions To ensure safety while performing wall push-ups: 1. If you have any pre-existing shoulder, wrist, or back injuries, consult with a healthcare professional before attempting this exercise. 2. Warm up your upper body with some light cardio and dynamic stretches before starting. 3. Maintain a controlled and steady pace throughout the exercise, avoiding sudden jerky movements. 4. If you experience any pain or discomfort, particularly in the wrists or shoulders, stop the exercise and seek guidance from a fitness professional or healthcare provider. Remember to listen to your body, start at a comfortable level, and progress gradually to more challenging variations as your strength improves.
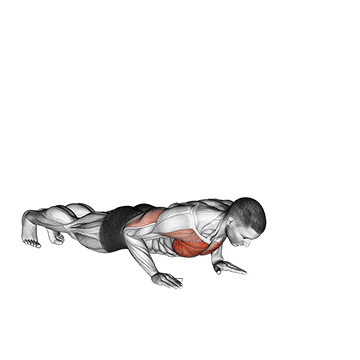
The push-up inside leg kick is a dynamic exercise that combines upper body strength and core stability with a lower body kicking movement. It targets the muscles of the chest, shoulders, arms, abdominals, and hip flexors. This exercise helps improve upper body strength, core stability, and coordination while engaging multiple muscle groups. ## Instructions 1. Start in a high plank position with your hands placed slightly wider than shoulder-width apart and your body in a straight line from head to heels. 2. Perform a push-up by bending your elbows and lowering your chest toward the floor. Keep your elbows close to your body. 3. Push yourself back up to the starting position. 4. Once you are back in the plank position, lift your right leg off the ground and bend your knee to bring it toward your chest. 5. Extend your right leg and kick it out to the side, away from your body. Engage your core to maintain stability. 6. Bring your right leg back to the starting position, returning it to the plank position. 7. Repeat steps 2-6, but this time lift and kick your left leg. 8. Continue alternating between right and left leg kicks for the desired number of repetitions or time. ## Variations Here are some variations of the push-up inside leg kick exercise: 1. **Modified version**: If the full push-up position is too challenging, you can perform the exercise with your knees on the ground, maintaining the same leg kick movement. 2. **Elevated version**: For an increased challenge, you can perform the exercise with your hands placed on an elevated surface, such as a bench or step, while still maintaining the leg kick movement. ## Muscles Worked The push-up inside leg kick primarily targets the following muscles: - Chest (pectoralis major and minor) - Shoulders (deltoids) - Triceps (back of the upper arm) - Abdominals (rectus abdominis, obliques) - Hip flexors ## Common Mistakes Here are some common mistakes people make while performing the push-up inside leg kick and how to avoid them: 1. **Sagging or arching the back**: Maintain a straight line from head to heels throughout the exercise. Avoid sagging your hips or arching your lower back. 2. **Lifting the leg too high**: Focus on kicking the leg out to the side at a moderate height while maintaining stability and control. Avoid excessive swinging or lifting of the leg. 3. **Rushing the exercise**: Perform the push-up and leg kick with controlled movements. Avoid rushing through the exercise to maintain proper form and maximize effectiveness. 4. **Lack of core engagement**: Keep your core muscles engaged throughout the exercise to provide stability and support for the upper and lower body movements. ## Safety Precautions To ensure safety while performing the push-up inside leg kick: 1. If you have any pre-existing shoulder, wrist, or back injuries, consult with a healthcare professional before attempting this exercise. 2. Warm up your body with some light cardio and dynamic stretches before starting. 3. Maintain proper form and alignment throughout the exercise to avoid strain on the joints. 4. Start with a manageable number of repetitions or time and gradually increase the intensity as your strength and stability improve. 5. If you experience any pain or discomfort, especially in the wrists, shoulders, or lower back, stop the exercise and seek guidance from a fitness professional or healthcare provider. As always, listen to your body, start at a comfortable level, and progress gradually to ensure safety and effectiveness.
Quick Feet v.2 is a cardiovascular exercise that targets agility, coordination, and lower-body strength. It involves rapid foot movements in a designated area, requiring quick changes in direction and speed. This exercise helps improve footwork, speed, reaction time, and overall athletic performance. ## Instructions 1. Begin by standing with your feet shoulder-width apart and your knees slightly bent. 2. Create a designated area on the ground using markers or cones, approximately 3-4 feet wide and 6-8 feet long. 3. Start moving your feet as quickly as possible within the designated area, keeping your feet close to the ground. 4. Alternate between various footwork patterns, such as: - Quick forward and backward steps. - Side-to-side movements. - Diagonal steps. - High knees. - Butt kicks. - Crossovers (crossing one foot in front of the other). 5. As you become more comfortable, increase the speed and intensity of your footwork, challenging yourself to move as quickly as possible. 6. Continue performing the quick feet movements for a desired duration or as part of a circuit training routine. ## Variations - **Beginner Variation**: If you're new to quick feet exercises, start by performing the movements at a slower pace. Focus on mastering the basic footwork patterns before increasing speed and intensity. - **Advanced Variation**: To increase the challenge, incorporate additional elements such as lateral hurdles, agility ladder, or reaction-based drills. You can also use resistance bands around your ankles to provide extra resistance and further engage your leg muscles. ## Muscles Worked - Quadriceps (thigh muscles) - Hamstrings (back of the thighs) - Calves - Glutes (buttocks) - Hip flexors - Core muscles (to maintain stability) ## Common Mistakes - Allowing the feet to lift too high off the ground: Keep the feet close to the ground to maximize speed and agility. - Leaning forward or backward excessively: Maintain an upright posture and engage your core muscles for better balance. - Poor footwork technique: Focus on precise and quick movements, avoiding shuffling or dragging the feet. - Neglecting arm movements: Coordinate your arm movements with your footwork to enhance overall coordination and balance. ## Safety Precautions - Choose a suitable surface for performing the exercise, preferably one with good traction to minimize the risk of slipping. - Make sure the designated area is free of any obstacles or hazards that could cause trips or falls. - Warm up before starting the exercise to prepare your muscles and joints for the intense footwork. - If you have any pre-existing medical conditions or injuries, consult with a healthcare professional or fitness trainer before attempting this exercise. - Stop immediately if you experience any pain, discomfort, or dizziness during the exercise. Listen to your body and adjust the intensity accordingly.
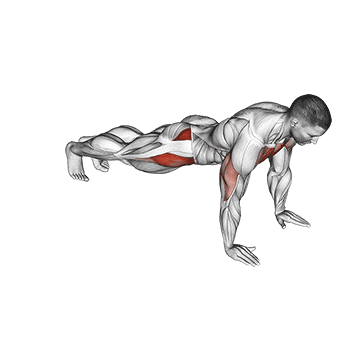
The Raise Single Arm Push-Up is a challenging variation of the traditional push-up exercise that targets the chest, shoulders, triceps, and core muscles. It requires increased upper body and core strength, stability, and balance. This exercise also helps develop unilateral strength and coordination. ## Instructions 1. Begin in a standard push-up position with your hands shoulder-width apart, fingers pointing forward, and your body in a straight line from head to heels. 2. Shift your body weight slightly to one side, positioning one hand slightly higher than the other. 3. Engage your core and maintain a stable body position. 4. Lower your body by bending your elbows, keeping them close to your sides, until your chest is just above the ground. 5. As you push back up, focus on raising the opposite arm off the ground, extending it straight out in front of you. 6. Keep your body aligned and balanced throughout the movement. 7. Lower your raised arm back to the ground as you lower your body for the next repetition. 8. Repeat the exercise, alternating the raised arm with each repetition. ## Variations - **Modified Version**: If you find the Raise Single Arm Push-Up too challenging, you can modify it by performing the exercise with your knees on the ground. This reduces the resistance and allows you to focus on developing upper body and core strength. - **Elevated Version**: To increase the difficulty, you can place your feet on an elevated surface, such as a bench or step. This variation increases the load on your upper body and further engages your core muscles. ## Muscles Worked - Chest (pectoralis major) - Shoulders (deltoids) - Triceps - Core muscles (abdominals, obliques) - Stabilizer muscles (scapular stabilizers) ## Common Mistakes - Allowing the hips to sag or the lower back to arch: Maintain a straight line from head to heels throughout the exercise. Engage your core muscles to prevent excessive sagging or arching. - Flaring the elbows out: Keep your elbows close to your sides as you lower and raise your body, which helps engage the triceps and protects the shoulder joints. - Lack of stability or balance: Focus on maintaining a stable and balanced position throughout the movement. Avoid excessive shifting or rotation of the body. - Raising the arm too high or too low: Raise the arm parallel to the ground, aligning it with your shoulders, for optimal engagement of the targeted muscles. ## Safety Precautions - Ensure that you have sufficient upper body and core strength before attempting the Raise Single Arm Push-Up. - Perform the exercise on a stable and non-slip surface. - Start with a proper warm-up to prepare your muscles and joints for the exercise. - If you have any shoulder, wrist, or lower back issues, consult with a healthcare professional or fitness trainer before attempting this exercise. - Listen to your body and progress gradually. If you experience any pain or discomfort, discontinue the exercise and seek guidance.
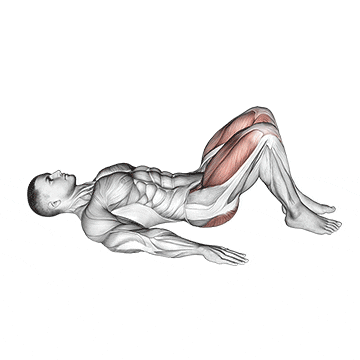
The Rear Decline Bridge is an exercise that targets the glutes (butt muscles) and hamstrings. It involves raising the hips off the ground while keeping the feet elevated on a stable surface. This exercise helps strengthen the posterior chain, improve hip stability, and enhance overall lower body strength. ## Instructions 1. Start by lying on your back with your feet resting on a stable elevated surface such as a bench or step. Your knees should be bent at a 90-degree angle, and your arms should be extended by your sides. 2. Engage your core muscles and press your feet firmly into the elevated surface. 3. Raise your hips off the ground, driving through your heels. Your body should form a straight line from your knees to your shoulders. 4. Squeeze your glutes at the top of the movement, ensuring you feel a contraction in your butt muscles. 5. Lower your hips back down to the starting position in a controlled manner. 6. Repeat the movement for the desired number of repetitions. ## Variations - **Single-Leg Rear Decline Bridge**: To increase the difficulty and target each glute individually, perform the exercise with one leg extended straight in the air while the other foot remains on the elevated surface. - **Weighted Rear Decline Bridge**: Hold a weight, such as a dumbbell or barbell, across your hips to add resistance and further challenge your glutes and hamstrings. - **Bench Hip Thrust**: Instead of using an elevated surface, perform a similar movement by placing your upper back and shoulders on a bench while keeping your feet on the ground. This variation also targets the glutes and hamstrings. ## Muscles Worked - Glutes (gluteus maximus) - Hamstrings (biceps femoris, semitendinosus, semimembranosus) - Core muscles (transverse abdominis, rectus abdominis, obliques, erector spinae) ## Common Mistakes - Raising the hips too high: Avoid overextending the hips and arching the lower back excessively. Focus on lifting the hips until your body forms a straight line and squeeze the glutes at the top of the movement. - Allowing the knees to collapse inward: Keep your knees aligned with your feet throughout the exercise to maintain proper form and engage the correct muscles. - Not fully extending the hips: Ensure that you raise your hips high enough to feel a contraction in your glutes. Avoid cutting the range of motion short. - Holding tension in the neck and shoulders: Keep your upper body relaxed and focus on contracting the glutes rather than straining other muscles. ## Safety Precautions - Choose a stable elevated surface that can support your body weight without wobbling or sliding. - If you have any pre-existing lower back or hip issues, consult with a healthcare professional or fitness trainer before attempting this exercise. - Start with a proper warm-up to prepare your muscles and joints for the exercise. - Use controlled movements and avoid jerking or thrusting the hips to reduce the risk of injury. - If you experience any pain or discomfort, stop the exercise and seek guidance from a professional.
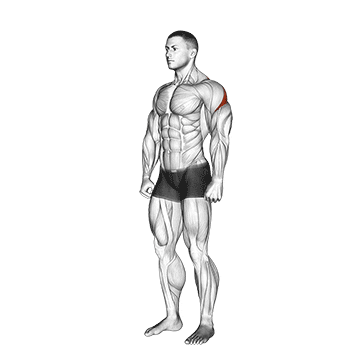
The Rear Deltoid Stretch is an exercise that targets the rear deltoid muscles, which are located at the back of the shoulders. It helps improve shoulder flexibility and mobility while relieving tension in the upper body. This stretch is particularly beneficial for individuals who engage in activities that involve repetitive forward shoulder movements, such as desk work or weightlifting. ## Instructions 1. Stand tall with your feet shoulder-width apart and your spine straight. 2. Extend your right arm across your chest, reaching it horizontally towards your left side. 3. Bend your left arm at the elbow and place your left forearm on your right upper arm, just above the elbow. 4. Gently apply pressure with your left forearm to pull the right arm closer to your body. 5. Keep your shoulders relaxed and maintain a slight inward rotation of the right arm, so your palm faces your body. 6. Hold the stretch for 15 to 30 seconds, feeling a gentle stretch in the back of your right shoulder. 7. Release the stretch and repeat on the opposite side, extending your left arm across your chest and using your right forearm to apply pressure. ## Variations - **Seated Variation**: If standing is uncomfortable or challenging, you can perform the rear deltoid stretch in a seated position. Sit upright on a chair or bench and follow the same steps described above. - **Overhead Arm Pull**: Stand with your feet shoulder-width apart and raise one arm straight above your head. Bend your elbow and reach behind your head, placing your hand on the opposite shoulder blade. With your other hand, gently pull the elbow of the raised arm towards the midline of your body, feeling a stretch in the rear deltoid. - **Standing Wall Stretch**: Stand facing a wall and extend one arm straight in front of you at shoulder height, with the palm touching the wall. Rotate your body away from the extended arm, keeping your hand in contact with the wall. This variation provides a deeper stretch for the rear deltoid. ## Muscles Worked - Rear deltoids (posterior deltoids) - Upper back muscles (rhomboids, trapezius) ## Common Mistakes - Applying excessive force or bouncing: Avoid using forceful jerking motions or bouncing during the stretch, as it can lead to injury. Focus on a gentle, gradual stretch. - Rounding the shoulders or hunching forward: Keep your shoulders relaxed and down, maintaining an upright posture throughout the stretch. - Holding the breath: Remember to breathe deeply and naturally during the stretch to promote relaxation and optimal muscle stretching. ## Safety Precautions - Perform the rear deltoid stretch in a controlled manner without causing pain or discomfort. If you experience any pain, modify the stretch or discontinue it. - Start with a proper warm-up to increase blood flow to the muscles and prepare them for stretching. - If you have a shoulder injury or any existing shoulder-related conditions, consult with a healthcare professional or physical therapist before attempting this stretch. - Do not force the stretch beyond your comfortable range of motion. Gradually increase the intensity of the stretch over time as your flexibility improves. - If you have any concerns or uncertainties about the exercise, seek guidance from a qualified fitness professional.
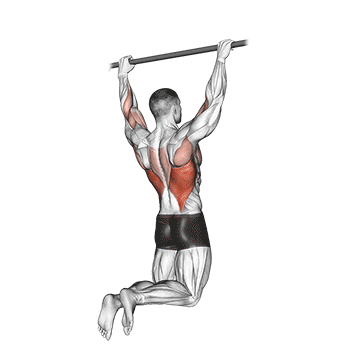
The Rear Pull-Up is an exercise that primarily targets the muscles of the upper back, including the rhomboids, trapezius, and latissimus dorsi. It involves pulling your body weight up towards a bar while focusing on squeezing the shoulder blades together. This exercise helps improve upper body strength, posture, and overall back development. ## Instructions 1. Stand facing a pull-up bar or a sturdy overhead bar. 2. Reach up and grip the bar with an overhand grip, slightly wider than shoulder-width apart. 3. Hang from the bar with your arms fully extended and your feet off the ground. 4. Engage your core and initiate the pull by squeezing your shoulder blades together and pulling your chest towards the bar. 5. Continue pulling until your chin is above the bar or as close to the bar as possible. 6. Pause for a moment at the top, focusing on the contraction in your upper back muscles. 7. Slowly lower yourself back down to the starting position with control, fully extending your arms. 8. Repeat the movement for the desired number of repetitions. ## Variations - **Assisted Pull-Up**: If you are unable to perform a full pull-up, you can use an assisted pull-up machine, resistance bands, or have a partner provide assistance by holding your legs or feet. - **Negative Pull-Up**: Start at the top of the pull-up position with your chin above the bar, and slowly lower yourself down to the fully extended position. This variation allows you to focus on the eccentric (lowering) portion of the movement and gradually build strength. - **Wide Grip Pull-Up**: Perform the pull-up with a wider grip, placing your hands slightly wider than shoulder-width apart. This variation targets the lats (latissimus dorsi) to a greater extent. ## Muscles Worked - Latissimus dorsi (lats) - Rhomboids - Trapezius (upper and middle fibers) - Biceps - Forearms ## Common Mistakes - Using excessive momentum or swinging: Maintain control throughout the movement and avoid using momentum to pull yourself up. Focus on engaging the target muscles. - Allowing the shoulders to shrug: Keep your shoulders down and away from your ears throughout the exercise to prevent excessive strain on the neck and traps. - Not fully extending the arms at the bottom: Ensure that you fully extend your arms at the starting position to achieve a full range of motion. - Neglecting proper breathing: Breathe in on the way down and exhale as you pull yourself up. Maintain a steady breathing pattern throughout the exercise. ## Safety Precautions - Ensure that the pull-up bar or overhead bar is securely mounted and can support your body weight. - Perform the exercise in a controlled manner, focusing on proper form and technique. - If you are new to pull-ups or have any shoulder or back issues, consult with a healthcare professional or fitness trainer before attempting this exercise. - Start with a proper warm-up to prepare your upper body muscles and joints for the exercise. - Progress gradually and do not push beyond your capabilities to avoid strain or injury. - If you experience pain or discomfort, discontinue the exercise and seek guidance.
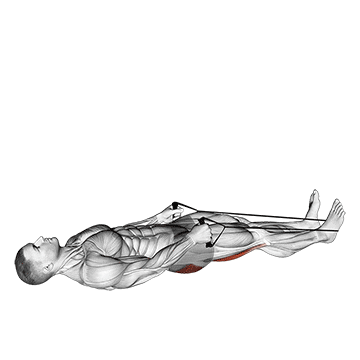
The Reclining Big Toe Pose with Rope is a yoga pose that targets the hamstrings, calves, and hips. It involves lying on your back and using a rope or strap to assist in stretching and extending one leg at a time. This pose helps improve flexibility, release tension in the lower body, and increase range of motion in the hips and hamstrings. ## Instructions 1. Start by lying on your back on a comfortable surface, such as a yoga mat or padded floor. 2. Bend your knees and place your feet flat on the ground, hip-width apart. 3. Loop a rope or strap around the ball of your right foot and hold one end of the rope in each hand. 4. Extend your right leg straight up towards the ceiling, keeping the strap taut. 5. Relax your shoulders, neck, and jaw. Keep your left leg bent with the foot resting on the ground. 6. Flex your right foot and gently pull the rope to bring your leg closer to your body, feeling a stretch in the back of your right leg. 7. Maintain a slight bend in the knee if needed to avoid excessive strain. The goal is to find a comfortable stretch, not to force the leg straight. 8. Hold the stretch for 30 seconds to 1 minute, breathing deeply and relaxing into the pose. 9. Slowly release the tension on the strap and lower your right leg back down to the ground. 10. Repeat the same steps with your left leg. ## Variations - **Bent Knee Reclining Big Toe Pose**: If you have tight hamstrings or limited flexibility, you can perform the pose with a bent knee. Instead of extending your leg straight up, keep the knee slightly bent while using the strap to assist in bringing the leg towards your body. - **One-Legged Reclining Hand-to-Big-Toe Pose**: Instead of using a strap or rope, you can perform a similar stretch by extending one leg straight up and holding the big toe with your hand. This variation requires more flexibility in the hamstrings and can be practiced with one leg at a time. ## Muscles Worked - Hamstrings (biceps femoris, semitendinosus, semimembranosus) - Calves (gastrocnemius, soleus) - Hips (hip flexors) ## Common Mistakes - Overstretching: Avoid pulling too hard on the strap, as it may lead to strain or injury. Maintain a gentle and controlled stretch without pushing beyond your comfort zone. - Holding tension in the shoulders and neck: Relax your upper body throughout the pose and focus on deep, steady breathing to release tension. - Locking the knees: Keep a slight bend in your knee to avoid hyperextension and maintain proper alignment. - Straining the lower back: Engage your core muscles and ensure that your lower back stays grounded on the mat. If you feel discomfort in the lower back, decrease the intensity of the stretch or modify the pose. ## Safety Precautions - If you have any pre-existing injuries or conditions, consult with a healthcare professional or a certified yoga instructor before attempting this pose. - Listen to your body and avoid pushing beyond your limits. Respect your current flexibility and progress gradually over time. - Do not force the stretch or experience sharp pain. It should feel like a gentle pulling sensation, not discomfort or pain. - Use a strap or rope that is sturdy and securely fastened to prevent it from slipping during the pose. - If you experience any pain or discomfort, release the pose and seek guidance from a qualified instructor.
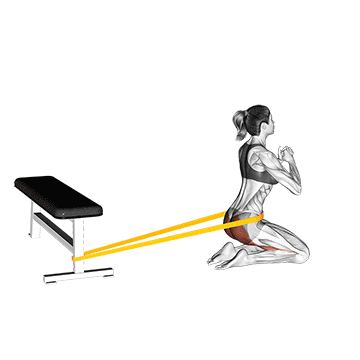
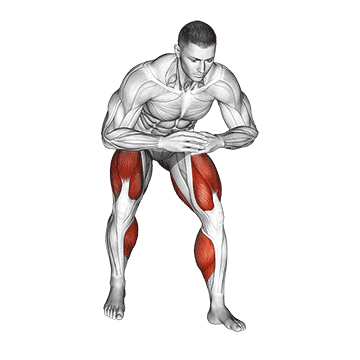
Resistance Band Hip Thrusts on Knees is an exercise that targets the glutes (particularly the gluteus maximus), hamstrings, and hip muscles. It involves using a resistance band looped just above the knees to add resistance while performing hip thrusts on the knees. This exercise helps strengthen and tone the lower body, improve hip stability, and enhance overall lower body strength. ## Instructions 1. Place a resistance band around your thighs, just above the knees. 2. Start by kneeling on a comfortable surface, such as a yoga mat or padded floor, with your knees hip-width apart and your toes pointing forward. 3. Engage your core muscles and maintain a neutral spine throughout the exercise. 4. Slowly lower your upper body backward, sitting on your heels while keeping your back straight. 5. Begin the movement by driving your hips forward, squeezing your glutes, and pressing your knees outward against the resistance band. 6. Push your hips forward until your body forms a straight line from your knees to your shoulders. 7. Hold the top position for a moment, focusing on squeezing your glutes and maintaining tension on the resistance band. 8. Slowly lower your hips back to the starting position, maintaining control and tension on the resistance band. 9. Repeat the movement for the desired number of repetitions. ## Variations - **Single-Leg Hip Thrust**: Perform the hip thrust with one leg at a time. Extend one leg straight out in front of you while keeping the other knee on the ground. This variation increases the challenge and focuses more on each glute individually. - **Banded Frog Pumps**: Lie on your back with your feet together and knees bent, and the resistance band looped just above your knees. Open your knees outward, maintaining tension on the band, and thrust your hips upward, squeezing your glutes at the top. - **Barbell Hip Thrust**: If you have access to a barbell and a bench, you can perform hip thrusts with a barbell placed across your hips. This variation allows for heavier resistance and greater muscle activation. ## Muscles Worked - Gluteus maximus (main target) - Hamstrings - Hip adductors and abductors - Core muscles (stabilizers) ## Common Mistakes - Allowing the knees to collapse inward: Focus on pressing your knees outward against the resistance band throughout the entire movement to activate the hip abductor muscles and maintain proper alignment. - Rounding the back: Keep your spine in a neutral position and avoid arching or rounding your lower back during the exercise. Engage your core to maintain stability. - Not fully extending the hips: Make sure to thrust your hips forward until your body forms a straight line from your knees to your shoulders, fully extending the hips to engage the glutes effectively. - Using excessive momentum: Avoid using momentum or swinging your body to perform the movement. Maintain control and focus on the muscle contraction. ## Safety Precautions - Choose an appropriate resistance band that provides enough challenge but still allows you to maintain proper form. - Ensure that the resistance band is securely positioned above your knees and does not slide or snap during the exercise. - If you have any knee or hip injuries or conditions, consult with a healthcare professional or fitness trainer before attempting this exercise. - Perform the exercise on a stable surface to prevent slipping or losing balance. - Start with a lighter resistance or fewer repetitions if you are new to the exercise or have limited strength in the glutes and hips. - If you experience any pain or discomfort, modify the exercise or discontinue it. Listen to your body and work within your limits.