
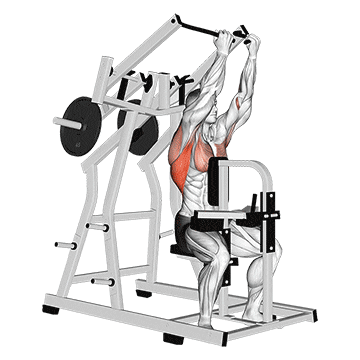
The Lever Reverse Grip Lateral Pulldown is a variation of the traditional lat pulldown exercise that targets the muscles of the back, particularly the latissimus dorsi (lats) and the biceps brachii. By using an underhand or reverse grip on the bar, this exercise emphasizes the development of the biceps and provides an effective way to strengthen the upper body. ## Instructions 1. Adjust the lever machine according to your height and comfort. Sit on the seat with your feet flat on the floor and your knees positioned under the knee pads. Make sure the knee pads are securely locked. 2. Reach up and grasp the bar with a shoulder-width underhand grip (palms facing you). Your hands should be positioned slightly wider than your shoulders. 3. Sit tall with a straight back and engage your core muscles. 4. Inhale and slowly pull the bar down towards your upper chest. Focus on using your back and biceps muscles to initiate and control the movement. 5. Keep your elbows pointed down and slightly backward as you pull the bar down. Imagine squeezing your shoulder blades together at the bottom of the movement. 6. When the bar is near your upper chest, pause for a brief moment, feeling the contraction in your back and biceps. 7. Exhale and slowly return the bar to the starting position, allowing your arms to fully extend without locking your elbows. 8. Repeat for the desired number of repetitions. ## Variations - Grip Width: Adjust the width of your grip on the bar to target different areas of the back and biceps. A narrower grip will focus more on the biceps, while a wider grip will engage the lats to a greater extent. - Resistance Adjustment: Adjust the weight or resistance on the lever machine according to your strength and fitness level. Start with a manageable weight and gradually increase as you progress. - Single-Arm Variation: Instead of using both arms simultaneously, you can perform the exercise one arm at a time by grasping the bar with one hand while keeping the other hand by your side. This variation helps to address muscle imbalances and provides a greater challenge to the stabilizing muscles. ## Muscles Worked - Latissimus dorsi (lats) - Biceps brachii - Rhomboids - Trapezius (upper and middle fibers) - Posterior deltoids ## Common Mistakes - Using momentum: Avoid using momentum to swing the body or jerk the weight down. Maintain control throughout the movement and focus on the muscles being targeted. - Pulling with the arms only: Ensure that the movement is initiated by the muscles of the back and not just the biceps. Imagine pulling the shoulder blades down and back as you perform the exercise. - Rounded back: Keep your back straight and avoid rounding the shoulders or upper back. Maintain good posture throughout the movement. - Gripping too tightly: Avoid gripping the bar too tightly, as it can result in excessive tension in the forearms and wrists. Maintain a firm but relaxed grip on the bar. ## Safety Precautions - Warm up before starting the exercise to prepare the muscles for the workout. - Use an appropriate weight or resistance that allows you to maintain proper form and control throughout the movement. - Ensure that the lever machine is set up correctly and the bar is securely attached. - If you have any pre-existing shoulder or back issues, consult with a healthcare professional before attempting this exercise. - Listen to your body and stop the exercise if you experience any pain or discomfort. - Maintain proper form and technique throughout the exercise to prevent injury.
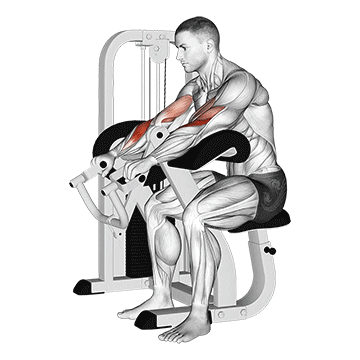
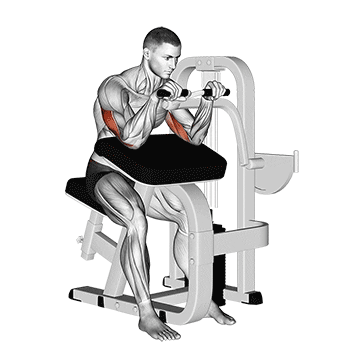
The Lever Reverse Grip Preacher Curl is an exercise that targets the muscles of the biceps and forearms. It is a variation of the traditional preacher curl exercise where the palms are facing upward in a reverse grip position. This exercise isolates the biceps brachii muscles and helps to build strength and definition in the arms. ## Instructions 1. Adjust the lever machine according to your height and comfort. Sit on the preacher curl bench and position your upper arms on the padded armrest, with your chest against the pad and your feet flat on the floor. 2. Grasp the lever handles with an underhand grip (palms facing upward) and a grip that is slightly wider than shoulder-width apart. 3. Ensure that your upper arms are fully extended and perpendicular to the floor, while keeping your elbows tucked in against the armrest. 4. Inhale and slowly curl the lever handles upward, contracting your biceps. Focus on keeping your upper arms stationary and using the strength of your biceps to lift the weight. 5. Continue the curl until your forearms are fully contracted and the lever handles are close to your shoulders. 6. Pause for a brief moment at the top of the movement, squeezing your biceps. 7. Exhale and slowly lower the lever handles back to the starting position, maintaining control throughout the eccentric phase of the movement. 8. Repeat for the desired number of repetitions. ## Variations - Grip Width: Adjust the grip width on the lever handles. A narrower grip will target the outer portion of the biceps, while a wider grip will engage the inner portion of the biceps. - Single-Arm Variation: If a lever machine is not available, you can perform the exercise with a dumbbell or resistance band while sitting on a regular preacher curl bench. Hold the weight or band in one hand and perform the curling motion with a reverse grip, focusing on one arm at a time. - Alternating Arms: Instead of curling both arms simultaneously, you can alternate between the left and right arms. This variation helps to address muscle imbalances and provides a greater challenge to the stabilizing muscles. ## Muscles Worked - Biceps brachii (short and long heads) - Brachialis - Brachioradialis - Forearm muscles (flexors) ## Common Mistakes - Using momentum: Avoid using momentum to swing the lever handles or lift more weight than you can handle. Focus on controlled and deliberate movements. - Raising the elbows: Keep your elbows tucked in against the armrest throughout the movement. Avoid allowing your elbows to move forward or flare out to the sides. - Shifting the torso: Maintain a stable and upright torso throughout the exercise. Avoid leaning forward or backward, as it can compromise the effectiveness of the exercise. - Gripping too tightly: Avoid gripping the handles too tightly, as it can create unnecessary tension in the forearms. Maintain a firm but relaxed grip. ## Safety Precautions - Warm up before starting the exercise to prepare the muscles for the workout. - Use an appropriate weight or resistance that allows you to maintain proper form and control throughout the movement. - If using a lever machine, ensure that it is set up correctly and the handles are securely attached. - If using a dumbbell or resistance band variation, choose an appropriate weight or resistance level and ensure proper control and stability. - If you have any pre-existing elbow or forearm issues, consult with a healthcare professional before attempting this exercise. - Listen to your body and stop the exercise if you experience any pain or discomfort. - Maintain proper form and technique throughout the exercise to prevent injury.
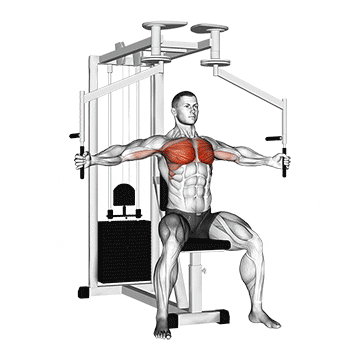
The lever seated fly is an exercise that primarily targets the muscles of the chest (pectoral muscles) and the shoulders (deltoids). It is an isolation exercise that involves the movement of the arms in a fly-like motion, simulating the action of hugging a large tree. ## Instructions 1. Start by sitting upright on a bench or seat with your back firmly supported. 2. Place your feet flat on the floor and maintain a stable and balanced position. 3. Adjust the lever machine's seat and handles according to your height and comfort. 4. Grasp the handles with an overhand grip (palms facing downward) and position your upper arms parallel to the floor, maintaining a slight bend at the elbows. 5. Keep your elbows at a fixed angle throughout the exercise. 6. In a controlled manner, bring the handles forward and together in a hugging motion until they meet in front of your chest. 7. Squeeze your chest muscles at the peak of the contraction for a brief moment. 8. Slowly return to the starting position by reversing the motion, allowing your chest muscles to stretch. 9. Repeat the movement for the desired number of repetitions. ## Variations - Machine Variation: If a lever machine is not available, a cable machine with adjustable handles can be used as an alternative. - Dumbbell Variation: Instead of using a machine, the exercise can be performed using dumbbells. Sit on a bench, hold a dumbbell in each hand, and perform the fly motion, keeping a slight bend in the elbows. ## Muscles Worked - Primary Muscles: Pectoralis major (chest muscles), anterior deltoids (front shoulder muscles). - Secondary Muscles: Serratus anterior, rhomboids, trapezius. ## Common Mistakes - Using Excessive Weight: Avoid using weights that are too heavy, as it can compromise your form and increase the risk of injury. Start with lighter weights and gradually increase as your strength and technique improve. - Rounded Back: Maintain an upright posture throughout the exercise and avoid rounding your back. Engage your core muscles to stabilize your spine. - Flaring Elbows: Keep your elbows fixed at a slightly bent position and avoid letting them flare out to the sides. This helps to engage the chest muscles effectively. - Lack of Control: Perform the exercise in a slow and controlled manner. Avoid using momentum or jerking motions, as it reduces the effectiveness of the exercise and increases the risk of injury. ## Safety Precautions - Consult with a healthcare professional before starting any new exercise program, especially if you have pre-existing injuries or medical conditions. - Ensure that the lever machine or cable machine is properly adjusted to your body size and securely locked in place. - Start with a light weight to familiarize yourself with the exercise and gradually increase the load as you become more comfortable and confident. - Maintain proper form and technique throughout the exercise to avoid strain or injury. - If you experience any pain or discomfort during the exercise, stop immediately and seek medical advice if needed.
The lever seated good morning is an exercise that primarily targets the muscles of the lower back (erector spinae) and the hamstrings. It involves a forward bending motion at the hips while keeping the back straight, simulating the movement of bending forward to pick up an object. ## Instructions 1. Start by sitting on a lever machine designed for seated good mornings. 2. Adjust the machine's seat and lever arm according to your height and comfort. 3. Position your feet firmly on the floor, hip-width apart. 4. Place your upper back against the pad and engage your core muscles for stability. 5. Grasp the handles or the sides of the seat for support. 6. Keeping your back straight and maintaining a slight bend at the knees, initiate the movement by hinging at the hips and leaning forward. 7. Lower your torso toward the floor while maintaining a controlled and stable motion. 8. Continue the descent until you feel a stretch in your hamstrings, or until you reach a comfortable range of motion. 9. Pause briefly at the bottom position. 10. Slowly reverse the movement, using your hamstrings and lower back muscles to bring your torso back to the starting position. 11. Repeat the movement for the desired number of repetitions. ## Variations - Dumbbell Variation: If a lever machine is not available, the exercise can be performed using dumbbells. Stand upright, hold a dumbbell in each hand, and perform the bending motion while keeping your back straight. - Barbell Variation: Similar to the dumbbell variation, the exercise can be performed using a barbell. Place the barbell on your upper back, perform the bending motion, and keep your back straight. ## Muscles Worked - Primary Muscles: Erector spinae (lower back muscles), hamstrings. - Secondary Muscles: Glutes, quadriceps. ## Common Mistakes - Rounding the Back: It is essential to maintain a straight back throughout the exercise. Avoid rounding or flexing the spine, as it can lead to strain or injury. Focus on keeping your core engaged and maintaining proper posture. - Using Excessive Weight: Start with lighter weights to ensure you have proper form and technique. Using excessive weight can compromise your form and increase the risk of injury. Gradually increase the weight as your strength and technique improve. - Jerking Motion: Perform the exercise in a controlled manner, avoiding any sudden or jerking movements. Maintain a slow and smooth motion to engage the targeted muscles effectively. - Lack of Hip Hinge: The movement should primarily come from the hips, not the lower back. Ensure you are hinging at the hips while maintaining a slight bend in the knees. This helps to engage the hamstrings and protect the lower back. ## Safety Precautions - Consult with a healthcare professional before starting any new exercise program, especially if you have pre-existing injuries or medical conditions. - Adjust the lever machine or use appropriate equipment to fit your body size and ensure proper alignment. - Start with a light weight and focus on mastering the technique before increasing the load. - Maintain proper form and technique throughout the exercise to avoid strain or injury. - If you experience any pain or discomfort during the exercise, stop immediately and seek medical advice if needed.
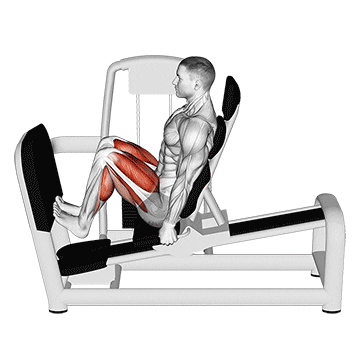
The lever seated squat calf raise on the leg press machine is an exercise that primarily targets the calf muscles (soleus and gastrocnemius) while also engaging the quadriceps and gluteal muscles. It involves a combination of squatting and calf raise movements, making it an effective compound exercise for building lower body strength and developing the calf muscles. ## Instructions 1. Adjust the seat and footplate of the leg press machine according to your comfort and range of motion. Ensure that your feet are positioned shoulder-width apart on the footplate. 2. Sit on the machine with your back pressed firmly against the backrest and your head positioned comfortably. 3. Release the safety handles or lever and unlock the weight stack. 4. Begin the movement by bending your knees and lowering the footplate towards your body, simulating a squatting motion. Keep your back straight and maintain control throughout the exercise. 5. Once your knees are flexed to a comfortable position, slowly extend your ankles by pushing the footplate away from your body, performing a calf raise. 6. Hold the top position for a brief pause and squeeze your calf muscles. 7. Slowly lower the footplate back down towards your body by flexing your ankles. 8. Repeat the movement for the desired number of repetitions. ## Variations - **Weight Variation**: Adjust the weight on the leg press machine to match your fitness level. Increase the weight as you get stronger. - **Foot Placement**: Experiment with different foot positions on the footplate. To target different areas of the calf muscles, try placing your toes inwards, outwards, or straight ahead. - **Single Leg Variation**: Perform the exercise using one leg at a time to increase the challenge and focus on each calf individually. ## Muscles Worked - Primary Muscles: Calf muscles (soleus, gastrocnemius) - Secondary Muscles: Quadriceps, gluteal muscles ## Common Mistakes - **Using Excessive Weight**: Avoid selecting a weight that is too heavy, as it can compromise your form and increase the risk of injury. Start with a manageable weight and gradually progress. - **Lack of Full Range of Motion**: Ensure that you squat down sufficiently, allowing your knees to flex and achieving a 90-degree angle or slightly lower. Similarly, fully extend your ankles during the calf raise portion of the movement. - **Rounding the Back**: Maintain proper posture throughout the exercise. Avoid rounding your back or hunching forward, as this can strain your lower back. Keep your chest up and your back against the backrest. - **Bouncing or Jerking Movements**: Perform the exercise in a controlled manner without using momentum. Avoid bouncing or jerking the weight, as it reduces the effectiveness of the exercise and increases the risk of injury. ## Safety Precautions - Consult with a healthcare professional or fitness instructor before attempting this exercise, especially if you have any pre-existing medical conditions or injuries. - Ensure that the leg press machine is in good working condition and properly maintained. - Always warm up your muscles before starting the exercise to reduce the risk of injury. - Start with a lighter weight and gradually increase the load as you become more comfortable and confident with the movement. - If you experience any pain or discomfort during the exercise, stop immediately and seek medical advice.

The lever seated twist is an exercise that targets the muscles of the core, particularly the obliques. It involves rotational movements of the torso while seated on a lever machine. This exercise helps strengthen the oblique muscles, improve core stability, and enhance rotational power and mobility. ## Instructions 1. Adjust the seat and handles of the lever machine according to your comfort and range of motion. Ensure that the handles are positioned at chest level. 2. Sit on the machine with your back pressed against the backrest, feet flat on the floor, and knees slightly bent. 3. Grasp the handles with both hands, keeping your elbows bent and close to your body. 4. Engage your core muscles by pulling your navel towards your spine and maintaining an upright posture. 5. Begin the movement by rotating your torso to one side while keeping your hips stable. Rotate as far as comfortable without straining or over-twisting. 6. Hold the twist for a brief pause, feeling the contraction in your oblique muscles. 7. Slowly return to the starting position by rotating your torso back to the center. 8. Repeat the movement to the opposite side, alternating the twists in a controlled manner. 9. Continue alternating twists for the desired number of repetitions. ## Variations - **Weight Variation**: Adjust the weight on the lever machine to match your fitness level. Start with a lighter weight and gradually increase as you gain strength and stability. - **Single-Arm Variation**: Perform the exercise using one arm at a time. This variation increases the challenge and requires greater stability and control. - **Medicine Ball Twist**: Instead of using a lever machine, you can perform seated twists with a medicine ball. Hold the medicine ball with both hands close to your chest, and rotate your torso from side to side while seated on the floor or an exercise mat. ## Muscles Worked - Primary Muscles: Obliques (internal and external) - Secondary Muscles: Transverse abdominis, rectus abdominis, erector spinae, hip muscles ## Common Mistakes - **Using Momentum**: Avoid relying on momentum to twist your torso. Perform the movement in a controlled manner, focusing on engaging the core muscles and initiating the rotation from the obliques. - **Over-Rotating**: Do not force your range of motion by over-rotating the torso. Rotate as far as comfortable, keeping your hips stable throughout the movement. - **Neglecting Proper Form**: Maintain proper posture throughout the exercise. Avoid slouching or rounding your back. Keep your chest lifted, shoulders relaxed, and core engaged. - **Straining the Neck**: Avoid excessive neck strain by keeping your neck in a neutral position. Do not pull or strain the neck muscles during the twist. ## Safety Precautions - If you have any pre-existing medical conditions, especially related to the spine or core, consult with a healthcare professional or fitness instructor before attempting this exercise. - Ensure that the lever machine is in good working condition and properly maintained. - Start with a lighter weight and gradually increase the load as you become more comfortable and confident with the movement. - If you experience any pain or discomfort during the exercise, especially in the spine or abdomen, stop immediately and seek medical advice. - Maintain proper form and control throughout the exercise to minimize the risk of injury.

The lever shoulder press is an exercise that primarily targets the muscles of the shoulders, specifically the deltoids (front, middle, and rear heads). It also engages the triceps, upper back, and core muscles. This exercise involves pressing the lever handles overhead while seated, providing resistance to build strength and muscle development in the shoulders. ## Instructions 1. Adjust the seat height and position of the lever machine according to your comfort and range of motion. The handles should be at shoulder level. 2. Sit on the machine with your back pressed against the backrest, feet flat on the floor, and knees slightly bent. 3. Grasp the lever handles with an overhand grip, slightly wider than shoulder-width apart. Your palms should be facing forward. 4. Position your elbows at a 90-degree angle, pointing out to the sides, and align them with your shoulders. 5. Engage your core muscles by pulling your navel towards your spine, and maintain an upright posture throughout the exercise. 6. Begin the movement by pressing the lever handles overhead in a controlled manner. Extend your arms fully, but avoid locking out the elbows. 7. Pause for a moment at the top of the movement, feeling the contraction in your shoulder muscles. 8. Slowly lower the lever handles back to the starting position, keeping the movement controlled and avoiding rapid descent. 9. Repeat the exercise for the desired number of repetitions. ## Variations - **Weight Variation**: Adjust the weight on the lever machine according to your strength and fitness level. Start with a manageable weight and gradually increase as you progress. - **Single-Arm Variation**: Perform the exercise using one arm at a time. This variation provides a unilateral challenge and requires greater stability and control. - **Seated Dumbbell Shoulder Press**: If a lever machine is not available, you can perform a seated dumbbell shoulder press. Sit on a bench or chair, holding dumbbells in each hand at shoulder level, and press them overhead. ## Muscles Worked - Primary Muscles: Deltoids (front, middle, and rear heads) - Secondary Muscles: Triceps, upper back muscles, core muscles for stability ## Common Mistakes - **Using Excessive Momentum**: Avoid using momentum or jerking movements to press the handles overhead. Focus on a controlled and smooth motion throughout the exercise. - **Neglecting Proper Form**: Maintain proper posture throughout the exercise. Avoid leaning forward or backward excessively. Keep your chest lifted, shoulders relaxed, and core engaged. - **Not Fully Extending the Arms**: Make sure to fully extend your arms without locking out the elbows at the top of the movement. This ensures proper engagement of the shoulder muscles. - **Overarching the Lower Back**: Avoid excessive arching of the lower back during the exercise. Maintain a neutral spine position by engaging the core and keeping the back against the backrest. ## Safety Precautions - If you have any pre-existing shoulder or upper body injuries, consult with a healthcare professional or fitness instructor before attempting this exercise. - Ensure that the lever machine is in good working condition and properly maintained. - Start with a lighter weight and gradually increase the load as you become more comfortable and confident with the movement. - Maintain proper form and control throughout the exercise to minimize the risk of injury. - If you experience any pain or discomfort in the shoulders, back, or joints, stop immediately and seek medical advice.
The lever triceps extension, also known as the triceps press or triceps pushdown, is an exercise that primarily targets the triceps muscles located at the back of the upper arm. This exercise involves extending the arms against resistance, which helps to strengthen and tone the triceps. It is commonly performed using a cable machine or a resistance band. ## Instructions 1. Stand facing the cable machine or attach a resistance band to a sturdy anchor point at chest level. 2. Grasp the cable attachment or the ends of the resistance band with an overhand grip, with your hands shoulder-width apart. 3. Position your feet shoulder-width apart, slightly bend your knees, and maintain a slight forward lean from your hips. 4. Start with your elbows bent at a 90-degree angle, tucked in close to your sides, and your forearms parallel to the floor. 5. Keeping your upper arms stationary, exhale and extend your forearms downward by fully straightening your arms. 6. Pause briefly at the bottom of the movement, squeezing your triceps. 7. Inhale and slowly return to the starting position by bending your elbows and allowing your forearms to rise back up. 8. Repeat for the desired number of repetitions. ## Variations - Rope Attachment: Instead of using a straight bar attachment, you can use a rope attachment for a different grip and range of motion. - One Arm Triceps Extension: Perform the exercise with one arm at a time, either using a single cable attachment or a single resistance band. - Reverse Grip Triceps Extension: Use an underhand grip (palms facing up) instead of an overhand grip (palms facing down) to target the triceps from a different angle. - Resistance Band Triceps Extension: If you don't have access to a cable machine, you can perform triceps extensions using resistance bands. Attach the band to a sturdy anchor above you and follow the same instructions as above. ## Muscles Worked The lever triceps extension primarily targets the triceps brachii muscles, specifically the long head, lateral head, and medial head. Additionally, it also engages the muscles in the shoulders and forearms to a lesser extent. ## Common Mistakes - Using Momentum: Avoid using momentum to swing the weight down or bounce it back up. Maintain control throughout the exercise. - Elbow Flaring: Keep your elbows close to your sides throughout the movement. Avoid allowing your elbows to flare out to the sides, as this reduces the emphasis on the triceps. - Insufficient Range of Motion: Aim to fully extend your arms at the bottom of the movement and return to the starting position with your forearms parallel to the floor. Avoid cutting the range of motion short. - Rounded Shoulders: Keep your shoulders pulled back and down, maintaining good posture throughout the exercise. Avoid rounding your shoulders forward. ## Safety Precautions - Start with a weight or resistance level that is appropriate for your fitness level and gradually increase as you become stronger. - If using a cable machine, ensure that the cable is securely attached and the weight stack is locked in place. - Maintain proper form and control throughout the exercise to minimize the risk of injury. - If you experience any pain or discomfort, stop the exercise and consult a qualified fitness professional.
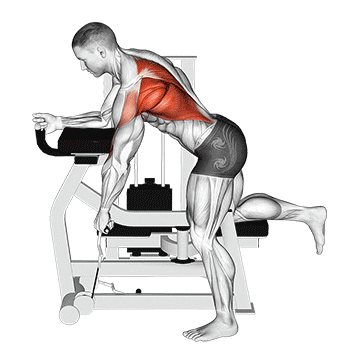
The lever unilateral row is an exercise that targets the muscles of the upper back, particularly the latissimus dorsi (lats), rhomboids, and rear deltoids. It involves pulling a lever or handle towards your body while maintaining a stable and balanced position. This exercise helps to improve upper body strength, posture, and overall back development. ## Instructions 1. Stand next to a lever machine or cable machine with your feet shoulder-width apart and knees slightly bent. 2. Adjust the height of the lever or cable attachment to approximately waist level. 3. Reach across your body with the hand closest to the machine and grasp the lever or handle with an overhand grip. 4. Keep your back straight, chest up, and maintain a slight forward lean from your hips. 5. Begin with your arm fully extended and your shoulder relaxed. 6. Exhale and initiate the movement by pulling the lever or handle towards your body, retracting your shoulder blade as you do so. 7. Continue pulling until your elbow is fully bent and your hand is close to your side. 8. Hold the contracted position for a brief moment, squeezing your back muscles. 9. Inhale and slowly extend your arm back to the starting position in a controlled manner. 10. Repeat for the desired number of repetitions and then switch sides. ## Variations - Seated Unilateral Row: Perform the exercise while seated on a bench or chair instead of standing. This variation provides stability and focuses solely on the rowing movement. - Bilateral Row: Instead of performing a unilateral row, you can perform a bilateral row by using both hands simultaneously to pull the lever or handles towards your body. This variation allows for heavier loads and engages both sides of the back simultaneously. - Single-Arm Dumbbell Row: If a lever machine or cable machine is not available, you can perform a single-arm dumbbell row. Place one knee and hand on a bench, keeping your back parallel to the ground, and row a dumbbell towards your side. ## Muscles Worked The lever unilateral row primarily targets the latissimus dorsi (lats) muscles, which are responsible for back width and strength. Additionally, it engages the rhomboids, rear deltoids, biceps, and forearm muscles. ## Common Mistakes - Rounded or Slouched Back: Maintain proper posture throughout the exercise by keeping your back straight and chest up. Avoid rounding or slouching your back, as this reduces the effectiveness of the exercise and may strain your lower back. - Excessive Momentum: Avoid using momentum to pull the lever or handle towards your body. Focus on controlled movements and engage the targeted muscles throughout the entire range of motion. - Elbow Flaring: Keep your elbow close to your side throughout the movement. Avoid allowing your elbow to flare out to the side, as this can shift the emphasis away from the back muscles. - Insufficient Range of Motion: Aim to fully extend your arm at the starting position and pull the lever or handle towards your side until your elbow is fully bent. Avoid cutting the range of motion short. ## Safety Precautions - Begin with a weight or resistance level that is suitable for your fitness level and gradually increase as you become stronger. - Ensure that the lever or cable attachment is securely attached and the weight stack is locked in place. - Use a controlled and smooth motion throughout the exercise to minimize the risk of injury. - If you experience any pain or discomfort, stop the exercise and consult a qualified fitness professional.