
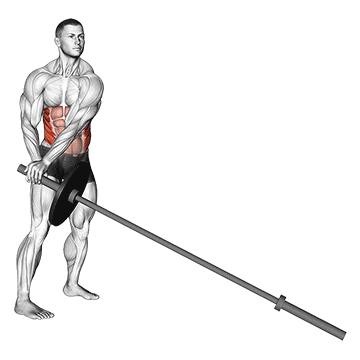
The Landmine 180 is a dynamic rotational exercise that targets the core muscles, including the obliques, abdominals, and lower back. It also engages the muscles of the shoulders, hips, and legs. The exercise improves core strength, rotational power, and overall stability. ## Instructions 1. Start by placing one end of a barbell into a landmine attachment or securely anchor it in a corner. 2. Stand with your feet shoulder-width apart, facing the landmine with the barbell at chest height. 3. Grasp the free end of the barbell with both hands, palms facing each other. 4. Position your elbows slightly bent, keeping them close to your body. 5. Engage your core muscles and maintain a tall and upright posture throughout the exercise. 6. Initiate the movement by rotating your torso to one side, driving the barbell across your body. 7. Continue rotating until the barbell is near your hip on the opposite side. 8. Reverse the movement by rotating in the opposite direction, bringing the barbell back to the starting position. 9. Repeat the rotation for the desired number of repetitions, alternating sides with each repetition. ## Variations - Landmine Press: Instead of performing the rotational movement, you can focus on the pressing motion by extending your arms and pushing the barbell away from your body. - Single-Arm Landmine 180: Perform the Landmine 180 using only one arm, holding the barbell with one hand while keeping the other hand on your hip or extended out for balance. ## Muscles Worked - Internal and external obliques - Rectus abdominis (abs) - Transverse abdominis - Erector spinae (lower back) - Deltoids (shoulders) - Glutes - Quadriceps - Hamstrings ## Common Mistakes - Using excessive momentum: Avoid relying solely on momentum to rotate the barbell. Focus on controlled movements and engage the core muscles throughout the exercise. - Rounded back: Maintain a straight and neutral spine during the rotation. Avoid rounding your back or hunching over, as it can strain the lower back. - Not rotating through the hips: Ensure that the movement originates from the hips and core, rather than just the arms. Rotate your entire torso and engage your obliques to maximize the benefits of the exercise. - Allowing the barbell to drift away from the body: Keep the barbell close to your body throughout the movement to maintain control and stability. ## Safety Precautions - Start with a lighter weight or resistance and gradually increase as you become comfortable with the exercise. - Use smooth and controlled movements to avoid any jerking or sudden motions that could lead to injury. - Maintain proper form and technique throughout the exercise to prevent strain or stress on the lower back. - If you have any existing back or shoulder injuries or conditions, consult with a fitness professional or healthcare provider before attempting this exercise. - If you experience pain or discomfort during the exercise, stop immediately and seek medical advice if needed. - Ensure that the landmine attachment or barbell is securely anchored to prevent any accidents or equipment movement.
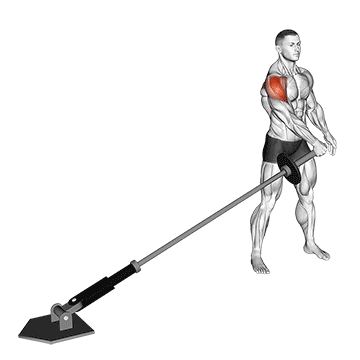
The Landmine Lateral Raise is an exercise that primarily targets the deltoid muscles of the shoulders. It also engages the muscles of the upper back and arms. The exercise helps to develop shoulder strength, stability, and improve overall shoulder aesthetics. ## Instructions 1. Begin by placing one end of a barbell into a landmine attachment or securely anchor it in a corner. 2. Stand with your feet shoulder-width apart, facing the landmine with the barbell in front of your thighs. 3. Grasp the free end of the barbell with one hand, palm facing inward. 4. Position your working arm slightly bent with your elbow close to your side. 5. Keep your core engaged and maintain an upright posture throughout the exercise. 6. Initiate the movement by raising your arm laterally, away from your body, while keeping it parallel to the ground. 7. Continue raising your arm until it reaches shoulder level or slightly above, maintaining control and a slight bend in the elbow. 8. Pause for a moment at the top of the movement, focusing on contracting the shoulder muscles. 9. Slowly lower your arm back down to the starting position. 10. Repeat the exercise for the desired number of repetitions and then switch to the other arm. ## Variations - Alternating Landmine Lateral Raise: Instead of performing the exercise with one arm at a time, you can alternate between the left and right arm for each repetition. - Landmine Lateral Raise with Both Arms: Grasp the barbell with both hands, maintaining an overhand grip, and perform the lateral raise simultaneously with both arms. ## Muscles Worked - Deltoids (shoulders) - Trapezius - Rhomboids - Upper back muscles - Biceps brachii (secondary) ## Common Mistakes - Using momentum: Avoid using momentum or swinging your body to lift the barbell. Focus on controlled movements and engage the shoulder muscles to perform the exercise. - Raising the arms too high: While it's important to lift the arms to shoulder level or slightly above, avoid lifting them excessively high, as it can put unnecessary strain on the shoulder joint. - Arching the back: Maintain a neutral spine and avoid arching your back throughout the movement. Engage your core muscles to stabilize your body. - Not controlling the descent: Maintain control while lowering the barbell back down to the starting position. Avoid allowing it to drop quickly or relying on gravity to bring it down. ## Safety Precautions - Start with a light weight or resistance and gradually increase as you become comfortable with the exercise. - If you have any pre-existing shoulder injuries or conditions, consult with a fitness professional or healthcare provider before attempting this exercise. - Maintain proper form and technique throughout the exercise to prevent strain or stress on the shoulders. - If you experience pain or discomfort during the exercise, stop immediately and seek medical advice if needed. - Ensure that the landmine attachment or barbell is securely anchored to prevent any accidents or equipment movement. - Warm up properly before attempting the Landmine Lateral Raise to prepare your muscles and joints.
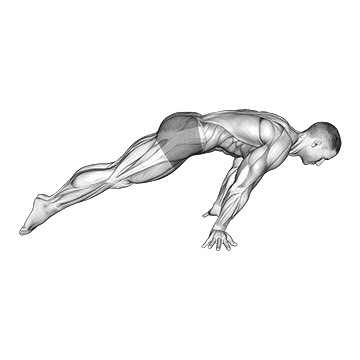
The Lean Planche is an advanced bodyweight exercise that targets the muscles of the upper body, particularly the shoulders, chest, and core. It requires significant strength, stability, and body control. The exercise helps develop upper body and core strength, improves shoulder stability, and enhances overall body control and coordination. ## Instructions 1. Start by positioning yourself in a push-up position with your hands placed slightly wider than shoulder-width apart on the ground. 2. Engage your core muscles and maintain a straight line from your head to your heels, with your body parallel to the ground. 3. Shift your weight forward by leaning your torso forward while keeping your arms straight. 4. As you lean forward, gradually lift your feet off the ground, keeping your legs straight and parallel to the ground. 5. Continue leaning forward until your torso is almost parallel to the ground, creating a straight line from your head to your toes. 6. Hold the lean planche position for the desired duration, aiming to maintain balance and control. 7. Slowly lower your feet back down to the starting position, maintaining control and stability. 8. Repeat the exercise for the desired number of repetitions or hold for a specific duration. ## Variations - Tuck Planche: If the lean planche is too challenging, you can start with a tuck planche. Instead of keeping your legs straight and parallel to the ground, bend your knees and bring them closer to your chest while maintaining the leaned position. - Advanced Planche Progressions: Once you have mastered the lean planche, you can progress to more advanced planche variations, such as the straddle planche or full planche. These variations require increased strength and body control. ## Muscles Worked - Deltoids (shoulders) - Pectoralis major (chest) - Triceps - Core muscles (abdominals, obliques) - Scapular stabilizers - Wrist flexors ## Common Mistakes - Sagging hips or arching the back: Maintain a straight and rigid body position throughout the exercise. Avoid sagging your hips or arching your back, as it reduces the effectiveness of the exercise and puts strain on the lower back. - Insufficient forward lean: Ensure that your torso leans forward enough to create a significant challenge. The further you lean, the more demanding the exercise becomes. - Not engaging the core: Focus on actively engaging your core muscles to maintain stability and proper form. This will help you achieve a straight and aligned body position. - Relying too much on arm strength: While the arms play a role in supporting your body, the lean planche primarily relies on body tension and core engagement. Avoid solely relying on your arm strength to hold the position. ## Safety Precautions - The lean planche is an advanced exercise that requires a high level of strength and body control. Ensure that you have sufficient upper body and core strength before attempting this exercise. - Warm up properly before attempting the lean planche to prepare your muscles and joints. - It is recommended to progress gradually and build strength with easier progressions before attempting the full lean planche. - If you have any wrist, shoulder, or lower back injuries or conditions, consult with a fitness professional or healthcare provider before attempting this exercise. - Stop the exercise if you experience pain or discomfort, and seek medical advice if necessary. - Use a spotter or train with a qualified coach when first learning the lean planche to ensure safety and proper form.

The left hook is a punching technique commonly used in boxing. It is a power shot that targets the opponent's head or body from the left side. The left hook primarily engages the muscles of the upper body, including the core, shoulders, and arms. It is a versatile and effective punch that can be used to create openings, generate power, and counterattack. ## Instructions 1. Start in a boxing stance with your feet shoulder-width apart. 2. Bend your knees slightly, keeping your weight balanced and centered. 3. Place your left foot (lead foot) slightly forward and your right foot (rear foot) slightly back. 4. Keep your hands up, with your left hand (lead hand) positioned near your face, at approximately chin level, and your right hand (rear hand) positioned near your cheek for protection. 5. To throw a left hook, initiate the movement from your legs and hips. Rotate your torso to the left, pivoting on the ball of your left foot. 6. Simultaneously, pivot your left shoulder forward, extending your left arm in a sweeping arc toward the target. 7. As you throw the left hook, aim to connect with the side of your opponent's head or body, depending on the target you are aiming for. 8. Rotate your torso back to the starting position, bringing your left hand back to your face to guard yourself. 9. Practice the left hook technique by repeating the movement, focusing on proper form, balance, and power generation. ## Variations - Left Uppercut: The left uppercut is another effective punch that can be thrown from a similar starting position as the left hook. Instead of sweeping horizontally, the left uppercut is an upward punch that targets the opponent's chin or body. - Left Hook to the Body: Instead of aiming for the head, you can modify the left hook technique to target the opponent's body. Lower your trajectory and aim for the ribs or midsection of your opponent. ## Muscles Worked - Deltoids (shoulders) - Biceps and triceps - Core muscles (abdominals, obliques) - Latissimus dorsi (lats) - Pectoralis major (chest) - Trapezius and rhomboids - Forearm muscles ## Common Mistakes - Overextending the arm: Avoid fully extending your arm during the left hook. Maintain a slight bend in your elbow to prevent hyperextension and protect your joints. - Dropping the opposite hand: Keep your right hand (rear hand) up near your cheek for protection while throwing the left hook. Avoid dropping the opposite hand, as it leaves you vulnerable to counterattacks. - Poor weight transfer: Ensure that your weight transfers from your back foot to your lead foot as you rotate your hips and torso. This helps generate power and stability in the punch. - Lack of body rotation: Engage your entire body in the left hook by rotating your hips, torso, and shoulders. Avoid relying solely on arm strength, as it limits the power and effectiveness of the punch. ## Safety Precautions - Use proper hand wraps and wear suitable boxing gloves to protect your hands and wrists. - Warm up properly before engaging in any boxing training or sparring sessions. - Start with light punches and gradually increase the intensity as you develop proper technique and conditioning. - Ensure that you have proper supervision and training when learning boxing techniques to minimize the risk of injury. - If you have any pre-existing injuries or medical conditions, consult with a healthcare professional before engaging in boxing activities. - Practice on a suitable training surface, such as a boxing ring or a well-padded and properly maintained punching bag, to reduce the risk of injury.
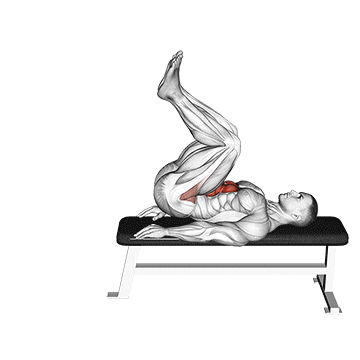
The leg pull-in on a flat bench is an abdominal exercise that targets the rectus abdominis (six-pack muscles) and the hip flexors. It helps to strengthen and tone the core muscles, improve stability, and enhance overall abdominal definition. ## Instructions 1. Start by sitting on a flat bench with your legs extended in front of you and your hands gripping the sides of the bench for support. 2. Lean back slightly, engaging your core muscles to maintain balance and stability. 3. Lift your legs off the ground, keeping them together and straight. 4. Slowly bend your knees and bring them toward your chest, while simultaneously flexing your hips. 5. Continue the movement until your knees are close to your chest and your lower back is rounded. 6. Pause for a moment and then slowly extend your legs back to the starting position, keeping them straight throughout the movement. 7. Repeat the exercise for the desired number of repetitions. ## Variations - Decline Leg Pull-In: Perform the leg pull-in exercise on a decline bench to increase the intensity and challenge your abdominal muscles further. - Weighted Leg Pull-In: Hold a dumbbell or a weighted plate between your feet to add resistance and increase the difficulty of the exercise. - Alternating Leg Pull-In: Instead of bringing both knees toward your chest simultaneously, alternate between the right and left legs, bringing one knee in at a time while keeping the other leg extended. ## Muscles Worked - Rectus abdominis (six-pack muscles) - Hip flexors (iliopsoas) - Transverse abdominis - Obliques (secondary) ## Common Mistakes - Using momentum: Avoid swinging your legs or using momentum to bring your knees toward your chest. Focus on controlled movements and engage your core muscles to perform the exercise. - Arching the lower back: Maintain a neutral spine throughout the movement and avoid arching your lower back excessively. This helps to target the abdominal muscles effectively and prevents strain on the lower back. - Not fully extending the legs: Ensure that you fully extend your legs back to the starting position, keeping them straight. Avoid stopping short of full extension to maintain proper form and engage the muscles fully. - Holding your breath: Remember to breathe throughout the exercise. Exhale as you pull your knees toward your chest and inhale as you extend your legs back to the starting position. ## Safety Precautions - If you have any pre-existing back or hip injuries or conditions, consult with a fitness professional or healthcare provider before attempting this exercise. - Start with a comfortable range of motion and gradually increase it as your flexibility and strength improve. - Maintain proper form and technique throughout the exercise to prevent strain or stress on the lower back. - If you experience pain or discomfort during the exercise, stop immediately and seek medical advice if needed. - Use a stable and sturdy flat bench to perform the leg pull-in exercise. - Warm up properly before attempting the leg pull-in to prepare your muscles and joints.
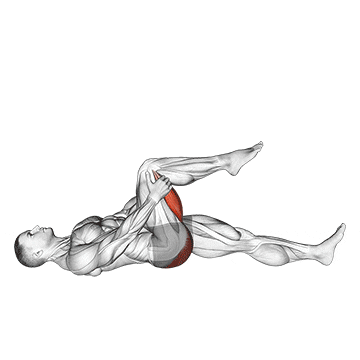
The leg up hamstring stretch is an exercise that primarily targets the hamstring muscles at the back of the thigh. It helps improve flexibility, increase the range of motion in the hamstrings, and can alleviate tightness in the lower body. This stretch is particularly beneficial for individuals involved in activities that require leg strength and flexibility, such as running, jumping, and various sports. ## Instructions 1. Start by lying flat on your back on a comfortable surface, such as a mat or carpeted floor. 2. Bend your right knee and keep your right foot flat on the ground. 3. Raise your left leg straight up into the air, keeping it as straight as possible. If you have difficulty keeping your leg straight, you can bend the knee slightly. 4. Interlace your fingers behind your left thigh, just below the knee joint. Alternatively, you can use a towel or strap to hold onto your leg if reaching behind is challenging. 5. Gently pull your left leg towards your torso while keeping the right leg relaxed and your lower back pressed into the floor. 6. As you pull, focus on feeling a stretch in the back of your left thigh. Avoid forcing the stretch or causing any pain. 7. Hold the stretch for 20 to 30 seconds while taking deep breaths. 8. Slowly release the stretch and lower your left leg back down to the ground. 9. Repeat the stretch on the other leg by bending the left knee, raising the right leg, and pulling it towards your torso using the same technique. ## Variations - Seated Hamstring Stretch: Sit on the edge of a chair or bench with one leg extended in front of you. Keep your back straight and hinge forward from the hips, reaching towards your extended leg to stretch the hamstring. - Standing Hamstring Stretch: Stand upright with one foot slightly in front of the other. Lean forward, keeping your back straight, and reach towards your toes to stretch the hamstring. You can also place your foot on an elevated surface like a step or bench for a deeper stretch. - Supine Hamstring Stretch with Strap: Lie on your back and loop a strap or towel around the arch of your foot. Gently pull the strap to bring your leg towards your torso, feeling the stretch in your hamstring. ## Muscles Worked - Hamstrings (specifically, the biceps femoris, semitendinosus, and semimembranosus muscles) - Calves (secondary) ## Common Mistakes - Rounding the back: Maintain a neutral spine throughout the stretch and avoid rounding your back. Keep your lower back pressed into the floor or mat. - Overstretching: Avoid pushing the stretch beyond your comfort level. Overstretching can lead to injury. Gradually increase the intensity of the stretch over time, but never force it. - Holding your breath: Remember to breathe deeply and naturally during the stretch. Avoid holding your breath as it may increase tension in your muscles. ## Safety Precautions - If you have a history of hamstring or lower back injuries, or any other medical condition, consult with a healthcare professional before attempting this stretch. - Perform the stretch on a comfortable surface that provides adequate support. - Start with a gentle stretch and gradually increase the intensity over time as your flexibility improves. - Avoid bouncing or jerking movements while stretching, as they can strain the muscles. - If you feel any sharp or intense pain during the stretch, stop immediately and consult with a healthcare professional. - Listen to your body and respect your limits. Do not push yourself into a painful or uncomfortable position.
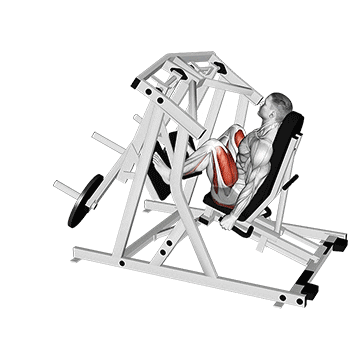
The lever alternate leg press is a lower body exercise that targets the quadriceps, hamstrings, and glutes. It involves pressing against a lever or resistance pad with one leg at a time while the other leg rests. This exercise helps to strengthen the muscles of the lower body, improve leg strength and power, and enhance overall lower body stability. ## Instructions 1. Start by adjusting the lever machine or resistance pad so that it aligns with your leg when you sit on the machine. 2. Sit on the machine with your back against the backrest and your feet placed on the foot platform. 3. Place one foot on the lever or resistance pad, with your knee bent at approximately 90 degrees. 4. Grasp the handles or sides of the machine for stability. 5. Press against the lever or resistance pad with your foot, extending your leg until it is almost fully straight. 6. Pause briefly at the top of the movement, maintaining control. 7. Slowly return your leg to the starting position, bending your knee and bringing the lever or resistance pad back to the starting position. 8. Repeat the movement with the opposite leg. 9. Continue alternating between legs for the desired number of repetitions. ## Variations - One-Leg Leg Press: If a lever machine or resistance pad is not available, you can perform a similar movement using a single-leg leg press machine. This variation focuses on one leg at a time and provides a similar workout for the lower body. - Resistance Band Leg Press: Attach a resistance band to a secure anchor point behind you and loop it around your foot. Perform a leg press motion by extending your leg against the resistance of the band. This variation can be done at home or in a gym with limited equipment. - Weighted Leg Press: To increase the intensity of the exercise, add weights by placing a weight plate on top of the lever or resistance pad. ## Muscles Worked - Quadriceps (front of the thigh) - Hamstrings (back of the thigh) - Glutes (butt muscles) - Calves (secondary) ## Common Mistakes - Using too much weight: Start with a manageable weight and focus on proper form and technique. Gradually increase the resistance as your strength improves. - Arching the lower back: Maintain proper posture throughout the exercise. Avoid arching or rounding your lower back. Keep your back pressed against the backrest. - Locking out the knees: Avoid fully locking out your knees at the top of the movement. Keep a slight bend in your knees to maintain tension on the muscles and prevent excessive stress on the joint. - Not controlling the movement: Maintain control throughout the exercise. Avoid using momentum or jerking motions to press the lever or resistance pad. Focus on a slow and controlled movement pattern. ## Safety Precautions - Adjust the machine or resistance pad according to your comfort and alignment. Ensure that your leg is properly positioned and supported during the exercise. - Start with a weight that allows you to maintain proper form and complete the movement with control. - If you experience any pain or discomfort during the exercise, stop immediately and consult with a fitness professional or healthcare provider. - If you have any pre-existing knee or lower body injuries or conditions, seek guidance from a professional before attempting this exercise. - Warm up before performing the leg press exercise to prepare your muscles and joints. - Use the appropriate range of motion that feels comfortable and safe for your body. Avoid excessive bending or extending of the knees.
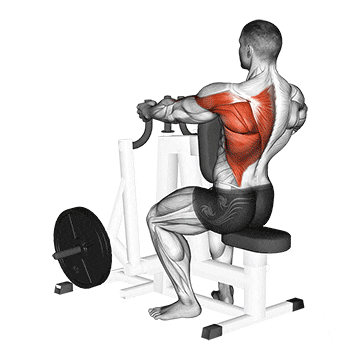
The lever alternating narrow grip seated row is an exercise that targets the muscles of the upper back, including the rhomboids, trapezius, and rear deltoids. It also engages the biceps and forearms to a lesser extent. This exercise helps to strengthen the muscles responsible for pulling movements, improve posture, and enhance overall upper body strength and stability. ## Instructions 1. Sit on the lever machine with your back against the backrest, feet firmly planted on the foot platform, and knees slightly bent. 2. Adjust the seat and chest pad so that you can comfortably reach the handles with a narrow grip. 3. Grasp the handles with an underhand grip (palms facing upward) and keep your hands close together, shoulder-width apart. 4. Sit tall with your chest lifted, shoulders down and back, and core engaged. 5. Begin with your arms fully extended, allowing your shoulders to stretch forward. 6. Pull one handle towards your torso, retracting your shoulder blade and squeezing your back muscles. Keep your elbow close to your body. 7. Pause briefly at the top of the movement, focusing on squeezing your back muscles. 8. Slowly extend your arm back to the starting position while simultaneously initiating the pull with the opposite arm. 9. Continue alternating between arms for the desired number of repetitions. ## Variations - Cable Narrow Grip Seated Row: If a lever machine is not available, you can perform a similar exercise using a cable machine. Attach a narrow-grip handle to the cable and sit facing the cable machine with your knees slightly bent. Grab the handle with an underhand grip and perform the rowing motion, following the same instructions as above. - Dumbbell Bent-Over Row: Stand with a dumbbell in each hand, hinge forward at the hips while keeping your back straight, and bring the dumbbells towards your torso in a rowing motion. This variation allows for greater range of motion and requires more stabilization. - Resistance Band Narrow Grip Seated Row: Attach a resistance band to a secure anchor point in front of you. Sit on a bench or chair, hold the ends of the band with an underhand grip, and perform the rowing motion, squeezing your back muscles at the end of each repetition. ## Muscles Worked - Rhomboids - Trapezius (middle and lower fibers) - Rear deltoids - Biceps - Forearms (secondary) ## Common Mistakes - Using momentum: Avoid using momentum to initiate the movement. Focus on a controlled and deliberate rowing motion. - Rounding the back: Maintain proper posture throughout the exercise. Avoid rounding or hunching your back. Keep your chest lifted and shoulders down and back. - Pulling with the arms only: Engage your back muscles and initiate the movement from the shoulder blades. Imagine squeezing your shoulder blades together as you pull. - Allowing the shoulders to shrug: Keep your shoulders down and away from your ears throughout the exercise. Avoid shrugging or lifting your shoulders towards your neck. ## Safety Precautions - Adjust the machine or cable resistance to a level that challenges you but still allows for proper form and control. - Keep your core engaged and maintain a stable position throughout the exercise. - Avoid using excessive weight that compromises your form or places excessive strain on your back or shoulders. - If you have any pre-existing shoulder or back injuries or conditions, consult with a fitness professional or healthcare provider before attempting this exercise. - Warm up before performing the exercise to prepare your muscles and joints. - If you experience any pain or discomfort during the exercise, stop immediately and consult with a fitness professional or healthcare provider.
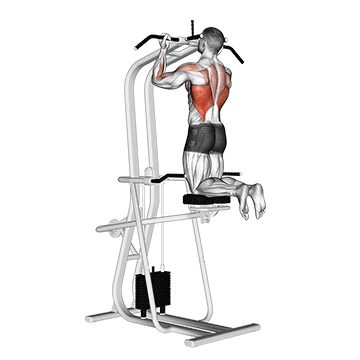
The lever assisted chin-up is an exercise that targets the muscles of the upper body, particularly the back and arms. It is designed to help individuals build strength and improve their ability to perform full chin-ups or pull-ups. By using a lever or a resistance band, the exercise reduces the amount of body weight that needs to be lifted, making it more achievable for beginners or those who are working towards building their strength. ## Instructions Here are the step-by-step instructions for performing the lever assisted chin-up: 1. Find a chin-up bar that is securely mounted and can support your body weight. 2. Set up a resistance band or a lever mechanism to assist you with the movement. If using a resistance band, loop it over the chin-up bar and position it so that it creates a loop to place your foot or knee. 3. Stand facing the bar and reach up to grip it with your palms facing towards you (underhand grip). Your hands should be slightly wider than shoulder-width apart. 4. Place your foot or knee into the loop of the resistance band or the lever mechanism to provide assistance. 5. Hang from the bar with your arms fully extended and your feet off the ground. 6. Initiate the movement by pulling your shoulder blades down and back, engaging your back muscles. 7. Bend your elbows and pull your chest towards the bar, leading with your chin. Aim to bring your chin above the bar if possible. 8. Pause briefly at the top of the movement, squeezing your back muscles. 9. Slowly lower yourself back to the starting position with control, fully extending your arms. 10. Repeat the exercise for the desired number of repetitions. ## Variations Here are some variations of the lever assisted chin-up: 1. Resistance Band Variation: Instead of using a lever mechanism, you can use a resistance band to provide assistance. The band can be adjusted to provide different levels of assistance by selecting bands with varying resistance levels. 2. Foot Placement: Depending on the level of assistance needed, you can experiment with different foot placements in the resistance band loop or lever mechanism. Placing your foot closer to the band or lever will provide more assistance, while moving it farther away will increase the difficulty. 3. Neutral Grip: Instead of the underhand grip, you can also perform the exercise with a neutral grip (palms facing each other) or an overhand grip (palms facing away). These variations target slightly different muscles in the upper body. ## Muscles Worked The lever assisted chin-up primarily targets the following muscles: 1. Latissimus dorsi (lats) - located in the back, these muscles are responsible for the pulling motion. 2. Biceps brachii - located in the front of the upper arm, these muscles assist in elbow flexion during the movement. 3. Rhomboids - located between the shoulder blades, these muscles help retract and stabilize the scapulae. 4. Posterior deltoids - located in the back of the shoulders, these muscles assist in the pulling motion. ## Common Mistakes Here are some common mistakes to avoid while performing the lever assisted chin-up: 1. Using excessive momentum: Avoid using swinging or kicking motions to generate momentum. Instead, focus on controlled movements throughout the exercise. 2. Not engaging the back muscles: Make sure to initiate the movement by pulling your shoulder blades down and back, actively engaging the muscles of your back. 3. Rounding the back: Maintain a neutral spine position throughout the exercise. Avoid rounding your back or hunching your shoulders. 4. Not achieving full range of motion: Aim to bring your chin above the bar during the movement to ensure you are achieving a full range of motion and engaging the targeted muscles effectively. ## Safety Precautions 1. **Maintain proper posture**: Keep your chest up, shoulders pulled back and down, and maintain a slight arch in your lower back. Avoid rounding your shoulders or hunching forward, as this can lead to poor form and potential injuries. 2. **Controlled movement**: Perform the pull-up in a slow and controlled manner. Avoid using momentum or swinging your body excessively, as this reduces the effectiveness of the exercise and increases the risk of strain or injury. 3. **Full range of motion**: Aim to lower yourself fully until your arms are straight, and then pull yourself up until your chin clears the bar. This ensures that you engage the targeted muscles fully and promotes muscle balance. 4. **Avoid excessive strain**: Listen to your body and avoid pushing yourself beyond your limits. If you experience sharp pain, discomfort, or excessive fatigue, stop the exercise and consult a professional if necessary. 5. **Use a spotter**: If possible, have a spotter nearby to assist you or provide guidance during your lever-assisted pull-ups. They can help you maintain proper form, provide additional support if needed, and help prevent accidents. 6. **Gradual progression**: Start with a comfortable level of assistance and gradually reduce the assistance over time as your strength improves. Avoid progressing too quickly, as it may lead to overexertion or injury.