
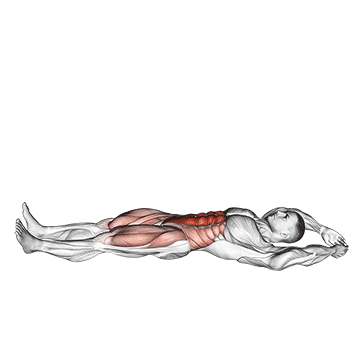
The jackknife sit-up is an abdominal exercise that targets the rectus abdominis, commonly known as the "six-pack" muscles. It involves a full range of motion, from lying flat on your back to sitting up and reaching for your toes. This exercise helps to strengthen the core muscles, improve abdominal definition, and enhance overall core stability. ## Instructions 1. Start by lying flat on your back on a mat or flat surface with your legs fully extended and your arms stretched overhead. 2. Engage your core muscles by drawing your belly button in towards your spine. 3. Simultaneously lift your upper body and legs off the ground, reaching your arms towards your toes. 4. Keep your legs straight as you sit up and try to touch your toes with your hands. 5. Pause for a moment at the top of the movement, then slowly lower your upper body and legs back down to the starting position. 6. Repeat the movement for the desired number of repetitions. ## Variations - Modified Jackknife Sit-Up: If you find the full sit-up challenging, you can modify the exercise by bending your knees and performing a sit-up while keeping your feet on the ground. This reduces the leverage and intensity of the exercise. - Weighted Jackknife Sit-Up: To increase the challenge, hold a dumbbell or a medicine ball against your chest while performing the sit-up. This adds resistance and increases the strength-building potential. ## Muscles Worked - Rectus Abdominis (six-pack muscles) - Hip Flexors - Hip Extensors ## Common Mistakes - Using momentum: Avoid swinging your arms or using momentum to sit up. Focus on controlled movements and engage your core muscles throughout the exercise. - Rounding the back: Keep your spine in a neutral position throughout the movement. Avoid excessive rounding or arching of the back. - Straining the neck: Avoid pulling on your neck or leading the movement with your head. Instead, focus on initiating the sit-up with your core muscles. - Lifting the legs too high: Aim to lift your legs and upper body to a comfortable and controlled height. Lifting too high can strain your lower back. ## Safety Precautions - If you have any pre-existing back or neck conditions, it is advisable to consult with a healthcare professional or a qualified fitness trainer before attempting this exercise. - Perform the exercise on a stable and supportive surface to ensure proper form and reduce the risk of injury. - Avoid jerking or using excessive force during the movement. Focus on a smooth and controlled motion. - If you experience any pain or discomfort in your lower back, modify the exercise or stop if necessary. - Listen to your body and avoid overexertion. Start with a comfortable range of motion and gradually increase the intensity as your core strength improves. - Breathe continuously throughout the exercise. Exhale as you sit up and inhale as you lower back down.
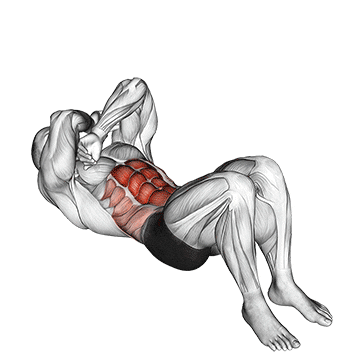
The Janda sit-up is an abdominal exercise that specifically targets the hip flexors and rectus abdominis muscles. It was developed by Czech physiotherapist Vladimir Janda to address muscle imbalances and strengthen the core. This exercise focuses on activating the deep abdominal muscles while minimizing the involvement of the hip flexors, promoting better core stability and alignment. ## Instructions 1. Start by lying flat on your back on a mat or flat surface with your knees bent and feet flat on the ground. 2. Position your arms alongside your body, palms facing down. 3. Engage your core by drawing your belly button in towards your spine. 4. Slowly lift your head, shoulders, and upper back off the ground, maintaining a tucked chin position. 5. Keep your lower back pressed into the mat or surface and avoid using momentum or pulling on your neck. 6. Hold the raised position for a few seconds, focusing on engaging your deep abdominal muscles. 7. Slowly lower your upper body back down to the starting position while maintaining control. 8. Repeat the movement for the desired number of repetitions. ## Variations - Janda Sit-Up with Resistance Band: To add resistance and increase the challenge, secure a resistance band around a stable anchor behind you and hold the ends of the band with your hands. Perform the sit-up as instructed, while keeping tension on the band throughout the movement. - Janda Sit-Up with Leg Raise: Once you have mastered the basic Janda sit-up, you can incorporate leg raises into the exercise. Lift your legs off the ground while performing the sit-up, keeping them straight or bent as desired. ## Muscles Worked - Rectus Abdominis (six-pack muscles) - Hip Flexors - Deep Abdominal Muscles (Transversus Abdominis) ## Common Mistakes - Using momentum: Avoid jerking or using momentum to lift your upper body. Focus on controlled movements and engage your core muscles throughout the exercise. - Rounding the lower back: Keep your lower back pressed into the mat or surface to maintain proper alignment and prevent excessive strain on the lumbar spine. - Pulling on the neck: Avoid pulling on your neck or leading the movement with your head. Instead, focus on initiating the sit-up with your core muscles. - Allowing the feet to lift off the ground: Keep your feet planted firmly on the ground throughout the exercise. This helps maintain stability and isolates the desired muscle groups. ## Safety Precautions - If you have any pre-existing back or neck conditions, it is advisable to consult with a healthcare professional or a qualified fitness trainer before attempting this exercise. - Perform the exercise on a stable and supportive surface to ensure proper form and reduce the risk of injury. - Start with a range of motion that feels comfortable for your fitness level and gradually increase the intensity as your core strength improves. - If you experience any pain or discomfort, especially in the lower back, modify the exercise or stop if necessary. - Maintain a controlled breathing pattern throughout the exercise. Exhale as you lift your upper body and inhale as you lower back down. - Focus on proper form and alignment rather than speed or quantity. Quality of movement is key in the Janda sit-up.
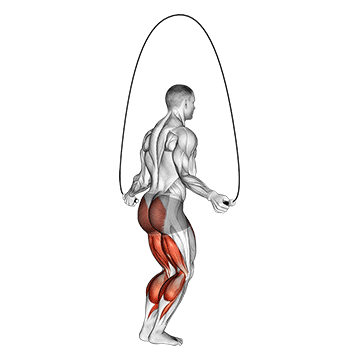
Jump rope is a cardiovascular exercise that involves jumping over a rope while swinging it under your feet and over your head. It targets the cardiovascular system, improves coordination, agility, and overall endurance. Jump rope is a versatile and effective exercise that can be done anywhere with a simple rope. ## Instructions 1. Hold the handles of the jump rope, one in each hand, with your arms comfortably extended. 2. Stand with your feet together and the rope behind you. 3. Swing the rope over your head and in front of your body, creating an arc with the rope. 4. As the rope approaches the ground, jump off both feet and allow the rope to pass under your feet. 5. Land lightly on the balls of your feet and immediately prepare for the next jump. 6. Maintain a steady rhythm and continue jumping over the rope for the desired duration or number of repetitions. ## Variations - Single-Leg Jump: Instead of jumping off both feet, focus on jumping off one foot while lifting the other leg slightly. Alternate between legs for an added challenge. - High Knee Jump: Lift your knees up towards your chest as you jump, emphasizing a high knee action. This variation increases the intensity and engages the hip flexors. - Double-Unders: Swing the rope twice under your feet for each jump. This advanced variation requires greater speed and coordination. ## Muscles Worked - Calves - Quadriceps - Hamstrings - Glutes - Abdominals - Shoulders - Forearms ## Common Mistakes - Using too much arm movement: The power for jumping comes from the legs, not the arms. Avoid excessive swinging of the rope with your wrists and focus on using small and controlled movements. - Jumping too high: Maintain a relaxed and efficient jump height. Jump just enough to clear the rope, as excessive height can lead to unnecessary fatigue and strain on the joints. - Landing with flat feet: Land on the balls of your feet to absorb the impact and maintain a more stable and controlled landing. - Lack of coordination: Practice the timing and coordination of the rope swing and jump. Start with a slower pace and gradually increase speed as you become more comfortable. ## Safety Precautions - Use a suitable surface for jumping, such as a shock-absorbing mat or a non-slip floor, to minimize the impact on your joints. - Start with a warm-up to prepare your muscles and joints for the exercise. - Wear appropriate footwear with good cushioning and support to reduce the risk of foot and ankle injuries. - Keep a safe clearance around you to prevent tripping or hitting objects while jumping. - Maintain a relaxed grip on the jump rope handles to avoid unnecessary strain on your wrists and hands. - Listen to your body and take breaks as needed. If you experience any pain, dizziness, or shortness of breath, stop exercising and seek medical advice if necessary.
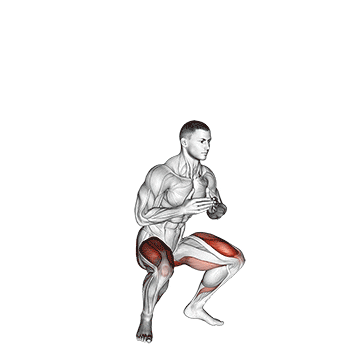
The jump squat is a plyometric exercise that combines a squat with an explosive jump. It targets the lower body muscles, including the quadriceps, hamstrings, glutes, and calves. Jump squats help improve lower body power, explosive strength, and overall athleticism. ## Instructions 1. Stand with your feet shoulder-width apart and toes pointing slightly outward. 2. Start by performing a regular squat: Bend your knees and lower your hips down and back as if sitting into a chair. Keep your chest lifted, back straight, and core engaged. 3. Once you reach the bottom of the squat position, explosively push through your feet and jump straight up into the air. 4. As you jump, extend your hips, knees, and ankles fully and reach your arms overhead for added momentum. 5. Land softly and with control, bending your knees to absorb the impact and return to the squat position. 6. Immediately go into the next repetition by repeating steps 2 to 5. ## Variations - Bodyweight Jump Squats: Perform the jump squats using only your bodyweight. This is suitable for beginners or those focusing on building strength and coordination. - Weighted Jump Squats: Hold a dumbbell or kettlebell at your chest level or use a barbell on your shoulders to add resistance and increase the challenge. - Single-Leg Jump Squats: Perform the exercise using one leg at a time, alternating between legs. This variation increases the difficulty and engages the stabilizer muscles. ## Muscles Worked - Quadriceps (front of the thighs) - Hamstrings (back of the thighs) - Glutes (buttocks) - Calves - Core muscles (abdominals and lower back) for stabilization ## Common Mistakes - Allowing the knees to collapse inward: Keep your knees in line with your toes throughout the movement to maintain proper alignment and prevent potential knee strain. Focus on pushing your knees out slightly as you squat and jump. - Not reaching full squat depth: Aim to squat down until your thighs are parallel to the ground or slightly below. This ensures proper engagement of the targeted muscles and maximizes the benefits of the exercise. - Using excessive forward lean: Maintain an upright posture throughout the movement, with your chest lifted and back straight. Avoid excessive forward lean, as it puts unnecessary stress on the lower back and reduces the effectiveness of the exercise. - Landing with stiff legs: Land softly and with bent knees to absorb the impact and protect your joints. Avoid landing with locked or fully extended legs, as it can increase the risk of injury. ## Safety Precautions - Warm up before performing jump squats to prepare your muscles and joints. - Start with a lower intensity, and gradually increase the height and power of your jumps as you become more comfortable and stronger. - Choose a suitable surface with good shock absorption for landing, such as a gym mat or a forgiving outdoor surface. - Listen to your body and avoid overexertion. If you feel any pain or discomfort, modify the exercise or consult a fitness professional. - If you have any pre-existing knee or joint conditions, it is advisable to consult with a healthcare professional before attempting jump squats. - Maintain proper form and control throughout the exercise to minimize the risk of injury.
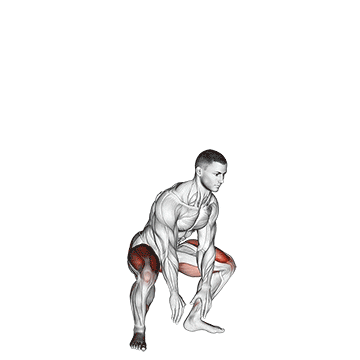
The jump squat is a plyometric exercise that combines the lower body strength-building benefits of squats with explosive power and coordination. It targets the muscles of the legs, including the quadriceps, hamstrings, glutes, and calves, while also engaging the core muscles. Jump squats are great for improving overall lower body strength, power, and athletic performance. ## Instructions 1. Start by standing with your feet shoulder-width apart and your toes pointing slightly outward. 2. Place your hands on your hips or extend them in front of you for balance. 3. Begin the movement by lowering your body into a squat position. Bend at the knees and hips, as if you're sitting back into an imaginary chair. 4. Keep your back straight, chest up, and your knees aligned with your toes throughout the movement. 5. Once you reach the bottom of the squat position, quickly explode upward by pushing through your heels and extending your hips, knees, and ankles simultaneously. 6. As you jump, swing your arms upward to generate more power and height. 7. Land softly on the balls of your feet and go immediately into the next repetition. 8. Repeat the exercise for the desired number of repetitions. ## Variations - **Weighted Jump Squat**: Hold a dumbbell or kettlebell in each hand or wear a weighted vest to increase the resistance and intensity of the exercise. - **Split Jump Squat**: Instead of jumping straight up, perform a jumping lunge by splitting your legs forward and backward during the jump. - **Box Jump Squat**: Use a sturdy box or platform and perform a jump squat, landing on the box with both feet and then stepping back down to the starting position. ## Muscles Worked - Quadriceps (front of the thighs) - Hamstrings (back of the thighs) - Glutes (buttocks) - Calves - Core muscles (to stabilize the body during the exercise) ## Common Mistakes - Allowing the knees to collapse inward: Keep your knees aligned with your toes throughout the movement to avoid unnecessary stress on the knee joints. Focus on pushing your knees out slightly as you squat. - Leaning too far forward: Maintain an upright posture and avoid leaning too far forward. This helps engage the correct muscles and prevents strain on the lower back. - Not fully extending the hips: Make sure to fully extend your hips at the top of the jump to maximize power and effectiveness. - Landing with stiff legs: Land softly on the balls of your feet and bend your knees to absorb the impact. Landing with stiff legs can lead to joint discomfort or injury. ## Safety Precautions - Warm up properly before performing jump squats to prepare your muscles and joints for the explosive movements. - Choose a suitable surface to perform the exercise, preferably one with some cushioning to reduce impact on your joints. - If you have any knee or lower back issues, consult with a fitness professional or healthcare provider before attempting jump squats or modify the exercise as needed. - Start with bodyweight jump squats and gradually progress to more challenging variations as your strength and coordination improve. - Listen to your body and stop the exercise immediately if you experience pain or discomfort.
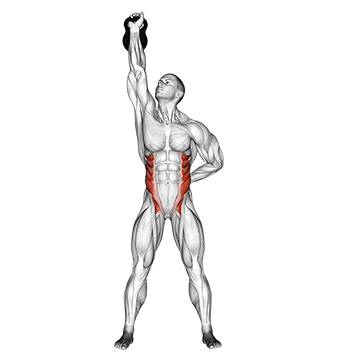
The advanced kettlebell windmill is a challenging exercise that primarily targets the core muscles, particularly the obliques, while also engaging the shoulders, hips, and legs. It involves a combination of stability, flexibility, and strength to perform the rotational movement with the kettlebell overhead. The exercise helps improve core strength, shoulder stability, hip mobility, and overall functional fitness. ## Instructions 1. Start by standing with your feet slightly wider than shoulder-width apart. Position the kettlebell on the floor to the side of your left foot. 2. Point your left foot outward at approximately a 45-degree angle and keep your right foot pointing forward. 3. Extend your left arm straight overhead, holding the kettlebell with a firm grip. 4. Shift your weight onto your right leg and begin the movement by hinging at the hips, pushing them towards the left. 5. As you hinge, keep your eyes fixed on the kettlebell and allow your torso to rotate towards the right. 6. Simultaneously, slide your right hand down the inside of your right leg, maintaining contact with your leg as you lower your torso. 7. Continue to hinge until you reach a comfortable range of motion or until your torso is parallel to the ground, while keeping your left arm extended overhead. 8. Pause briefly in this position, then engage your core and push through your right foot to return to the starting position. 9. Repeat the exercise for the desired number of repetitions, then switch sides and perform the movement with the kettlebell on the other side. ## Variations - **Bodyweight Windmill**: If using a kettlebell is too challenging, you can practice the windmill movement without any weights. Focus on maintaining proper form and gradually progress to using a kettlebell. - **Lighter Kettlebell**: Start with a lighter kettlebell until you feel comfortable with the movement and gradually increase the weight as your strength and stability improve. - **Bottoms-Up Kettlebell Windmill**: Hold the kettlebell upside down with the handle pointing upward. This variation requires greater grip strength and shoulder stability. ## Muscles Worked - Obliques (side abdominal muscles) - Rectus abdominis (front abdominal muscles) - Erector spinae (back muscles) - Shoulders - Hips - Glutes - Quadriceps ## Common Mistakes - Rounding the back: Keep your back straight throughout the movement and avoid rounding or hunching your shoulders. Engage your core to maintain a stable and aligned spine. - Lifting the heel: Keep your entire foot grounded, especially the heel of the foot on the side opposite to the kettlebell. Lifting the heel can compromise stability and balance. - Failing to engage the core: Focus on actively engaging your core muscles throughout the exercise. This helps stabilize your torso and prevent excessive twisting or strain on the lower back. - Overarching the lower back: While maintaining a straight back, be cautious not to overly arch your lower back. Maintain a neutral spine position throughout the movement. ## Safety Precautions - Prioritize proper form and technique over using heavy weights. It's important to master the movement with lighter loads before progressing to heavier kettlebells. - Perform a thorough warm-up, particularly targeting the shoulders, core, and hips, to prepare your body for the exercise. - If you have any existing shoulder, back, or hip issues, consult with a fitness professional or healthcare provider before attempting the advanced kettlebell windmill. - Start with a lighter kettlebell and gradually increase the weight as your strength and stability improve. - If you feel any pain or discomfort during the exercise, stop immediately and reassess your form.
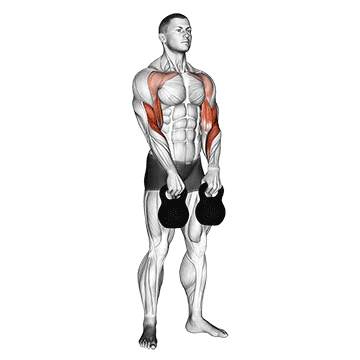
The kettlebell alternating hang clean is a dynamic exercise that targets multiple muscle groups, including the legs, hips, back, shoulders, and arms. It combines elements of power, strength, and coordination. The exercise involves explosively lifting the kettlebell from a hanging position to the rack position, alternating between the left and right sides. It helps develop overall body strength, power, and enhances functional movement patterns. ## Instructions 1. Start by standing with your feet shoulder-width apart, knees slightly bent, and the kettlebell placed between your feet on the floor. 2. Hinge at the hips and bend your knees to lower your body into a squat position. Keep your back straight, chest up, and maintain a neutral spine. 3. Reach down and grasp the kettlebell handle with one hand, palm facing towards you. The other hand can remain at your side or provide stability by resting on your thigh. 4. Explosively extend your hips, knees, and ankles while simultaneously pulling the kettlebell upward using your arm. Keep the kettlebell close to your body. 5. As the kettlebell rises, rotate your hand underneath it and "catch" the kettlebell at shoulder height, allowing it to rest in the rack position. Your elbow should be bent, and the kettlebell should be close to your body, resting on your forearm. 6. Lower the kettlebell back down to the starting position by reversing the movement. Lower it with control and avoid slamming it into your thighs. 7. Repeat the exercise with the other hand, alternating between left and right for each repetition. 8. Continue the alternating hang clean for the desired number of repetitions. ## Variations - **Double Kettlebell Alternating Hang Clean**: Perform the exercise using two kettlebells simultaneously, one in each hand. This variation increases the overall load and requires greater coordination and strength. - **Dumbbell Alternating Hang Clean**: If kettlebells are not available, you can perform the exercise using dumbbells, following the same technique and movement pattern. ## Muscles Worked - Quadriceps (front of the thighs) - Hamstrings (back of the thighs) - Glutes (buttocks) - Calves - Core muscles (abdominals and lower back) - Shoulders - Upper back muscles - Biceps ## Common Mistakes - Using excessive arm strength: Focus on generating power from your lower body, particularly your hips and legs. The arms should act as a connector, not the primary source of force. - Rounding the back: Maintain proper form by keeping your back straight and core engaged throughout the movement. Avoid rounding your back or hunching your shoulders. - Lifting the kettlebell too high: Aim to catch the kettlebell at shoulder height in the rack position. Avoid excessively pulling the kettlebell upward, as it may strain the shoulders. - Allowing the kettlebell to drift away from the body: Keep the kettlebell close to your body throughout the movement. This ensures better control and minimizes the stress on your arms and shoulders. ## Safety Precautions - Start with a light to moderate kettlebell weight and gradually increase the load as you become more comfortable with the movement and develop sufficient strength. - Ensure you have a firm grip on the kettlebell handle to avoid dropping it or losing control during the exercise. - Maintain proper body alignment and form throughout the movement to reduce the risk of injury. Avoid excessive forward lean or rounding of the back. - Perform the exercise on a stable surface, and ensure there is enough space around you to safely swing the kettlebell. - If you have any pre-existing shoulder or back issues, consult with a fitness professional or healthcare provider before attempting the kettlebell alternating
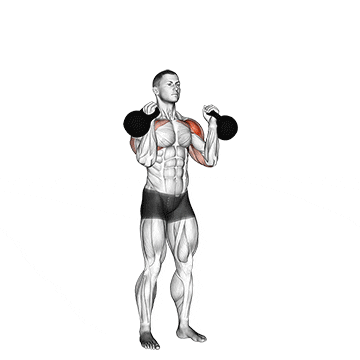
The kettlebell alternating press is an exercise that targets the shoulders, arms, and core muscles. It involves pressing a kettlebell overhead while alternating between the left and right arms. The exercise improves shoulder strength, stability, and muscular endurance, while also engaging the core for stability and balance. ## Instructions 1. Start by standing with your feet shoulder-width apart, knees slightly bent, and hold a kettlebell in each hand at shoulder level. Ensure your palms are facing inward. 2. Brace your core, engage your glutes, and maintain an upright posture throughout the exercise. 3. Begin with one arm by pressing the kettlebell straight up overhead, fully extending your arm while keeping your bicep close to your ear. 4. While holding the kettlebell overhead with one arm, simultaneously lower the other kettlebell back down to shoulder level. 5. Maintain stability and control throughout the movement. 6. Lower the kettlebell back to the starting position with the first arm, returning it to shoulder level. 7. Repeat the movement on the opposite side, pressing the other kettlebell overhead while lowering the previously pressed kettlebell to the shoulder level. 8. Continue alternating the pressing motion between the left and right arms for the desired number of repetitions. ## Variations - **Single-Arm Kettlebell Press**: If using two kettlebells is too challenging, you can perform the exercise with only one kettlebell, pressing it overhead with each arm individually. - **Seated Alternating Kettlebell Press**: Perform the exercise while seated on a bench or stability ball. This variation provides additional core stability challenges. - **Half-Kneeling Alternating Kettlebell Press**: Assume a half-kneeling position with one knee on the ground and the other foot flat on the floor. Perform the alternating press from this position, engaging the core and maintaining stability. ## Muscles Worked - Shoulders (deltoids) - Triceps - Upper back muscles (rhomboids and trapezius) - Core muscles (abdominals and lower back) - Stabilizing muscles of the shoulder girdle ## Common Mistakes - Shrugging the shoulders: Avoid shrugging your shoulders towards your ears during the press. Keep your shoulders down and away from your ears to maintain proper alignment and reduce strain on the neck and upper traps. - Arching the lower back: Maintain a neutral spine position and avoid excessive arching of the lower back. Engage your core muscles to stabilize the torso throughout the exercise. - Lack of control: Focus on maintaining control throughout the movement, especially during the lowering phase. Avoid dropping the kettlebells or allowing them to swing uncontrollably. - Failing to fully extend the arm: Make sure to fully extend your arm at the top of the press to engage the muscles fully and maximize the benefits of the exercise. ## Safety Precautions - Choose an appropriate kettlebell weight that allows you to maintain proper form and technique throughout the exercise. Start with lighter weights and gradually increase the load as your strength improves. - Warm up your shoulder joints and muscles before performing the kettlebell alternating press to reduce the risk of injury. - If you have any pre-existing shoulder or upper body issues, consult with a fitness professional or healthcare provider before attempting this exercise. - Maintain proper breathing throughout the movement. Exhale as you press the kettlebell overhead and inhale during the lowering phase. - Keep your wrists aligned with your forearms and avoid excessive bending or straining of the wrists. - If you experience any pain or discomfort, stop the exercise and consult a healthcare professional.
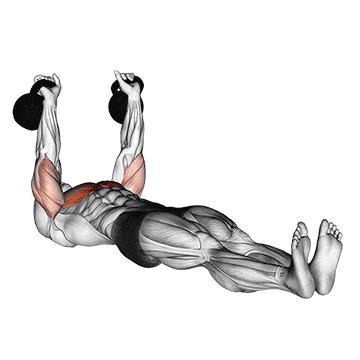
The kettlebell alternating press on the floor is an exercise that targets the shoulders, arms, and core muscles. It involves pressing a kettlebell overhead while starting from a lying position on the floor. This exercise improves shoulder strength, stability, and muscular endurance while engaging the core for stability and balance. ## Instructions 1. Start by lying on your back on the floor with your knees bent and feet flat on the ground. Hold a kettlebell in each hand, resting them on your shoulders. 2. Brace your core, engage your glutes, and maintain a neutral spine throughout the exercise. 3. Begin with one arm by pressing the kettlebell straight up overhead, fully extending your arm while keeping your bicep close to your ear. 4. While holding the kettlebell overhead with one arm, simultaneously lower the other kettlebell back down to your shoulder. 5. Maintain stability and control throughout the movement. 6. Lower the kettlebell back to the starting position with the first arm, returning it to your shoulder. 7. Repeat the movement on the opposite side, pressing the other kettlebell overhead while lowering the previously pressed kettlebell to the shoulder. 8. Continue alternating the pressing motion between the left and right arms for the desired number of repetitions. ## Variations - **Single-Arm Kettlebell Press on Floor**: If using two kettlebells is too challenging, you can perform the exercise with only one kettlebell, pressing it overhead with each arm individually while lying on the floor. - **Bench Press Variation**: Perform the alternating press on a bench instead of the floor. This variation allows for a greater range of motion and may be more comfortable for individuals with mobility restrictions. ## Muscles Worked - Shoulders (deltoids) - Triceps - Upper back muscles (rhomboids and trapezius) - Core muscles (abdominals and lower back) - Stabilizing muscles of the shoulder girdle ## Common Mistakes - Arching the lower back: Maintain a neutral spine position throughout the exercise. Avoid excessive arching of the lower back by engaging your core muscles and keeping your ribs down. - Shrugging the shoulders: Keep your shoulders relaxed and away from your ears during the press. Avoid tensing or shrugging your shoulders. - Lack of control: Focus on maintaining control throughout the movement, especially during the lowering phase. Avoid dropping the kettlebells or allowing them to swing uncontrollably. - Failing to fully extend the arm: Make sure to fully extend your arm at the top of the press to engage the muscles fully and maximize the benefits of the exercise. ## Safety Precautions - Choose an appropriate kettlebell weight that allows you to maintain proper form and technique throughout the exercise. Start with lighter weights and gradually increase the load as your strength improves. - Warm up your shoulder joints and muscles before performing the kettlebell alternating press on the floor to reduce the risk of injury. - If you have any pre-existing shoulder or upper body issues, consult with a fitness professional or healthcare provider before attempting this exercise. - Keep your elbows and wrists aligned throughout the movement to avoid unnecessary strain or stress on the joints. - If you experience any pain or discomfort, stop the exercise and consult a healthcare professional.