
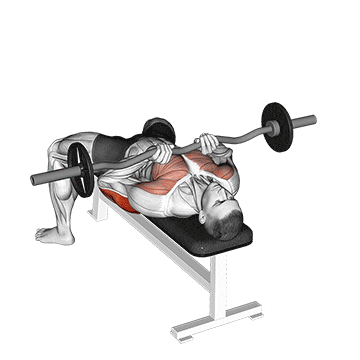
The EZ-Bar Close-Grip Bench Press is a compound exercise that primarily targets the triceps brachii muscles while also engaging the chest and shoulders to a lesser extent. This exercise involves using an EZ barbell with a narrow grip, placing more emphasis on the triceps compared to a standard bench press. It is an effective way to develop and strengthen the triceps while also enhancing overall upper body strength and stability. ## Instructions 1. Lie down on a flat bench with your feet flat on the floor, ensuring your lower back is in a neutral position. 2. Grasp the EZ barbell with a close grip (hands shoulder-width apart or slightly narrower), using an overhand grip (palms facing away from you). 3. Lift the barbell off the rack and hold it directly above your chest with your arms fully extended. 4. Lower the barbell slowly and under control by bending your elbows, keeping them close to your body. 5. Continue lowering the barbell until it touches your lower chest or comes close to it. 6. Pause briefly at the bottom position and then push the barbell back up by extending your elbows, while maintaining control and stability. 7. Return to the starting position with your arms fully extended and repeat for the desired number of repetitions. ## Variations - Dumbbell Close-Grip Bench Press: Instead of using an EZ barbell, you can perform the exercise with dumbbells. Lie down on a flat bench and hold a dumbbell in each hand with a palms-in grip. Follow the same motion as described above. - Incline Close-Grip Bench Press: Perform the exercise on an inclined bench instead of a flat bench. The incline position targets the upper portion of the chest muscles to a greater extent. - Smith Machine Close-Grip Bench Press: Use a Smith machine with an adjustable barbell for added stability. Follow the same technique as described above. ## Muscles Worked The EZ-Bar Close-Grip Bench Press primarily targets the following muscles: - Triceps brachii (especially the long head) - Pectoralis major (chest muscles) - Anterior deltoids (front shoulder muscles) - Stabilizer muscles in the shoulders and upper back ## Common Mistakes - Flaring the elbows out too much: Keep your elbows relatively close to your body throughout the movement. Avoid excessively flaring them out to the sides, as this can place excessive stress on the shoulder joints. - Bouncing the barbell off the chest: Maintain control and avoid bouncing the barbell off your chest at the bottom of the movement. This minimizes the engagement of the triceps and reduces the effectiveness of the exercise. - Arching the lower back excessively: Keep your lower back in a neutral position and avoid excessive arching. This helps maintain stability and prevents lower back strain. - Using excessive weight: Select a weight that allows you to maintain proper form and technique. Using excessive weight can compromise your form and increase the risk of injury. ## Safety Precautions - Warm up adequately before performing the exercise to prepare your muscles and joints for the workout. - Use a spotter or have someone nearby for assistance, especially when handling heavy weights. - Maintain proper form throughout the exercise to avoid unnecessary strain on the joints and muscles. - If you have any pre-existing shoulder or elbow injuries, consult with a healthcare professional or fitness trainer before attempting this exercise. - Listen to your body and stop immediately if you experience any pain or discomfort.
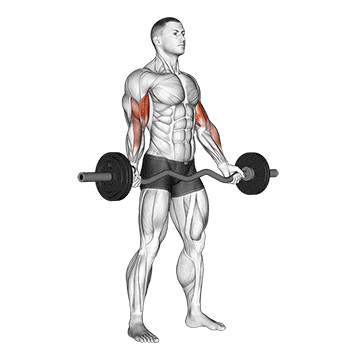
The EZ-Barbell Standing Wide Grip Biceps Curl is an exercise that targets the biceps brachii muscles, specifically emphasizing the long head of the biceps. By using a wide grip on the EZ barbell, this exercise allows for greater activation of the outer portion of the biceps. It helps in building overall biceps strength, size, and definition. ## Instructions 1. Stand upright with your feet shoulder-width apart, holding the EZ barbell with an underhand grip (palms facing upward) using a wider-than-shoulder-width grip. 2. Allow your arms to hang fully extended in front of your body, with your elbows slightly flexed. 3. Keep your upper arms stationary and close to your sides throughout the exercise. 4. Exhale and curl the barbell upward by flexing your elbows. Avoid any swinging or using momentum to lift the weight. 5. Continue curling until the barbell is close to your shoulders, ensuring a full contraction of the biceps. 6. At the top of the movement, briefly pause and squeeze your biceps. 7. In a controlled manner, inhale and slowly lower the barbell back down to the starting position, fully extending your arms. 8. Repeat for the desired number of repetitions. ## Variations - Dumbbell Standing Wide Grip Biceps Curl: Instead of using an EZ barbell, you can perform the exercise with dumbbells. Hold a dumbbell in each hand with an underhand grip and follow the same motion as described above. - Alternating Wide Grip Biceps Curl: Perform the exercise one arm at a time. While holding the barbell or dumbbell with a wide grip, curl one arm at a time, alternating between left and right. This variation helps address strength imbalances between the arms. - Preacher Curl with Wide Grip: Use a preacher curl bench and an EZ barbell with a wide grip. Position your arms on the preacher pad and perform the curling motion with a wide grip. This variation provides additional stability and isolates the biceps. ## Muscles Worked The EZ-Barbell Standing Wide Grip Biceps Curl primarily targets the following muscles: - Biceps brachii (especially the long head) - Brachialis (located underneath the biceps) - Brachioradialis (forearm muscle, involved as a synergist) ## Common Mistakes - Using excessive weight: Avoid selecting weights that are too heavy, as it may compromise your form and lead to poor exercise execution. Start with a weight that allows you to maintain proper technique and gradually increase as your strength improves. - Swinging the body: Keep your upper body steady and avoid any swinging or using momentum to lift the weight. Engage your core muscles to maintain stability throughout the exercise. - Rounding the back: Maintain proper posture during the exercise by keeping your back straight and avoiding rounding of the spine. Engage your core muscles and stabilize your body throughout the movement. - Allowing the elbows to flare out: Keep your upper arms close to your sides and avoid allowing your elbows to flare out during the curling motion. This helps to isolate the biceps and prevent the engagement of other muscle groups. ## Safety Precautions - Warm up adequately before performing the exercise to prepare your muscles for the workout. - Choose an appropriate weight that allows you to maintain proper form and technique. - If you have any pre-existing arm or shoulder injuries, consult with a healthcare professional or fitness trainer before attempting this exercise. - Maintain proper breathing throughout the exercise, exhaling during the lifting phase and inhaling during the lowering phase. - Listen to your body and perform the exercise within your personal limits, avoiding excessive strain on the
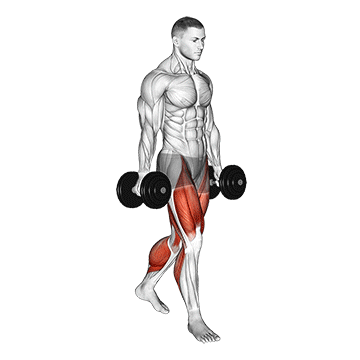
The Farmers Walk is a functional exercise that involves walking while holding heavy weights in each hand. It targets multiple muscle groups and primarily focuses on developing grip strength, forearm muscles, core stability, and overall muscular endurance. It mimics carrying heavy objects in real-life situations and can enhance overall strength and physical performance. ## Instructions 1. Stand upright with your feet hip-width apart. 2. Select a pair of heavy dumbbells, kettlebells, or any other weighted objects of equal weight. 3. Bend your knees slightly, maintain a neutral spine, and engage your core muscles for stability. 4. Pick up the weights one at a time, gripping them firmly in each hand. 5. Lift the weights by extending your hips and knees, maintaining an upright posture. 6. Begin walking forward with a controlled and purposeful stride, keeping your chest up and shoulders back. 7. Take small, quick steps and maintain an even pace. 8. Continue walking for a predetermined distance or time period. 9. To stop, gradually slow down and carefully place the weights back on the ground. ## Variations - Single-arm Farmers Walk: Instead of holding weights in both hands, perform the exercise while holding a weight in only one hand. This variation challenges your core stability and grip strength on one side at a time. - Farmers Walk with a Trap Bar: If available, you can use a trap bar or hex bar for the exercise. Step inside the bar, grasp the handles, and perform the Farmers Walk in a similar manner. - Uneven Farmers Walk: Hold two weights of different weights or sizes in each hand. This variation adds an element of instability and challenges your grip strength and coordination. ## Muscles Worked The Farmers Walk targets several muscle groups, including: - Forearm muscles (flexors and extensors) - Grip muscles - Trapezius muscles - Deltoids (shoulder muscles) - Rhomboids (upper back muscles) - Core muscles (abdominals, obliques, and erector spinae) ## Common Mistakes - Poor posture: Maintain an upright posture with your shoulders back and chest up throughout the exercise. Avoid rounding your shoulders or slouching forward. - Overstriding: Take small, controlled steps instead of long strides to maintain balance and stability. Overstriding can lead to loss of control and potential injury. - Holding the weights too loosely: Maintain a firm grip on the weights to ensure control and prevent them from slipping out of your hands. - Excessive leaning: Avoid excessive leaning to one side while walking. Keep your body centered and balanced. - Not using enough weight: Choose weights that challenge you without compromising your form. If the weights are too light, the exercise may not provide the desired strength and endurance benefits. ## Safety Precautions - Start with lighter weights and gradually progress to heavier weights as your strength and stability improve. - Wear supportive shoes with good traction to prevent slipping. - Keep your core muscles engaged throughout the exercise to maintain stability and protect your lower back. - Be mindful of your surroundings while walking to avoid tripping or colliding with objects. - If you have any pre-existing back, shoulder, or grip-related injuries, consult with a healthcare professional or fitness trainer before attempting this exercise. - Always use proper form and technique to minimize the risk of injury.
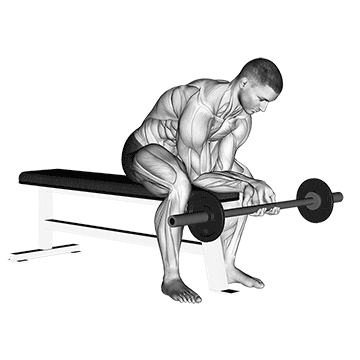
Finger curls are a simple yet effective exercise that targets the muscles of the forearm, specifically the flexor muscles. This exercise involves flexing and strengthening the fingers against resistance, helping to improve grip strength, forearm stability, and overall hand dexterity. Finger curls are beneficial for athletes, climbers, and anyone looking to enhance their hand and forearm strength. ## Instructions 1. Sit on a chair or bench with your feet flat on the floor, maintaining an upright posture. 2. Hold a dumbbell or a barbell in one hand, palm facing up. Start with a weight that is challenging but manageable. 3. Rest your forearm on your thigh, allowing your hand to hang over the edge. 4. Allow your fingers to fully extend and relax, holding the weight with an open grip. 5. Begin the exercise by curling your fingers, bringing the weight up toward your palm. Contract your forearm muscles as you perform the movement. 6. Continue curling until the weight is fully lifted and your fingers are flexed as much as possible. 7. Hold the contracted position for a brief moment, feeling the tension in your forearm muscles. 8. Slowly lower the weight back down by extending your fingers, returning to the starting position with your hand fully open. 9. Repeat the exercise for the desired number of repetitions, then switch hands and repeat the steps. ## Variations - Plate Pinch: Instead of using a dumbbell or barbell, perform finger curls using weight plates. Pinch two weight plates together using your fingers and thumbs, then curl them upward, engaging your forearm muscles. This variation specifically targets finger strength and grip. - Finger Extension: Instead of flexing your fingers, focus on extending them against resistance. Use a rubber band or a finger extension device and place it around your fingers. Open your hand against the resistance, working the extensor muscles of the forearm. ## Muscles Worked The finger curls primarily target the following muscles: - Forearm flexor muscles (flexor digitorum profundus and flexor digitorum superficialis) - Wrist flexor muscles - Grip muscles - Finger extensor muscles (to a lesser extent) ## Common Mistakes - Using excessive weight: Start with a weight that allows you to perform the exercise with proper form and technique. Using too much weight can lead to compromised form and potential injury. - Allowing the wrist to bend: Keep your wrist in a neutral position throughout the exercise. Avoid allowing it to flex or extend excessively. - Rushing through the movement: Perform the finger curls in a slow and controlled manner, focusing on the contraction and extension of the forearm muscles. Avoid using momentum or performing the exercise too quickly. - Neglecting full range of motion: Ensure that you fully extend your fingers at the starting position and fully curl them at the top of the movement. This helps engage the muscles through their full range of motion. ## Safety Precautions - Start with lighter weights and gradually increase the resistance as your strength improves. - Avoid using weights that are too heavy, as this can strain your forearm muscles and increase the risk of injury. - If you have any pre-existing hand, wrist, or forearm injuries, consult with a healthcare professional or a qualified trainer before attempting this exercise. - Listen to your body and stop immediately if you experience pain or discomfort in your hand, wrist, or forearm. - Perform the exercise in a controlled environment to ensure safety and minimize the risk of dropping the weight. - If you experience any numbness or tingling in your hand or fingers during or after the exercise, seek medical advice.
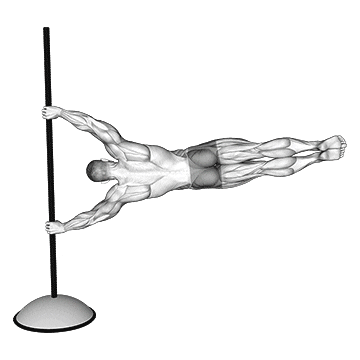
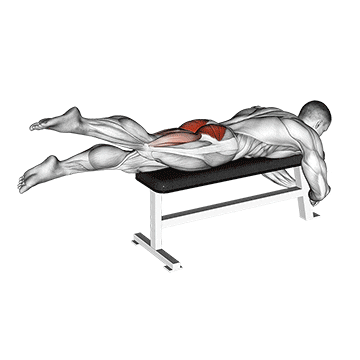
The flag exercise is an advanced bodyweight movement that requires upper body and core strength. It involves holding the body horizontally while gripping a vertical pole or bar and keeping the body straight and parallel to the ground. The flag primarily targets the muscles of the core, back, shoulders, and arms. It is a challenging exercise that showcases upper body strength, stability, and body control. ## Instructions 1. Find a sturdy vertical pole or bar that can support your body weight. 2. Stand beside the pole and grip it firmly with an overhand grip, with your palms facing away from you. Your hands should be placed slightly wider than shoulder-width apart. 3. Position your body to the side of the pole, with your feet together and one arm fully extended overhead, holding onto the pole. 4. Engage your core and glutes to create a straight line from your head to your heels. 5. Slowly lift your feet off the ground and extend your legs straight out to the side, perpendicular to the pole. 6. Keep your body straight and parallel to the ground, maintaining tension throughout your core and upper body. 7. Hold the position for as long as you can maintain proper form. 8. To come down, lower your legs back down and carefully release your grip from the pole. ## Variations The flag exercise is an advanced movement, and variations may include: - Assisted Flag: Use a resistance band or have a partner hold your legs to provide assistance and help you maintain the position. - Tuck Flag: Instead of extending your legs straight out, tuck your knees toward your chest, making the exercise slightly easier. - Straddle Flag: Instead of extending your legs out to the side, open them in a straddle position, which reduces the leverage and makes the exercise more manageable. ## Muscles Worked The flag primarily targets the following muscles: - Abdominal muscles (rectus abdominis, obliques) - Back muscles (latissimus dorsi, erector spinae) - Shoulder muscles (deltoids) - Arm muscles (biceps, triceps) ## Common Mistakes - Arching or sagging: Keep your body straight and avoid arching or sagging in the hips or shoulders. Maintain a tight core and engaged muscles throughout the exercise. - Insufficient grip strength: Ensure that you have sufficient grip strength to hold onto the pole throughout the exercise. Gradually build your grip strength before attempting the flag. - Lack of body control: It's important to have good body control and stability to maintain the proper position. Avoid excessive swinging or wobbling. - Not engaging the core: The flag requires significant core engagement. Focus on actively contracting your abdominal muscles to maintain stability and control. - Overexertion: The flag is an advanced exercise that places substantial demands on the upper body. Avoid attempting it before building sufficient strength and mastering the prerequisite exercises. ## Safety Precautions - Ensure that the pole or bar you're using is securely anchored and can support your body weight. - Start with the assisted variations or progress gradually to the full flag as you develop the necessary strength and stability. - Perform the exercise on a stable surface to minimize the risk of falling or losing balance. - Pay attention to your body's signals. If you experience pain, discomfort, or excessive strain, stop the exercise and consult with a fitness professional. - Warm up properly before attempting the flag to prepare your muscles and joints for the challenging movement. - Always prioritize proper form and technique over the duration of the hold. Gradually increase the duration as you gain strength and proficiency in the exercise.
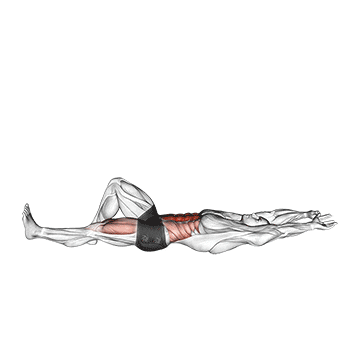
The flexion leg sit-up with bent knees is an abdominal exercise that primarily targets the rectus abdominis, commonly known as the "six-pack" muscles. This exercise involves a flexion movement of the trunk while keeping the knees bent, which places greater emphasis on the abdominal muscles. It helps strengthen and tone the core muscles, improves abdominal endurance, and enhances overall trunk stability. ## Instructions 1. Lie down on your back on a mat or a flat surface with your knees bent and feet flat on the floor. Position your arms alongside your body with your palms facing down. 2. Engage your abdominal muscles by drawing your belly button in towards your spine. 3. Slowly lift your head, neck, and shoulders off the ground, initiating the movement from your abdominal muscles. Keep your chin slightly tucked and maintain a neutral spine. 4. Continue to roll your torso upward, reaching your hands towards your knees while maintaining the bent-knee position. 5. Exhale as you reach the top of the movement, feeling the contraction in your abdominal muscles. 6. Hold the top position briefly, focusing on squeezing your abs. 7. Slowly lower your torso back down to the starting position, keeping your core engaged and maintaining control throughout the movement. 8. Inhale as you lower your upper body, allowing your shoulders and head to touch the ground, but keeping tension in your abdominal muscles. 9. Repeat the exercise for the desired number of repetitions. ## Variations - Weighted Flexion Leg Sit-Up: Hold a weight plate or a dumbbell against your chest to increase the resistance and intensity of the exercise. - Swiss Ball Flexion Leg Sit-Up: Perform the exercise on a stability ball, which adds an element of instability, further engaging your core muscles. - Decline Flexion Leg Sit-Up: Perform the exercise on a decline bench, positioning your feet at the higher end of the bench. This variation increases the difficulty of the movement by challenging the abdominal muscles against gravity. ## Muscles Worked The flexion leg sit-up primarily targets the following muscles: - Rectus abdominis (six-pack muscles) - Hip flexors (iliopsoas) - Obliques (secondary involvement) ## Common Mistakes - Using momentum: Avoid using momentum to lift your upper body. Focus on initiating the movement from your abdominal muscles and perform the exercise in a slow and controlled manner. - Pulling on the neck: Do not pull on your neck with your hands or use your neck muscles to lift your upper body. The movement should be initiated from the abdominal muscles. - Lifting the entire back off the ground: Focus on lifting your head, neck, and shoulders off the ground while maintaining contact between your lower back and the floor. This ensures that the movement targets the abdominal muscles effectively. - Allowing the knees to move: Keep your knees bent and fixed throughout the exercise. Avoid allowing them to move or sway during the movement. - Not engaging the core: Maintain constant engagement of your core muscles throughout the exercise. Avoid relaxing your abdominal muscles at any point during the movement. ## Safety Precautions - If you have any existing back or neck conditions, consult with a healthcare professional or a qualified trainer before attempting this exercise. - Perform the exercise on a mat or a padded surface to cushion your lower back and reduce discomfort. - Start with a range of motion that is comfortable for you. Gradually increase the range of motion as your abdominal strength improves. - If you experience any pain or discomfort in your lower back or neck during the exercise, stop immediately and consult with a professional. - Breathe rhythmically throughout the exercise, inhaling during the lowering phase and exhaling during the lifting phase.
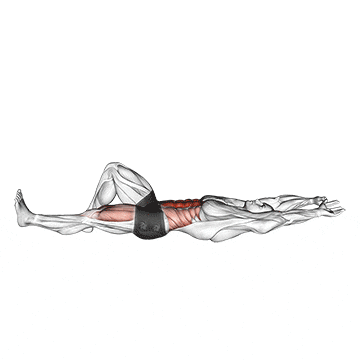
The flexion leg sit-up with straight arms is an abdominal exercise that targets the rectus abdominis, also known as the "six-pack" muscles. This variation involves a flexion movement of the trunk while keeping the arms straight and reaching towards the knees. It challenges the core muscles and helps strengthen and tone the abdominal region. ## Instructions 1. Lie down on your back on a mat or a flat surface with your legs extended and your feet together. 2. Extend your arms straight overhead, keeping them in line with your shoulders and parallel to the floor. 3. Engage your abdominal muscles by drawing your belly button in towards your spine. 4. Slowly lift your head, neck, and shoulders off the ground, initiating the movement from your abdominal muscles. 5. Simultaneously raise your arms towards the ceiling, reaching towards your toes while lifting your upper body off the ground. 6. Continue to roll your torso upward, maintaining a slight bend in your knees, and aiming to touch your toes with your fingertips. 7. Exhale as you reach the top of the movement, feeling the contraction in your abdominal muscles. 8. Hold the top position briefly, focusing on squeezing your abs. 9. Slowly lower your torso back down to the starting position, keeping your core engaged and maintaining control throughout the movement. 10. Inhale as you lower your upper body, allowing your shoulders and head to touch the ground while keeping tension in your abdominal muscles. 11. Repeat the exercise for the desired number of repetitions. ## Variations - Weighted Flexion Leg Sit-Up: Hold a weight plate or a dumbbell in your hands to add resistance and increase the challenge. - Cable Flexion Leg Sit-Up: Attach a cable pulley system to your feet and perform the sit-up while holding the cable handles. This variation adds resistance throughout the movement. - Decline Flexion Leg Sit-Up: Perform the exercise on a decline bench, positioning your feet at the higher end of the bench. This variation increases the difficulty by challenging the abdominal muscles against gravity. ## Muscles Worked The flexion leg sit-up with straight arms primarily targets the following muscles: - Rectus abdominis (six-pack muscles) - Hip flexors (iliopsoas) - Obliques (secondary involvement) ## Common Mistakes - Using momentum: Avoid using momentum to lift your upper body. Focus on engaging your abdominal muscles and perform the exercise in a controlled manner. - Straining the neck: Keep your neck relaxed and avoid pulling on it with your arms. Let your abdominal muscles do the work. - Allowing the legs to lift off the ground: Keep your legs grounded throughout the movement and avoid lifting them off the floor. - Lack of core engagement: Maintain constant engagement of your core muscles to stabilize your torso and support the movement. - Overarching or rounding the back: Aim to maintain a neutral spine position throughout the exercise. Avoid excessive arching or rounding of the back. ## Safety Precautions - If you have any existing back or neck conditions, consult with a healthcare professional or a qualified trainer before attempting this exercise. - Perform the exercise on a mat or a padded surface to cushion your spine and reduce discomfort. - Start with a range of motion that is comfortable for you. Gradually increase the range of motion as your abdominal strength improves. - If you experience any pain or discomfort in your lower back or neck during the exercise, stop immediately and consult with a professional. - Breathe rhythmically throughout the exercise, inhaling during the lowering phase and exhaling during the lifting phase.
The floor fly with a barbell is a compound exercise that primarily targets the chest muscles, specifically the pectoralis major. It also engages the shoulders and triceps as secondary muscles. This exercise is an effective way to develop upper body strength, improve chest definition, and enhance shoulder stability. ## Instructions 1. Begin by lying flat on your back on a workout mat or the floor. Hold a barbell with an overhand grip, hands slightly wider than shoulder-width apart. 2. Extend your arms straight up toward the ceiling, directly above your chest, with the barbell positioned perpendicular to your body. 3. Keep your feet flat on the floor and your knees bent at a 90-degree angle. 4. Lower the barbell slowly and with control toward the floor, allowing your elbows to bend slightly. Keep your wrists firm and your core engaged throughout the movement. 5. Continue lowering the barbell until your upper arms are parallel to the floor or until you feel a comfortable stretch in your chest muscles. 6. Pause briefly in this position, then engage your chest muscles to bring the barbell back to the starting position. 7. Repeat the exercise for the desired number of repetitions. ## Variations - **Dumbbell Floor Fly**: Perform the exercise using dumbbells instead of a barbell. This allows for a greater range of motion and independent movement of each arm. - **Resistance Band Floor Fly**: Attach resistance bands to a stable anchor point and perform the fly motion while lying on the floor. This variation provides constant tension throughout the movement. - **Single-Arm Floor Fly**: Lie on your side, holding a dumbbell or a kettlebell in one hand, and perform the fly motion using a single arm. This variation helps improve unilateral strength and stability. ## Muscles Worked - Primary muscles: Pectoralis major (chest muscles) - Secondary muscles: Anterior deltoids (front shoulders), triceps brachii (back of upper arms) ## Common Mistakes - **Using excessive weight**: Avoid selecting a weight that is too heavy to control. It is essential to maintain proper form throughout the exercise. - **Allowing the elbows to drop too low**: Keep your elbows at or slightly below shoulder level to ensure optimal engagement of the chest muscles. - **Rushing the movement**: Maintain a slow and controlled pace throughout the exercise, focusing on the contraction of the chest muscles. - **Arching the back**: Keep your back flat against the floor to prevent excessive strain on the lower back. Engage your core muscles for stability. ## Safety Precautions - Before performing any new exercise, it's recommended to consult with a qualified fitness professional, particularly if you have any pre-existing injuries or medical conditions. - Start with a lighter weight to familiarize yourself with the movement and gradually increase the resistance as you become more comfortable and stronger. - Maintain proper breathing throughout the exercise, inhaling during the lowering phase and exhaling during the lifting phase. - If you experience any pain or discomfort, discontinue the exercise and seek advice from a healthcare professional.
Flutter kicks are a core exercise that primarily targets the abdominal muscles, particularly the lower abs. It also engages the hip flexors and improves overall core stability. Flutter kicks are an effective way to strengthen the core, improve endurance, and enhance hip mobility. ## Instructions 1. Start by lying flat on your back on a mat or the floor. Extend your legs fully and keep them close together. 2. Place your hands palms down under your glutes or by your sides for support. 3. Engage your core muscles by pulling your belly button in towards your spine. This will help maintain stability throughout the exercise. 4. Lift both legs a few inches off the ground, keeping them straight and close to each other. 5. Begin the exercise by alternating small, rapid up-and-down movements of your legs. 6. Imagine your legs are like a pair of fins fluttering in water, with the movement originating from your hips. 7. Continue the fluttering motion for the desired duration or number of repetitions. 8. Remember to breathe steadily throughout the exercise. ## Variations - **Bent Knee Flutter Kicks**: If you find it challenging to keep your legs straight, you can perform flutter kicks with bent knees. Instead of extending your legs fully, keep your knees bent at approximately a 90-degree angle. - **Scissor Kicks**: Instead of fluttering both legs simultaneously, perform scissor kicks by crossing one leg over the other and then switching positions in a scissor-like motion. - **Weighted Flutter Kicks**: To increase the intensity, hold a light dumbbell or medicine ball between your feet while performing the flutter kicks. ## Muscles Worked - Primary muscles: Rectus abdominis (lower abs) - Secondary muscles: Hip flexors, obliques, transverse abdominis ## Common Mistakes - **Lifting the legs too high**: Avoid lifting your legs too high, as this can put unnecessary strain on your lower back. The movement should be controlled and focused on the core muscles. - **Losing control or momentum**: Maintain a steady and controlled pace throughout the exercise. Avoid using momentum or swinging motions to perform the flutter kicks. - **Arching the lower back**: Keep your lower back pressed against the mat or floor throughout the exercise. Engage your core muscles to prevent excessive arching. - **Tensing the neck and shoulders**: Keep your neck and shoulders relaxed during the exercise. Avoid tensing or straining these areas to prevent unnecessary muscle tension. ## Safety Precautions - As with any exercise, it is important to listen to your body and avoid pushing through any sharp or severe pain. Discontinue the exercise if you experience any discomfort and consult a healthcare professional if needed. - If you have any pre-existing conditions or injuries, particularly related to the lower back or abdominal area, it is advisable to consult with a qualified fitness professional or healthcare provider before attempting flutter kicks. - Maintain proper breathing throughout the exercise by inhaling deeply during the relaxation phase and exhaling during the exertion phase. - Start with a lower number of repetitions or shorter duration and gradually increase as your core strength and endurance improve. - Ensure that the surface you perform the exercise on is stable and provides adequate support for your back.