
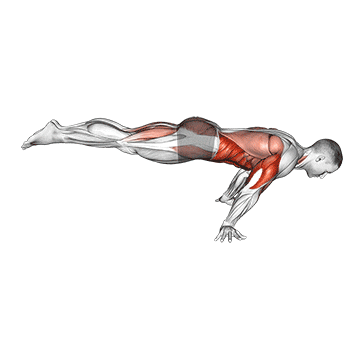
The Full Planche Push-Up is an advanced bodyweight exercise that targets the upper body and core muscles. It combines the strength and stability of the planche position with the pushing movement of a push-up. This exercise requires exceptional upper body strength, balance, and body control. It primarily focuses on developing the shoulders, chest, triceps, and core muscles. ## Instructions Follow these step-by-step instructions to perform the Full Planche Push-Up correctly: 1. Begin in a kneeling position on a soft surface or mat. 2. Place your hands on the ground in front of you, slightly wider than shoulder-width apart. Your fingers should be pointing forward. 3. Lean forward and place your shoulders in front of your hands. Your hips should be raised, and your legs extended behind you. 4. Transfer your weight onto your hands and fingers, gradually lifting your feet off the ground. 5. Keep your body in a straight line from your head to your heels. Engage your core muscles to maintain stability and prevent sagging or arching. 6. Slowly lower your body towards the ground by bending your elbows. Maintain control and keep your body parallel to the ground throughout the movement. 7. Once your chest reaches the lowest point, push back up to the starting position by straightening your elbows. 8. Repeat the exercise for the desired number of repetitions or for the recommended duration. ## Variations Consider these variations or modifications for the Full Planche Push-Up: 1. Tuck Planche Push-Up: If you're not yet able to perform the full planche position, you can begin with a tuck planche. Bend your knees and tuck them towards your chest while maintaining the planche position. This variation reduces the demand on the shoulders and core, allowing for better balance. 2. Assisted Planche Push-Up: Use resistance bands or have a spotter assist you by holding your legs to provide support and help you with the movement. 3. Planche Push-Up on Parallettes: Perform the exercise using parallettes instead of the floor. Parallettes allow for a greater range of motion and increased stability during the movement. ## Muscles Worked The Full Planche Push-Up primarily targets the following muscles: 1. Deltoids (shoulders) 2. Pectoralis major (chest) 3. Triceps brachii (triceps) 4. Rectus abdominis (core) 5. Obliques (core) 6. Serratus anterior (scapular stability) ## Common Mistakes Avoid these common mistakes while performing the Full Planche Push-Up: 1. Improper body alignment: Maintain a straight line from your head to your heels throughout the exercise. Avoid sagging or arching your back, as it can lead to excessive stress on the shoulders and compromise form. 2. Insufficient strength and stability: The Full Planche Push-Up is an advanced exercise that requires significant upper body and core strength. Make sure you have developed sufficient strength and stability through progressive exercises like planche progressions, push-ups, and core strengthening exercises. 3. Lack of controlled movement: Focus on maintaining control throughout the entire range of motion. Avoid rushing through the exercise or relying on momentum to complete the movement. 4. Overtraining: Due to the high demand on the shoulders and wrists, it's essential to avoid excessive volume or frequency when training the Full Planche Push-Up. Gradually increase the intensity and volume of the exercise to allow for proper recovery and injury prevention. ## Safety Precautions Keep the following safety precautions in mind when performing the Full Planche Push-Up: 1. Warm up adequately before attempting the exercise to prepare your muscles and joints for the demands of the movement. 2.

The Hack One Leg Calf Raise is an exercise that primarily targets the calf muscles in the lower leg. It involves standing on one leg and lifting the body up onto the toes, focusing on the calf of the working leg. This exercise helps strengthen and tone the calf muscles while improving balance and stability. ## Instructions 1. Stand upright with your feet shoulder-width apart. 2. Shift your weight onto one leg, slightly bending the knee of the supporting leg. 3. Place the ball of your other foot on a raised surface, such as a step or weight plate, with your heel hanging off the edge. 4. Engage your core and maintain a tall posture throughout the exercise. 5. Keeping your balance, slowly rise up onto the toes of the working leg by pushing through the ball of your foot. 6. Pause for a moment at the top of the movement, feeling the contraction in your calf muscle. 7. Slowly lower your heel back down, controlling the descent. 8. Repeat the movement for the desired number of repetitions. 9. Switch legs and perform the exercise on the other side. ## Variations - **Assisted One Leg Calf Raise**: If you're a beginner or need additional support, you can use a wall or a stable object to lightly hold onto for balance. - **Weighted One Leg Calf Raise**: For advanced individuals, you can add resistance by holding a dumbbell or wearing a weighted vest while performing the exercise. - **Elevated Surface Variation**: Instead of using a step or weight plate, you can try performing the exercise on an unstable surface, such as a foam pad or balance board, to further challenge your balance and engage additional stabilizer muscles. ## Muscles Worked The Hack One Leg Calf Raise primarily targets the following muscles: - Gastrocnemius (calf muscle) - Soleus (calf muscle) - Tibialis posterior (stabilizer muscle) ## Common Mistakes - Using excessive momentum: Avoid using momentum to lift your body up, as it reduces the effectiveness of the exercise. Focus on a controlled and slow movement. - Leaning too far forward or backward: Maintain an upright posture throughout the exercise. Avoid leaning excessively in any direction, as it may compromise your balance and form. - Failing to engage the core: Keep your core muscles activated throughout the movement to enhance stability and maintain proper alignment. - Not achieving a full range of motion: Ensure you raise your heel as high as possible without compromising form. Aim for a full stretch and contraction of the calf muscles. ## Safety Precautions - Prioritize safety and stability when performing the Hack One Leg Calf Raise. Make sure you have a firm and stable surface to stand on. - Start with a lower surface height, such as a low step, and gradually increase the height as your balance and strength improve. - If you have any pre-existing knee or ankle conditions, consult with a healthcare professional before attempting this exercise. - Listen to your body and stop immediately if you feel any pain or discomfort.
Half knee bends, also known as half squats or half leg presses, are lower body exercises that target the quadriceps, hamstrings, and gluteal muscles. This exercise involves bending the knees to a partial squatting position, focusing on the lower body muscles. It helps strengthen the legs, improve lower body stability, and enhance overall lower body strength. ## Instructions 1. Stand upright with your feet shoulder-width apart and toes pointed slightly outward. 2. Keep your back straight and engage your core muscles for stability. 3. Slowly bend your knees, lowering your hips downward as if you're sitting back into a chair. 4. Descend until your thighs are approximately parallel to the floor, or as far as you can comfortably go. 5. Ensure your knees track over your toes, avoiding inward collapsing or excessive forward movement. 6. Maintain a neutral spine and avoid rounding or arching your back. 7. Pause for a moment at the bottom position, feeling the engagement in your leg muscles. 8. Push through your heels and extend your knees and hips to return to the starting position. 9. Repeat the movement for the desired number of repetitions. ## Variations - **Full Squat**: For individuals with good lower body strength and flexibility, you can perform a full squat by descending until your thighs are below parallel to the floor. - **Weighted Half Knee Bends**: To increase the challenge, you can hold a dumbbell or a barbell across your shoulders while performing the exercise. - **Single-Leg Half Knee Bends**: For advanced individuals, you can perform the exercise on one leg at a time, which further engages the stabilizer muscles and challenges balance. ## Muscles Worked The half knee bend primarily targets the following muscles: - Quadriceps (front of the thigh) - Hamstrings (back of the thigh) - Gluteal muscles (buttocks) - Calves (gastrocnemius and soleus muscles) to a lesser extent ## Common Mistakes - Allowing knees to cave inward: Ensure that your knees track over your toes and do not collapse inward during the movement. Keep your knees in line with your feet. - Rounding the back: Maintain a neutral spine throughout the exercise. Avoid rounding or arching your back, as it can strain the lower back. - Going too deep or not deep enough: Find a comfortable range of motion where your thighs are parallel to the floor or slightly above. Avoid going too deep if it compromises your form or causes discomfort. - Using momentum: Avoid relying on momentum to perform the exercise. Focus on controlled movements and avoid bouncing at the bottom position. ## Safety Precautions - Warm up adequately before performing half knee bends to prepare your muscles for the exercise. - If you have any pre-existing knee, hip, or lower back conditions, consult with a healthcare professional before attempting this exercise. - Start with lighter weights or bodyweight and gradually increase the resistance as your strength and form improve. - Listen to your body and stop immediately if you experience pain or discomfort in your joints or muscles. - Maintain proper form and avoid excessive forward leaning or rounding of the back to prevent injury.
The half sit-up is an abdominal exercise that targets the rectus abdominis, commonly known as the "six-pack" muscles. It involves a partial movement from lying flat on your back to a seated position, focusing on the abdominal muscles. This exercise helps strengthen the core, improve abdominal endurance, and enhance overall trunk stability. ## Instructions 1. Lie down on your back on a comfortable mat or floor with your knees bent and feet flat on the ground. 2. Position your arms straight and parallel to your body, palms facing downward. 3. Engage your core muscles by drawing your navel towards your spine. 4. Slowly lift your head, neck, and shoulders off the ground while simultaneously reaching your hands toward your knees. 5. Focus on using your abdominal muscles to initiate the movement rather than pulling with your hands. 6. Continue the upward movement until your upper back is off the ground, and you feel a strong contraction in your abdominals. 7. Hold the top position for a brief moment, maintaining tension in your abs. 8. Slowly lower your upper back and shoulders back to the starting position in a controlled manner, maintaining engagement in your core throughout the descent. 9. Repeat the movement for the desired number of repetitions. ## Variations - **Weighted Half Sit-Up**: To increase the intensity, you can hold a weight plate or dumbbell against your chest while performing the exercise. - **Decline Half Sit-Up**: If you have access to an inclined bench, you can perform the half sit-up with your upper body positioned at a higher angle, which adds more resistance and challenges the abdominal muscles further. - **Leg Raises**: Instead of reaching towards your knees, you can perform leg raises by keeping your legs straight and lifting them off the ground while keeping your upper back on the floor. This variation targets the lower abdominal muscles to a greater extent. ## Muscles Worked The half sit-up primarily targets the following muscles: - Rectus abdominis (frontal abdominal muscles) - Hip flexors (muscles that flex the hips) ## Common Mistakes - Pulling with the neck or arms: Avoid using your neck or arms to pull yourself up. The movement should be initiated by the abdominal muscles. - Rounding the lower back: Keep your lower back in contact with the ground throughout the exercise. Avoid excessive rounding or arching of the lower back. - Using momentum: Focus on controlled movements and avoid using momentum to complete the exercise. This ensures proper muscle engagement and reduces the risk of injury. - Straining the neck: Keep your neck relaxed and avoid excessive tension. Allow your abdominal muscles to do the work. ## Safety Precautions - If you have any pre-existing back or neck conditions, it is advisable to consult with a healthcare professional before attempting this exercise. - Start with a controlled range of motion that feels comfortable for your abdominal strength. Gradually increase the range as your strength improves. - Keep your breathing steady throughout the exercise. Exhale as you lift your upper body and inhale as you lower it back down. - If you experience any pain or discomfort, stop the exercise immediately and seek guidance from a fitness professional or healthcare provider. - Engage your core muscles and maintain proper form to avoid strain on the back or neck.
The hands bike exercise, also known as hand cycling or arm cycling, is a cardiovascular and upper body workout that targets the muscles of the arms, shoulders, and upper back. It involves mimicking the motion of cycling using your arms instead of your legs. This exercise is beneficial for improving cardiovascular endurance, strengthening the upper body, and increasing overall stamina. ## Instructions 1. Sit on a stable chair or wheelchair with good back support. 2. Place your hands on the hand pedals or handles of the hand bike machine. 3. Adjust the resistance level or intensity based on your fitness level and goals. 4. Begin by pedaling forward with your hands, similar to riding a bicycle. Push one hand forward while pulling the other hand backward in a continuous alternating motion. 5. Maintain a controlled and smooth rhythm throughout the exercise, keeping a steady pace. 6. Continue pedaling for a desired duration, aiming for a sustained and elevated heart rate. 7. Cool down gradually by reducing the speed and intensity of the pedaling motion. 8. Stretch your arms, shoulders, and upper back after the workout to promote flexibility and recovery. ## Variations - **Resistance Level**: Adjust the resistance level on the hand bike machine to make the exercise more challenging or less demanding based on your fitness level. - **Interval Training**: Alternate between periods of high-intensity pedaling and lower-intensity recovery periods to add variety and increase cardiovascular conditioning. - **Outdoor Hand Cycling**: If you have access to a specialized hand cycle, you can take your hand cycling outdoors for a different terrain experience and increased workout intensity. ## Muscles Worked The hands bike primarily targets the following muscles: - Biceps brachii (front of the upper arm) - Triceps brachii (back of the upper arm) - Deltoids (shoulder muscles) - Trapezius (upper back muscles) - Rhomboids (muscles between the shoulder blades) - Pectoralis muscles (chest muscles) - Forearm muscles and grip strength are also engaged during the exercise. ## Common Mistakes - Incorrect hand positioning: Make sure your hands are properly placed on the hand pedals or handles to ensure a secure grip and effective movement. - Slouching or rounding the back: Maintain good posture throughout the exercise. Avoid slouching or rounding the back, as it may strain the upper body and compromise form. - Overgripping: Avoid excessive gripping or tensing of the hands and forearms. Maintain a relaxed grip to prevent unnecessary fatigue and strain. - Jerky or uncontrolled movements: Aim for smooth and controlled pedaling motions. Avoid rapid or jerky movements that may put stress on the joints or cause instability. ## Safety Precautions - Warm up your upper body with some dynamic stretching exercises before starting the hands bike workout. - Start with a comfortable resistance level and gradually increase it as your strength and endurance improve. - Listen to your body and adjust the intensity and duration of the exercise according to your fitness level and any physical limitations. - Stay hydrated throughout the workout and take breaks as needed. - If you have any pre-existing upper body injuries or medical conditions, consult with a healthcare professional before attempting hands bike exercises. - Use proper form and technique to avoid strain or injury. If you experience pain or discomfort, stop the exercise and seek advice from a fitness professional or healthcare provider.
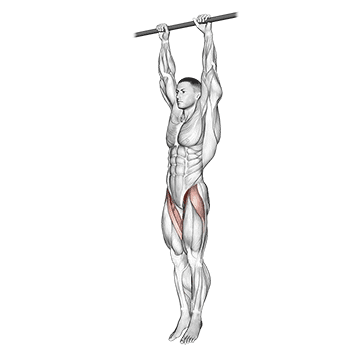
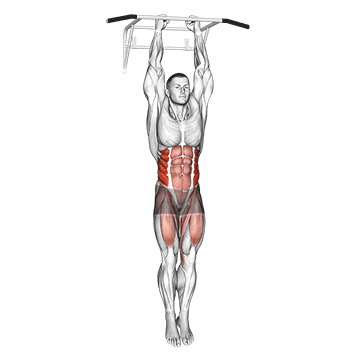
The hanging leg raise is an advanced abdominal exercise that primarily targets the rectus abdominis, commonly known as the six-pack muscles. It also engages the hip flexors and the muscles of the lower back. This exercise involves lifting the legs while hanging from a bar or other stable overhead apparatus. It requires strength and stability in the core and upper body. ## Instructions 1. Find a sturdy pull-up bar or overhead apparatus that can support your body weight. Ensure that it is secure and at a height that allows your legs to hang freely. 2. Stand underneath the bar and reach up to grip it with an overhand grip, slightly wider than shoulder-width apart. 3. Hang from the bar with your arms fully extended, ensuring your shoulders are relaxed and your core is engaged. 4. Keep your legs straight and together, and initiate the movement by contracting your abdominal muscles. 5. Slowly raise your legs upward by lifting your hips and bending at the waist. Continue the movement until your legs are parallel to the floor or as high as you can comfortably go. 6. Pause briefly at the top of the movement, focusing on squeezing your abs. 7. Slowly lower your legs back down to the starting position, maintaining control throughout the descent. 8. Repeat for the desired number of repetitions. ## Tips and Precautions - Engage your core muscles throughout the exercise to maintain stability and control. - Avoid excessive swinging or using momentum to lift your legs. Focus on controlled movements. - If you find it challenging to keep your legs straight, you can slightly bend your knees. - Start with a comfortable range of motion and gradually increase it as you build strength. - If you have lower back issues or find it difficult to perform the exercise, consult with a fitness professional or modify the movement to a variation that suits your abilities. ## Variations - Bent Knee Hanging Leg Raise: Instead of keeping your legs straight, you can bend your knees at a 90-degree angle while lifting them. - Captain's Chair Leg Raise: If you have access to a captain's chair, you can perform leg raises by resting your forearms on the arm pads and lifting your legs from a seated position. - Hanging Knee Tucks: Rather than lifting your legs straight, you can bring your knees toward your chest in a tucking motion while hanging. ## Muscles Worked - Rectus Abdominis (six-pack muscles) - Hip Flexors - Lower Back Muscles (Erector Spinae) ## Common Mistakes - Swinging the legs: Swinging the legs to generate momentum reduces the effectiveness of the exercise. Focus on controlled movements without excessive swinging. - Arching the back: Avoid excessive arching of the lower back during the leg raise. Maintain a neutral spine position throughout the exercise. - Using momentum: Using momentum to lift the legs makes the exercise easier but less effective. Concentrate on using your core muscles to lift your legs instead of relying on momentum. ## Safety Precautions - Ensure that the bar or overhead apparatus is securely fixed and can support your body weight. - If you have any pre-existing conditions or injuries, consult with a healthcare professional or fitness expert before attempting the exercise. - Start with proper warm-up exercises to prepare your muscles for the movement. - If you experience any pain or discomfort during the exercise, stop immediately and seek guidance from a qualified professional.
The hanging oblique knee raise is an advanced abdominal exercise that primarily targets the oblique muscles, which are located on the sides of the abdomen. It also engages the rectus abdominis and other core muscles. This exercise involves hanging from a bar or other stable overhead apparatus and lifting the knees toward the opposite side, targeting the oblique muscles and promoting core strength and stability. ## Instructions 1. Find a sturdy pull-up bar or overhead apparatus that can support your body weight. Ensure that it is secure and at a height that allows your legs to hang freely. 2. Stand underneath the bar and reach up to grip it with an overhand grip, slightly wider than shoulder-width apart. 3. Hang from the bar with your arms fully extended, ensuring your shoulders are relaxed and your core is engaged. 4. Keep your legs straight and together initially. 5. Initiate the movement by contracting your oblique muscles on one side and lifting your knees diagonally toward that side. 6. Focus on rotating your pelvis and torso as you raise your knees, aiming to bring them up toward your armpit or as close to your shoulder as possible. 7. Pause briefly at the top of the movement, feeling the contraction in your oblique muscles. 8. Slowly lower your knees back down to the starting position with control. 9. Repeat the movement on the opposite side by contracting the oblique muscles on the other side and lifting your knees diagonally toward that side. 10. Continue alternating sides for the desired number of repetitions. ## Tips and Precautions - Maintain a controlled and stable position throughout the exercise, avoiding excessive swinging or using momentum to lift your knees. - Engage your core muscles, particularly the obliques, to initiate and control the movement. - Start with a comfortable range of motion and gradually increase it as you become more comfortable and stronger. - Focus on maintaining proper form and technique rather than rushing through the exercise. - If you have any lower back issues or find it difficult to perform the exercise, consult with a fitness professional or modify the movement to a variation that suits your abilities. ## Variations - Hanging Side Knee Raise: Instead of lifting the knees diagonally, raise them directly to the side, targeting the oblique muscles individually. - Hanging Twisting Knee Raise: Perform the knee raise as described, but incorporate a twisting motion by bringing the knees toward the opposite shoulder, engaging the obliques further. ## Muscles Worked - Obliques (Internal and External) - Rectus Abdominis (assisting) - Hip Flexors (secondary) ## Common Mistakes - Using momentum: Avoid swinging the legs or using momentum to lift the knees. Focus on controlled movements and engaging the obliques. - Hunching the shoulders: Keep the shoulders relaxed and down, avoiding hunching or shrugging during the exercise. - Lifting the knees too high: While it's important to lift the knees with the obliques, avoid excessive range of motion that compromises form or strains the lower back. Lift the knees comfortably while maintaining control. ## Safety Precautions - Ensure that the bar or overhead apparatus is securely fixed and can support your body weight. - If you have any pre-existing conditions or injuries, consult with a healthcare professional or fitness expert before attempting the exercise. - Start with proper warm-up exercises to prepare your muscles for the movement. - If you experience any pain or discomfort during the exercise, particularly in the lower back, stop immediately and seek guidance from a qualified professional.
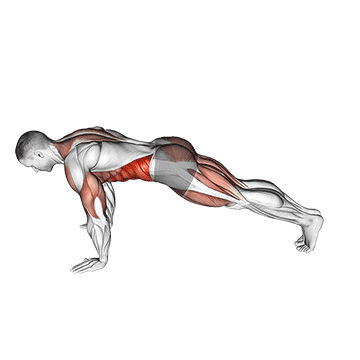
The inchworm exercise is a dynamic full-body movement that targets multiple muscle groups, including the shoulders, arms, core, hamstrings, and calves. It involves a forward folding motion, walking the hands out into a high plank position, and then returning to the starting position. The inchworm exercise helps improve flexibility, core strength, and overall body coordination. ## Instructions 1. Stand tall with your feet hip-width apart and your arms by your sides. 2. Begin the movement by slowly bending at the hips, lowering your torso towards the floor. Keep your legs as straight as possible without locking the knees. 3. Once your hands reach the floor, continue walking them forward in small steps, moving into a high plank position. Walk your hands out until your body is in a straight line from head to heels. 4. Pause briefly in the high plank position, engaging your core and maintaining a neutral spine. 5. Reverse the movement by slowly walking your hands back towards your feet, keeping your legs as straight as possible. 6. Once your hands are near your feet, slowly roll your spine up, one vertebra at a time, until you return to the starting position. 7. Repeat the movement for the desired number of repetitions. ## Variations - Modified Inchworm: If you have limited flexibility or difficulty keeping your legs straight, you can perform the exercise with a slight bend in your knees. - Inchworm with Push-Up: To increase the challenge and incorporate more upper body strength, add a push-up at the bottom of the high plank position. After walking your hands out, perform a push-up before walking your hands back towards your feet. - Inchworm with Shoulder Taps: To further engage your core and shoulders, add shoulder taps in the high plank position. After walking your hands out, touch one hand to the opposite shoulder while maintaining stability and control. - Inchworm with Dumbbells: Hold a pair of dumbbells in your hands while performing the inchworm to add resistance and increase the intensity of the exercise. ## Muscles Worked - Primary muscles: Shoulders (deltoids), arms (triceps), core muscles (abdominals, obliques), hamstrings, calves - Secondary muscles: Glutes, quadriceps ## Common Mistakes - Rounded back: Maintain a neutral spine throughout the exercise. Avoid rounding your back or sagging your hips in the high plank position. - Lack of core engagement: Keep your core muscles activated throughout the movement. This helps stabilize your body and protects your lower back. - Bending the knees excessively: While some knee flexion is acceptable, avoid excessively bending your knees to ensure you engage the hamstrings and maintain proper form. - Rushing the movement: Perform the inchworm exercise in a slow and controlled manner to maximize the benefits and engage the targeted muscles effectively. ## Safety Precautions - If you have any pre-existing back or shoulder issues, or if you experience pain or discomfort during the exercise, consult with a healthcare professional before attempting the inchworm. - Warm up your body and stretch your hamstrings before performing the exercise to reduce the risk of strain or injury. - Avoid locking your knees or hyperextending them during the movement. Maintain a slight bend in the knees for better joint protection. - Listen to your body and modify the exercise as needed to suit your fitness level and capabilities. - If you have wrist problems or discomfort, perform the exercise on dumbbells or push-up bars to keep your wrists in a more neutral position.

The incline close-grip push-up is a variation of the traditional push-up exercise that targets the triceps, chest, and shoulders. By placing your hands closer together and elevating your upper body on an incline surface, this exercise places more emphasis on the triceps muscles. It helps develop upper body strength and muscular endurance. ## Instructions 1. Set up an incline surface such as an elevated platform, bench, or step. 2. Position yourself facing the incline surface and place your hands slightly narrower than shoulder-width apart on the surface. Your fingers should be pointing forward or slightly inward. 3. Walk your feet back until your body forms a straight line from head to heels. Keep your core engaged and your feet hip-width apart. 4. Lower your body towards the incline surface by bending your elbows. Keep your elbows close to your sides as you descend. 5. Go as low as you comfortably can, feeling a stretch in your chest and shoulders. 6. Push through your palms and extend your arms, pushing your body away from the incline surface until your arms are fully extended. 7. Repeat for the desired number of repetitions. ## Variations - Knee Incline Close-Grip Push-Up: If the standard incline close-grip push-up is too challenging, you can modify the exercise by performing it on your knees. Follow the same instructions but instead of being in a high plank position, position yourself on your knees and keep your lower legs in contact with the ground. - Decline Incline Close-Grip Push-Up: To increase the difficulty, you can elevate your feet on an incline surface while performing the exercise. This variation places more emphasis on the upper chest muscles. ## Muscles Worked - Primary muscles: Triceps, chest (pectoral muscles), shoulders (deltoids) - Secondary muscles: Core muscles, including the abs and obliques, as well as the muscles of the back and arms. ## Common Mistakes - Elbows flaring out: Keep your elbows close to your sides throughout the exercise. Avoid letting your elbows flare outwards, as this can place unnecessary stress on the shoulders. - Sagging hips: Maintain a straight line from head to heels. Avoid sagging or arching your lower back, as it can lead to poor form and reduce the effectiveness of the exercise. - Insufficient range of motion: Aim to lower your chest as close to the incline surface as possible while maintaining control. Avoid limiting your range of motion by not going low enough. ## Safety Precautions - If you have any pre-existing shoulder, elbow, or wrist issues, or if you experience pain during the exercise, consult with a healthcare professional before attempting incline close-grip push-ups. - Start with an incline surface that allows you to maintain proper form and gradually increase the difficulty by decreasing the incline as you gain strength. - Warm up your shoulders, chest, and triceps before performing incline close-grip push-ups to reduce the risk of injury. - Maintain proper form and technique throughout the exercise to prevent strain or injury to the shoulders, elbows, or wrists. - Listen to your body and modify the exercise as needed to suit your fitness level and capabilities.