
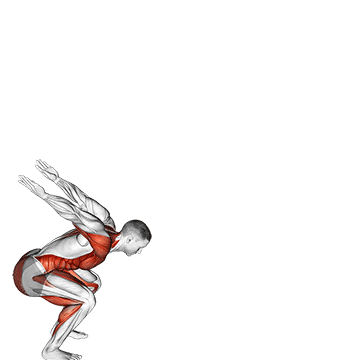
The forward jump is a dynamic plyometric exercise that targets multiple muscles, primarily the lower body. It helps improve explosive power, lower body strength, and overall athleticism. The exercise involves a forceful jump forward, engaging the leg muscles and requiring coordination and balance. ## Instructions 1. Start by standing with your feet shoulder-width apart, keeping your knees slightly bent. 2. Engage your core muscles and maintain an upright posture throughout the exercise. 3. Begin the movement by lowering your body into a partial squat position, preparing to explode forward. 4. In one explosive motion, push off the balls of your feet and jump forward as far as possible. 5. Swing your arms forward to help generate momentum and maintain balance. 6. As you land, focus on landing softly and absorbing the impact by bending your knees and hips. 7. Maintain control as you land and immediately transition into the next repetition by going back into the squat position. 8. Repeat the exercise for the desired number of repetitions or distance. ## Variations - **Box Jumps**: Instead of jumping forward on a flat surface, perform the exercise by jumping onto a sturdy box or elevated surface, then step down and repeat. - **Broad Jumps**: Similar to forward jumps, but instead of focusing on distance, focus on jumping as far forward as possible in one explosive motion. - **Single-Leg Forward Jumps**: Perform the exercise on a single leg to add an additional challenge and improve balance and stability. ## Muscles Worked - Primary muscles: Quadriceps (front of the thighs), glutes (buttocks), calves, hamstrings - Secondary muscles: Core muscles, hip flexors ## Common Mistakes - **Not maintaining proper form**: Keep your back straight, chest up, and knees aligned with your toes throughout the exercise. Avoid rounding the back or allowing the knees to collapse inward. - **Landing with locked knees**: To prevent joint stress and potential injury, ensure that your knees are slightly bent when you land to absorb the impact. - **Lack of control during landing**: Focus on landing softly and with control to minimize stress on the joints and prevent injuries. Avoid landing with excessive force or allowing your heels to slam into the ground. - **Insufficient warm-up**: Prior to performing forward jumps, it is essential to warm up the muscles and joints with dynamic movements and stretches to reduce the risk of injury. ## Safety Precautions - Perform forward jumps on a flat, non-slip surface to ensure stability and reduce the risk of slipping or losing balance. - Start with smaller jumps and gradually increase the distance or intensity as your strength and skill improve. - If you have any pre-existing knee or joint issues, it is advisable to consult with a qualified fitness professional or healthcare provider before attempting forward jumps. - Ensure there is enough space in front of you to perform the exercise safely without any obstacles or hazards. - If you experience pain or discomfort during the exercise, discontinue immediately and seek advice from a healthcare professional.
The forward lunge is a lower body exercise that targets the quadriceps, hamstrings, and glutes. It also engages the core muscles for stability and balance. This exercise helps improve lower body strength, stability, and functional movement patterns. ## Instructions 1. Start by standing tall with your feet hip-width apart and your hands on your hips or relaxed by your sides. 2. Take a step forward with your right foot, ensuring you have enough space to lunge without your front knee extending beyond your toes. 3. Lower your body by bending both knees. Your front knee should be directly above your ankle, and your back knee should be pointing toward the floor. 4. Keep your torso upright, with your chest lifted and shoulders relaxed. 5. Engage your core muscles to maintain stability throughout the movement. 6. Push through your front heel and extend your legs to return to the starting position. 7. Repeat the movement on the other side, stepping forward with your left foot and lowering into a lunge. 8. Alternate legs and continue the exercise for the desired number of repetitions. ## Variations - **Reverse Lunge**: Instead of stepping forward, take a step backward to perform the lunge. This variation can be beneficial for individuals with knee issues or those looking to target the glutes and hamstrings more. - **Walking Lunge**: Instead of returning to the starting position after each lunge, take continuous steps forward, alternating legs. This variation adds an element of cardiovascular endurance and coordination. - **Dumbbell or Barbell Loaded Lunge**: Hold dumbbells or a barbell across your shoulders to increase the resistance and intensity of the exercise. ## Muscles Worked - Primary muscles: Quadriceps (front of the thighs), glutes (buttocks), hamstrings - Secondary muscles: Calves, core muscles (abdominals, lower back), hip flexors ## Common Mistakes - **Allowing the knee to extend beyond the toes**: Be mindful of keeping your front knee in line with your ankle to avoid placing excessive stress on the knee joint. Take a slightly longer step if needed. - **Collapsing or rounding the upper body**: Maintain an upright posture throughout the exercise. Avoid leaning forward or rounding your back, as this can compromise form and stability. - **Not lunging deep enough**: Aim to lower your body until your front thigh is parallel to the floor. This ensures proper engagement of the targeted muscles. - **Lack of control and stability**: Focus on controlling the movement and maintaining stability throughout the exercise. Avoid rushing or losing balance. ## Safety Precautions - Choose a clear and open space to perform forward lunges, ensuring there are no obstacles or tripping hazards. - If you have any knee or joint issues, it is advisable to consult with a qualified fitness professional or healthcare provider before attempting forward lunges. - Start with bodyweight lunges or lighter weights to master the movement and gradually increase the resistance as you become more comfortable and stronger. - Maintain proper form and avoid compensating with other muscles. If you feel any pain or discomfort, modify the exercise or discontinue it. - Warm up the muscles and joints with dynamic movements before performing forward lunges to reduce the risk of injury.
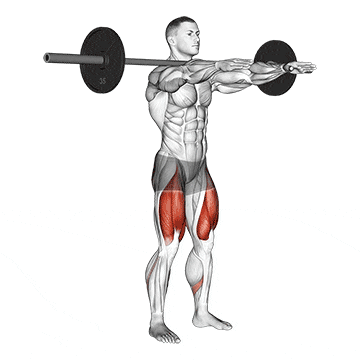
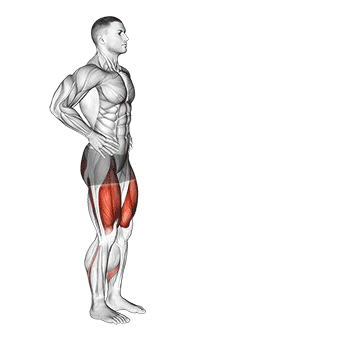
The Frankenstein squat is a lower body exercise that targets the quadriceps, glutes, and hamstrings. It involves holding your arms straight out in front of you, parallel to the ground, resembling the Frankenstein monster's walk. This exercise helps improve lower body strength, stability, and overall leg muscle development. ## Instructions 1. Stand tall with your feet shoulder-width apart and your toes pointing slightly outward. 2. Extend your arms straight out in front of you, parallel to the ground. Keep your palms facing down. 3. Engage your core muscles by pulling your belly button in toward your spine. 4. Lower your body by bending your knees and hips, as if you were sitting back into an imaginary chair. 5. Maintain a straight back and keep your chest lifted throughout the movement. 6. Continue lowering until your thighs are parallel to the ground or as low as you can comfortably go. 7. Pause for a moment in the lowered position, then push through your heels to return to the starting position. 8. Repeat the movement for the desired number of repetitions. ## Variations - **Dumbbell or Barbell Frankenstein Squat**: Hold a dumbbell or barbell across your shoulders to increase resistance and add an extra challenge to the exercise. - **Pulse Squats**: Instead of returning to the starting position after each squat, perform small pulsing movements at the bottom of the squat to increase muscle engagement and intensity. - **Narrow Stance Frankenstein Squat**: Bring your feet closer together, narrower than shoulder-width apart, to target the quadriceps more intensely. ## Muscles Worked - Primary muscles: Quadriceps (front of the thighs), glutes (buttocks), hamstrings - Secondary muscles: Calves, core muscles (abdominals, lower back), hip flexors ## Common Mistakes - **Collapsing or rounding the upper back**: Keep your chest lifted and shoulders back throughout the exercise. Avoid hunching or rounding your upper back, as it can compromise form and stability. - **Allowing the knees to collapse inward**: Ensure that your knees are aligned with your toes throughout the movement. Avoid letting them cave inward, as it can place excessive stress on the knee joint. - **Lifting the heels off the ground**: Keep your heels firmly planted on the ground throughout the squat. Avoid lifting them, as it can disrupt balance and compromise form. - **Not maintaining control throughout the movement**: Focus on a slow and controlled descent into the squat position, avoiding rapid or jerky movements. Maintain proper form and stability throughout the exercise. ## Safety Precautions - Choose a clear and open space to perform the Frankenstein squat, ensuring there are no obstacles or tripping hazards. - If you have any knee or joint issues, it is advisable to consult with a qualified fitness professional or healthcare provider before attempting Frankenstein squats. - Start with bodyweight squats or lighter weights to master the movement and gradually increase the resistance as you become more comfortable and stronger. - Maintain proper form and avoid compensating with other muscles. If you feel any pain or discomfort, modify the exercise or discontinue it. - Warm up the muscles and joints with dynamic movements before performing Frankenstein squats to reduce the risk of injury.
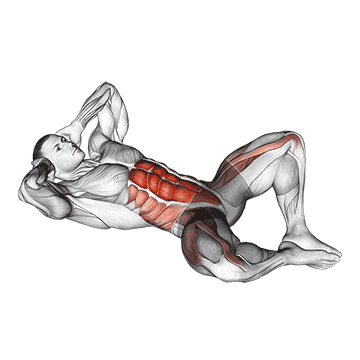
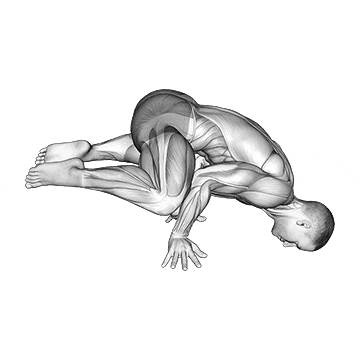
The frog crunch is an abdominal exercise that targets the rectus abdominis (six-pack muscles) and the hip flexors. This exercise involves a crunching motion while keeping the legs in a frog-like position. It helps strengthen the core, improve abdominal definition, and enhance overall core stability. ## Instructions 1. Start by lying on your back on a mat or the floor. 2. Bend your knees and bring the soles of your feet together, allowing your knees to open outward, resembling a frog position. 3. Place your hands lightly behind your head, supporting your neck, or you can keep them crossed on your chest. 4. Engage your core muscles by drawing your belly button in toward your spine. 5. Lift your head, neck, and shoulders off the ground, using your abdominal muscles. 6. Simultaneously bring your knees toward your chest while keeping the soles of your feet together. 7. Exhale as you crunch up and squeeze your abdominal muscles. 8. Pause at the top of the crunch for a moment, feeling the contraction in your abs. 9. Slowly lower your head, neck, shoulders, and legs back to the starting position. 10. Repeat the movement for the desired number of repetitions. ## Variations - **Weighted Frog Crunch**: Hold a weight plate, dumbbell, or medicine ball against your chest to increase the resistance and difficulty of the exercise. - **Frog Leg Lifts**: Instead of performing a crunch, extend your legs upward while keeping them in the frog position. Lower your legs back down without touching the ground, and repeat the movement. - **Single-Leg Frog Crunch**: Perform the exercise with one leg extended straight while the other leg remains in the frog position. Alternate legs for each repetition. ## Muscles Worked - Primary muscles: Rectus abdominis (six-pack muscles), hip flexors - Secondary muscles: Obliques (side abdominal muscles), transverse abdominis (deep core muscles) ## Common Mistakes - **Pulling on the neck**: Avoid pulling or straining your neck while performing the crunch. Keep your hands lightly supporting your head or crossed on your chest to prevent excessive strain on the neck muscles. - **Using momentum**: Focus on using your abdominal muscles to initiate the movement rather than relying on momentum. Perform the exercise in a controlled manner to maximize muscle engagement. - **Lifting the feet too high**: Lift your knees toward your chest without lifting your hips off the ground. Avoid excessive swinging or lifting of the legs, as it can reduce the effectiveness of the exercise. - **Not fully contracting the abs**: At the top of the crunch, make sure to squeeze your abdominal muscles and hold the contraction for a moment to maximize engagement. ## Safety Precautions - If you have any pre-existing neck or back conditions, it is advisable to consult with a qualified fitness professional or healthcare provider before attempting frog crunches. - Perform the exercise on a stable surface and use a mat or soft surface to provide cushioning and support for your lower back. - Avoid straining or overexerting your neck muscles during the exercise. Focus on engaging your core and using your abdominal muscles to lift your upper body. - If you experience any pain or discomfort, modify the exercise or discontinue it. Listen to your body and work within your own range of motion and fitness level. - It is recommended to warm up your abdominal muscles with some light dynamic stretches or exercises before performing frog crunches.
The frog planche is an advanced gymnastics exercise that targets the core, upper body, and shoulder muscles. It requires a high level of strength, balance, and body control. The frog planche involves balancing on the hands while keeping the legs extended and parallel to the ground, resembling the shape of a frog. This exercise helps develop upper body strength, core stability, and overall body control. ## Instructions 1. Begin by placing your hands on the ground slightly wider than shoulder-width apart, fingers pointing forward. 2. Extend your legs backward and lift your feet off the ground, keeping them together and parallel to the ground. 3. Bend your knees and bring them toward your chest, opening your legs out to the sides, resembling a frog position. 4. Shift your weight forward, engaging your core and pressing through your palms to lift your hips and legs higher off the ground. 5. Maintain a straight line from your head to your heels, with your body parallel to the ground. 6. Focus on maintaining balance and stability, keeping your core and shoulder muscles engaged. 7. Hold the frog planche position for a few seconds or as long as you can maintain proper form. 8. Slowly lower your feet back to the starting position and repeat the movement for the desired number of repetitions or hold time. ## Variations - **Tuck Planche**: If the frog planche is too challenging, you can start by practicing the tuck planche. Instead of extending the legs backward, bend your knees and tuck them towards your chest, keeping your feet off the ground. - **Straddle Planche**: Once you have mastered the frog planche, you can progress to the straddle planche. Keep your legs extended straight out to the sides, forming a wide "V" shape. - **Full Planche**: The full planche is the most advanced variation where the legs are fully extended forward, parallel to the ground, while balancing on the hands. This requires exceptional strength, flexibility, and body control. ## Muscles Worked - Primary muscles: Core muscles (abdominals, lower back), shoulder muscles (deltoids, triceps), chest muscles (pectoralis major) - Secondary muscles: Biceps, forearms, upper back muscles (rhomboids, trapezius) ## Common Mistakes - **Losing balance and falling forward**: Focus on distributing your weight evenly through your hands and engaging your core to maintain balance. Start with shorter hold times and gradually increase as you build strength and stability. - **Lack of core engagement**: Keep your abdominal and lower back muscles engaged throughout the exercise. This helps stabilize your body and maintain proper form. - **Bending at the hips or sagging in the lower back**: Aim to maintain a straight line from your head to your heels. Avoid bending at the hips or allowing your lower back to sag, as it can strain the lower back and compromise form. - **Not warming up properly**: Perform a thorough warm-up before attempting the frog planche to prepare your muscles and joints for the demands of the exercise. This can help reduce the risk of injury. ## Safety Precautions - The frog planche is an advanced exercise that requires a high level of strength and body control. It is recommended for experienced individuals who have already developed a solid foundation of upper body and core strength. - Progress gradually and build up your strength and balance over time. Attempting advanced variations without proper preparation and strength can increase the risk of injury. - Practice on a soft, padded surface or use mats to cushion your hands and protect your wrists. - If you have any pre-existing shoulder, wrist, or back injuries, it is advisable to consult with a qualified gymnastics coach or

The front lever is an advanced gymnastics exercise that targets the muscles of the core, back, shoulders, and arms. It involves hanging from a horizontal bar while keeping the body parallel to the ground. The front lever requires exceptional upper body strength, core stability, and body control. It is a challenging exercise that helps develop overall upper body strength, including the muscles of the back, core, and arms. ## Instructions 1. Start by gripping a horizontal bar with an overhand grip, slightly wider than shoulder-width apart. 2. Hang from the bar with your arms fully extended, engaging your shoulder blades and activating your core. 3. Begin to lift your legs, keeping them together and parallel to the ground, while simultaneously pulling your shoulder blades down and back. 4. Engage your core and back muscles to maintain a straight line from your head to your toes. 5. Continue pulling your shoulder blades down and back, keeping your chest open and facing forward. 6. Hold the front lever position for a few seconds or as long as you can maintain proper form. 7. Slowly lower your legs back down and release from the bar. ## Variations - **Tuck Front Lever**: If the full front lever is too challenging, you can start with the tuck front lever. Instead of keeping the legs fully extended, tuck your knees toward your chest, keeping your thighs parallel to the ground. - **Advanced Front Lever Variations**: Once you have mastered the front lever, you can progress to more advanced variations such as the straddle front lever or the full front lever with one arm extended. ## Muscles Worked - Primary muscles: Latissimus dorsi (lats), rhomboids, posterior deltoids, core muscles (abdominals, lower back), biceps - Secondary muscles: Forearms, trapezius, serratus anterior, obliques ## Common Mistakes - **Lack of scapular retraction**: It is essential to actively retract your shoulder blades and engage your back muscles to maintain proper form and stability throughout the exercise. - **Sagging or arching the back**: Aim to keep your body in a straight line from head to toes. Avoid sagging or arching your back, as it can compromise form and decrease the effectiveness of the exercise. - **Insufficient core engagement**: Engage your core muscles throughout the exercise to stabilize your body and maintain proper alignment. - **Not progressing gradually**: The front lever is an advanced exercise that requires significant strength and control. Progress gradually by starting with easier variations and gradually working your way up to the full front lever to avoid injury. ## Safety Precautions - The front lever is an advanced exercise and should only be attempted by individuals with a strong foundation of upper body and core strength. - Ensure that the bar or apparatus you are using is secure and can support your weight. - Practice on a padded surface or use mats to cushion your hands and protect your wrists. - If you have any pre-existing shoulder, wrist, or back injuries, it is advisable to consult with a qualified gymnastics coach or trainer before attempting the front lever. - Progress gradually and listen to your body. If you experience pain or discomfort, modify the exercise or discontinue it.
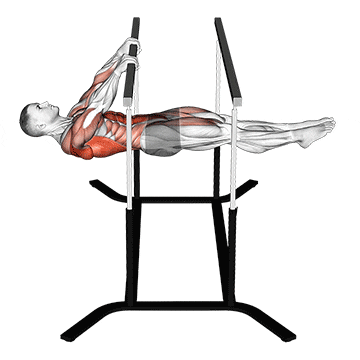
Front lever reps refer to performing repetitions of the front lever exercise. The front lever is an advanced gymnastics movement that targets the muscles of the core, back, shoulders, and arms. Performing front lever reps helps develop upper body strength, core stability, and body control. It requires maintaining a horizontal position while hanging from a bar, with the body parallel to the ground. ## Instructions 1. Begin by gripping a horizontal bar with an overhand grip, slightly wider than shoulder-width apart. 2. Hang from the bar with your arms fully extended, engaging your shoulder blades and activating your core. 3. Initiate the front lever movement by lifting your legs, keeping them together and parallel to the ground, while simultaneously pulling your shoulder blades down and back. 4. Engage your core and back muscles to maintain a straight line from your head to your toes. 5. Hold the front lever position for a desired duration or for a specific number of seconds. 6. Slowly lower your legs back down while maintaining control and proper form. 7. Repeat the movement for the desired number of repetitions. ## Variations - **Tuck Front Lever Reps**: Perform front lever reps with the knees tucked toward the chest, keeping the thighs parallel to the ground. This variation reduces the leverage and difficulty compared to the full front lever. - **Advanced Front Lever Reps**: Once you have mastered the front lever, you can progress to more advanced variations such as straddle front lever reps or one-arm front lever reps. ## Muscles Worked - Primary muscles: Latissimus dorsi (lats), rhomboids, posterior deltoids, core muscles (abdominals, lower back), biceps - Secondary muscles: Forearms, trapezius, serratus anterior, obliques ## Common Mistakes - **Lack of scapular retraction**: Failing to actively retract your shoulder blades and engage your back muscles can compromise form and stability. Focus on pulling the shoulder blades down and back throughout the movement. - **Sagging or arching the back**: Maintain a straight line from head to toes. Avoid sagging or arching the back, as it reduces the effectiveness of the exercise and may lead to improper form. - **Insufficient core engagement**: Keep your core muscles engaged throughout the exercise to stabilize your body and maintain proper alignment. - **Improper breathing**: Remember to breathe consistently and avoid holding your breath during the reps. Inhale and exhale naturally to maintain proper oxygenation and prevent unnecessary tension. ## Safety Precautions - Front lever reps are an advanced exercise and should only be attempted by individuals with a strong foundation of upper body and core strength. - Ensure that the bar or apparatus you are using is secure and can support your weight. - Practice on a padded surface or use mats to cushion your hands and protect your wrists. - Warm up properly before attempting front lever reps to prepare your muscles and joints for the exercise. - If you have any pre-existing shoulder, wrist, or back injuries, it is advisable to consult with a qualified gymnastics coach or trainer before attempting front lever reps. - Progress gradually and listen to your body. If you experience pain or discomfort, modify the exercise or discontinue it.
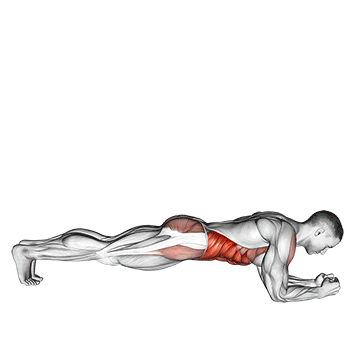
The front plank with twist is a variation of the traditional front plank exercise. It targets the core muscles, including the rectus abdominis, obliques, and transverse abdominis. The added twist engages the oblique muscles to a greater extent, increasing the challenge and effectiveness of the exercise. It also improves core stability, spinal alignment, and rotational strength. ## Instructions 1. Start by assuming a front plank position on the floor. Place your forearms on the ground, elbows aligned below the shoulders, and toes resting on the floor. 2. Engage your core muscles by drawing your navel toward your spine. Keep your body in a straight line from head to heels. 3. Once you are stable in the front plank position, begin the twist by rotating your hips and legs to one side. 4. Maintain a controlled and stable movement as you twist, keeping your core engaged and avoiding any excessive rotation or sagging of the hips. 5. Return to the starting position and repeat the twist on the opposite side. 6. Continue alternating sides for the desired number of repetitions. ## Variations - **Knee Variation**: If the full front plank with twist is too challenging, you can perform the exercise with your knees on the ground instead of the toes. This reduces the lever arm and makes it more accessible for beginners. - **Extended Arm Variation**: For an additional challenge, perform the front plank with twist with your arms fully extended, supporting your body weight on your hands instead of the forearms. ## Muscles Worked - Primary muscles: Rectus abdominis, obliques (internal and external), transverse abdominis - Secondary muscles: Hip muscles (hip flexors, glutes), shoulder stabilizers (scapular muscles) ## Common Mistakes - **Sagging or lifting of the hips**: Maintain a straight line from head to heels throughout the exercise. Avoid sagging the hips toward the floor or lifting them too high, as it reduces the effectiveness of the exercise and can strain the lower back. - **Lack of core engagement**: Focus on actively engaging your core muscles by drawing your navel toward your spine. This helps stabilize the spine and intensifies the workout for the abdominal muscles. - **Excessive rotation**: While twisting, aim for controlled and deliberate movement without excessive rotation. Avoid rotating the hips too far, as it can compromise form and strain the lower back. - **Poor shoulder alignment**: Ensure that your elbows or hands are directly under your shoulders, maintaining proper alignment throughout the exercise. Avoid allowing the shoulders to hunch or round forward. ## Safety Precautions - Maintain proper form and alignment throughout the exercise to prevent strain or injury. - If you have any pre-existing back or shoulder injuries, consult with a qualified fitness professional or healthcare provider before attempting the front plank with twist. - Engage your core muscles and focus on stability to protect your lower back during the exercise. - Start with proper warm-up exercises to prepare your muscles and joints for the movement. - If you experience pain or discomfort, modify the exercise or discontinue it. Listen to your body and work within your own limitations.
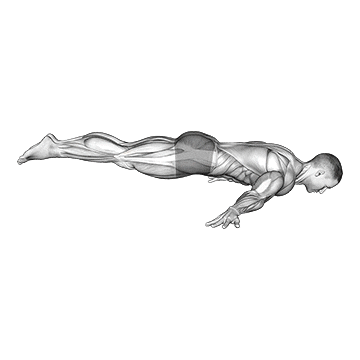
The Full Maltese is an advanced gymnastics strength exercise that primarily targets the upper body, specifically the shoulders, chest, triceps, and core muscles. It requires a high level of strength, stability, and body control. The exercise is named after the Maltese cross, a symbol resembling two intersecting bars, which is similar to the position of the body during the exercise. ## Instructions Here are the step-by-step instructions for performing the Full Maltese exercise correctly: 1. Find a set of parallel bars or gymnastics rings that are set at an appropriate height. The bars or rings should be stable and securely anchored. 2. Stand between the parallel bars or rings, facing outward. Place your hands on the bars or rings and grip them firmly. 3. Lower yourself into a support position, with your arms fully extended and your body elevated off the ground. Your palms should be facing down, and your fingers should be pointing forward. 4. Slowly shift your body forward while maintaining the support position. Extend your legs forward until they are parallel to the ground. Your body should be completely horizontal, forming a straight line from your head to your toes. 5. From the horizontal position, begin to lower your body by bending your elbows. Lower yourself as close to the ground as possible, aiming for a deep stretch in your shoulders and chest. 6. Hold the lowered position for a few seconds if possible, and then push yourself back up to the starting position by straightening your elbows. 7. Repeat the exercise for the desired number of repetitions or for the recommended duration. ## Variations Here are some variations or modifications you can consider: 1. Assisted Maltese: If you're not yet strong enough to perform the Full Maltese, you can use resistance bands or have a spotter assist you by holding your legs and providing support. 2. Tuck Maltese: Instead of fully extending your legs, you can tuck your knees towards your chest while maintaining the horizontal body position. This variation reduces the demand on the core and allows for better balance. 3. Ring Maltese: Instead of using parallel bars, you can perform the exercise on gymnastics rings. This variation adds an element of instability, requiring additional shoulder and core stabilization. ## Muscles Worked The Full Maltese primarily targets the following muscles: 1. Deltoids (shoulders) 2. Pectoralis major (chest) 3. Triceps brachii (triceps) 4. Rectus abdominis (core) 5. Obliques (core) ## Common Mistakes Here are some common mistakes people make while performing the Full Maltese exercise and how to avoid them: 1. Overarching the lower back: Avoid excessive arching in the lower back by engaging your core muscles and maintaining a straight body line. 2. Allowing the shoulders to elevate: Keep your shoulders depressed and engaged throughout the exercise to avoid excessive strain on the shoulder joints. 3. Lack of proper progression: The Full Maltese is an advanced exercise. Ensure you have developed sufficient strength and stability through progressive exercises like planche progressions and advanced dips before attempting the Full Maltese. 4. Sacrificing form for depth: It's important to prioritize maintaining proper form over achieving a deep range of motion. Start with a comfortable depth and gradually work towards increasing it as your strength improves. ## Safety Precautions To ensure safety while performing the Full Maltese exercise, consider the following precautions: 1. Warm up adequately before attempting the exercise to prepare your muscles and joints for the demands of the movement. 2. Perform the exercise on stable and secure parallel bars or rings to prevent any accidents or falls. 3. Start with