
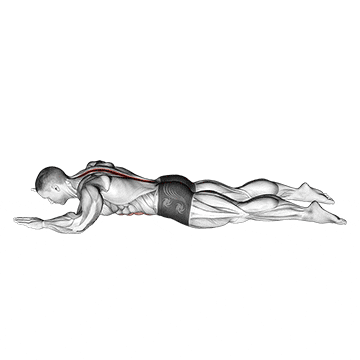
The Sphinx exercise, also known as the Sphinx pose or the Sphinx press-up, is a yoga and strength training exercise that primarily targets the muscles in the core and the back. It is a beginner-friendly exercise that helps improve spinal flexibility, strengthen the lower back, and engage the muscles of the core. ## Instructions 1. Start by lying face down on a mat or the floor. 2. Place your forearms on the ground, elbows positioned directly under your shoulders. 3. Press your forearms and palms firmly into the ground, creating a stable base. 4. Lift your chest off the ground while keeping your hips and thighs in contact with the floor. The movement should come from your lower back. 5. Lengthen your spine and gently lift your head, looking straight ahead or slightly upward. 6. Keep your shoulders relaxed and away from your ears, maintaining a neutral neck position. 7. Engage your core muscles by drawing your navel inwards towards your spine. 8. Hold the Sphinx pose for a duration that is comfortable for you, aiming to maintain proper form throughout the exercise. 9. To release the pose, slowly lower your chest and head back down to the starting position. ## Variations - Modified Sphinx Pose: If you find it challenging to lift your chest off the ground, you can start with a modified version by placing a bolster or folded blanket under your chest for support. - Dynamic Sphinx: Instead of holding the pose statically, you can add movement by gently raising and lowering your chest in a controlled manner. ## Muscles Worked The Sphinx exercise primarily targets the following muscles: - Lower back (erector spinae) - Abdominal muscles (rectus abdominis, transverse abdominis) - Core muscles (obliques) - Upper back (rhomboids, trapezius) ## Common Mistakes 1. Raising the hips or thighs: It's important to keep your hips and thighs in contact with the floor throughout the exercise to isolate the back and core muscles. 2. Overarching the lower back: Avoid excessive arching of the lower back, as it can strain the muscles. Focus on maintaining a natural curve and engaging the core. 3. Tensing the shoulders: Keep your shoulders relaxed and away from your ears. Avoid shrugging or tensing the neck and shoulder muscles. ## Safety Precautions - Listen to your body and work within your range of motion. If you experience pain or discomfort, modify the exercise or consult with a healthcare professional. - Avoid forcing your body into an extreme range of motion. Start with a small lift of the chest and gradually increase the height as you become more comfortable and flexible. - If you have any pre-existing back or neck injuries or conditions, it's advisable to seek guidance from a qualified instructor or healthcare professional before attempting the exercise.
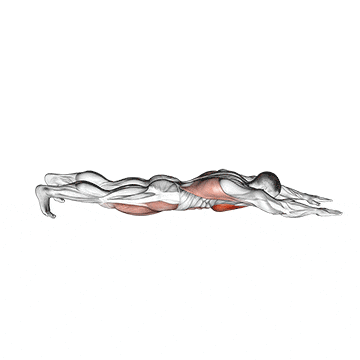
The spider crawl push-up is a challenging variation of the traditional push-up exercise that targets the chest, shoulders, triceps, and core muscles. It also engages the muscles of the hip flexors and requires coordination and stability. This exercise incorporates a crawling motion, mimicking the movement of a spider, hence the name. ## Instructions 1. Start in a high plank position with your hands directly under your shoulders and your body forming a straight line from head to heels. 2. Lower your body towards the ground by bending your elbows, keeping them close to your sides. 3. As you lower your body, simultaneously lift your right knee towards your right elbow, aiming to bring it as close to the elbow as possible. 4. Pause briefly in this position, then extend your right leg back to the starting position while pushing your body up to the top of the push-up position. 5. Repeat the same movement on the other side by lifting your left knee towards your left elbow. 6. Continue alternating sides with each repetition, performing the push-up and bringing the knee to the elbow in a controlled and coordinated manner. 7. Complete the desired number of repetitions. ## Variations - Modified Spider Crawl: If the full spider crawl push-up is too challenging, you can modify the exercise by performing it from a kneeling push-up position. Follow the same instructions, but keep your knees on the ground instead of being in a high plank position. - Incline Spider Crawl: To make the exercise slightly easier, you can perform it with your hands elevated on an elevated surface like a bench or step. ## Muscles Worked The spider crawl push-up primarily targets the following muscles: - Chest muscles (pectoralis major) - Front shoulder muscles (anterior deltoids) - Triceps brachii - Core muscles (rectus abdominis, transverse abdominis) - Hip flexors (iliopsoas) ## Common Mistakes 1. Sagging hips: Keep your body in a straight line from head to heels throughout the exercise. Avoid letting your hips drop or rise too high, as this can reduce the effectiveness of the exercise and strain the lower back. 2. Allowing elbows to flare out: Keep your elbows close to your sides as you perform the push-up portion of the exercise. This helps engage the triceps and protects the shoulder joints. 3. Rushing the movement: Maintain control and perform the exercise with a slow and controlled pace. Avoid rushing or using momentum to swing the legs towards the elbows. ## Safety Precautions - Ensure that you have sufficient upper body and core strength before attempting this exercise, as it requires stability and control. - Start with proper form and gradually increase the difficulty and range of motion as you become more comfortable and stronger. - If you have any pre-existing shoulder, wrist, or lower back injuries, it's advisable to consult with a healthcare professional or fitness instructor before attempting this exercise. - Listen to your body and stop immediately if you experience any pain or discomfort.
The standing pelvic tilt is an exercise that targets the core muscles, particularly the muscles of the lower back and abdomen. It involves tilting the pelvis forward and backward while maintaining an upright posture. This exercise helps to improve core stability, posture, and overall body awareness. ## Instructions 1. Stand upright with your feet shoulder-width apart and your arms relaxed by your sides. 2. Engage your abdominal muscles by pulling your navel towards your spine. 3. Begin the movement by tilting your pelvis forward, as if you are tucking your tailbone between your legs. Imagine flattening your lower back against a wall. 4. Hold the forward tilt for a few seconds, focusing on contracting your abdominal muscles. 5. Slowly return to the starting position by tilting your pelvis backward, allowing your lower back to arch slightly. 6. Hold the backward tilt for a few seconds while maintaining the engagement of your core muscles. 7. Repeat the forward and backward tilts for the desired number of repetitions or as instructed by your fitness professional. ## Variations - Modified Standing Pelvic Tilt: If you have difficulty maintaining balance or stability while standing, you can perform this exercise while sitting on a stability ball or chair. - Wall-supported Pelvic Tilt: Stand with your back against a wall and perform the pelvic tilts, focusing on maintaining contact with the wall throughout the movement. This variation provides additional support and helps maintain proper alignment. ## Muscles Worked The standing pelvic tilt primarily targets the following muscles: - Rectus abdominis (the "six-pack" muscle) - Transversus abdominis (deep core muscle) - Erector spinae (lower back muscles) - Hip flexors ## Common Mistakes - Rounding the shoulders or hunching forward: Keep your shoulders relaxed and maintain an upright posture throughout the exercise. - Overarching the lower back: Avoid excessive arching of the lower back during the backward tilt. Focus on maintaining a controlled movement and engaging the core muscles. - Holding the breath: Remember to breathe naturally throughout the exercise. Avoid holding your breath, as it can lead to unnecessary tension. ## Safety Precautions - Start with small movements: Begin with gentle pelvic tilts and gradually increase the range of motion as you become more comfortable and confident. - Avoid excessive strain: Do not force the movement or push beyond your comfortable range. Listen to your body and work within your limits. - Consult a healthcare professional: If you have any pre-existing conditions or concerns about your suitability for this exercise, it is advisable to consult a healthcare professional before attempting it.
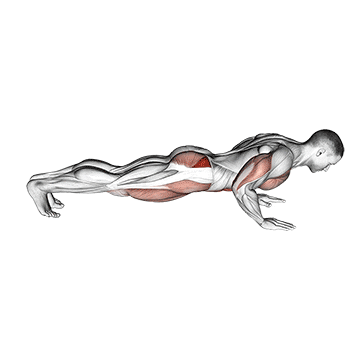
The Superman push-up is a challenging variation of the traditional push-up exercise that primarily targets the chest, shoulders, triceps, and core muscles. It involves a dynamic movement that mimics the flying posture of Superman, hence the name. This exercise not only builds upper body strength but also enhances core stability and improves overall body control. ## Instructions 1. Start by assuming the standard push-up position with your hands slightly wider than shoulder-width apart and your toes on the ground. Your body should form a straight line from head to toe. 2. Engage your core muscles by drawing your navel toward your spine. 3. Lower your body towards the ground by bending your elbows, keeping them close to your sides. 4. As you push back up, simultaneously lift your arms and legs off the ground, engaging your back muscles. 5. Extend your arms forward while lifting your chest, thighs, and knees off the ground. Imagine flying like Superman. 6. Hold the lifted position for a second or two, focusing on maintaining a straight body alignment. 7. Slowly lower your arms, chest, and legs back to the starting position while bending your elbows. 8. Repeat the exercise for the desired number of repetitions. ## Variations - Modified Superman Push-Up: Perform the exercise on your knees instead of your toes to decrease the intensity. - Assisted Superman Push-Up: Use a stability ball or an exercise band around your hips to provide additional support and assistance during the movement. - Plyometric Superman Push-Up: After lifting your arms and legs off the ground, explosively push off the ground and clap your hands before returning to the starting position. This variation adds an element of power and explosiveness to the exercise. ## Muscles Worked - Chest (pectoralis major and minor) - Shoulders (deltoids) - Triceps - Core muscles (abdominals, obliques, and lower back) - Upper and lower back muscles (erector spinae, rhomboids, and trapezius) ## Common Mistakes - Arching the back: Avoid excessive arching or sagging of the lower back during the exercise. Maintain a neutral spine position throughout the movement. - Raising the hips too high: Focus on lifting the entire body evenly, avoiding excessive elevation of the hips. - Failing to engage the core: Keep the core muscles engaged throughout the exercise to maintain stability and control. - Flaring the elbows: Keep the elbows close to your sides as you lower and raise your body to maintain proper alignment and target the desired muscles effectively. ## Safety Precautions - Prioritize maintaining proper form over the number of repetitions or speed of the exercise. - If you experience any pain or discomfort, especially in the lower back, modify the exercise or consult a fitness professional. - Start with the modified version or assisted variations if you are a beginner or have limited upper body strength. - Warm up adequately before attempting the exercise to prepare the muscles for the movement. - If you have any pre-existing injuries or medical conditions, consult with a healthcare professional before incorporating this exercise into your routine.
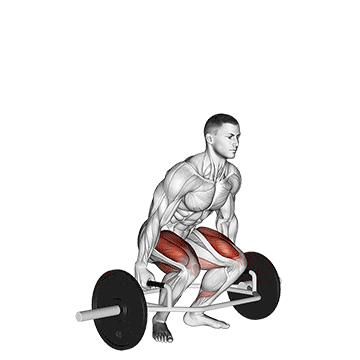
The trap bar deadlift, also known as the hex bar deadlift, is a compound exercise that primarily targets the muscles in the lower body, including the glutes, hamstrings, quadriceps, and calves. It also engages the core muscles, lower back, and upper body to a lesser extent. This exercise is performed using a specialized trap bar, which allows for a more upright posture and places less stress on the lower back compared to conventional barbell deadlifts. ## Instructions 1. Begin by standing inside the trap bar with your feet shoulder-width apart. The bar should be centered with your body. 2. Bend at the hips and knees, lowering yourself into a squat position. Keep your back straight and your chest up. 3. Grip the handles of the trap bar firmly with your hands, maintaining a neutral grip (palms facing each other). 4. Take a deep breath and engage your core muscles. 5. Push through your heels, straighten your legs, and lift the trap bar off the ground. Focus on driving your hips forward as you rise. 6. Keep your back straight throughout the movement and avoid rounding or arching it. 7. Once you reach a standing position, pause briefly and squeeze your glutes. 8. Lower the trap bar back down to the starting position by bending at the hips and knees. Control the descent and maintain proper form. 9. Repeat for the desired number of repetitions. ## Variations - **Elevated Trap Bar Deadlift**: If you have limited flexibility or want to increase the range of motion, you can perform the trap bar deadlift on an elevated surface, such as blocks or plates. This allows for a deeper squat position and greater muscle activation. - **Single-Leg Trap Bar Deadlift**: For an added challenge and improved balance, you can perform the trap bar deadlift using one leg at a time. Hold onto the handles with one hand while keeping the other arm extended for balance. - **Sumo Trap Bar Deadlift**: Instead of standing with your feet shoulder-width apart, assume a wider stance with your toes pointing outwards. This variation targets the inner thighs (adductors) to a greater extent. ## Muscles Worked - Primary muscles: Glutes (gluteus maximus), hamstrings (biceps femoris, semitendinosus, semimembranosus), quadriceps (rectus femoris, vastus lateralis, vastus medialis, vastus intermedius), calves (gastrocnemius, soleus) - Secondary muscles: Core muscles (rectus abdominis, obliques), lower back (erector spinae), upper back (trapezius, rhomboids), forearms (brachioradialis) ## Common Mistakes - Rounding the back: Maintain a neutral spine throughout the exercise and avoid rounding or arching your back. Engage your core muscles to support your spine. - Lifting with the arms: The trap bar deadlift should primarily be driven by leg and hip strength. Avoid using excessive arm strength to lift the bar. - Not fully extending the hips: Ensure that you fully extend your hips at the top of the movement by squeezing your glutes. This maximizes muscle activation. - Using improper grip: Use a neutral grip with your palms facing each other. Avoid using an overhand or underhand grip, as it can compromise your grip strength and stability. ## Safety Precautions - Prioritize proper form and technique over heavy weights. Start with lighter loads to master the movement before gradually increasing the weight. - Warm up adequately before performing trap bar deadlifts to prepare your muscles and joints for the exercise. - If you have any pre-existing back
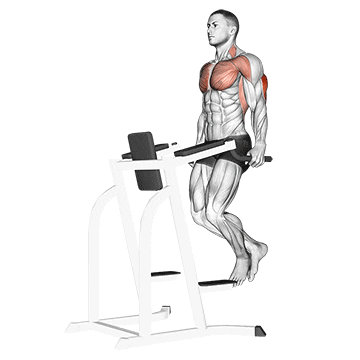
The triceps dip is a compound exercise that primarily targets the triceps muscles, located at the back of the upper arms. It also engages the muscles in the chest, shoulders, and core. Triceps dips are an effective exercise for building strength and muscle tone in the upper body. ## Instructions 1. Sit on a stable bench or chair with your hands gripping the edge of the seat on either side of your hips. Your fingers should be pointing forward. 2. Slide your hips off the seat and position your feet slightly in front of you, creating a 90-degree angle at the knees. 3. Slowly lower your body by bending your elbows, allowing them to flare out to the sides. Keep your back close to the bench or chair. 4. Continue lowering your body until your upper arms are parallel to the ground, or you feel a stretch in your triceps. 5. Pause briefly in the lowered position, then push through your hands to extend your arms and raise your body back to the starting position. 6. Repeat for the desired number of repetitions. ## Variations - **Bench Dip**: If you find the triceps dip too challenging, you can perform the exercise with your feet resting on the ground and your hands gripping a bench or step behind you. This variation reduces the resistance and makes the exercise easier. - **Assisted Triceps Dip**: If you need additional assistance, you can use resistance bands or an assisted dip machine to reduce the amount of bodyweight you are lifting. - **Weighted Triceps Dip**: To increase the intensity of the exercise, you can add weight by using a dip belt or holding a dumbbell between your feet. ## Muscles Worked - Primary muscles: Triceps brachii - Secondary muscles: Chest (pectoralis major), shoulders (deltoids), core muscles (rectus abdominis, obliques) ## Common Mistakes - Allowing the elbows to flare out excessively: Keep your elbows pointing backward and avoid letting them flare out to the sides. This places more emphasis on the triceps muscles. - Not maintaining proper shoulder position: Keep your shoulders down and back, away from your ears, throughout the exercise. Avoid shrugging or hunching your shoulders. - Rounding the back: Keep your back straight and avoid rounding or arching it. Engage your core muscles to maintain stability. - Not achieving a full range of motion: Lower your body until your upper arms are parallel to the ground or you feel a stretch in your triceps. Avoid shortening the range of motion by not descending far enough. ## Safety Precautions - Start with a stable bench or chair that can support your weight. Ensure that it is securely positioned to prevent tipping or sliding during the exercise. - If you have any pre-existing shoulder or elbow injuries, consult with a healthcare professional before attempting triceps dips. - Listen to your body and stop the exercise if you experience any sharp pain or discomfort. - If you're new to triceps dips, begin with a controlled and manageable range of motion. Gradually increase the depth as you become more comfortable and gain strength. - Engage your core muscles throughout the exercise to stabilize your body and reduce stress on your lower back.
The triceps dip between benches is a variation of the triceps dip exercise that specifically targets the triceps muscles while also engaging the muscles in the chest and shoulders. This exercise requires two parallel benches or sturdy elevated platforms and is an effective way to strengthen and tone the upper body. ## Instructions 1. Place two parallel benches or sturdy elevated platforms about shoulder-width apart. 2. Sit on one bench and place your hands on the edge of the bench beside your hips, fingers pointing forward. 3. Slide your hips off the bench, supporting your bodyweight with your arms. Your legs should be extended in front of you, heels resting on the edge of the other bench. 4. Ensure that your arms are fully extended, and your shoulders are down and back, away from your ears. 5. Lower your body by bending your elbows, allowing them to flare out to the sides. Keep your back close to the bench throughout the movement. 6. Continue lowering your body until your upper arms are parallel to the ground or you feel a stretch in your triceps. 7. Pause briefly in the lowered position, then push through your hands to extend your arms and raise your body back to the starting position. 8. Repeat for the desired number of repetitions. ## Variations - **Assisted Triceps Dip**: If you find the triceps dip between benches too challenging, you can use resistance bands or an assisted dip machine to reduce the amount of bodyweight you are lifting. - **Weighted Triceps Dip**: To increase the intensity of the exercise, you can add weight by using a dip belt or holding a dumbbell between your feet. ## Muscles Worked - Primary muscles: Triceps brachii - Secondary muscles: Chest (pectoralis major), shoulders (deltoids) ## Common Mistakes - Allowing the elbows to flare out excessively: Keep your elbows pointing backward and avoid letting them flare out to the sides. This places more emphasis on the triceps muscles. - Not maintaining proper shoulder position: Keep your shoulders down and back, away from your ears, throughout the exercise. Avoid shrugging or hunching your shoulders. - Rounding the back: Keep your back straight and avoid rounding or arching it. Engage your core muscles to maintain stability. - Not achieving a full range of motion: Lower your body until your upper arms are parallel to the ground or you feel a stretch in your triceps. Avoid shortening the range of motion by not descending far enough. ## Safety Precautions - Ensure that the benches or platforms used are sturdy and can support your bodyweight. - If you have any pre-existing shoulder or elbow injuries, consult with a healthcare professional before attempting triceps dips between benches. - Listen to your body and stop the exercise if you experience any sharp pain or discomfort. - Engage your core muscles throughout the exercise to stabilize your body and reduce stress on your lower back. - Start with a controlled and manageable range of motion, gradually increasing the depth as you become more comfortable and gain strength.
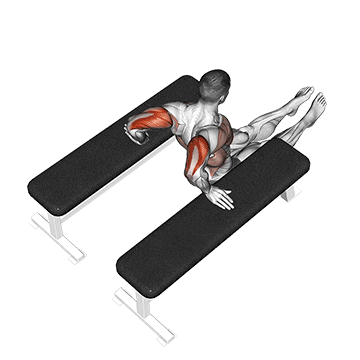
The twisted leg raise is an exercise that primarily targets the abdominal muscles, particularly the rectus abdominis and obliques. It also engages the hip flexors and lower back muscles. This exercise helps strengthen the core, improve stability, and enhance overall abdominal definition. ## Instructions 1. Lie flat on your back on an exercise mat or a comfortable surface. 2. Extend your legs fully and place your arms by your sides. 3. Engage your core by drawing your belly button toward your spine. 4. Lift both legs off the ground, keeping them straight. 5. As you raise your legs, simultaneously twist your hips to one side, bringing your legs toward that side of your body. 6. Lower your legs back to the starting position while maintaining control. 7. Repeat the movement, but this time twist your hips to the opposite side. 8. Continue alternating the twisting motion from side to side for the desired number of repetitions or time. ## Variations - Beginner Variation: If you are new to this exercise, you can bend your knees slightly to reduce the difficulty. This will provide additional support for your lower back. - Advanced Variation: To make the exercise more challenging, you can hold a dumbbell or medicine ball between your feet while performing the leg raises. ## Muscles Worked - Rectus abdominis (six-pack muscles) - Obliques (internal and external) - Hip flexors - Lower back muscles (erector spinae) ## Common Mistakes - Using momentum: Avoid swinging your legs or using momentum to lift them. Focus on controlled movements to engage the target muscles effectively. - Arching the back: Keep your lower back pressed against the mat throughout the exercise. Avoid arching or lifting the hips off the ground. - Not engaging the core: Ensure that you actively engage your core by contracting your abdominal muscles. This will help stabilize your spine and maximize the effectiveness of the exercise. ## Safety Precautions - If you have any pre-existing lower back or abdominal injuries, consult with a healthcare professional before attempting this exercise. - Start with a range of motion that feels comfortable for your body. You can gradually increase the twist as your flexibility and strength improve. - Listen to your body and avoid overexertion or pushing through pain. If you experience any discomfort or pain, stop the exercise and seek guidance from a qualified fitness professional.
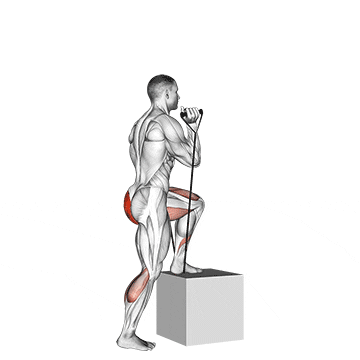
The band step-up is a lower body exercise that targets the muscles of the legs, including the quadriceps, hamstrings, and glutes. It involves stepping onto an elevated platform or step while using resistance bands to add extra challenge and resistance to the movement. This exercise helps improve lower body strength, balance, and stability. ## Instructions Here are the step-by-step instructions for performing the band step-up correctly: 1. Begin by placing a resistance band around your thighs, just above the knees. Make sure the band is securely in place and not too loose. 2. Stand facing an elevated platform or step. The height of the platform should be challenging but manageable for your fitness level. 3. Position your feet shoulder-width apart, toes pointing forward. 4. Engage your core and keep your chest lifted throughout the exercise. 5. Step onto the platform with one foot, pushing through your heel and using the resistance band tension for stability. 6. Fully extend your hip and knee of the stepping leg until you are standing on the platform with both feet. 7. Slowly lower yourself back down by bending your knee and hip of the stepping leg, returning to the starting position. 8. Repeat the movement with the same leg for the desired number of repetitions. 9. Switch legs and repeat the exercise with the opposite leg. ## Variations Here are a few variations of the band step-up that you can try: 1. **Band Resistance Variation**: Depending on your fitness level, you can use bands with different levels of resistance. Thicker bands provide more resistance, while thinner bands offer less resistance. Choose a band that challenges you without compromising your form. 2. **Lateral Band Step-Up**: Instead of stepping directly onto the platform in front of you, perform a lateral step-up by stepping onto the platform with your side. This variation targets the outer thighs and glutes more intensely. 3. **Weighted Band Step-Up**: Hold dumbbells or kettlebells in your hands while performing the band step-up to increase the resistance further. This modification adds an extra challenge to the exercise. ## Muscles Worked The band step-up primarily targets the following muscles: 1. Quadriceps (front of the thighs) 2. Hamstrings (back of the thighs) 3. Glutes (buttocks) 4. Calves (gastrocnemius and soleus muscles) 5. Core muscles (to stabilize the body during the exercise) ## Common Mistakes Avoid these common mistakes to get the most out of your band step-up: 1. **Leaning forward**: Maintain an upright posture throughout the exercise. Avoid leaning forward or hunching your shoulders. Keep your chest lifted and your spine aligned. 2. **Not fully extending the hip and knee**: Make sure to fully extend your hip and knee of the stepping leg when you reach the top of the movement. This engages the targeted muscles fully. 3. **Using the non-stepping leg for assistance**: Avoid pushing off or relying heavily on the non-stepping leg to complete the movement. Instead, focus on using the stepping leg to lift your body up onto the platform. 4. **Using excessive momentum**: Perform the exercise in a controlled manner, avoiding any sudden or jerky movements. Concentrate on using the muscles of the lower body to lift your body weight. ## Safety Precautions Consider the following safety precautions when performing the band step-up: 1. **Choose a stable platform**: Ensure that the platform or step you are using is stable and secure. It should not wobble or move during the exercise. 2. **Start with a lower step height**: If you are new to the exercise or have any concerns about balance, start with a lower step height and gradually progress to