
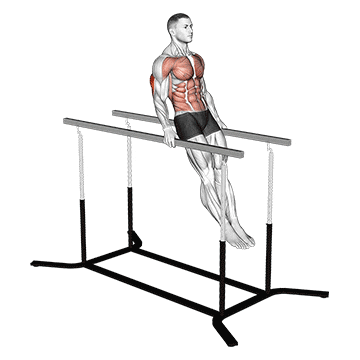
Impossible dips, also known as Russian dips, are an advanced bodyweight exercise that targets the chest, triceps, shoulders, and core muscles. This exercise requires significant upper body strength and stability, as well as good control and balance. Impossible dips provide a challenging variation to traditional dips and can help develop upper body strength, muscular endurance, and stability. ## Instructions 1. Begin by setting up two parallel bars or sturdy dip bars at shoulder-width apart. Ensure that the bars are secure and can support your body weight. 2. Stand in between the bars and place your hands on the bars with an overhand grip. Your palms should be facing forward. 3. Lift your legs off the ground and straighten your arms to support your body weight. This is your starting position. 4. Slowly lower your body by bending your elbows and leaning forward. Maintain control and keep your torso slightly tilted forward throughout the movement. 5. Lower yourself as far as you can, aiming for a deep stretch in your chest and shoulders. 6. Push through your palms and engage your chest and triceps to lift your body back up to the starting position. Fully extend your arms at the top. 7. Repeat for the desired number of repetitions. ## Variations - Assisted Variation: If you are unable to perform the full impossible dips, you can use resistance bands or an assisted dip machine to support a portion of your body weight. This can help gradually build strength until you can perform the exercise unassisted. - Negative Variation: If you find it challenging to lift yourself up, you can focus on the eccentric (lowering) portion of the movement. Step onto a platform or use assistance to position yourself at the top of the movement, then slowly lower yourself down in a controlled manner. - Weighted Variation: Once you have mastered the impossible dips, you can add additional resistance by using a weighted vest or holding a dumbbell between your feet. ## Muscles Worked - Primary muscles: Chest (pectoral muscles), triceps, shoulders (deltoids) - Secondary muscles: Core muscles, including the abs and obliques, as well as the muscles of the back and arms. ## Common Mistakes - Swinging: Avoid using momentum or swinging your body during the exercise. Maintain control throughout the movement and focus on engaging the targeted muscles. - Dropping too low: While a deep stretch is beneficial, avoid going too low to the point where your shoulders are strained or your range of motion is compromised. Find a comfortable and safe depth that allows you to maintain proper form. - Arching the back: Keep your core muscles engaged and maintain a neutral spine throughout the exercise. Avoid excessive arching or overarching of the lower back. ## Safety Precautions - Impossible dips require a high level of upper body strength and stability. Ensure that you have developed sufficient strength through other exercises like regular dips and push-ups before attempting this advanced variation. - Warm up your shoulders, chest, and triceps before performing impossible dips to reduce the risk of injury. - Maintain proper form and technique throughout the exercise to prevent strain or injury to the shoulders, elbows, or wrists. - If you have any pre-existing shoulder, elbow, or wrist issues, or if you experience pain during the exercise, consult with a healthcare professional before attempting impossible dips.
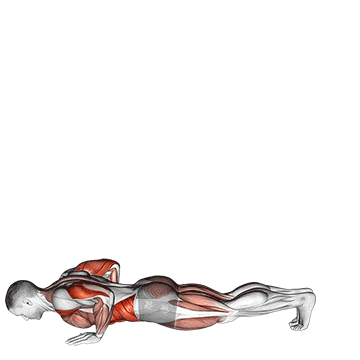
The inchworm exercise is a dynamic full-body movement that targets multiple muscle groups, including the shoulders, arms, core, hamstrings, and calves. It involves a forward folding motion and walking your hands out into a high plank position before walking them back to the starting position. The inchworm exercise helps improve flexibility, core strength, and overall body coordination. ## Instructions 1. Stand with your feet hip-width apart and your arms by your sides. 2. Begin the movement by hinging at the hips, bending forward, and lowering your hands towards the floor. Keep your legs as straight as possible without locking the knees. 3. Once your hands touch the floor, begin walking them forward in small steps while keeping your legs extended. Continue walking your hands out until you reach a high plank position, with your body in a straight line from head to heels. 4. Pause briefly in the high plank position, engaging your core and maintaining a neutral spine. 5. Reverse the movement by walking your hands back towards your feet while keeping your legs as straight as possible. 6. Once your hands are near your feet, stand back up by hinging at the hips and extending your body to return to the starting position. 7. Repeat the movement for the desired number of repetitions. ## Variations - Modified Inchworm: If you have limited flexibility or difficulty keeping your legs straight, you can perform the exercise with a slight bend in your knees. - Inchworm with Push-Up: To increase the challenge and incorporate more upper body strength, you can add a push-up at the bottom of the high plank position. After walking your hands out, perform a push-up before walking your hands back towards your feet. - Inchworm with Shoulder Taps: To further engage your core and shoulders, add shoulder taps in the high plank position. After walking your hands out, touch one hand to the opposite shoulder while maintaining stability and control. ## Muscles Worked - Primary muscles: Shoulders (deltoids), arms (triceps), core muscles (abdominals, obliques), hamstrings, calves - Secondary muscles: Glutes, quadriceps ## Common Mistakes - Rounded back: Maintain a neutral spine throughout the exercise. Avoid rounding your back or sagging your hips in the high plank position. - Lack of core engagement: Keep your core muscles activated throughout the movement. This helps stabilize your body and protects your lower back. - Bending the knees excessively: While some knee flexion is acceptable, avoid excessively bending your knees to ensure you engage the hamstrings and maintain proper form. - Rushing the movement: Perform the inchworm exercise in a slow and controlled manner to maximize the benefits and engage the targeted muscles effectively. ## Safety Precautions - If you have any pre-existing back or shoulder issues, or if you experience pain or discomfort during the exercise, consult with a healthcare professional before attempting the inchworm. - Warm up your body and stretch your hamstrings before performing the exercise to reduce the risk of strain or injury. - Avoid locking your knees or hyperextending them during the movement. Maintain a slight bend in the knees for better joint protection. - Listen to your body and modify the exercise as needed to suit your fitness level and capabilities.
The incline reverse grip push-up is a variation of the traditional push-up exercise that targets the chest, triceps, and shoulders. It also engages the core muscles for stability. This exercise is performed with a reverse grip, meaning the palms are facing towards you instead of away from you. By using an incline, such as a bench or step, the exercise becomes slightly easier and allows individuals to build strength gradually. ## Instructions 1. Place a bench or step at a height that allows you to comfortably perform the exercise. 2. Stand facing away from the bench or step and position your feet shoulder-width apart. 3. Bend forward at the waist and place your hands on the edge of the bench or step with a reverse grip (palms facing towards you) and slightly wider than shoulder-width apart. Your fingers should be pointing towards your feet. 4. Extend your legs behind you, balancing on your toes, so that your body forms a straight line from head to toe. 5. Engage your core muscles and keep your back straight throughout the exercise. 6. Lower your body towards the bench or step by bending your elbows, while keeping them close to your sides. Aim to lower your chest just below the level of the bench or step. 7. Pause for a moment in the bottom position, then push through your hands to extend your arms and return to the starting position. 8. Repeat for the desired number of repetitions. ## Variations - To make the exercise more challenging, you can decrease the incline by using a lower bench or step. - If you want to increase the difficulty further, you can perform the exercise on the ground without any incline, using the same reverse grip. ## Muscles Worked The incline reverse grip push-up primarily targets the following muscles: - Chest (pectoralis major) - Triceps - Shoulders (anterior deltoids) - Core muscles (abdominals and lower back) for stabilization ## Common Mistakes - Arching the back: Avoid arching your back during the exercise. Maintain a straight line from head to toe throughout the movement. - Flaring elbows: Keep your elbows close to your sides as you lower your body. Avoid letting them flare out to the sides, as this can put unnecessary stress on the shoulder joints. - Dropping the head: Keep your head aligned with your spine. Avoid dropping or lifting your head during the exercise. - Not engaging the core: Remember to engage your core muscles throughout the exercise to maintain stability and protect your lower back. ## Safety Precautions - If you have any pre-existing shoulder or wrist injuries, it's advisable to consult with a healthcare professional before attempting this exercise. - Start with a bench or step height that is suitable for your current strength and gradually progress to lower inclines as you become more comfortable and stronger. - Listen to your body and stop the exercise if you experience any pain or discomfort.
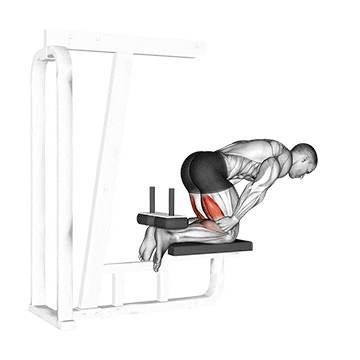
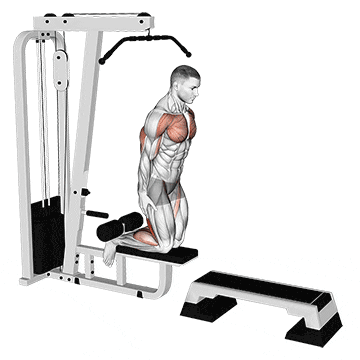
The inverse leg curl, also known as the Nordic curl, is an exercise that primarily targets the hamstrings, as well as the glutes and lower back. It is a challenging exercise that helps to strengthen the posterior chain, improve hamstring strength and stability, and enhance overall lower body power. ## Instructions 1. Start by kneeling on a mat or a soft surface with your toes tucked under and your ankles secured by a partner or using a bench or any other sturdy support. 2. Position yourself with your knees directly under your hips and your hands placed on your chest or crossed over your shoulders. 3. Slowly lean forward from your knees while keeping your core engaged and maintaining a straight line from your knees to your shoulders. 4. Control the descent by using your hamstrings and lower your upper body towards the ground. Your arms can act as a counterbalance to maintain stability. 5. Continue lowering your body until you can no longer control the descent or until your body is nearly parallel to the ground. 6. At this point, push into the ground with your hands to assist the hamstring contraction and return to the starting position, using your hamstrings to pull your body back up. 7. Repeat for the desired number of repetitions. ## Variations - If you are unable to complete the full movement, you can gradually increase the difficulty by starting with a smaller range of motion and gradually working towards a deeper descent. - To make the exercise more challenging, you can perform the inverse leg curl without any assistance, allowing yourself to descend as far as possible and then using your hamstrings to push yourself back up. ## Muscles Worked The inverse leg curl primarily targets the following muscles: - Hamstrings (biceps femoris, semitendinosus, semimembranosus) - Glutes (particularly the gluteus maximus) - Lower back (erector spinae) ## Common Mistakes - Rounding the back: Keep your back straight throughout the exercise. Avoid rounding or arching your back, as it can lead to strain or injury. - Using momentum: Control the movement and avoid relying on momentum to lift yourself back up. Focus on using your hamstrings to initiate the ascent. - Allowing the knees to shift forward: Keep your knees directly under your hips throughout the exercise. Avoid allowing them to shift forward or backward, as it can compromise form and effectiveness. - Not engaging the core: Maintain a strong and stable core throughout the exercise. Engage your abdominal muscles to assist in controlling the movement and maintaining proper alignment. ## Safety Precautions - If you have any pre-existing knee or lower back injuries or conditions, it's advisable to consult with a healthcare professional before attempting this exercise. - Perform the exercise on a soft surface or use a folded mat to provide cushioning for your knees. - Start with a conservative range of motion and gradually increase it as your strength and stability improve. - Work within your capabilities and do not push yourself beyond your limits. It is better to perform the exercise with proper form and a smaller range of motion than to compromise your technique.
The inverse leg curl on a pull-up cable machine is an exercise that primarily targets the hamstrings, as well as the glutes and lower back. It is a variation of the inverse leg curl that uses a cable machine to provide resistance and allows for a controlled movement. This exercise helps to strengthen the posterior chain, improve hamstring strength and stability, and enhance overall lower body power. ## Instructions 1. Adjust the cable machine by attaching an ankle strap to the low pulley and setting the desired weight. 2. Lie face down on a mat or a bench, positioning yourself under the cable machine with the ankle strap attached to your ankles. 3. Grasp the handles or any available support in front of you for stability. 4. Keep your body straight and aligned from head to toe, engaging your core muscles. 5. Begin the movement by flexing your knees and curling your lower legs towards your glutes. 6. Keep your upper body stationary and focus on using your hamstrings to initiate the movement. 7. Once your lower legs are fully flexed and your glutes are engaged, slowly return to the starting position by extending your knees. 8. Repeat for the desired number of repetitions. ## Variations - Adjust the weight on the cable machine to match your fitness level and gradually increase it as you become stronger. - If you don't have access to a cable machine, you can perform a similar movement using a resistance band attached to a sturdy anchor point. ## Muscles Worked The inverse leg curl on a pull-up cable machine primarily targets the following muscles: - Hamstrings (biceps femoris, semitendinosus, semimembranosus) - Glutes (particularly the gluteus maximus) - Lower back (erector spinae) ## Common Mistakes - Rounding the back: Maintain a neutral spine throughout the exercise. Avoid rounding or arching your back, as it can lead to strain or injury. - Not fully engaging the hamstrings: Focus on initiating the movement with your hamstrings. Avoid relying solely on the calf muscles or momentum to perform the exercise. - Allowing the knees to shift forward: Keep your knees in line with your hips and avoid allowing them to move forward or backward during the exercise. - Not controlling the movement: Maintain control throughout the entire range of motion. Avoid using excessive momentum or swinging the legs. ## Safety Precautions - If you have any pre-existing knee or lower back injuries or conditions, it's advisable to consult with a healthcare professional before attempting this exercise. - Use proper padding or a mat to protect your knees and shins from the cable or any hard surfaces. - Start with a weight that allows you to maintain proper form and gradually increase it as you become more comfortable with the exercise. - Ensure that the ankle strap is securely attached to your ankles and properly adjusted to prevent slipping during the movement. - Maintain proper breathing throughout the exercise, exhaling during the curling phase and inhaling during the return phase. - If you experience any pain or discomfort, stop the exercise and reassess your form.
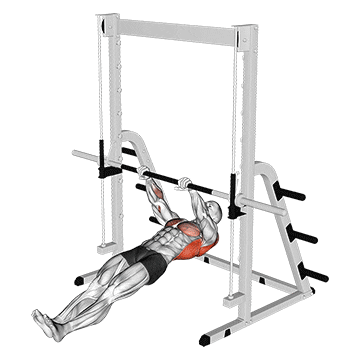
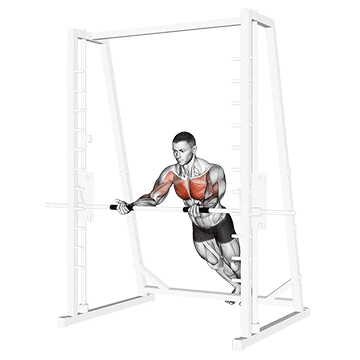
The inverted row, also known as the body row or Australian pull-up, is an exercise that targets the muscles of the upper back, including the rhomboids, latissimus dorsi, and trapezius. It also engages the biceps and the muscles of the core. The inverted row is a compound exercise that helps to improve upper body strength, posture, and stability. ## Instructions 1. Set up a barbell, Smith machine, suspension trainer, or TRX straps at waist height or slightly lower. 2. Stand facing the bar or straps and grip it with your hands slightly wider than shoulder-width apart, palms facing toward you (pronated grip). 3. Walk your feet forward until your body is at an incline, leaning back with your arms extended and your heels on the ground. 4. Keep your body straight and aligned from head to heels, engaging your core muscles. 5. Initiate the movement by retracting your shoulder blades and pulling your chest towards the bar or straps. 6. Keep your elbows close to your body and continue pulling until your chest reaches the bar or straps. 7. Pause for a moment at the top of the movement, squeezing your shoulder blades together. 8. Slowly lower your body back down to the starting position, fully extending your arms. 9. Repeat for the desired number of repetitions. ## Variations - To make the exercise easier, you can adjust the difficulty level by changing the height of the bar or straps. Starting with a higher bar or using an inclined bench will reduce the resistance and make the exercise less challenging. - To make the exercise more difficult, you can increase the intensity by lowering the bar or straps or adding weight by using a weight vest or placing a weight plate on your chest. ## Muscles Worked The inverted row primarily targets the following muscles: - Upper back (rhomboids, latissimus dorsi, trapezius) - Biceps - Core muscles (rectus abdominis, obliques) ## Common Mistakes - Rounding the shoulders: Avoid shrugging or rounding your shoulders during the movement. Keep your shoulder blades pulled back and down throughout the exercise. - Using momentum: Focus on using your back muscles to pull your body up, rather than relying on momentum or swinging. Maintain control throughout the entire range of motion. - Arching the lower back: Keep your core engaged and your lower back neutral throughout the exercise. Avoid arching or hyperextending your lower back. - Not fully extending the arms: Make sure to fully extend your arms at the bottom of the movement to achieve a full range of motion. ## Safety Precautions - Ensure that the bar or straps are securely fastened and can support your body weight. - Maintain a strong grip on the bar or straps throughout the exercise to prevent slipping or losing control. - If you have any pre-existing shoulder or back injuries or conditions, it's advisable to consult with a healthcare professional before attempting this exercise. - Start with a conservative incline and gradually increase the difficulty as your strength and stability improve. - Avoid jerking or using excessive force during the movement. Control the motion and focus on proper form. - If you experience any pain or discomfort, stop the exercise and reassess your form.

The inverted row with bent knees is a variation of the inverted row exercise that targets the muscles of the upper back, including the rhomboids, latissimus dorsi, and trapezius. By bending the knees, this variation reduces the lever arm and decreases the intensity of the exercise, making it more suitable for beginners or individuals with limited upper body strength. It also engages the biceps and the muscles of the core. The inverted row with bent knees helps to improve upper body strength, posture, and stability. ## Instructions 1. Set up a barbell, Smith machine, suspension trainer, or TRX straps at waist height or slightly lower. 2. Stand facing the bar or straps and grip it with your hands slightly wider than shoulder-width apart, palms facing toward you (pronated grip). 3. Walk your feet forward until your body is at an incline, leaning back with your arms extended and your heels on the ground. 4. Bend your knees to approximately 90 degrees, keeping your feet flat on the ground. 5. Keep your body straight and aligned from head to heels, engaging your core muscles. 6. Initiate the movement by retracting your shoulder blades and pulling your chest towards the bar or straps. 7. Keep your elbows close to your body and continue pulling until your chest reaches the bar or straps. 8. Pause for a moment at the top of the movement, squeezing your shoulder blades together. 9. Slowly lower your body back down to the starting position, fully extending your arms. 10. Repeat for the desired number of repetitions. ## Variations - To increase the difficulty of the exercise, you can extend your legs fully, creating a straight line from your head to your heels. This variation, known as the straight leg inverted row, increases the lever arm and requires more strength from the upper body and core muscles. - If you find the bent knees variation too challenging, you can adjust the difficulty by changing the height of the bar or straps. Starting with a higher bar or using an inclined bench will reduce the resistance and make the exercise easier. ## Muscles Worked The inverted row with bent knees primarily targets the following muscles: - Upper back (rhomboids, latissimus dorsi, trapezius) - Biceps - Core muscles (rectus abdominis, obliques) ## Common Mistakes - Rounding the shoulders: Avoid shrugging or rounding your shoulders during the movement. Keep your shoulder blades pulled back and down throughout the exercise. - Using momentum: Focus on using your back muscles to pull your body up, rather than relying on momentum or swinging. Maintain control throughout the entire range of motion. - Arching the lower back: Keep your core engaged and your lower back neutral throughout the exercise. Avoid arching or hyperextending your lower back. - Not fully extending the arms: Make sure to fully extend your arms at the bottom of the movement to achieve a full range of motion. ## Safety Precautions - Ensure that the bar or straps are securely fastened and can support your body weight. - Maintain a strong grip on the bar or straps throughout the exercise to prevent slipping or losing control. - If you have any pre-existing shoulder or back injuries or conditions, it's advisable to consult with a healthcare professional before attempting this exercise. - Start with a conservative incline and gradually increase the difficulty as your strength and stability improve. - Avoid jerking or using excessive force during the movement. Control the motion and focus on proper form. - If you experience any pain or discomfort, stop the exercise and reassess your form.
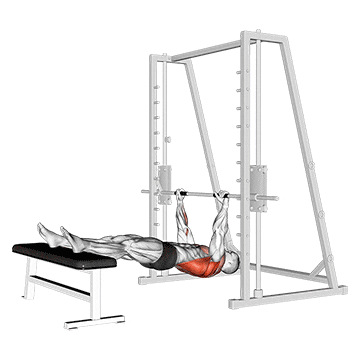
The inverted row on a bench, also known as the supine row or body row, is an exercise that targets the muscles of the upper back, including the rhomboids, latissimus dorsi, and trapezius. It also engages the biceps and the muscles of the core. The inverted row on a bench is a convenient alternative to using a bar or suspension trainer, and it helps to improve upper body strength, posture, and stability. ## Instructions 1. Set up a bench parallel to a Smith machine, barbell rack, or other sturdy support at waist height. 2. Lie face-up on the bench with your chest directly under the bar or support. 3. Reach up and grip the bar with your hands slightly wider than shoulder-width apart, palms facing away from you (overhand grip). 4. Extend your legs and position your heels on the ground, keeping your knees bent at approximately 90 degrees. 5. Keep your body straight and aligned from head to heels, engaging your core muscles. 6. Initiate the movement by retracting your shoulder blades and pulling your chest towards the bar or support. 7. Keep your elbows close to your body and continue pulling until your chest reaches the bar or support. 8. Pause for a moment at the top of the movement, squeezing your shoulder blades together. 9. Slowly lower your body back down to the starting position, fully extending your arms. 10. Repeat for the desired number of repetitions. ## Variations - To increase the difficulty of the exercise, you can elevate your feet on an elevated surface or a stability ball. This variation, known as the feet-elevated inverted row, increases the challenge for the upper body and core muscles. - If you find the exercise too challenging, you can modify it by bending your knees and placing your feet flat on the ground, creating a bent-knee inverted row. This variation reduces the lever arm and makes the exercise more manageable for beginners or individuals with limited upper body strength. ## Muscles Worked The inverted row on a bench primarily targets the following muscles: - Upper back (rhomboids, latissimus dorsi, trapezius) - Biceps - Core muscles (rectus abdominis, obliques) ## Common Mistakes - Rounding the shoulders: Avoid shrugging or rounding your shoulders during the movement. Keep your shoulder blades pulled back and down throughout the exercise. - Using momentum: Focus on using your back muscles to pull your body up, rather than relying on momentum or swinging. Maintain control throughout the entire range of motion. - Arching the lower back: Keep your core engaged and your lower back neutral throughout the exercise. Avoid arching or hyperextending your lower back. - Not fully extending the arms: Make sure to fully extend your arms at the bottom of the movement to achieve a full range of motion. ## Safety Precautions - Ensure that the bench and the supporting structure are sturdy and can support your body weight. - Maintain a strong grip on the bar or support throughout the exercise to prevent slipping or losing control. - If you have any pre-existing shoulder or back injuries or conditions, it's advisable to consult with a healthcare professional before attempting this exercise. - Start with a comfortable height for the bench and gradually progress to a lower position as your strength and stability improve. - Avoid jerking or using excessive force during the movement. Control the motion and focus on proper form. - If you experience any pain or discomfort, stop the exercise and reassess your form.
The inverted row, also known as the body row or supine row, is an exercise that targets the muscles of the upper back, including the rhomboids, latissimus dorsi, and trapezius. It also engages the biceps and the muscles of the core. The inverted row is a compound exercise that helps to improve upper body strength, posture, and stability. ## Instructions 1. Set up a barbell, Smith machine, suspension trainer, or TRX straps at waist height or slightly lower. 2. Stand facing the bar or straps and grip it with your hands slightly wider than shoulder-width apart, palms facing toward you (pronated grip). 3. Walk your feet forward until your body is at an incline, leaning back with your arms extended and your heels on the ground. 4. Keep your body straight and aligned from head to heels, engaging your core muscles. 5. Initiate the movement by retracting your shoulder blades and pulling your chest towards the bar or straps. 6. Keep your elbows close to your body and continue pulling until your chest reaches the bar or straps. 7. Pause for a moment at the top of the movement, squeezing your shoulder blades together. 8. Slowly lower your body back down to the starting position, fully extending your arms. 9. Repeat for the desired number of repetitions. ## Variations - Feet-Elevated Inverted Row: Place your feet on an elevated surface, such as a bench or box, to increase the challenge and engage your muscles more intensely. - One-Arm Inverted Row: Perform the exercise with one arm while keeping the other arm extended for balance. This variation further challenges your stability and engages each side of your upper body independently. - Towel Inverted Row: Instead of using a bar or straps, place a towel over a bar or other sturdy support and grip the ends of the towel. This variation adds an element of grip strength and stability to the exercise. ## Muscles Worked The inverted row primarily targets the following muscles: - Upper back (rhomboids, latissimus dorsi, trapezius) - Biceps - Core muscles (rectus abdominis, obliques) ## Common Mistakes - Rounding the shoulders: Avoid shrugging or rounding your shoulders during the movement. Keep your shoulder blades pulled back and down throughout the exercise. - Using momentum: Focus on using your back muscles to pull your body up, rather than relying on momentum or swinging. Maintain control throughout the entire range of motion. - Arching the lower back: Keep your core engaged and your lower back neutral throughout the exercise. Avoid arching or hyperextending your lower back. - Not fully extending the arms: Make sure to fully extend your arms at the bottom of the movement to achieve a full range of motion. ## Safety Precautions - Ensure that the bar or straps are securely fastened and can support your body weight. - Maintain a strong grip on the bar or straps throughout the exercise to prevent slipping or losing control. - If you have any pre-existing shoulder or back injuries or conditions, it's advisable to consult with a healthcare professional before attempting this exercise. - Start with a conservative incline and gradually increase the difficulty as your strength and stability improve. - Avoid jerking or using excessive force during the movement. Control the motion and focus on proper form. - If you experience any pain or discomfort, stop the exercise and reassess your form.