
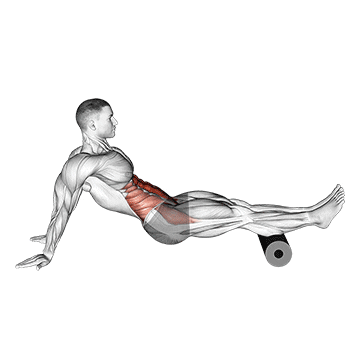
The roller reverse crunch is an abdominal exercise that targets the lower abs and helps strengthen the core. This exercise involves using a foam roller to add instability and increase the challenge of the movement. It is an effective way to engage the deep abdominal muscles and improve core stability. ## Instructions 1. Start by lying flat on your back with your legs extended and the foam roller positioned horizontally under your ankles. 2. Place your hands on the floor beside you or hold onto the sides of the roller for stability. 3. Engage your core muscles by drawing your belly button in towards your spine. This will help stabilize your lower back throughout the exercise. 4. Press your ankles into the foam roller and lift your legs off the ground, bringing your knees towards your chest. This movement will lift your hips off the ground and curl your lower back off the floor. 5. Slowly lower your legs back down, extending them to the starting position. Keep control throughout the movement and avoid letting your legs drop quickly. 6. Repeat the exercise for the desired number of repetitions, maintaining proper form and control. ## Variations - Bent Knee Variation: If the straight leg position is too challenging, you can modify the exercise by bending your knees and bringing them towards your chest. This reduces the lever arm and decreases the difficulty. - Single Leg Variation: For an advanced variation, you can perform the roller reverse crunch with one leg at a time. Lift one leg off the roller and keep the other leg extended. Alternate between legs for each repetition. ## Muscles Worked - Rectus abdominis (lower abs) - Transverse abdominis (deep core stabilizer) - Hip flexors ## Common Mistakes - Using momentum: Avoid swinging your legs or using momentum to lift your hips. Focus on using your abdominal muscles to initiate and control the movement. - Lifting the shoulders off the ground: Keep your shoulders relaxed on the ground throughout the exercise. The movement should primarily come from the lower abs and not from the upper body. - Allowing the lower back to arch: Maintain a neutral spine position and avoid excessive arching of the lower back. Engage your core muscles to stabilize the spine throughout the exercise. ## Safety Precautions - If you have any pre-existing lower back or abdominal injuries or conditions, consult with a fitness professional or healthcare provider before attempting the roller reverse crunch. - Engage your core and maintain proper form throughout the exercise to avoid excessive strain on the lower back. - Start with a smaller range of motion and gradually increase it as you gain strength and control. - If you experience any pain or discomfort in your lower back, modify the exercise or stop and consult a professional for guidance. - Listen to your body and avoid overexertion. Focus on maintaining proper form and control rather than striving for high repetitions.
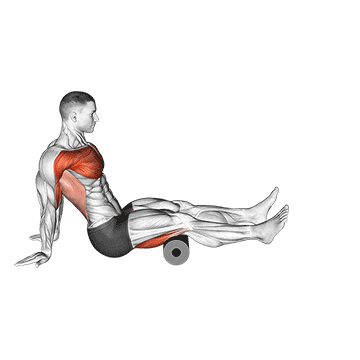
The roller seated shoulder flexor depressor retractor exercise is a movement that targets the muscles of the shoulder girdle, specifically the shoulder flexors, depressors, and retractors. This exercise helps improve shoulder mobility, posture, and upper body strength. By using a foam roller for support, it adds an element of stability and balance to the exercise. ## Instructions 1. Start by sitting on a flat surface with your legs extended in front of you and the foam roller placed vertically behind you. 2. Position yourself so that the foam roller is aligned with your spine and the base of your shoulder blades. 3. Sit up tall with good posture, engaging your core muscles to maintain stability. 4. Reach back with both hands and grip the foam roller, placing your hands slightly wider than shoulder-width apart. 5. Begin the movement by pressing your hands into the foam roller and retracting your shoulder blades. Imagine squeezing a pencil between your shoulder blades. 6. From this position, depress your shoulders by actively pulling them downward. 7. Next, flex your shoulders by raising your arms and the foam roller overhead. Aim to keep your elbows straight throughout the movement. 8. Once your arms are fully extended overhead, reverse the movement by lowering the foam roller back to the starting position behind your head. 9. Repeat the exercise for the desired number of repetitions, maintaining control and stability throughout. ## Variations - Single-Arm Variation: To increase the challenge or address muscle imbalances, you can perform the exercise with one arm at a time. Keep the non-working arm by your side or hold it behind your back. - Resistance Band Variation: Instead of using a foam roller, you can use a resistance band anchored to a stable object. Hold the ends of the band with your hands and perform the same movement pattern. ## Muscles Worked - Shoulder flexors (anterior deltoids, pectoralis major) - Shoulder depressors (lower trapezius, latissimus dorsi) - Shoulder retractors (middle trapezius, rhomboids) ## Common Mistakes - Rounded shoulders: Avoid slouching or rounding your shoulders throughout the exercise. Maintain good posture and keep your chest lifted. - Shrugging the shoulders: Be mindful of not lifting or shrugging your shoulders towards your ears. Focus on actively depressing your shoulders. - Lack of control: Maintain control throughout the movement and avoid swinging or using momentum. Emphasize slow and controlled motions. ## Safety Precautions - If you have any shoulder or upper body injuries or conditions, consult with a fitness professional or healthcare provider before attempting this exercise. - Start with a lighter resistance or less range of motion if you are new to the exercise or have limited shoulder mobility. - If you experience any pain or discomfort in your shoulders or neck, modify the exercise or stop and consult a professional for guidance. - Engage your core muscles to maintain stability and support your spine throughout the exercise. - Use a foam roller or surface that provides adequate stability and support. Ensure that the foam roller is secure and does not move during the exercise. - If you have balance issues, perform the exercise on a stable surface or with the guidance of a fitness professional.
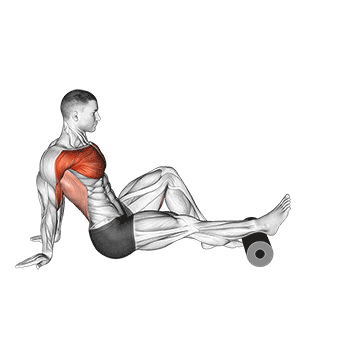
The roller seated single leg shoulder flexor depressor retractor exercise is a variation of the seated shoulder exercise that focuses on targeting the muscles of the shoulder girdle, while also challenging your balance and stability. By performing the exercise with a single leg lifted off the ground, it further engages the core muscles and improves overall body control. ## Instructions 1. Start by sitting on a flat surface with your legs extended in front of you and the foam roller placed vertically behind you. 2. Position yourself so that the foam roller is aligned with your spine and the base of your shoulder blades. 3. Sit up tall with good posture, engaging your core muscles to maintain stability. 4. Extend one leg in front of you, lifting it off the ground while keeping the other leg firmly planted on the floor. 5. Reach back with both hands and grip the foam roller, placing your hands slightly wider than shoulder-width apart. 6. Begin the movement by pressing your hands into the foam roller and retracting your shoulder blades. Imagine squeezing a pencil between your shoulder blades. 7. From this position, depress your shoulders by actively pulling them downward. 8. Next, flex your shoulders by raising your arms and the foam roller overhead. Aim to keep your elbows straight throughout the movement. 9. Once your arms are fully extended overhead, reverse the movement by lowering the foam roller back to the starting position behind your head. 10. Repeat the exercise for the desired number of repetitions, maintaining control and stability throughout. 11. Switch legs and repeat the exercise with the opposite leg lifted. ## Variations - Regression: If lifting a single leg is too challenging, you can perform the exercise with both feet on the ground. Focus on maintaining proper form and control. - Progression: To increase the challenge, you can hold a light dumbbell or resistance band in your hands while performing the exercise. ## Muscles Worked - Shoulder flexors (anterior deltoids, pectoralis major) - Shoulder depressors (lower trapezius, latissimus dorsi) - Shoulder retractors (middle trapezius, rhomboids) - Core muscles (especially the stabilizing muscles of the torso) ## Common Mistakes - Rounded shoulders: Avoid slouching or rounding your shoulders throughout the exercise. Maintain good posture and keep your chest lifted. - Shrugging the shoulders: Be mindful of not lifting or shrugging your shoulders towards your ears. Focus on actively depressing your shoulders. - Lack of control: Maintain control throughout the movement and avoid swinging or using momentum. Emphasize slow and controlled motions. - Losing balance: Focus on engaging your core and keeping your body stable throughout the exercise. If balance is an issue, perform the exercise with both feet on the ground. ## Safety Precautions - If you have any shoulder or upper body injuries or conditions, consult with a fitness professional or healthcare provider before attempting this exercise. - Start with a lighter resistance or less range of motion if you are new to the exercise or have limited shoulder mobility. - If you experience any pain or discomfort in your shoulders or neck, modify the exercise or stop and consult a professional for guidance. - Engage your core muscles to maintain stability and support your spine throughout the exercise. - Use a foam roller or surface that provides adequate stability and support. Ensure that the foam roller is secure and does not move during the exercise. - Maintain control over your movements and avoid overexertion. Focus on proper form and stability rather than striving for high repetitions. - Listen to your body and stop the exercise if you feel any sharp pain or discomfort.
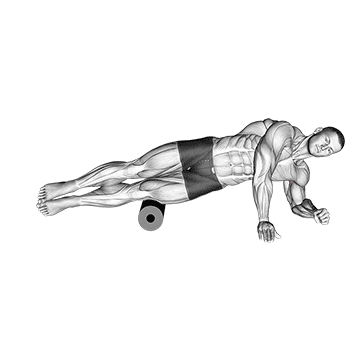
The roller side lat stretch is an exercise that targets the latissimus dorsi, commonly known as the lats, which are the large muscles on the sides of your back. This stretch helps improve the flexibility and mobility of the lats, promoting better posture and reducing tension in the upper body. ## Instructions 1. Start by positioning yourself on a mat or on the floor with a foam roller placed horizontally beside you. 2. Lie on your right side with your legs extended and your right arm resting on the foam roller. Your left arm can be extended overhead or resting on your left hip for support. 3. Engage your core muscles to maintain stability throughout the exercise. 4. Slowly roll your body to the right, allowing the foam roller to move up towards your armpit while maintaining contact between your lat muscles and the roller. 5. Once you reach a point of mild discomfort or tension, hold the stretch for about 20-30 seconds, focusing on relaxing and breathing deeply. 6. Return to the starting position by rolling back to the initial position. 7. Repeat the exercise on the other side by lying on your left side and stretching your right lat. ## Variations - If you find the foam roller too intense, you can use a softer roller or substitute it with a rolled-up towel or yoga block for a gentler stretch. - For a deeper stretch, you can try placing your top leg in front of the bottom leg with the knee bent at a 90-degree angle. This will increase the stretch in the lats. ## Muscles Worked The main muscles targeted during the roller side lat stretch are: - Latissimus dorsi (lats) ## Common Mistakes - Rolling too quickly: Avoid rolling too fast as it can reduce the effectiveness of the stretch. Take your time and focus on feeling the stretch in your lats. - Poor posture: Maintain proper alignment throughout the exercise by keeping your spine straight and avoiding excessive arching or rounding of the back. - Holding tension in the neck and shoulders: Relax your neck and shoulders during the stretch to ensure the focus remains on the lats. ## Safety Precautions - Consult with a healthcare professional or fitness trainer before attempting this exercise, especially if you have any pre-existing injuries or medical conditions. - If you experience sharp pain or discomfort, stop the exercise immediately and seek medical advice. - Start with gentle pressure on the foam roller and gradually increase the intensity as your flexibility improves. - Listen to your body and avoid overstretching. The stretch should feel challenging yet comfortable. - Stay hydrated and breathe deeply throughout the exercise to promote relaxation and prevent muscle tension.
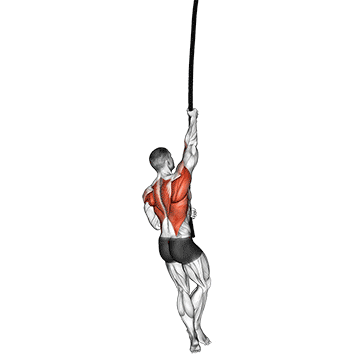
The rope climb is a challenging exercise that targets the upper body, particularly the muscles in the arms, back, and core. It involves using your arms and legs to ascend a rope vertically, simulating a climbing motion. Rope climbing is an effective way to build upper body strength, grip strength, and overall body coordination. ## Instructions 1. Find a secure and sturdy rope that is long enough for your desired climbing height. 2. Stand facing the rope with your feet shoulder-width apart and slightly bent. 3. Grasp the rope firmly with both hands, using an overhand grip. 4. Engage your core muscles and keep your body in a straight line from head to toe. 5. Begin climbing by alternating your hands and legs, creating a rhythm of pulling and stepping. 6. As you pull yourself up, use your legs to push against the rope, providing additional support and power. 7. Continue climbing until you reach your desired height or until you can no longer climb safely. 8. To descend, reverse the climbing motion by slowly lowering yourself down the rope, using controlled movements. ## Variations - Assisted Rope Climb: If you're new to rope climbing or need assistance, you can use your legs to help push off from the ground, providing extra support and reducing the reliance on upper body strength. - L-Sit Rope Climb: Instead of using your legs to assist in climbing, challenge yourself by keeping your legs extended in an L-sit position throughout the climb, engaging your core muscles for stability. - Rope Pull-Ups: If you don't have access to a long climbing rope, you can perform rope pull-ups by attaching a shorter rope to a pull-up bar or other sturdy overhead structure. Pull yourself up using the rope while maintaining a proper pull-up form. ## Muscles Worked The main muscles targeted during a rope climb are: - Biceps - Forearms - Back (latissimus dorsi, rhomboids, and trapezius) - Shoulders - Core muscles (abdominals and obliques) - Grip muscles ## Common Mistakes - Relying solely on arm strength: Remember to engage your legs and use them to push against the rope, which helps share the load and reduces strain on your arms. - Hunching or rounding the back: Maintain proper posture throughout the climb, keeping your back straight and shoulders down to prevent injury and promote efficient movement. - Gripping too tightly: While it's essential to hold the rope firmly, avoid excessive gripping that may cause premature fatigue. Find a grip that allows you to maintain control without excessive tension. ## Safety Precautions - Ensure that the rope is securely anchored and can support your weight before attempting a climb. - Use appropriate protective equipment, such as gloves, to prevent rope burn and improve grip. - Start with a height and difficulty level that matches your fitness and climbing ability. - Gradually increase the difficulty and height of the climb as you gain strength and confidence. - Listen to your body and avoid overexertion. Rest and recover between climbs to prevent fatigue and reduce the risk of injury. - If you have any pre-existing medical conditions or concerns, consult with a healthcare professional before attempting rope climbing.
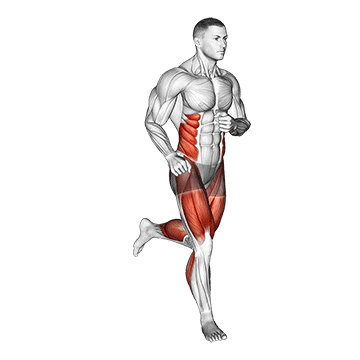
Running is a cardiovascular exercise that involves the rhythmic movement of the legs, targeting the lower body muscles and providing numerous health benefits. It is a popular form of aerobic exercise that helps improve cardiovascular fitness, strengthen muscles, burn calories, and enhance overall endurance. ## Instructions 1. Start by wearing comfortable running shoes and appropriate clothing for your running environment. 2. Begin with a warm-up consisting of dynamic stretches or a brisk walk to prepare your muscles for the activity. 3. Choose a suitable running surface, such as a track, trail, treadmill, or sidewalk, depending on your preference and accessibility. 4. Start running at a comfortable pace, gradually increasing your speed as you warm up and become more comfortable. 5. Maintain proper running form: - Keep your head up, looking forward, not down at the ground. - Relax your shoulders and let your arms swing naturally at your sides. - Bend your elbows at a 90-degree angle. - Engage your core muscles by drawing your navel toward your spine. - Land softly on the midfoot, rolling through the toes to push off for the next step. - Maintain a quick, comfortable stride while avoiding overstriding (landing with your foot too far ahead of your body). 6. Find a pace that challenges you but allows you to maintain a conversation without being completely out of breath (unless you're doing high-intensity interval training). 7. Maintain a steady breathing pattern, inhaling through your nose and exhaling through your mouth. 8. Aim for a duration and distance that align with your fitness level and goals. Start with shorter runs and gradually increase the time or distance as your endurance improves. 9. After completing your run, finish with a cool-down period, consisting of walking or gentle stretching to help your body gradually return to its resting state. ## Variations - Interval Training: Incorporate periods of higher-intensity running, alternating with periods of slower recovery jogging or walking. This method can help improve speed, endurance, and calorie burning. - Hill Running: Incorporate inclines or find hilly terrain to challenge your leg muscles and increase cardiovascular intensity. - Trail Running: Explore nature trails or off-road paths to add variety and engage different muscle groups due to the uneven terrain. ## Muscles Worked Running primarily targets the following muscles: - Quadriceps (front of thighs) - Hamstrings (back of thighs) - Calves - Glutes (buttocks) - Hip flexors - Core muscles (abdominals and obliques) ## Common Mistakes - Overstriding: Landing with your foot too far ahead of your body can increase the risk of injury. Aim for a midfoot strike and keep your stride comfortably quick. - Poor posture: Avoid hunching or slouching while running. Maintain an upright posture with your head up, shoulders relaxed, and core engaged. - Not allowing enough recovery time: Rest and recovery are crucial to prevent overuse injuries. Incorporate rest days into your running routine and listen to your body's signals. - Neglecting strength training: It's important to complement running with strength exercises to improve muscular balance and reduce the risk of imbalances or overuse injuries. ## Safety Precautions - Consult with a healthcare professional before starting a new running program, especially if you have any underlying health conditions or concerns. - Invest in proper running shoes that provide adequate support and cushioning for your foot type and running style. - Gradually increase the intensity, duration, and distance of your runs to allow your body to adapt and minimize the risk of overuse injuries. - Stay hydrated before, during, and after your runs, especially in hot or humid weather conditions. - Listen to your body and avoid pushing
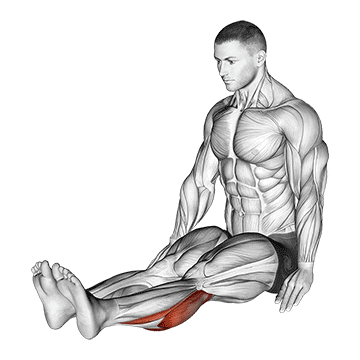
The seated calf stretch is a stretching exercise that primarily targets the calf muscles. It involves sitting on the ground or a chair and gently stretching the calf muscles to increase flexibility and reduce muscle tightness. This exercise is beneficial for individuals involved in activities that require calf strength and flexibility, such as running, jumping, or sports involving quick changes in direction. ## Instructions 1. Sit on the floor or on a chair with your legs extended in front of you. 2. Keep your back straight and your shoulders relaxed. 3. Bend one knee and bring your foot towards you, placing it on the floor or on a step in front of you. 4. Extend the other leg straight in front of you, keeping the heel on the floor. 5. Place your hands on the top of the bent leg for support. 6. Slowly lean forward from your hips, maintaining a straight back, until you feel a gentle stretch in your calf muscle. 7. Hold the stretch for 20 to 30 seconds, while maintaining a relaxed breathing pattern. 8. Repeat the stretch on the other leg. ## Variations - If sitting on the floor is uncomfortable, you can perform this stretch while seated on a chair. Place the heel of one foot on the floor in front of you, and follow the same instructions as mentioned above. - To increase the intensity of the stretch, you can place a weight or a resistance band around the ball of the foot and gently pull it towards you while maintaining the stretch position. - For individuals with limited flexibility, you can use a towel or a stretching strap to loop around the foot and gently pull it towards you, assisting the stretch. ## Muscles Worked The seated calf stretch primarily targets the calf muscles, specifically the gastrocnemius and soleus muscles. These muscles are responsible for plantar flexion, which is the movement of pointing the foot downward. ## Common Mistakes - Rounding the back: It's important to maintain a straight back throughout the stretch. Avoid rounding your back or hunching your shoulders. - Overstretching: Do not force the stretch to the point of pain. A gentle stretch should be felt in the calf muscle, but it should not be painful. - Bouncing or jerking movements: Avoid using momentum or bouncing during the stretch. Instead, maintain a slow and controlled movement to maximize the effectiveness of the stretch. ## Safety Precautions - If you have any pre-existing injuries or conditions related to the calf muscles or lower extremities, it's advisable to consult with a healthcare professional or a qualified fitness trainer before performing this exercise. - Avoid placing excessive pressure on the knee joint while performing the stretch. If you feel any discomfort or pain in the knee, adjust your positioning or discontinue the exercise. - Perform the stretch in a controlled manner, without any sudden or jerky movements, to prevent injury. - If you experience sharp pain or discomfort during the stretch, stop immediately and seek medical advice. - Remember to warm up before stretching to prepare your muscles and reduce the risk of injury.
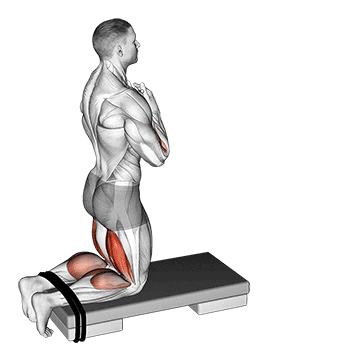
The self-assisted inverse leg curl is an exercise that targets the hamstrings, the muscles located at the back of the thigh. This exercise is performed using a stability ball or a towel, and it helps to strengthen and tone the hamstrings while also engaging the glutes and core muscles. ## Instructions 1. Lie flat on your back with your arms extended by your sides. 2. Place a stability ball or a rolled-up towel under your feet, ensuring that your heels are resting on the ball or towel. 3. Engage your core muscles by drawing your navel towards your spine. 4. Press your feet against the stability ball or towel, and lift your hips off the ground, forming a straight line from your shoulders to your knees. 5. Bend your knees and pull the stability ball or towel towards your glutes, rolling the ball or towel with your feet. 6. Once your feet are close to your glutes, pause for a moment, and then slowly extend your legs, rolling the ball or towel away from your glutes. 7. Lower your hips back down to the starting position, maintaining control and keeping your core engaged. 8. Repeat the movement for the desired number of repetitions. ## Variations - If a stability ball or towel is not available, you can perform the self-assisted inverse leg curl using a gliding disc or a paper plate placed under your feet on a smooth surface. This variation allows for a similar sliding movement to engage the hamstrings. - For individuals with limited hamstring strength or flexibility, you can start by performing the exercise with both legs, and then progress to single-leg curls once you feel comfortable and confident in the movement. ## Muscles Worked The self-assisted inverse leg curl primarily targets the hamstrings, specifically the biceps femoris, semitendinosus, and semimembranosus muscles. It also engages the glutes and the core muscles to stabilize the body during the exercise. ## Common Mistakes - Raising the hips too high: Avoid overextending your hips at the top of the movement. Aim for a straight line from your shoulders to your knees. - Allowing the lower back to arch: Maintain a neutral spine throughout the exercise. Avoid overarching your lower back or allowing it to lift off the ground. - Using momentum: Focus on a controlled and deliberate movement. Avoid using momentum or swinging your legs to complete the curl. - Not engaging the core: Keep your core muscles engaged throughout the exercise to stabilize your body and protect your lower back. ## Safety Precautions - If you have any pre-existing injuries or conditions related to the hamstrings or lower back, it's advisable to consult with a healthcare professional or a qualified fitness trainer before performing this exercise. - Start with a range of motion and intensity that feels comfortable for your fitness level. Gradually increase the difficulty as you become more accustomed to the exercise. - If you experience any sharp pain or discomfort during the exercise, stop immediately and seek medical advice. - Ensure that the stability ball, towel, or other equipment used is stable and secure. Check for proper inflation and placement before starting the exercise. - Engage your core muscles throughout the exercise to provide stability and protect the lower back.

The semi squat jump is a plyometric exercise that primarily targets the lower body, including the quadriceps, hamstrings, glutes, and calf muscles. It is a dynamic movement that combines elements of a squat and a jump to improve lower body power and explosiveness. ## Instructions 1. Stand with your feet shoulder-width apart and toes pointing slightly outward. 2. Bend your knees and hips to lower yourself into a semi-squat position. Keep your back straight, chest lifted, and core engaged. 3. Maintain a slight forward lean, but ensure that your knees do not extend past your toes. 4. From the semi-squat position, explosively jump upward as high as you can. 5. While jumping, fully extend your hips, knees, and ankles and reach your arms overhead for added momentum. 6. As you land, focus on landing softly and absorbing the impact through your legs. 7. Immediately go into the next repetition by bending your knees and hips again to return to the semi-squat position. ## Variations - **Modified Semi Squat Jump**: If you're a beginner or have knee issues, you can perform the exercise with a smaller range of motion. Instead of jumping as high, focus on the explosive movement from the semi-squat position. - **Weighted Semi Squat Jump**: For advanced individuals, you can add resistance by holding dumbbells or a weighted vest while performing the exercise. This will increase the challenge and further develop lower body strength and power. ## Muscles Worked The semi squat jump primarily targets the following muscles: - Quadriceps (front of the thigh) - Hamstrings (back of the thigh) - Glutes (buttocks) - Calves (gastrocnemius and soleus) ## Common Mistakes 1. **Landing with stiff legs**: Avoid landing with your knees locked. Always aim to land with soft knees to absorb the impact and reduce stress on your joints. 2. **Leaning too far forward**: Maintain a slight forward lean, but avoid excessive leaning, as it can strain your lower back. Keep your chest lifted and core engaged throughout the exercise. 3. **Allowing knees to collapse inward**: Be mindful of your knee alignment. Avoid letting your knees cave inward during the squat or jump. Keep them in line with your toes to maintain proper form and prevent knee injuries. 4. **Not engaging the core**: Neglecting to engage your core can lead to poor stability and compromise your form. Focus on contracting your abdominal muscles throughout the exercise to maintain stability and protect your lower back. ## Safety Precautions - Ensure you have sufficient space and a clear area to perform the exercise. - If you have any pre-existing knee or joint issues, consult with a healthcare professional before attempting this exercise. - Start with a proper warm-up to prepare your muscles for the dynamic movement. - Listen to your body and progress gradually. If you experience pain or discomfort, stop the exercise and seek professional guidance. - Land on a forgiving surface, such as a gym mat or a grassy area, to reduce the impact on your joints. Remember, it's always advisable to consult with a fitness professional or trainer to assess your individual fitness level and provide personalized guidance before starting any new exercise program.