
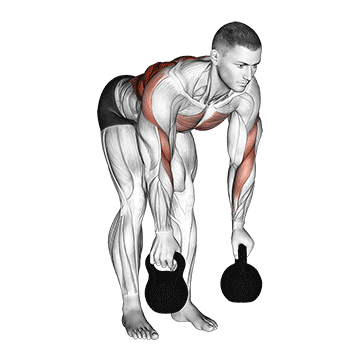
The Kettlebell Two-Arm Row is a compound exercise that primarily targets the muscles of the upper back, including the latissimus dorsi (lats), rhomboids, and trapezius. It also engages the biceps, rear deltoids, and core muscles. This exercise helps improve upper body strength, posture, and stability. ## Instructions 1. Begin by placing a kettlebell on the floor in front of you. 2. Stand with your feet shoulder-width apart and slightly bend your knees. 3. Bend at the hips, keeping your back straight and chest up, to pick up the kettlebell with both hands. This is your starting position. 4. Pull the kettlebell up toward your chest by retracting your shoulder blades and bending your elbows. Keep your back straight and avoid any twisting or jerking movements. 5. Squeeze your shoulder blades together at the top of the movement, and hold for a brief moment. 6. Slowly lower the kettlebell back to the starting position while maintaining control. 7. Repeat the movement for the desired number of repetitions. ## Variations - Single-Arm Row: Perform the exercise using one arm at a time. Place your non-working hand on a stable surface such as a bench or a wall for support. - Supported Row: Rest your non-working knee and hand on a bench or other stable surface while performing the row. This variation provides additional stability and support. - Renegade Row: Start in a push-up position with each hand gripping a kettlebell. Alternate rows by pulling one kettlebell up while stabilizing your body with the other hand on the ground. ## Muscles Worked - Latissimus dorsi (lats) - Rhomboids - Trapezius - Biceps - Rear deltoids - Core muscles (stabilization) ## Common Mistakes - Rounding the back: Keep your back straight throughout the exercise and avoid rounding the shoulders. - Using momentum: Avoid swinging or using momentum to lift the kettlebell. Focus on controlled movements. - Pulling with the arms only: Engage your back muscles and squeeze your shoulder blades together to initiate the movement. - Lifting the kettlebell too high: The row should focus on pulling the kettlebell toward the chest, not lifting it excessively high. ## Safety Precautions - Warm up properly before starting the exercise to prepare your muscles. - Choose an appropriate kettlebell weight that allows you to maintain proper form throughout the exercise. - Engage your core muscles to stabilize your spine and prevent excessive strain on your lower back. - If you have any pre-existing back or shoulder injuries, consult with a healthcare professional before attempting this exercise. - Start with lighter weights and gradually increase the load as your strength and technique improve. - If you experience any pain or discomfort during the exercise, stop immediately and seek medical advice.
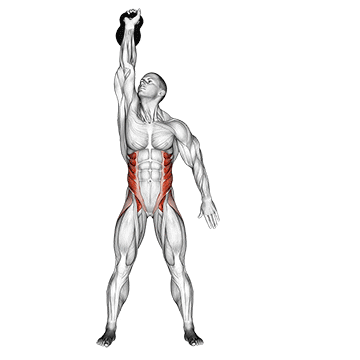
The Kettlebell Windmill is a dynamic exercise that primarily targets the core muscles, specifically the obliques, while also engaging the shoulders, hips, and hamstrings. This exercise helps improve core strength, stability, and flexibility. ## Instructions 1. Start by standing with your feet slightly wider than shoulder-width apart. 2. Hold a kettlebell in your right hand with your arm fully extended above your shoulder. 3. Rotate your left foot slightly outward while keeping your right foot pointed forward. 4. Shift your weight onto your left leg and begin to hinge at the hips, pushing your hips to the right. 5. Keep your right arm extended overhead and your eyes on the kettlebell. 6. As you hinge, lower your torso toward the left and slide your left hand down your left leg, aiming to touch your left foot. 7. Keep your back straight and your core engaged throughout the movement. 8. Pause briefly at the bottom position, then slowly reverse the movement by driving through your left foot and returning to the starting position. 9. Repeat for the desired number of repetitions, then switch sides and perform the exercise with the kettlebell in your left hand. ## Variations - Bodyweight Windmill: If using a kettlebell is too challenging, you can perform the windmill without any weight, focusing on the movement and maintaining proper form. - Bottoms-Up Kettlebell Windmill: Hold the kettlebell with the bottom facing up, which adds an additional challenge to grip strength and shoulder stability. - One-Arm Kettlebell Windmill: Perform the exercise with only one arm while keeping the other arm extended out to the side for balance. ## Muscles Worked - Obliques (side abdominal muscles) - Core muscles (including rectus abdominis) - Shoulders (deltoids) - Hips (glutes and hip abductors) - Hamstrings ## Common Mistakes - Twisting the hips: Keep your hips facing forward throughout the movement and focus on the lateral bending of the spine. - Leaning forward or backward: Maintain a straight line from your ankles to your shoulders without leaning too far forward or backward. - Neglecting proper alignment: Keep your arm fully extended overhead and your eyes on the kettlebell throughout the exercise. - Lack of hip hinge: Initiate the movement by hinging at the hips, not by bending at the waist. ## Safety Precautions - Prioritize proper form and technique over the amount of weight lifted. - Start with a lighter kettlebell to master the movement before progressing to heavier weights. - If you have any existing back, shoulder, or hip injuries, consult with a healthcare professional before attempting this exercise. - Engage your core muscles to stabilize your spine and protect your lower back. - Take your time with the movement and avoid rushing or using momentum. - If you experience any pain or discomfort, stop the exercise and seek guidance from a qualified fitness professional.
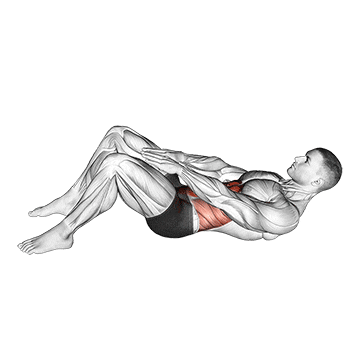
The Kick Out Sit is an exercise that targets the abdominal muscles, specifically the rectus abdominis, while also engaging the hip flexors and lower back. This exercise helps improve core strength, stability, and overall abdominal definition. ## Instructions 1. Start by lying flat on your back on an exercise mat or the floor. 2. Bend your knees and place your feet flat on the ground, hip-width apart. 3. Position your hands by your sides with your palms facing down for support. 4. Engage your core muscles by drawing your navel towards your spine. 5. Lift your feet off the ground while simultaneously bringing your knees toward your chest, creating a tucked position. 6. From this tucked position, quickly kick your legs straight out in front of you, extending them parallel to the ground. 7. At the same time, lower your upper body back towards the ground, lowering your shoulders and head. 8. Reverse the movement by pulling your knees back towards your chest and simultaneously sitting up, bringing your upper body back to an upright position. 9. Repeat the movement for the desired number of repetitions. ## Variations - Modified Kick Out Sit: If the full exercise is too challenging, you can perform a modified version by keeping your feet on the ground and focusing on the upper body movement of sitting up and lowering back down. - Medicine Ball Kick Out Sit: Hold a medicine ball or a weight plate against your chest while performing the exercise to increase resistance and intensity. ## Muscles Worked - Rectus abdominis (six-pack muscles) - Hip flexors - Lower back muscles (erector spinae) ## Common Mistakes - Using momentum: Avoid swinging your legs or using momentum to perform the movement. Focus on controlled and deliberate movements. - Relying on the neck muscles: Instead of pulling with your neck, engage your core muscles to initiate the movement and minimize strain on your neck. - Lifting the lower back off the ground: Keep your lower back pressed against the floor throughout the exercise to maintain proper form and prevent excessive stress on the spine. - Not engaging the core: Remember to activate your core muscles by drawing your navel towards your spine and maintaining abdominal tension throughout the exercise. ## Safety Precautions - Start with smaller movements and gradually increase the range of motion as you build strength and flexibility. - Keep a controlled pace and avoid jerky movements to prevent injury. - If you have any existing back or neck issues, it is advisable to consult with a healthcare professional before attempting this exercise. - Engage your core muscles to stabilize your spine and protect your lower back. - Listen to your body and stop the exercise if you experience any pain or discomfort. - Maintain proper breathing throughout the movement, exhaling as you kick out and inhaling as you bring your knees back in.
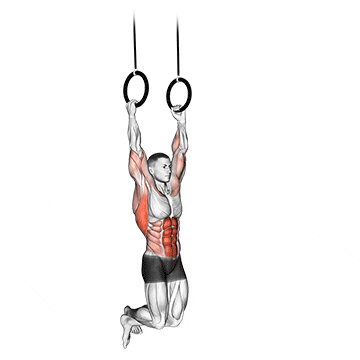
The Kipping Muscle Up is an advanced gymnastic exercise that combines a pull-up and a dip to transition from below the rings or bar to above it. This exercise primarily targets the muscles of the upper body, including the back, shoulders, chest, and arms. It requires strength, coordination, and explosive power. The Kipping Muscle Up is commonly seen in CrossFit workouts and gymnastics training. ## Instructions 1. Start by hanging from a set of rings or a pull-up bar with an overhand grip. 2. Initiate the movement by performing a kipping motion, which involves swinging your legs and hips in a controlled manner to generate momentum. 3. Swing your body backward while simultaneously bending your knees and pulling your feet up towards your buttocks. 4. As you swing forward, aggressively extend your legs and hips while pulling with your arms, aiming to bring your chest towards the rings or bar. 5. As your momentum carries you upward, transition from the pulling motion to a dip by pushing down on the rings or bar and simultaneously straightening your arms. 6. Continue the movement until your arms are fully extended and you are above the rings or bar. 7. Reverse the movement by bending your arms and allowing your body to descend back to the starting position. 8. Repeat the exercise for the desired number of repetitions. ## Variations - Assisted Muscle Up: Use resistance bands or a partner's assistance to provide support during the movement, making it easier to complete the muscle up. - Strict Muscle Up: Perform the muscle up without using any swinging or kipping motion. This variation requires greater strength and control. - False Grip Muscle Up: Utilize a false grip, where the wrist is positioned above the rings or bar, to facilitate the transition phase of the muscle up. ## Muscles Worked - Latissimus dorsi (lats) - Rhomboids - Deltoids - Pectoralis major (chest) - Biceps - Triceps - Core muscles (stabilization) ## Common Mistakes - Lack of proper technique: Focus on mastering the kipping motion and timing to efficiently generate momentum for the muscle up. - Inadequate upper body strength: Build sufficient pulling and pushing strength through exercises like pull-ups, dips, and rows before attempting the muscle up. - Not engaging the core: Maintain a tight and stable core throughout the movement to provide better control and stability. - Overusing the arms: Utilize the power generated from the hips and legs to assist the pulling motion, reducing strain on the arms. ## Safety Precautions - Prioritize proper technique and form over speed or quantity of repetitions. - Build up strength gradually and progress at a pace that suits your abilities. - Ensure that the rings or bar are securely anchored and can support your body weight. - Use a spotter or train with a qualified instructor to receive feedback and assistance in mastering the exercise. - If you experience any pain or discomfort, especially in the shoulders or wrists, discontinue the exercise and seek guidance from a fitness professional or healthcare provider.
The Knee Touch Crunch is an abdominal exercise that targets the rectus abdominis, commonly known as the "six-pack" muscles. This exercise involves a combination of a crunch and a knee touch movement. It helps strengthen the core muscles and improves abdominal definition. ## Instructions 1. Start by lying flat on your back on an exercise mat or the floor. 2. Bend your knees and place your feet flat on the ground, hip-width apart. 3. Position your arms by your sides with your palms facing down. 4. Engage your core muscles by drawing your navel towards your spine. 5. Lift your head, neck, and shoulders off the ground, performing a traditional crunch movement. 6. Simultaneously, bring your right hand toward your right knee and touch your knee with your hand. 7. Lower your upper body back down to the starting position while keeping your head, neck, and shoulders slightly elevated. 8. Repeat the crunch movement, this time bringing your left hand toward your left knee and touching your knee with your hand. 9. Alternate sides and continue the movement, touching each knee with the opposite hand, for the desired number of repetitions. ## Variations - Double Knee Touch Crunch: Instead of alternating sides, touch both knees with both hands simultaneously in the middle of the crunch movement. - Medicine Ball Knee Touch Crunch: Hold a medicine ball or a weight plate against your chest while performing the exercise to increase resistance and intensity. ## Muscles Worked - Rectus abdominis (six-pack muscles) - Obliques (side abdominal muscles) ## Common Mistakes - Using neck muscles: Avoid pulling or straining your neck during the exercise. Focus on using your abdominal muscles to lift your upper body. - Rounding the lower back: Keep your lower back pressed against the floor throughout the movement to maintain proper form and prevent excessive stress on the spine. - Not engaging the core: Remember to activate your core muscles by drawing your navel towards your spine and maintaining abdominal tension throughout the exercise. - Using momentum: Avoid swinging or using momentum to complete the movement. Focus on controlled and deliberate movements. ## Safety Precautions - Start with smaller movements and gradually increase the range of motion as you build strength and flexibility. - Avoid pulling on your neck or straining your back during the exercise. - Maintain proper breathing throughout the movement, exhaling as you lift your upper body and inhaling as you lower back down. - If you have any existing back or neck issues, it is advisable to consult with a healthcare professional before attempting this exercise. - Listen to your body and stop the exercise if you experience any pain or discomfort. - If you're new to abdominal exercises or have any concerns, consider seeking guidance from a qualified fitness professional.
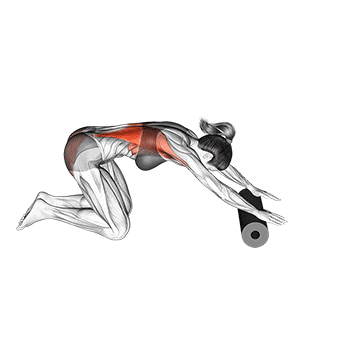
The roller back stretch is a stretching exercise that targets the muscles of the back, particularly the muscles of the upper and middle back. This exercise involves using a foam roller to apply pressure and release tension in the muscles, promoting improved flexibility, mobility, and posture. ## Instructions 1. Begin by placing a foam roller on the ground and sitting in front of it with your knees bent and feet flat on the floor. 2. Slowly lie back onto the foam roller, positioning it horizontally across your upper back, just below the shoulder blades. Support your head with your hands, interlacing your fingers and placing them behind your head. 3. Engage your core muscles and lift your hips off the ground, creating a straight line from your head to your knees. 4. Using your legs and core, start rolling up and down along the foam roller, moving from the upper back to the middle back region. Use your feet to control the rolling motion. 5. As you roll, focus on areas of tightness or discomfort, spending more time on those areas to apply targeted pressure. 6. Continue rolling up and down for the desired duration, maintaining control and avoiding sudden movements. 7. To finish the stretch, gradually lower your hips to the ground and carefully roll off the foam roller to the side. ## Variations - Upper Back Focus: If you want to target the upper back more specifically, position the foam roller higher on your back, just below the base of your neck. - Lower Back Focus: For a focus on the lower back, position the foam roller below the ribcage and above the waist. - One-Sided Stretch: To focus on one side of the back at a time, shift your weight to one side and slightly rotate your body as you roll. This can provide additional stretching and release for the muscles along the side of the back. ## Muscles Worked - Upper back muscles (rhomboids, trapezius) - Middle back muscles (erector spinae) - Posterior shoulder muscles - Latissimus dorsi ## Common Mistakes - Rolling too fast: Maintain a slow and controlled rolling motion to effectively target the muscles and avoid injury. - Applying excessive pressure: Start with a gentle amount of pressure and gradually increase it as tolerated. Avoid excessive pressure that causes pain or discomfort. - Arching the lower back: Keep your core engaged and avoid excessive arching of the lower back. Focus on maintaining a neutral spine throughout the exercise. ## Safety Precautions - Choose a foam roller with an appropriate density for your comfort level. Softer foam rollers provide a gentler stretch, while firmer ones offer deeper pressure. - If you have any spinal or back injuries or conditions, consult with a healthcare professional before attempting the roller back stretch. - Avoid rolling directly on the spine or any bony prominences. Keep the foam roller positioned on the muscles of the back. - Listen to your body and stop the exercise if you experience any sharp pain or discomfort. - Stay hydrated and breathe deeply during the stretch to promote relaxation and enhance the effectiveness of the exercise.
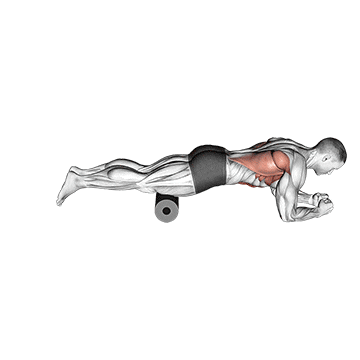
The roller body saw is a challenging core exercise that targets the muscles of the abs, including the rectus abdominis and the deep stabilizing muscles of the core. This exercise is performed using a stability or foam roller, which adds an element of instability, requiring increased muscle activation and control. ## Instructions 1. Start by placing a stability or foam roller on the floor horizontally. Position yourself on your forearms, with your elbows directly under your shoulders and your toes resting on the roller. 2. Engage your core muscles, glutes, and legs to create a straight line from your head to your heels. This is your starting position. 3. Slowly begin to roll the roller forward by pushing your forearms into the ground and extending your elbows. Maintain the straight line from head to heels throughout the movement. 4. Continue rolling forward until your forearms reach the maximum comfortable range or until your body is nearly parallel to the ground. 5. Pause briefly in the extended position, then reverse the movement by pulling your forearms back, using your core to bring your body back to the starting position. 6. Repeat the rolling motion for the desired number of repetitions, maintaining control and stability throughout the exercise. ## Variations - Bent Knee Variation: If you find the exercise too challenging, you can modify it by bending your knees and resting them on the roller instead of being on your toes. This reduces the lever arm and decreases the difficulty. - Single Arm Variation: For an advanced variation, you can perform the roller body saw using one arm at a time, while the other arm is extended straight out in front of you. Alternate between arms for each repetition. ## Muscles Worked - Rectus abdominis (six-pack muscles) - Transverse abdominis (deep core stabilizer) - Internal and external obliques - Lower back muscles (erector spinae) - Hip flexors ## Common Mistakes - Sagging or arching the lower back: Maintain a neutral spine throughout the exercise and avoid letting your lower back sag or arch excessively. - Allowing the shoulders to shrug: Keep your shoulders down and away from your ears throughout the movement. This helps engage the core and maintain proper form. - Rolling too far or losing control: Control the range of motion and avoid rolling too far forward or losing control of the movement. Focus on maintaining stability and a controlled pace. ## Safety Precautions - Start with a smaller range of motion and gradually increase it as you gain strength and stability. - If you have any wrist or shoulder issues, consult with a fitness professional or healthcare provider before attempting the roller body saw. - Engage your core and maintain a strong connection between your shoulders, hips, and legs throughout the exercise to support stability and prevent excessive strain on the lower back. - Listen to your body and stop the exercise if you experience pain or discomfort. It's important to maintain proper form and avoid overexertion.
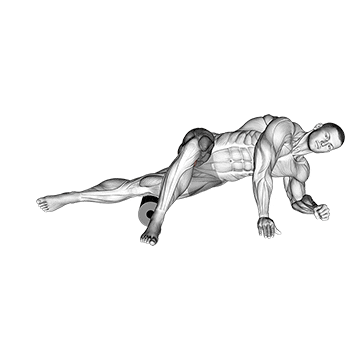
The roller hip lat stretch is a stretching exercise that targets the muscles of the hips and lats (latissimus dorsi). This stretch involves using a foam roller to apply pressure and release tension in the hip and lat muscles, promoting improved flexibility and mobility in these areas. ## Instructions 1. Begin by sitting on the ground with your legs extended in front of you and the foam roller placed horizontally behind you. 2. Bend your knees and place your feet flat on the ground, hip-width apart. 3. Slowly lie back onto the foam roller, aligning it with your spine. Ensure that the roller is positioned perpendicular to your body, just below the shoulder blades. 4. Extend your arms overhead and interlace your fingers, pressing your palms toward the ceiling. 5. From this position, bend your knees and place the soles of your feet on the ground. Your feet should be hip-width apart and close to your glutes. 6. Engage your core muscles and press your hips upward, lifting your glutes off the ground. Your weight should be supported by your feet and the foam roller. 7. Once you feel stable, begin to lower your hips to one side, allowing the foam roller to roll along your hip and lat area. Keep your upper body relaxed and allow the stretch to deepen as you lower your hips. 8. Hold the stretch for 20 to 30 seconds, feeling the gentle stretch in your hip and lat area. 9. Return your hips to the center, and then lower them to the other side to stretch the opposite hip and lat. 10. Repeat the stretch for the desired number of repetitions, alternating sides. ## Variations - Arm Position: If it's more comfortable for you, you can keep your arms by your sides or place your hands on your hips instead of extending them overhead. - Single-Leg Variation: For a deeper stretch, you can perform the exercise with one leg extended straight and the other knee bent, allowing the foam roller to roll along the side of the extended leg. ## Muscles Worked - Latissimus dorsi (lats) - Hip flexors - Gluteus maximus - Hamstrings - Spinal erectors ## Common Mistakes - Rolling too quickly or forcefully: Maintain a slow and controlled motion throughout the stretch, focusing on the targeted muscles. Avoid using excessive force or momentum. - Arching the lower back: Keep your core engaged and avoid excessive arching of the lower back. Focus on maintaining a neutral spine throughout the exercise. - Holding your breath: Remember to breathe deeply and relax as you hold the stretch. Avoid holding your breath, as it can increase tension and limit the effectiveness of the stretch. ## Safety Precautions - Choose a foam roller with an appropriate density for your comfort level. Softer foam rollers provide a gentler stretch, while firmer ones offer deeper pressure. - If you have any hip or back injuries or conditions, consult with a healthcare professional before attempting the roller hip lat stretch. - Avoid rolling directly on the spine or any bony prominences. Keep the foam roller positioned on the muscles of the hips and lats. - Listen to your body and stop the exercise if you experience any sharp pain or discomfort. - Take your time and gradually deepen the stretch as your muscles relax. Do not force the stretch beyond your comfort level.
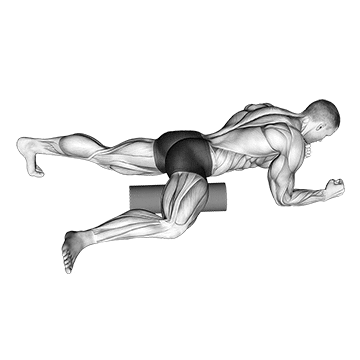
The roller hip stretch is a stretching exercise that targets the muscles of the hips, including the hip flexors, glutes, and outer hip muscles. This stretch involves using a foam roller to apply pressure and release tension in the hip muscles, promoting improved flexibility, mobility, and reduced muscle tightness. ## Instructions 1. Start by sitting on the ground with your legs extended in front of you and the foam roller placed vertically behind you. 2. Bend your knees and place your feet flat on the ground, hip-width apart. 3. Slowly lie back onto the foam roller, aligning it with your spine. Ensure that the roller is positioned perpendicular to your body, just below the lower back. 4. Bend your knees and place your feet flat on the ground, hip-width apart. Keep your arms relaxed by your sides. 5. Engage your core muscles and press your hips upward, lifting your glutes off the ground. Your weight should be supported by your feet and the foam roller. 6. Once you feel stable, bring your right ankle to rest on your left knee, creating a figure-four position. 7. Allow the foam roller to apply gentle pressure on the outer side of your right hip. You should feel a stretch in the right hip and glute area. 8. Hold the stretch for 20 to 30 seconds, focusing on relaxing and breathing deeply. 9. Release the stretch and repeat on the other side by bringing your left ankle to rest on your right knee. 10. Continue alternating sides for the desired number of repetitions. ## Variations - Arm Position: You can place your hands on your hips or extend your arms overhead for a deeper stretch. - Single-Leg Variation: For a deeper stretch, you can perform the exercise with one leg extended straight and the other leg in the figure-four position, allowing the foam roller to apply pressure on the outer hip of the bent leg. ## Muscles Worked - Hip flexors (iliopsoas) - Gluteus maximus - Gluteus medius - Tensor fasciae latae - Piriformis - External rotators of the hip ## Common Mistakes - Arching the lower back: Keep your core engaged and avoid excessive arching of the lower back. Focus on maintaining a neutral spine throughout the exercise. - Applying excessive pressure: Start with a gentle amount of pressure and gradually increase it as tolerated. Avoid excessive pressure that causes pain or discomfort. - Holding your breath: Remember to breathe deeply and relax as you hold the stretch. Avoid holding your breath, as it can increase tension and limit the effectiveness of the stretch. ## Safety Precautions - Choose a foam roller with an appropriate density for your comfort level. Softer foam rollers provide a gentler stretch, while firmer ones offer deeper pressure. - If you have any hip or back injuries or conditions, consult with a healthcare professional before attempting the roller hip stretch. - Avoid rolling directly on the spine or any bony prominences. Keep the foam roller positioned on the muscles of the hips. - Listen to your body and stop the exercise if you experience any sharp pain or discomfort. - Take your time and gradually deepen the stretch as your muscles relax. Do not force the stretch beyond your comfort level.