
The potty squat, also known as the deep squat or deep squatting position, refers to assuming a squatting position similar to that used when using a squat toilet. This exercise mimics the natural human resting position for elimination and targets the muscles of the lower body, particularly the quadriceps, hamstrings, glutes, and calves. The potty squat helps improve lower body strength, flexibility, and mobility, as well as enhances hip and ankle joint mobility. ## Instructions 1. Stand with your feet slightly wider than shoulder-width apart and toes pointing slightly outward. 2. Slowly lower your body down into a squat position by bending your knees and hips, keeping your back straight and chest up. 3. As you lower down, focus on pushing your hips back and down, while maintaining a neutral spine alignment. 4. Aim to lower your hips as close to the ground as possible, ideally reaching a deep squat where your buttocks are close to or touching your heels. 5. Keep your heels grounded and distribute your weight evenly through your feet. 6. Once in the deep squat position, you can use your elbows to gently press your knees apart, which can help open the hips and improve the depth of the squat. 7. Hold the squat position for a few seconds or longer, depending on your comfort level and flexibility. 8. To rise back up, push through your heels, engage your leg muscles, and straighten your hips and knees. 9. Repeat the squatting motion for the desired number of repetitions. ## Variations 1. Supported Potty Squat: If you have difficulty maintaining balance or lowering into a deep squat, you can hold onto a sturdy object, such as a doorframe, wall, or squat rack, for support. This variation allows you to focus on the squatting motion while providing stability. 2. Elevated Heels Potty Squat: If you have limited ankle mobility, you can place small plates or a wedge under your heels to elevate them slightly. This modification helps reduce the demand on ankle flexibility and allows for a more comfortable deep squat. 3. Assisted Potty Squat: If you need additional support or assistance, you can use a suspension trainer, resistance band, or partner-assisted technique to help you maintain balance and control while performing the squat. ## Muscles Worked - Quadriceps (front thigh muscles) - Hamstrings (back thigh muscles) - Glutes (buttocks) - Calves - Core muscles (stabilization) ## Common Mistakes - Rounded back: Avoid rounding your back or hunching over during the squat. Maintain an upright posture with your chest up and shoulders back. - Knees collapsing inward: Be mindful of your knee alignment and ensure that your knees track over your toes throughout the movement. Avoid allowing your knees to cave inward. - Lifting heels off the ground: Keep your heels grounded throughout the squatting motion. Lifting the heels can put excess strain on the knees and compromise stability. - Overextending knees: While rising back up from the squat, avoid locking out your knees at the top. Maintain a slight bend in the knees to engage the leg muscles and maintain stability. ## Safety Precautions - If you have any knee, hip, or ankle injuries or conditions, consult with a healthcare professional before attempting the potty squat. They can provide guidance based on your specific situation. - Start with a range of motion and depth that is comfortable for you. Gradually work on increasing the depth and range of the squat as your flexibility and strength improve. - If you experience any pain or discomfort during the exercise, modify the depth or range of motion or stop the exercise. Listen to your body and work within your limits. - Ensure
The potty squat with support is a modified version of the deep squat or potty squat exercise. It involves using a support, such as a wall, doorframe, or squat rack, to assist with balance and stability during the squatting motion. This exercise targets the muscles of the lower body, including the quadriceps, hamstrings, glutes, and calves, while providing additional support for those who may have difficulty maintaining balance or achieving a deep squat position. ## Instructions 1. Stand facing a wall, doorframe, or squat rack, with your feet slightly wider than shoulder-width apart and toes pointing slightly outward. 2. Place your hands on the support at a comfortable height, ensuring a secure grip. 3. Slowly lower your body down into a squat position by bending your knees and hips, keeping your back straight and chest up. 4. As you lower down, focus on pushing your hips back and down, while maintaining a neutral spine alignment. 5. Aim to lower your hips as close to the ground as possible, ideally reaching a deep squat where your buttocks are close to or touching your heels. 6. Keep your heels grounded and distribute your weight evenly through your feet. 7. Once in the deep squat position, engage your core and leg muscles to maintain stability. 8. Hold the squat position for a few seconds or longer, depending on your comfort level and flexibility. 9. To rise back up, push through your heels, engage your leg muscles, and straighten your hips and knees. 10. Repeat the squatting motion for the desired number of repetitions. ## Variations 1. Wall-Supported Potty Squat: Stand with your back against a wall and perform the squatting motion while keeping your back in contact with the wall. This variation provides additional support and stability. 2. Squat Rack-Supported Potty Squat: Stand facing a squat rack and hold onto the rack at a comfortable height. Perform the squatting motion while using the rack for support and stability. ## Muscles Worked - Quadriceps (front thigh muscles) - Hamstrings (back thigh muscles) - Glutes (buttocks) - Calves - Core muscles (stabilization) ## Common Mistakes - Rounding the back: Maintain proper posture throughout the exercise. Keep your back straight and avoid rounding or hunching over. - Allowing the knees to collapse inward: Ensure that your knees track over your toes throughout the squat. Avoid letting the knees cave inward. - Lifting the heels off the ground: Keep your heels grounded throughout the squatting motion. Lifting the heels can strain the knees and compromise stability. - Overextending the knees: When rising back up from the squat, avoid locking out your knees at the top. Maintain a slight bend in the knees to engage the leg muscles and maintain stability. ## Safety Precautions - If you have any knee, hip, or ankle injuries or conditions, consult with a healthcare professional before attempting the potty squat with support. They can provide guidance based on your specific situation. - Choose a support that is sturdy and secure. Ensure that it can comfortably bear your weight and provide the necessary stability. - Start with a range of motion and depth that is comfortable for you. Gradually work on increasing the depth and range of the squat as your flexibility and strength improve. - If you experience any pain or discomfort during the exercise, modify the depth or range of motion or stop the exercise. Listen to your body and work within your limits. - Use the support as needed to maintain balance and stability. Adjust the height of the support to a comfortable level. - Focus on maintaining proper form and alignment throughout the exercise.
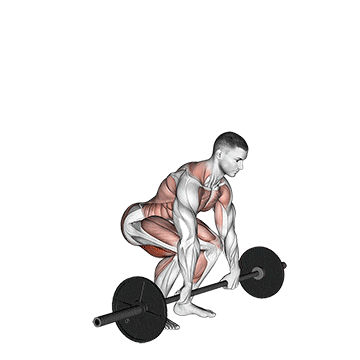
The power clean is a compound Olympic weightlifting exercise that targets multiple muscle groups and involves explosively lifting a weighted barbell from the floor to the shoulders. It primarily targets the muscles of the lower body, including the hamstrings, glutes, quadriceps, and calves, while also engaging the muscles of the upper body, such as the shoulders, upper back, and arms. The power clean is known for its ability to develop explosive power, strength, and coordination. ## Instructions 1. Start with the barbell on the floor in front of you. Stand with your feet hip-width apart and toes pointing slightly outward. The barbell should be positioned over the balls of your feet. 2. Bend at the hips and knees, keeping your back straight and chest up, and grip the barbell with an overhand grip, slightly wider than shoulder-width apart. 3. Lower your hips into a squat position, maintaining a neutral spine and keeping your weight on your heels. 4. Explosively extend your hips and knees, simultaneously pulling the barbell upward in a straight path close to your body. Keep your elbows high and out to the sides. 5. As the barbell reaches hip level, quickly drop your body under the bar by bending your knees and hips and rotating your elbows forward. 6. Catch the barbell in a front squat position, with your elbows high and the bar resting across the front of your shoulders. 7. Stand up from the front squat position, fully extending your hips and knees. 8. Lower the barbell back down to the starting position by reversing the movement, leading with your hips and keeping the barbell close to your body. 9. Repeat the exercise for the desired number of repetitions. ## Variations 1. Hang Power Clean: Instead of starting from the floor, begin the movement with the barbell at the hang position, which is just above the knees. This variation focuses on the explosive lifting phase of the exercise. 2. Power Clean from Blocks: Perform the power clean starting from elevated blocks or platforms. This variation can help improve strength and technique at specific portions of the lift. 3. Dumbbell Power Clean: If you don't have access to a barbell, you can perform the power clean using dumbbells. Hold one dumbbell in each hand and follow the same movement pattern. ## Muscles Worked - Quadriceps (front thigh muscles) - Hamstrings (back thigh muscles) - Glutes (buttocks) - Calves - Trapezius (upper back) - Deltoids (shoulders) - Biceps and Forearms - Core muscles (stabilization) ## Common Mistakes - Rounding the back: Maintain a flat back throughout the movement and avoid rounding or excessive arching of the spine. - Using excessive arm pull: The power clean should primarily be driven by the legs and hips. Avoid relying too much on the arms to lift the barbell. - Not fully extending the hips: Make sure to fully extend your hips and stand tall at the top of the movement. This is crucial for generating power. - Allowing the barbell to drift away from the body: Keep the barbell close to your body throughout the lift to maintain proper mechanics and minimize the risk of injury. - Neglecting proper technique: Focus on proper form and technique, even when using heavy weights. It is important to master the movement before increasing the load. ## Safety Precautions - Before attempting the power clean, ensure that you have a good foundation of strength, stability, and mobility. Consider working with a qualified strength and conditioning coach to learn the proper technique. - Start with lighter weights and gradually progress to heavier loads as your technique and strength improve. - Always perform
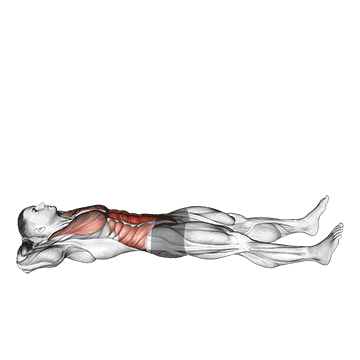
The prisoner half sit-up is an abdominal exercise that targets the rectus abdominis, commonly known as the "six-pack" muscles. This exercise also engages the hip flexors and the muscles of the lower back. It is an effective exercise for developing core strength and improving abdominal muscle definition. ## Instructions 1. Start by lying on your back on a comfortable mat or flat surface. Bend your knees and position your feet flat on the ground, hip-width apart. Keep your arms crossed over your chest, with your hands touching opposite shoulders. 2. Engage your core muscles by drawing your navel towards your spine. This will help stabilize your torso throughout the exercise. 3. Begin the movement by initiating a curling motion from your upper body. Lift your shoulders off the ground, peeling your spine off the mat one vertebra at a time. 4. Continue curling up until your shoulder blades are off the ground, while keeping your lower back in contact with the mat. 5. Pause for a moment at the top of the movement and squeeze your abdominal muscles. 6. Slowly lower your upper body back down to the starting position, maintaining control and engaging your core muscles. 7. Repeat the exercise for the desired number of repetitions. ## Variations - Modified Version: If you find the exercise challenging, you can modify it by placing your feet under a stable object, such as a sturdy piece of furniture, to provide additional stability as you perform the sit-up. - Weighted Version: To increase the intensity of the exercise, you can hold a weight plate or dumbbell against your chest while performing the sit-up. This adds resistance and further challenges the abdominal muscles. ## Muscles Worked - Rectus abdominis (six-pack muscles) - Hip flexors - Lower back muscles (erector spinae) ## Common Mistakes 1. Using Momentum: Avoid using momentum or swinging your body to lift yourself up. Focus on controlled and deliberate movements, using your abdominal muscles to lift your upper body. 2. Straining the Neck: Avoid pulling on your neck or leading the movement with your head. Keep your hands crossed over your chest and engage your core to perform the exercise. 3. Lifting Hips off the Ground: Ensure that your lower back remains in contact with the mat throughout the exercise. Lifting your hips can reduce the effectiveness of the exercise and strain your lower back. 4. Lack of Core Engagement: It's essential to engage your core muscles throughout the exercise. Focus on pulling your navel towards your spine to maintain proper abdominal activation. ## Safety Precautions - If you have any pre-existing back or neck conditions, consult with a healthcare professional or a qualified fitness instructor before attempting this exercise. - Perform the exercise on a comfortable and supportive surface, such as a mat, to cushion your spine. - Start with a suitable number of repetitions and gradually increase the intensity and volume as your core strength improves. - If you experience any sharp pain or discomfort during the exercise, stop immediately and consult with a healthcare professional.
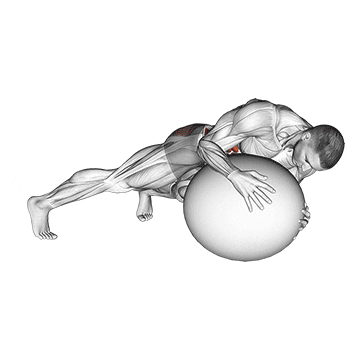
The prone twist on a stability ball is an exercise that targets the muscles of the core, particularly the obliques. This exercise helps improve rotational stability and strengthens the muscles responsible for trunk rotation. It also engages the muscles of the shoulders and back. ## Instructions 1. Start by positioning a stability ball on the floor. Lie face down on the ball, with your abdomen and hips centered on the ball. Walk your hands forward on the floor until the ball supports your upper body from your hips to your chest. 2. Align your body in a straight line from your head to your heels. Engage your core muscles by drawing your navel toward your spine. 3. Extend your arms straight out to the sides, forming a "T" shape with your body. 4. Slowly exhale and begin the movement by rotating your upper body to one side. Keep your arms extended and parallel to the floor. 5. Rotate as far as you can comfortably, feeling a stretch through your core and oblique muscles. 6. Inhale and return to the starting position, maintaining control and engaging your core muscles. 7. Repeat the rotation to the opposite side. 8. Continue alternating sides for the desired number of repetitions. ## Variations - Modified Version: If you find it challenging to maintain balance on the stability ball, you can perform the exercise on a mat or the floor. Lie face down and place your arms out to the sides. Then, perform the twisting motion by lifting your upper body off the floor and rotating side to side. - Weighted Version: To increase the intensity of the exercise, you can hold a dumbbell or a medicine ball in your hands while performing the rotations. This adds resistance and further challenges the oblique muscles. ## Muscles Worked - Obliques (side abdominal muscles) - Rectus abdominis (six-pack muscles) - Transverse abdominis (deep core stabilizer) - Erector spinae (back muscles) - Deltoids (shoulder muscles) ## Common Mistakes 1. Over-Rotating: Avoid excessive rotation that compromises your form or causes discomfort. Focus on rotating within your comfortable range of motion. 2. Arching the Lower Back: Maintain a neutral spine position throughout the exercise. Avoid arching your lower back or allowing your hips to sag. 3. Poor Core Engagement: Remember to engage your core muscles by drawing your navel toward your spine. This helps stabilize your body and ensures proper activation of the targeted muscles. 4. Rushing the Movement: Perform the exercise in a controlled manner, focusing on the quality of each repetition. Avoid rushing through the rotations. ## Safety Precautions - Use a stability ball that is appropriate for your height and weight and ensure it is properly inflated. - If you have any lower back issues or instability, consult with a healthcare professional or a qualified fitness instructor before attempting this exercise. - Start with a suitable number of repetitions and gradually increase the intensity and range of motion as your core strength improves. - If you experience any sharp pain or discomfort during the exercise, stop immediately and consult with a healthcare professional.
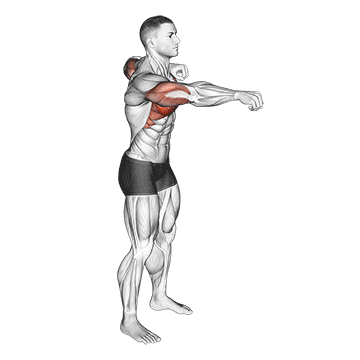
The push and pull bodyweight exercise is a compound movement that targets multiple muscle groups simultaneously. It combines a pushing motion (push-up) with a pulling motion (bodyweight row), making it a comprehensive exercise for upper body strength and muscle development. This exercise primarily engages the muscles of the chest, shoulders, back, and arms. ## Instructions 1. Find a sturdy horizontal bar or secure a suspension trainer at chest height. Ensure that it can support your body weight. 2. Stand facing the bar or suspension trainer. Place your hands on the bar or grab the handles of the suspension trainer, slightly wider than shoulder-width apart. Your palms should be facing away from you (pronated grip). 3. Step back from the bar or suspension trainer and position your feet hip-width apart. 4. Lean back, keeping your body in a straight line from head to heels. Your arms should be fully extended, and your body should be at a slight diagonal angle. 5. Start the exercise by bending your elbows and pulling your chest towards the bar or handles. Keep your core engaged and squeeze your shoulder blades together. 6. Once your chest reaches the bar or handles, pause for a moment and then slowly extend your arms back to the starting position, maintaining control throughout the movement. 7. Immediately transition into the pushing motion by stepping forward and assuming a push-up position on the ground. Your hands should be slightly wider than shoulder-width apart, with your palms facing down. 8. Lower your body by bending your elbows, keeping them close to your sides. Aim to bring your chest as close to the ground as possible while maintaining a straight body alignment. 9. Push through your palms to extend your arms and return to the starting push-up position. 10. Repeat the push and pull motions for the desired number of repetitions. ## Variations - Modified Version: If the full exercise is too challenging, you can modify it by performing knee push-ups instead of full push-ups. For the bodyweight row, adjust the angle of your body by stepping forward or backward to increase or decrease the intensity. - Assisted Version: If you need assistance with the bodyweight row, use resistance bands or a spotter to help you with the pulling motion. This can make the exercise more accessible and gradually build your strength. ## Muscles Worked - Chest muscles (pectoralis major and minor) - Shoulder muscles (deltoids) - Back muscles (latissimus dorsi, rhomboids, trapezius) - Arm muscles (biceps, triceps) ## Common Mistakes 1. Improper Form: Maintain a straight body alignment throughout the exercise. Avoid sagging or arching your back during both the push-up and bodyweight row. 2. Shoulder Shrugging: Keep your shoulders relaxed and avoid shrugging them towards your ears. Focus on engaging your back muscles and pulling your shoulder blades together during the bodyweight row. 3. Insufficient Range of Motion: Aim to perform the exercises through a full range of motion. Lower your chest as close to the ground as possible during the push-up, and pull your chest towards the bar or handles during the bodyweight row. 4. Lack of Core Engagement: Engage your core muscles throughout the exercise to maintain stability and prevent excessive movement in your hips and lower back. ## Safety Precautions - Ensure that the bar or suspension trainer is securely anchored and can support your body weight before attempting the exercise. - If you have any existing shoulder, wrist, or back injuries, consult with a healthcare professional or a qualified fitness instructor before attempting this exercise. - Start with a suitable number of repetitions and gradually increase the intensity and volume as your strength improves. - Listen to your body and avoid pushing yourself to the
Push to Run is a conditioning exercise that combines a push-up with a dynamic movement to transition into a sprint or run. It targets multiple muscle groups, including the chest, shoulders, arms, core, and lower body. This exercise helps improve upper body strength, cardiovascular endurance, and overall power. ## Instructions 1. Start in a push-up position with your hands slightly wider than shoulder-width apart and your body in a straight line from head to heels. 2. Lower your body by bending your elbows, keeping them close to your sides. Aim to bring your chest as close to the ground as possible while maintaining proper form. 3. Push through your palms to extend your arms and explosively drive your body upward. 4. As you reach the top of the push-up position, quickly transition your body forward into a sprint or run. 5. Begin running at a comfortable pace, focusing on maintaining proper running form. 6. Continue running for a predetermined distance or duration, or until you reach your desired goal. 7. Once you've completed the run, slow down gradually and come to a controlled stop. 8. Optionally, you can repeat the exercise by transitioning back into the push-up position and performing another set. ## Variations - Modified Version: If you find the push-up challenging, you can modify it by performing knee push-ups instead. This reduces the amount of body weight you have to lift, making it more manageable. - Walk to Run: If you're not comfortable with running, you can modify the exercise by transitioning from a push-up into a brisk walk or jog instead. - Interval Training: Incorporate intervals into your Push to Run workout by alternating between periods of high-intensity sprints and recovery walks or jogs. This adds intensity and variability to the exercise. ## Muscles Worked - Chest muscles (pectoralis major and minor) - Shoulder muscles (deltoids) - Arm muscles (triceps and biceps) - Core muscles (abdominals and lower back) - Leg muscles (quadriceps, hamstrings, calves) ## Common Mistakes 1. Poor Push-Up Form: Maintain proper form during the push-up by keeping your body in a straight line and avoiding sagging or arching of the back. 2. Lack of Explosiveness: To effectively transition into the run, focus on generating power and speed by pushing off forcefully from the ground during the push-up. 3. Inefficient Running Technique: Maintain good running posture with an upright torso, relaxed arms, and a controlled stride. Avoid excessive bouncing, heel striking, or overstriding. 4. Overexertion: Start at a manageable pace and gradually increase the intensity. Avoid pushing yourself too hard or sprinting at maximum effort if you're not conditioned for it. ## Safety Precautions - Warm up adequately before attempting Push to Run to prepare your muscles and joints for the exercise. - If you have any existing shoulder, wrist, or back injuries, consult with a healthcare professional or a qualified fitness instructor before attempting this exercise. - Listen to your body and adjust the intensity and duration according to your fitness level. - Choose a safe and suitable running surface to minimize the risk of tripping or falling. - Stay hydrated and take breaks as needed during longer runs to prevent exhaustion or dehydration.
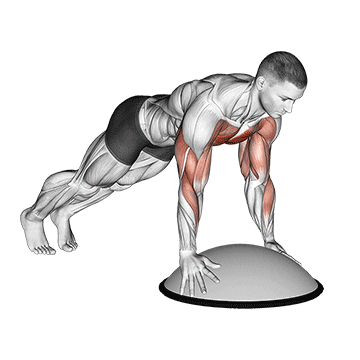
The push-up on a Bosu ball is a variation of the traditional push-up exercise that adds an element of instability. By performing the push-up on the unstable surface of the Bosu ball, this exercise challenges your core stability and engages additional muscles to maintain balance. It primarily targets the chest, shoulders, arms, and core muscles. ## Instructions 1. Place the Bosu ball on the floor with the dome side facing up. 2. Position yourself facing down, with your hands slightly wider than shoulder-width apart on the flat sides of the Bosu ball. 3. Extend your legs behind you, balancing on your toes, and position your body in a straight line from head to heels. 4. Engage your core muscles by drawing your navel toward your spine. 5. Lower your body toward the Bosu ball by bending your elbows, keeping them close to your sides. 6. Aim to bring your chest as close to the Bosu ball as possible, while maintaining control and proper form. 7. Pause for a brief moment in the bottom position, and then push through your palms to extend your arms and return to the starting position. 8. Maintain control throughout the movement and avoid letting the Bosu ball wobble excessively. 9. Repeat the exercise for the desired number of repetitions. ## Variations - Modified Version: If the full push-up on a Bosu ball is too challenging, you can modify it by performing the exercise with your knees on the ground. Place your knees on a mat or cushion to reduce the level of difficulty. - Incline Version: If you find the full push-up on a Bosu ball too difficult, you can perform the exercise with your hands on the flat sides of the Bosu ball and your feet on the floor. This decreases the instability and makes it easier to maintain balance. ## Muscles Worked - Chest muscles (pectoralis major and minor) - Shoulder muscles (deltoids) - Arm muscles (triceps and biceps) - Core muscles (abdominals and lower back) - Stabilizer muscles in the shoulders, arms, and core ## Common Mistakes 1. Poor Core Stability: Maintain a strong and stable core throughout the exercise. Avoid sagging or arching your back, and engage your abdominal muscles to keep your body in a straight line. 2. Elbows Flaring Out: Keep your elbows close to your sides as you lower and raise your body. Avoid allowing your elbows to flare out to the sides, as this can place excessive stress on the shoulder joints. 3. Lack of Full Range of Motion: Aim to lower your chest as close to the Bosu ball as possible while maintaining proper form. This ensures that you are getting the full benefit of the exercise. 4. Uncontrolled Movement: Maintain control throughout the exercise. Avoid bouncing or jerking your body, and focus on performing the push-up in a smooth and controlled manner. ## Safety Precautions - Ensure that the Bosu ball is stable and properly inflated before using it for the exercise. - If you have any existing shoulder, wrist, or back injuries, consult with a healthcare professional or a qualified fitness instructor before attempting this exercise. - Start with a suitable number of repetitions and gradually increase the intensity and volume as your strength improves. - If you feel any pain or discomfort, stop the exercise and consult with a healthcare professional. - Be cautious when performing the exercise on a slippery or unstable surface to prevent slipping or falling.
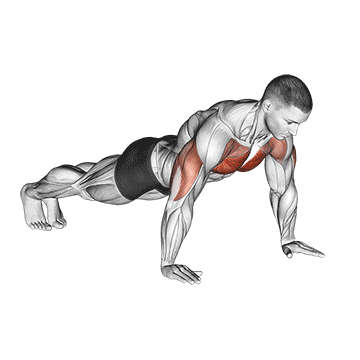
The push-up is a classic bodyweight exercise that targets the muscles of the upper body, including the chest, shoulders, and arms. It is a versatile and effective exercise for building upper body strength, improving muscular endurance, and enhancing overall fitness. ## Instructions 1. Start by positioning yourself face-down on the floor with your hands slightly wider than shoulder-width apart. 2. Extend your legs behind you, balancing on your toes, and position your body in a straight line from head to heels. 3. Engage your core muscles by drawing your navel toward your spine. 4. Lower your body toward the floor by bending your elbows, keeping them close to your sides. 5. Aim to bring your chest as close to the floor as possible while maintaining control and proper form. 6. Pause for a brief moment in the bottom position, and then push through your palms to extend your arms and return to the starting position. 7. Maintain control throughout the movement, and avoid letting your hips sag or your back arch. 8. Repeat the exercise for the desired number of repetitions. ## Variations - Modified Version: If the full push-up is too challenging, you can modify it by performing the exercise with your knees on the ground. This reduces the amount of body weight you have to lift, making it more manageable. - Incline Version: If you want to decrease the intensity or work on building strength, you can perform push-ups with your hands on an elevated surface such as a bench or step. This reduces the amount of resistance and makes the exercise easier. - Decline Version: To increase the challenge and engage the muscles from a different angle, you can perform push-ups with your feet elevated on a stable platform or step. - Close-Grip Push-Up: Place your hands close together, forming a diamond shape with your thumbs and index fingers. This variation emphasizes the triceps muscles more than the chest. - Wide-Grip Push-Up: Position your hands wider than shoulder-width apart to target the chest muscles from a different angle. ## Muscles Worked - Chest muscles (pectoralis major and minor) - Shoulder muscles (deltoids) - Arm muscles (triceps and biceps) - Core muscles (abdominals and lower back) - Stabilizer muscles in the shoulders, arms, and core ## Common Mistakes 1. Sagging Hips: Maintain a straight line from head to heels throughout the exercise. Avoid letting your hips sag or your lower back arch. 2. Elbows Flaring Out: Keep your elbows close to your sides as you lower and raise your body. Avoid allowing your elbows to flare out to the sides, as this can place excessive stress on the shoulder joints. 3. Lack of Full Range of Motion: Aim to lower your chest as close to the floor as possible while maintaining proper form. This ensures that you are getting the full benefit of the exercise. 4. Uncontrolled Movement: Maintain control throughout the exercise. Avoid bouncing or jerking your body, and focus on performing the push-up in a smooth and controlled manner. ## Safety Precautions - If you have any existing shoulder, wrist, or back injuries, consult with a healthcare professional or a qualified fitness instructor before attempting this exercise. - Warm up adequately before performing push-ups to prepare your muscles and joints. - Start with a suitable number of repetitions and gradually increase the intensity and volume as your strength improves. - Listen to your body and avoid pushing yourself to the point of pain. If you feel any discomfort, modify the exercise or stop if necessary. - If you experience wrist discomfort, try using push-up handles or performing push-ups on your fists to reduce strain on the wrists.