
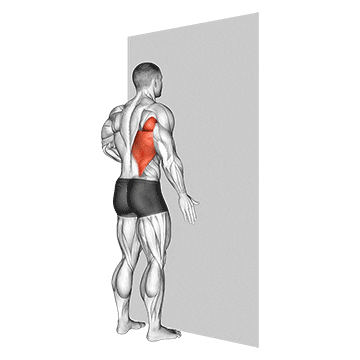
The one arm against the wall exercise is a bodyweight exercise that primarily targets the muscles of the upper body, including the chest, shoulders, and triceps. It is a challenging variation of the traditional push-up exercise that requires stability and control. This exercise can help improve upper body strength and muscular endurance. ## Instructions 1. Stand facing a wall with your feet shoulder-width apart. 2. Extend one arm forward, placing your palm flat against the wall at shoulder height. 3. Position your arm slightly wider than shoulder-width apart. 4. Step back and position your feet so that your body is at a slight angle, leaning towards the wall. 5. Keep your body straight, with your core engaged and your feet firmly planted. 6. Slowly lower your chest towards the wall by bending your elbow, keeping your body in a straight line. 7. Pause briefly when your chest is close to the wall. 8. Push through your palm to extend your arm and return to the starting position. 9. Repeat the exercise for the desired number of repetitions, then switch sides and perform with the other arm. ## Variations - Incline One Arm Push-Up: Perform the exercise with your hand on an elevated surface, such as a bench or step. This decreases the intensity of the exercise and can be a suitable modification for beginners. - One Arm Push-Up: Once you have mastered the one arm against the wall exercise, you can progress to the full one arm push-up. This involves performing the exercise with your hand on the floor and your body supported by one arm. - Assisted One Arm Push-Up: Use a resistance band or have a partner assist you by holding your leg or providing light support at the hip to help with the movement. ## Muscles Worked The one arm against the wall exercise primarily targets the following muscles: - Chest (pectoralis major and minor) - Shoulders (deltoids) - Triceps brachii - Core muscles (engaged for stability) ## Common Mistakes - Arching the back: Maintain a straight line from your head to your heels throughout the exercise. Avoid arching or sagging the back. - Allowing the shoulder to collapse: Keep your shoulder engaged and avoid letting it collapse towards the wall. Maintain stability and control in the shoulder joint. - Flaring the elbow outwards: Keep your elbow close to your body throughout the movement. Avoid letting your elbow flare out to the side, as it can strain the shoulder joint. - Insufficient range of motion: Lower your chest as close to the wall as possible while maintaining proper form. Aim for a full range of motion to effectively engage the targeted muscles. ## Safety Precautions - Perform the exercise on a stable surface and ensure that the wall is secure and can support your weight. - Start with a suitable distance from the wall that allows you to maintain proper form and control. - Listen to your body and stop the exercise if you experience any pain or discomfort. - Engage your core muscles to maintain stability and protect your lower back. - Gradually increase the difficulty by stepping further away from the wall or progressing to more challenging variations as your strength improves. - If you have any pre-existing shoulder, wrist, or elbow issues, consult with a healthcare professional or a qualified fitness trainer before attempting this exercise.
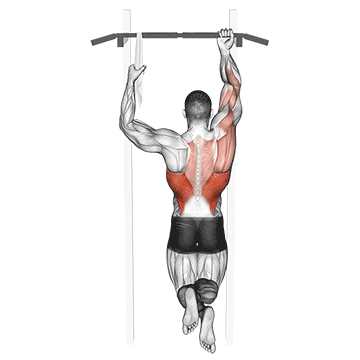
The one arm chin-up is an advanced bodyweight exercise that primarily targets the muscles of the upper body, including the back, biceps, and shoulders. It is a challenging exercise that requires significant upper body strength, stability, and control. The one arm chin-up is an excellent way to develop upper body pulling strength and achieve a high level of muscular development. ## Instructions 1. Start by hanging from a chin-up bar with an overhand grip using one hand, palm facing away from you. 2. Ensure that your shoulder is engaged, and your body is straight with your legs extended or slightly bent at the knees. 3. Brace your core and keep your shoulder blades pulled down and back. 4. Begin the movement by pulling yourself up towards the bar using your back and biceps. 5. Focus on driving your elbow down and back, pulling your body up until your chin is above the bar. 6. Pause briefly at the top of the movement, squeezing your back and biceps. 7. Slowly lower yourself back down with control until your arm is fully extended. 8. Repeat the exercise for the desired number of repetitions, then switch arms and perform with the other arm. ## Variations - Assisted One Arm Chin-Up: Use a resistance band or have a partner assist you by providing light support at the hip or leg to help with the movement. - Eccentric One Arm Chin-Up: Use both hands to pull yourself up and then release one hand, focusing on controlling the lowering (eccentric) phase of the exercise. This allows you to work on the strength required for the one arm chin-up. - One Arm Negative Chin-Up: Start in the top position of the one arm chin-up and slowly lower yourself down in a controlled manner, focusing on the eccentric portion of the exercise. ## Muscles Worked The one arm chin-up primarily targets the following muscles: - Latissimus dorsi (lats) - Biceps brachii - Rhomboids - Rear deltoids - Brachialis - Forearm muscles (grip strength) - Core muscles (stabilization) ## Common Mistakes - Lack of proper scapular engagement: Ensure that your shoulder blades are pulled down and back throughout the movement to engage the appropriate muscles and maintain stability. - Not using a full range of motion: Aim to pull your chin above the bar to achieve a full range of motion and effectively engage the targeted muscles. - Relying on momentum: Avoid using momentum or swinging to complete the exercise. Focus on using controlled and deliberate movements. - Insufficient grip strength: Develop and strengthen your grip by incorporating grip-specific exercises into your training routine. - Neglecting proper form: Maintain proper form and body alignment throughout the exercise. Avoid excessive twisting, kipping, or jerking movements. ## Safety Precautions - Perform the exercise on a secure chin-up bar that can support your body weight. - Ensure that your grip is secure and that your hand does not slip during the exercise. - Start with a suitable progression based on your current strength level. Gradually increase the difficulty as you progress. - Use a spotter or have someone assist you if necessary, especially when first attempting the exercise. - Listen to your body and stop the exercise if you experience any pain or discomfort. - If you have any pre-existing shoulder, wrist, or elbow issues, consult with a healthcare professional or a qualified fitness trainer before attempting this exercise. - Allow sufficient recovery time between training sessions to avoid overuse injuries. - Focus on maintaining proper scapular and shoulder stability throughout the movement to prevent shoulder injuries.
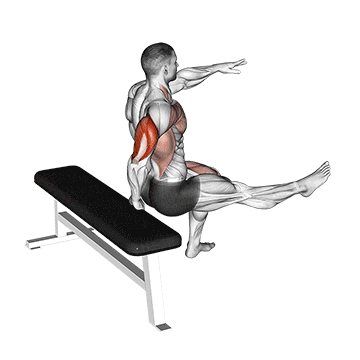
The one-arm dip is a challenging upper body exercise that primarily targets the triceps, chest, and shoulders. It involves using one arm to perform a dip movement, which requires significant upper body strength and stability. The exercise can be performed using parallel bars, dip bars, or even a sturdy bench or chair. ## Instructions 1. Begin by placing your hands on the bars or edges of the surface, with your palms facing down. Your hands should be shoulder-width apart or slightly wider. 2. Position your body slightly in front of the bars or bench, with your legs extended forward and your heels touching the ground. 3. Choose which arm you will use for the exercise and lift the other arm to your side or place it behind your back. 4. Slowly lower your body by bending your elbow, allowing it to move backward and outward. Keep your body close to the bars or bench throughout the movement. 5. Continue lowering yourself until your upper arm is parallel to the ground or your triceps are parallel to the bars or bench. 6. Pause briefly at the bottom of the movement, then push through your triceps to extend your arm and raise your body back to the starting position. 7. Repeat the exercise for the desired number of repetitions and then switch to the other arm. ## Variations 1. Assisted One Arm Dip: If you find the one-arm dip too challenging, you can use a resistance band or an assisted dip machine to provide support. This variation helps reduce the amount of bodyweight you have to lift, making it easier to perform the exercise. 2. Bench Dip: If you don't have access to parallel bars or dip bars, you can perform bench dips instead. Position yourself with your back facing a sturdy bench or chair, place your hands on the edge of the bench, and perform the dip movement with one arm. ## Muscles Worked - Triceps (main emphasis) - Chest (secondary emphasis) - Shoulders (secondary emphasis) - Core muscles for stability ## Common Mistakes - Allowing the elbow to flare out excessively: Keep your elbow close to your body throughout the movement to maximize triceps engagement and reduce stress on the shoulder. - Not maintaining a stable body position: Keep your body upright and avoid excessive swinging or leaning forward/backward during the exercise. - Not using full range of motion: Lower yourself until your upper arm is parallel to the ground or your triceps are parallel to the bars/bench for optimal muscle activation. - Lack of control: Maintain a controlled and slow movement throughout the exercise to maximize muscle engagement and reduce the risk of injury. ## Safety Precautions - Warm up properly before attempting the one-arm dip to prepare your muscles and joints for the exercise. - Ensure that the bars or bench you are using are stable and can support your bodyweight. - Start with a weight or resistance level that is suitable for your strength level to avoid overexertion or injury. - If you have any pre-existing shoulder, elbow, or wrist injuries, consult with a healthcare professional before attempting this exercise. - Listen to your body and stop the exercise if you experience any pain or discomfort.
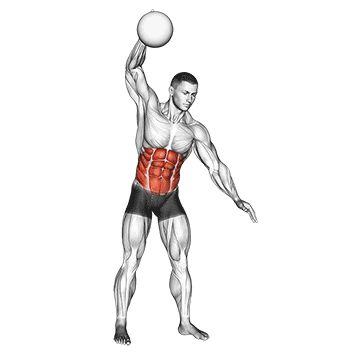
The one-arm slam is a dynamic exercise that involves using a medicine ball to slam it forcefully onto the ground. This exercise primarily targets the core muscles, including the abdominals, obliques, and lower back. It also engages the shoulders, arms, and legs, making it a full-body exercise. The one-arm slam is an effective way to improve power, explosive strength, and cardiovascular endurance. ## Instructions 1. Stand with your feet shoulder-width apart, holding a medicine ball with one hand in front of your body. 2. Engage your core muscles by pulling your belly button towards your spine. 3. Bend your knees slightly and hinge at the hips, lowering the medicine ball between your legs. 4. Explosively extend your knees and hips while simultaneously raising the medicine ball above your head. 5. At the peak of the movement, forcefully slam the medicine ball into the ground in front of you. 6. As you slam the ball, engage your core muscles to control the movement and prevent excessive strain on your back. 7. Catch the rebound of the ball with your free hand or allow it to bounce back up to you. 8. Repeat the exercise for the desired number of repetitions and then switch to the other arm. ## Variations 1. Squat One-Arm Slam: Instead of bending at the hips, perform a full squat before explosively extending your knees and hips to slam the medicine ball down. This variation increases leg involvement and adds more lower body power to the exercise. 2. Rotational One-Arm Slam: Start with the medicine ball positioned at one side of your body. As you slam the ball down, rotate your torso in the opposite direction to engage your obliques and add rotational power to the exercise. ## Muscles Worked - Abdominals - Obliques - Lower back - Shoulders - Arms - Legs ## Common Mistakes - Rounding the back: Maintain proper form throughout the exercise and avoid rounding your back. Keep your core engaged and back straight to protect your spine. - Using excessive arm strength: Focus on generating power from your lower body and core rather than relying solely on your arms. The movement should be initiated by your hips and legs. - Not using a controlled movement: Maintain control during the slam and catch the rebound of the ball. Avoid letting the ball bounce uncontrollably or rebound too far away. - Overextending the arms or shoulders: Avoid hyperextending your arms or shoulders during the overhead movement. Keep a slight bend in your elbows to prevent joint strain. ## Safety Precautions - Choose an appropriate weight medicine ball that you can handle safely and control throughout the exercise. - Ensure you have enough space and a suitable surface for slamming the ball without causing damage or injury. - Start with a lighter medicine ball and gradually increase the weight as your strength and technique improve. - Maintain proper form and control to minimize the risk of strains or sprains. - If you have any pre-existing back, shoulder, or arm injuries, consult with a healthcare professional before attempting this exercise. - Listen to your body and stop the exercise if you experience any pain or discomfort.
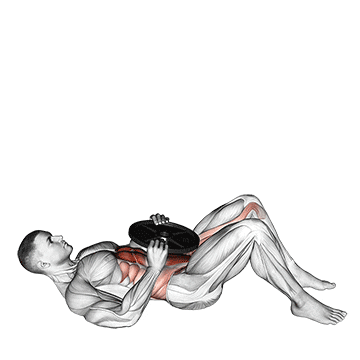
The Otis Up is an advanced core exercise that targets the abdominal muscles, particularly the rectus abdominis (six-pack muscles), obliques, and hip flexors. It involves a combination of a leg raise and a hip-up movement, challenging the core's stability, strength, and coordination. The exercise helps improve core strength, overall abdominal definition, and hip flexibility. ## Instructions 1. Lie flat on your back on a mat or a comfortable surface with your legs extended and your arms by your sides. 2. Engage your core by pulling your belly button towards your spine and pressing your lower back into the ground. 3. Lift both legs off the ground, keeping them straight and together. Your feet should be pointing towards the ceiling. 4. Simultaneously, raise your hips off the ground, tilting your pelvis upward and lifting your legs toward the ceiling. 5. Continue the movement until your legs are perpendicular to the floor and your hips are fully raised. 6. Hold the position briefly, focusing on squeezing your abdominal muscles and maintaining stability. 7. Slowly lower your legs and hips back to the starting position, maintaining control throughout the movement. 8. Repeat the exercise for the desired number of repetitions. ## Variations 1. Bent Knee Otis Up: If the straight leg version is too challenging, you can perform the exercise with bent knees. Instead of keeping your legs straight, bend your knees at a 90-degree angle and perform the same movement. 2. Knee Tuck Otis Up: Start in the same position as the straight leg Otis Up. Instead of extending your legs straight up, bend your knees and bring them towards your chest, tucking them in as you raise your hips. ## Muscles Worked - Rectus Abdominis (six-pack muscles) - Obliques - Hip Flexors ## Common Mistakes - Using momentum: Avoid using momentum to lift your legs and hips. Focus on using your core muscles to control the movement and maintain stability throughout. - Arching the lower back: Keep your lower back pressed into the ground throughout the exercise. Avoid arching or hyperextending your back, as this may lead to strain or discomfort. - Not engaging the core: It's important to actively engage your core muscles by pulling your belly button towards your spine. This helps to stabilize your torso and maximize the effectiveness of the exercise. - Letting the legs drop too low: Control the descent of your legs and hips to maintain tension in your abdominal muscles. Avoid letting your legs drop too low, which can reduce the effectiveness of the exercise. ## Safety Precautions - If you have any pre-existing back, hip, or core-related injuries, consult with a healthcare professional before attempting this exercise. - Start with the straight leg Otis Up only if you have sufficient core strength and flexibility. If it feels too challenging, switch to a variation that suits your fitness level. - Perform the exercise on a comfortable surface or exercise mat to provide cushioning and support for your spine. - Listen to your body and stop the exercise if you experience any pain or discomfort, particularly in your lower back.
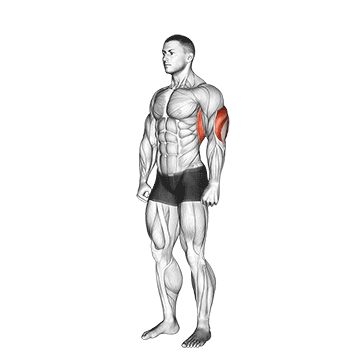
The overhead triceps stretch is a simple stretching exercise that primarily targets the triceps muscle, located on the back of the upper arm. It helps to improve triceps flexibility and range of motion, alleviates muscle tension, and promotes better overall shoulder and arm mobility. ## Instructions 1. Stand tall with your feet shoulder-width apart and maintain good posture by keeping your spine straight. 2. Raise one arm overhead, bending it at the elbow, and allowing your forearm to hang behind your head. 3. Reach behind your back with your other hand and grip the elbow of the raised arm. 4. Gently pull the elbow of the raised arm downward, allowing your hand to move closer to the center of your upper back. 5. As you stretch, you should feel a gentle pulling sensation in the back of your upper arm and shoulder. 6. Hold the stretch for 20 to 30 seconds, focusing on deep, relaxed breathing. 7. Release the stretch slowly and switch sides, repeating the same steps for the other arm. ## Variations 1. Standing Wall Triceps Stretch: Stand facing a wall and place your hand on the wall at shoulder height, with your fingers pointing downward. Slowly lean forward, allowing your body to move closer to the wall while keeping your arm straight. This variation provides a slightly different angle for the triceps stretch. 2. Seated Triceps Stretch: Sit on a chair or a mat and extend one arm overhead. Bend your elbow and place your hand behind your head. With your other hand, gently press on the elbow of the raised arm, increasing the stretch in the triceps. ## Muscles Worked - Triceps ## Common Mistakes - Arching the lower back: Keep your spine straight and avoid arching your lower back during the stretch. Engage your core muscles to maintain proper alignment. - Pulling too hard: The stretch should be gentle and controlled. Avoid pulling or jerking your arm too forcefully, as it can lead to discomfort or injury. Gradually increase the stretch if needed, but never push beyond your comfort zone. - Not breathing deeply: Remember to breathe deeply and relax during the stretch. Deep breathing helps relax the muscles and allows for a more effective stretch. - Holding the stretch too briefly: Aim to hold the stretch for at least 20 to 30 seconds. Holding it for a shorter duration may not provide enough time for the muscle to fully relax and lengthen. ## Safety Precautions - Avoid the overhead triceps stretch if you have a shoulder or elbow injury or any other condition that causes pain or discomfort during the movement. - Perform the stretch in a controlled manner, avoiding any sudden or jerky movements that could strain the muscles or joints. - If you have limited shoulder mobility, be cautious and do not force the stretch beyond your range of motion. Gradually work on improving your flexibility over time. - Stop the stretch immediately if you experience any sharp or severe pain. Consult with a healthcare professional if you have any concerns or persistent discomfort.
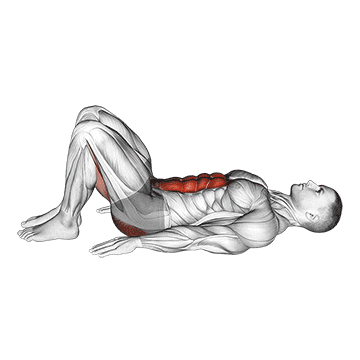
The pelvic tilt is an exercise that targets the muscles of the core, specifically the abdominal muscles and the muscles of the lower back. It involves tilting the pelvis forward and backward while maintaining a neutral spine. The pelvic tilt helps improve core stability, strengthens the abdominal muscles, and promotes proper alignment and posture. ## Instructions 1. Lie on your back on a mat or a comfortable surface with your knees bent and feet flat on the ground. Place your arms by your sides. 2. Relax your body and take a few deep breaths. 3. Begin the movement by engaging your core muscles. Imagine pulling your belly button towards your spine to activate your deep abdominal muscles. 4. Slowly tilt your pelvis forward by pressing your lower back into the mat or floor. You should feel a gentle arch in your lower back. 5. Hold the forward tilt for a few seconds, maintaining engagement in your core muscles. 6. Next, tilt your pelvis backward by flattening your lower back against the mat or floor. You should feel your abdominal muscles engaging as your lower back comes off the ground slightly. 7. Hold the backward tilt for a few seconds, continuing to engage your core. 8. Repeat the forward and backward tilting motion for the desired number of repetitions. ## Variations 1. Standing Pelvic Tilt: Stand with your feet hip-width apart and your hands resting on your hips. Tilt your pelvis forward by pushing your hips forward, then tilt it backward by pulling your hips backward. Perform the movement while maintaining an upright posture. 2. Bridge with Pelvic Tilt: Lie on your back with your knees bent and feet flat on the ground. Lift your hips off the ground into a bridge position, then perform the pelvic tilt by tilting your pelvis forward and backward while maintaining the bridge position. ## Muscles Worked - Abdominal muscles (including rectus abdominis and transverse abdominis) - Lower back muscles (erector spinae) - Glutes ## Common Mistakes - Using excessive hip movement: Focus on isolating the movement in the pelvis and avoid excessive movement in the hips or legs. - Arching or rounding the back: Maintain a neutral spine throughout the exercise and avoid overarching or rounding of the lower back. - Holding the breath: Remember to breathe naturally throughout the movement. Avoid holding your breath, as it can interfere with muscle engagement and relaxation. - Performing the movement too quickly: Slow and controlled movements are key to effectively engage the core muscles. Avoid rushing through the exercise and prioritize proper form and technique. ## Safety Precautions - If you have any existing back or hip injuries or conditions, consult with a healthcare professional before attempting this exercise. - Start with small movements and gradually increase the range of motion as your core strength improves. - Avoid pushing into pain or discomfort during the exercise. It should be a gentle and controlled movement. - If you experience any sharp or severe pain, stop the exercise and seek medical advice. - Maintain proper form and alignment throughout the exercise to minimize the risk of strain or injury.
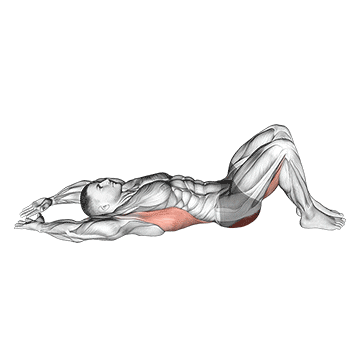
The pelvic tilt into bridge exercise combines the pelvic tilt movement with a bridge position, creating a dynamic movement that targets the muscles of the core, glutes, and hamstrings. It helps improve core stability, strengthens the posterior chain, enhances hip mobility, and promotes proper alignment and posture. ## Instructions 1. Lie on your back on a mat or a comfortable surface with your knees bent and feet flat on the ground. Place your arms by your sides. 2. Relax your body and take a few deep breaths. 3. Begin the movement by engaging your core muscles. Imagine pulling your belly button towards your spine to activate your deep abdominal muscles. 4. Perform a pelvic tilt by tilting your pelvis forward, pressing your lower back into the mat or floor. You should feel a gentle arch in your lower back. 5. From the pelvic tilt position, continue lifting your hips off the ground, pushing through your heels and squeezing your glutes. Your body should form a straight line from your shoulders to your knees. 6. Hold the bridge position for a few seconds, focusing on maintaining engagement in your core and glute muscles. 7. Lower your hips back down to the starting position by reversing the movement. First, slowly roll down the spine, vertebra by vertebra, until your lower back is in contact with the mat or floor. 8. Complete the movement by performing a pelvic tilt in the opposite direction, tilting your pelvis backward and flattening your lower back against the mat. 9. Repeat the pelvic tilt into bridge movement for the desired number of repetitions. ## Variations 1. Single-Leg Pelvic Tilt into Bridge: Perform the same movement as described above, but extend one leg straight out in front of you while lifting your hips into the bridge position. This variation increases the challenge and engages the muscles of the glutes and hamstrings more intensively. 2. Weighted Pelvic Tilt into Bridge: Hold a dumbbell, medicine ball, or weight plate on your hips as you perform the pelvic tilt into bridge movement. The additional weight increases resistance and further strengthens the muscles involved. ## Muscles Worked - Abdominal muscles (including rectus abdominis and transverse abdominis) - Glutes - Hamstrings - Lower back muscles (erector spinae) ## Common Mistakes - Rushing through the movement: Maintain a slow and controlled pace throughout the exercise. Avoid rushing or using momentum to lift the hips into the bridge position. - Hyperextending the lower back: Be mindful of your lower back position during the bridge. Avoid excessive arching or overarching of the lower back. Focus on maintaining a neutral spine alignment. - Neglecting core engagement: Prioritize core activation by performing a pelvic tilt before lifting into the bridge. This ensures that the movement starts from the core and maintains stability throughout. - Allowing the knees to cave inward: Pay attention to the alignment of your knees during the bridge. Keep them in line with your hips and ankles, avoiding inward collapse. ## Safety Precautions - If you have any existing back, hip, or core injuries or conditions, consult with a healthcare professional before attempting this exercise. - Start with a range of motion and intensity that is comfortable for you. Gradually increase the height of the bridge and the number of repetitions as your strength and stability improve. - Focus on maintaining proper form and alignment throughout the exercise to minimize the risk of strain or injury. - If you experience any pain or discomfort, especially in the lower back, modify the movement or stop the exercise. Listen to your body and work within your limits. - Perform the exercise on a supportive surface, such as a mat, to provide cushioning and support for
The peroneals stretch targets the peroneal muscles, which are located on the outer side of the lower leg. These muscles, specifically the peroneus longus and peroneus brevis, help with ankle stability and control. Stretching the peroneals can improve flexibility, prevent injuries, and alleviate tightness in the lower leg. ## Instructions 1. Sit on the edge of a chair, bench, or mat with your legs extended in front of you. 2. Cross one ankle over the opposite knee, allowing the foot to hang freely. 3. Use your hand to gently grasp the toes of the crossed foot, or if reaching the toes is difficult, hold onto the ankle or lower leg. 4. Slowly and gently pull the toes or ankle upward, toward your body, while keeping the leg relaxed. 5. You should feel a stretch along the outer side of the lower leg, specifically in the area around the ankle. 6. Hold the stretch for 20 to 30 seconds, while maintaining relaxed breathing. 7. Release the stretch and repeat on the other side. ## Variations 1. Standing Peroneals Stretch: Stand near a wall or sturdy object for support. Cross one foot over the other and press the toes or outside of the foot against the ground, as if you're trying to roll the foot inward. Hold the stretch for 20 to 30 seconds and repeat on the other side. 2. Seated Peroneals Stretch with Resistance Band: Sit on a mat with your legs extended in front of you. Loop a resistance band around the ball of the foot of the leg you want to stretch. Hold onto the ends of the resistance band, and gently pull the foot inward, creating resistance against the band. Hold the stretch for 20 to 30 seconds and repeat on the other side. ## Muscles Worked - Peroneus longus - Peroneus brevis ## Common Mistakes - Pulling too hard: Avoid pulling too forcefully on the foot or ankle. The stretch should be gentle and controlled. Gradually increase the tension if needed, but never force the stretch. - Tensing the leg or foot: Keep the leg and foot relaxed during the stretch. Tension in the muscles can interfere with the effectiveness of the stretch. - Bouncing or jerking: Maintain a static stretch without any bouncing or jerking movements. Bouncing can strain the muscles and increase the risk of injury. - Holding the breath: Remember to breathe deeply and naturally during the stretch. Holding your breath can increase tension in the muscles and limit the effectiveness of the stretch. ## Safety Precautions - Avoid the peroneals stretch if you have an acute ankle or lower leg injury or any other condition that causes pain or discomfort during the movement. - Perform the stretch in a controlled manner, without any sudden or jerky movements that could strain the muscles or joints. - If you have any chronic ankle instability or ankle instability related to a previous injury, be cautious and do not push the stretch beyond your comfort level. Gradually work on improving flexibility and stability over time. - Stop the stretch immediately if you experience any sharp or severe pain. Consult with a healthcare professional if you have any concerns or persistent discomfort. - If you have any existing foot, ankle, or lower leg conditions, it's advisable to consult with a healthcare professional before attempting this stretch. They can provide guidance based on your specific situation.