
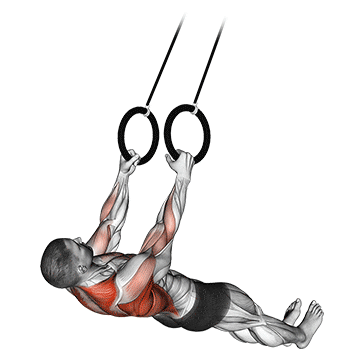
The suspended row is a compound exercise that primarily targets the muscles of the upper back, including the latissimus dorsi, rhomboids, and trapezius. It also engages the biceps, forearms, and core muscles. This exercise is performed using suspension straps, such as TRX, and mimics the movement of a traditional bent-over row. The suspended row helps improve upper body strength, posture, and overall back muscle development. ## Instructions 1. Begin by attaching the suspension straps to a secure anchor point above you. Stand facing the anchor point and grasp the handles or straps with an overhand grip. 2. Walk a few steps backward to create tension in the straps, leaning back slightly, and extending your arms in front of you. 3. Keep your feet hip-width apart, and maintain a slight bend in your knees throughout the exercise for stability. 4. Engage your core by pulling your belly button toward your spine and maintain a neutral spine position. 5. Initiate the rowing motion by squeezing your shoulder blades together and pulling your elbows back, aiming to bring your hands to the sides of your torso. 6. Keep your wrists neutral and avoid excessive wrist flexion or extension. 7. Pause briefly at the top of the movement, then slowly extend your arms back to the starting position, maintaining control and tension in the straps. 8. Repeat the rowing motion for the desired number of repetitions, focusing on maintaining proper form and control throughout. ## Variations - Single-Arm Row: Perform the exercise with one arm at a time, allowing for a greater focus on each side of the back and engaging the core for stability. - Wide Grip Row: Adjust the width of your hand placement on the handles or straps to target the muscles of the upper back from a different angle. - Inverted Row: Instead of standing facing the anchor point, position yourself underneath the straps and lie on your back. Grasp the handles or straps with an overhand grip and perform the rowing motion while keeping your body in a straight line. ## Muscles Worked - Latissimus dorsi (lats) - Rhomboids - Trapezius - Biceps - Forearms - Core muscles (to maintain stability) ## Common Mistakes - Rounded Shoulders: Avoid rounding your shoulders or hunching forward during the row. Keep your shoulders down and back, maintaining proper posture throughout the exercise. - Jerking Motion: Maintain control and avoid using momentum to perform the row. Focus on a slow and controlled movement, emphasizing the contraction of the back muscles. - Insufficient Range of Motion: Aim to bring your hands to the sides of your torso, squeezing your shoulder blades together at the top of the movement. Avoid only pulling the straps halfway or not achieving a full range of motion. - Overextending the Neck: Keep your neck in a neutral position, avoiding excessive tilting or looking up during the exercise. ## Safety Precautions - Ensure that the suspension straps are properly anchored and securely fastened before starting the exercise. - Perform the exercise on a stable surface with adequate space around you to prevent collisions or injuries. - Start with a higher anchor point or adjust the strap length to decrease the intensity of the exercise, and gradually progress to a lower anchor point or longer straps for a greater challenge. - If you have any pre-existing shoulder or back injuries, consult with a healthcare professional before attempting this exercise. - Listen to your body and modify or stop the exercise if you experience pain or discomfort.
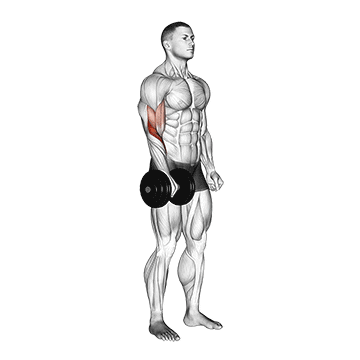
The Dumbbell Standing One Arm Reverse Curl is an exercise that primarily targets the brachialis and brachioradialis muscles, which are located in the forearm. This exercise helps to develop strength and size in the forearm muscles, improving grip strength and overall arm aesthetics. ## Instructions 1. Stand tall with your feet shoulder-width apart, holding a dumbbell in one hand with a pronated grip (palms facing downward). 2. Keep your core engaged, chest lifted, and back straight throughout the exercise. 3. Start with your arm fully extended and the dumbbell hanging at arm's length in front of your thighs. 4. Keep your upper arm stationary and, without moving your elbow, exhale and curl the dumbbell upward towards your shoulder. 5. Contract your forearm muscles and squeeze at the top of the movement. 6. Pause briefly at the top, then inhale and slowly lower the dumbbell back to the starting position. 7. Repeat for the desired number of repetitions, then switch to the other arm and perform the exercise with the opposite side. ## Variations - Two Arms Dumbbell Reverse Curl: If you prefer, you can perform the exercise with both arms simultaneously. Hold a dumbbell in each hand and follow the same range of motion as described above. ## Muscles Worked - Brachialis: Located underneath the biceps, the brachialis muscle helps in elbow flexion and contributes to overall arm thickness. - Brachioradialis: Located on the forearm, the brachioradialis assists in forearm flexion and contributes to forearm size and strength. ## Common Mistakes - Using excessive momentum: Avoid using momentum or swinging the dumbbell to lift the weight. Focus on controlled movements, engaging the forearm muscles throughout the exercise. - Curling the wrist: Keep your wrist in a neutral position and avoid curling it upward or downward during the movement. This ensures that the emphasis remains on the forearm muscles rather than the wrist flexors or extensors. - Rounding the back: Maintain proper posture throughout the exercise. Avoid rounding your back or leaning backward. Keep your chest lifted and shoulders back to stabilize the upper body. ## Safety Precautions - Start with a lighter dumbbell or no weights at all if you're new to the exercise. Gradually increase the weight as you become comfortable and confident with the movement. - Maintain proper form and stability throughout the exercise. Keep your back straight, chest up, and core engaged. Avoid excessive arching or leaning during the movement. - Be cautious of the weight selection to prevent strain or injury. Use a weight that challenges your forearm muscles without sacrificing proper form and control. - If you have any pre-existing wrist or forearm injuries, it is advisable to consult with a fitness professional or healthcare provider before attempting this exercise. - If you experience any pain or discomfort during the exercise, especially in the wrist or forearm area, stop immediately and seek guidance from a qualified professional.
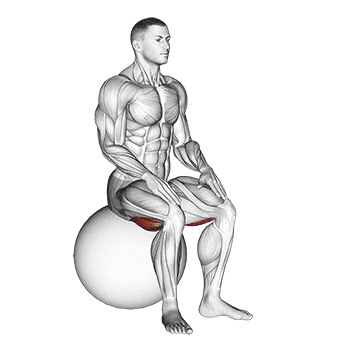
The exercise ball seated hamstring stretch is a stretching exercise that targets the muscles of the hamstrings, which are located at the back of the thighs. This stretch helps improve flexibility and range of motion in the hamstrings, reduces muscle tightness, and promotes better posture. ## Instructions 1. Start by sitting on an exercise ball with your feet flat on the floor, hip-width apart. 2. Slowly walk your feet forward, rolling the exercise ball away from your body until your legs are extended straight out in front of you. Your heels should be resting on top of the exercise ball. 3. Engage your core muscles and sit up tall, maintaining good posture throughout the stretch. 4. Keeping your legs straight, gently flex your ankles by pulling your toes toward your shins. This will help activate the muscles in the back of your legs. 5. Inhale deeply, and as you exhale, begin to hinge forward at the hips, bending from the waist and reaching toward your toes. 6. Continue to reach forward until you feel a gentle stretch in the back of your thighs (hamstrings). Avoid bouncing or jerking motions while stretching. 7. Hold the stretch for 20-30 seconds while maintaining relaxed breathing. 8. Slowly release the stretch and return to the starting position. 9. Repeat the stretch for the desired number of repetitions. ## Variations - Single-Leg Seated Hamstring Stretch: Perform the same seated hamstring stretch as described above, but focus on one leg at a time. Extend one leg straight out in front of you while bending the other knee and resting the foot on the inside of the opposite thigh. Lean forward and reach toward the extended leg to stretch the hamstrings of that leg. - Assisted Seated Hamstring Stretch: If you have difficulty reaching your toes, you can use a resistance band or towel for assistance. Loop the band around the bottom of your feet and hold onto the ends. Use the band to gently pull yourself forward into the stretch. ## Muscles Worked - Hamstrings (back of the thighs) - Calves (gastrocnemius and soleus muscles) - Glutes (buttocks) ## Common Mistakes - Rounding the lower back: Maintain good posture throughout the stretch and avoid rounding the lower back. Sit up tall and engage your core muscles to protect your spine. - Straining the neck or shoulders: Keep your shoulders relaxed and away from your ears. Avoid pulling or straining your neck while reaching forward. - Overstretching: It's important to stretch within your comfortable range of motion. Avoid forcing the stretch or going beyond what feels like a gentle pull in the hamstrings. - Holding your breath: Remember to breathe deeply and naturally throughout the stretch. Avoid holding your breath as it can increase tension in the muscles. ## Safety Precautions - If you have any existing hamstring or lower back injuries, consult with a qualified fitness professional or healthcare provider before attempting this stretch. - Perform the stretch on a stable and non-slip surface to ensure stability and prevent accidents. - Ease into the stretch gradually and avoid sudden or jerky movements. - If you experience any pain or discomfort during the stretch, release the stretch and seek medical advice. - If you have difficulty maintaining balance on the exercise ball, you can perform the stretch seated on a stable chair or bench instead.
The band push sit-up is an exercise that targets the abdominal muscles, specifically the rectus abdominis (six-pack muscles), and the hip flexors. It involves using a resistance band to increase the intensity and challenge of the traditional sit-up exercise. The band provides resistance throughout the movement, engaging the core muscles more effectively. ## Instructions 1. Start by anchoring a resistance band securely to a stable object or have a partner hold it firmly. 2. Lie down on your back with your knees bent and feet flat on the floor, hip-width apart. 3. Hold the ends of the resistance band with both hands and position them against your chest, just below the collarbone. 4. Engage your core muscles by drawing your navel towards your spine. 5. Slowly lift your upper body off the ground, curling your spine and pushing against the resistance of the band. 6. Continue the movement until your torso is in an upright, seated position. 7. Pause for a moment, then slowly lower your upper body back down to the starting position, maintaining control. 8. Repeat the exercise for the desired number of repetitions. ## Variations - Beginner Variation: If you're new to this exercise or have limited core strength, you can perform the sit-up without using a resistance band. - Advanced Variation: To increase the difficulty, you can use a stronger resistance band or cross the band over your chest, holding the handles with the opposite hands. ## Muscles Worked - Rectus abdominis (six-pack muscles) - Hip flexors ## Common Mistakes - Using momentum: Avoid using momentum to swing your body up. Focus on engaging your core muscles and performing the movement slowly and controlled. - Pulling on the neck: Do not pull or strain your neck during the exercise. Keep your hands against your chest or lightly touching the sides of your head to support it, but avoid pulling. - Rounding the lower back: Maintain a neutral spine throughout the exercise. Avoid rounding your lower back excessively. ## Safety Precautions - Choose a resistance band with an appropriate level of resistance for your fitness level. - Ensure that the resistance band is securely anchored or held by a partner before starting the exercise. - If you have any pre-existing back or neck conditions, consult with a healthcare professional before attempting this exercise. - If you experience any pain or discomfort during the exercise, stop immediately and seek guidance from a qualified fitness instructor or healthcare professional.
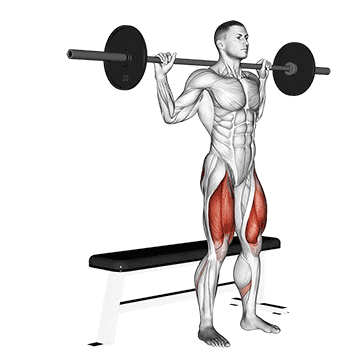
The barbell bench squat is a compound exercise that targets the lower body, particularly the quadriceps, hamstrings, and glutes. It involves performing a squat movement while holding a barbell across the front of your shoulders. This exercise helps improve lower body strength, stability, and overall lower body development. ## Instructions 1. Start by setting up a barbell on a squat rack at a height that allows you to comfortably unrack and re-rack the barbell. 2. Stand facing the barbell and position yourself underneath it. Your feet should be shoulder-width apart. 3. Grasp the barbell with an overhand grip and bring it across the front of your shoulders, resting it on your upper chest and shoulders. 4. Brace your core, engage your glutes, and keep your chest lifted. 5. Slowly begin to lower your body into a squatting position by bending at the hips and knees. Keep your weight on your heels. 6. Lower yourself until your thighs are parallel to the ground or slightly below. 7. Pause for a moment at the bottom of the squat, then push through your heels to extend your hips and knees and return to the starting position. 8. Repeat the exercise for the desired number of repetitions. ## Variations - Dumbbell Bench Squat: If a barbell is not available, you can perform the exercise using dumbbells. Hold a dumbbell in each hand, resting them on your shoulders as you squat. - Bodyweight Bench Squat: Beginners or those with limited strength can perform the squatting motion without any added weight. Use a bench or chair to assist with balance and stability. ## Muscles Worked - Quadriceps (front thigh muscles) - Hamstrings (back thigh muscles) - Glutes (buttocks muscles) - Calves - Core muscles for stability ## Common Mistakes - Rounded back: Avoid rounding your back during the exercise. Keep your chest lifted and maintain a neutral spine throughout. - Knee collapsing inward: Ensure that your knees track in line with your toes and do not collapse inward. Engage your glutes and focus on pushing your knees out slightly. - Shallow squat: Aim to squat until your thighs are parallel to the ground or slightly below. Avoid performing half squats as they limit the engagement of the targeted muscles. - Lifting heels: Keep your weight on your heels throughout the exercise. Avoid lifting your heels off the ground, as it may compromise your balance and form. ## Safety Precautions - Start with a weight that is manageable for your strength level and gradually increase it as you become more comfortable with the exercise. - Ensure that the barbell is securely racked and the squat rack is stable. - Maintain proper form throughout the exercise to avoid injury. If you're unsure about your technique, seek guidance from a qualified fitness instructor. - If you have any pre-existing knee or back conditions, consult with a healthcare professional before attempting this exercise. - Warm up adequately before performing the barbell bench squat to prepare your muscles and joints for the exercise. - If you experience any pain or discomfort during the exercise, stop immediately and seek guidance from a qualified fitness instructor or healthcare professional.
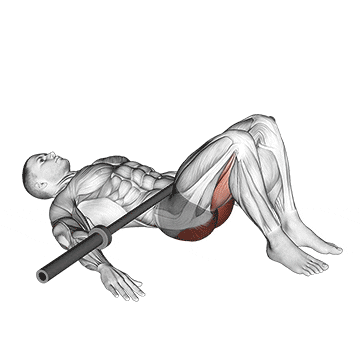
The barbell glute bridge is an exercise that targets the glutes (buttocks) and hamstrings. It involves lifting the hips off the ground while lying on your back and using a barbell placed across your hips for added resistance. This exercise helps to strengthen and tone the glute muscles, improve hip mobility, and enhance overall lower body stability. ## Instructions 1. Start by positioning a barbell on the floor near your feet. Load it with an appropriate amount of weight plates. 2. Sit down on the ground with your back against a bench or step, and roll the barbell over your thighs until it is directly above your hips. 3. Lean back and lie down on your back, ensuring that your shoulder blades are resting on the bench or step, and your knees are bent with your feet flat on the floor, hip-width apart. 4. Grab the barbell with an overhand grip and make sure your hands are secure. 5. Engage your core and glutes, and press your heels into the ground. 6. Drive through your heels and lift your hips off the ground, pushing the barbell up towards the ceiling. 7. As you lift your hips, squeeze your glutes at the top of the movement and hold for a second. 8. Slowly lower your hips back down to the starting position with control. 9. Repeat the exercise for the desired number of repetitions. ## Variations - Dumbbell Glute Bridge: If a barbell is not available, you can use dumbbells or kettlebells placed on your hips to add resistance. - Single-Leg Glute Bridge: Perform the glute bridge exercise with one leg lifted off the ground, focusing on the working glute. - Banded Glute Bridge: Place a resistance band above your knees or around your thighs to increase activation of the glute muscles. ## Muscles Worked - Glutes (gluteus maximus, gluteus medius, gluteus minimus) - Hamstrings - Core muscles for stability ## Common Mistakes - Lifting too high: Avoid hyperextending your lower back and lifting your hips excessively high. Focus on squeezing your glutes at the top without overarching your back. - Allowing the knees to collapse inward: Keep your knees in line with your feet throughout the movement. Engage your glutes and actively push your knees out to prevent them from caving in. - Placing the barbell too high on the hips: Ensure that the barbell is positioned directly above your hips, and not resting on your abdomen or lower abdomen. - Not maintaining a neutral spine: Keep your spine in a neutral position throughout the exercise. Avoid arching or rounding your back excessively. ## Safety Precautions - Start with a weight that is appropriate for your strength level and gradually increase it as you become more comfortable with the exercise. - Use a barbell pad or towel to cushion the barbell if it feels uncomfortable on your hips. - Ensure that the barbell is securely placed across your hips before starting the exercise. - If you have any pre-existing hip or lower back conditions, consult with a healthcare professional before attempting this exercise. - If you experience any pain or discomfort during the exercise, stop immediately and seek guidance from a qualified fitness instructor or healthcare professional.
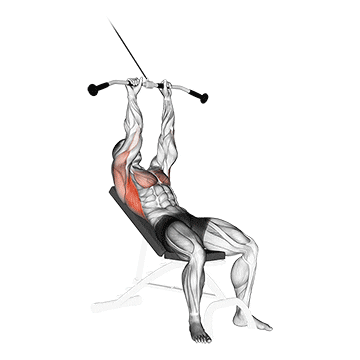
The cable incline pushdown, also known as the cable overhead triceps extension, is an exercise that primarily targets the triceps muscles, located at the back of the upper arm. It involves using a cable machine and an incline bench to perform a pushing movement that engages and strengthens the triceps. This exercise helps develop arm strength, improves triceps definition, and enhances overall upper body stability. ## Instructions 1. Set up a cable machine with a rope attachment at a high position. 2. Adjust an incline bench to a 45-degree angle and position it facing away from the cable machine. 3. Sit on the incline bench, facing the cable machine, and grab the rope attachment with a neutral grip (palms facing each other). 4. Bring your elbows close to your ears, keeping your upper arms parallel to the ground and your forearms pointing upward. 5. Engage your core, maintain a slight arch in your lower back, and keep your chest lifted. 6. Start with your elbows bent at 90 degrees, forearms parallel to the ground, and the rope just above your head. 7. Begin the movement by extending your forearms and pushing the rope downward until your arms are fully extended and the rope is near your thighs. 8. Pause briefly at the bottom of the movement, focusing on squeezing your triceps. 9. Slowly return to the starting position by bending your elbows and allowing the rope to move back up. 10. Repeat the exercise for the desired number of repetitions. ## Variations - Single-Arm Cable Incline Pushdown: Perform the exercise with one arm at a time, using a single rope attachment or a D-handle attachment. This variation allows you to focus on each arm independently. - Bar Attachment: Instead of using a rope attachment, you can use a straight bar or an EZ bar attachment for a different grip and muscle activation. ## Muscles Worked - Triceps (long head, lateral head, medial head) - Shoulders (deltoids) - Chest (pectoral muscles) ## Common Mistakes - Rounding the shoulders: Keep your shoulders down and back, avoiding any excessive rounding or shrugging during the exercise. - Arching the lower back: Maintain a slight arch in your lower back, but avoid excessive arching or overarching during the movement. - Using momentum: Avoid using momentum to complete the exercise. Focus on controlled and deliberate movements, engaging the triceps throughout. - Allowing the elbows to flare out: Keep your elbows close to your ears and avoid allowing them to flare out to the sides during the pushing motion. ## Safety Precautions - Use an appropriate weight on the cable machine that allows you to maintain proper form and control throughout the exercise. - Adjust the incline bench to a comfortable angle that supports your body and allows for proper alignment of the shoulders and arms. - If you have any pre-existing shoulder, elbow, or lower back conditions, consult with a healthcare professional before attempting this exercise. - Start with a lighter weight and gradually increase it as you become more comfortable and confident with the movement. - If you experience any pain or discomfort during the exercise, stop immediately and seek guidance from a qualified fitness instructor or healthcare professional.
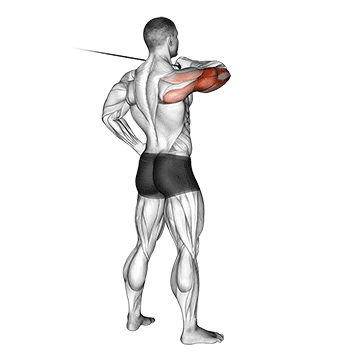
The cable rear delt fly is an exercise that primarily targets the rear deltoid muscles, which are located at the back of the shoulders. It involves using a cable machine and specific movement to isolate and strengthen the rear delts. This exercise helps improve shoulder stability, enhance posture, and develop balanced shoulder muscle strength. ## Instructions 1. Stand facing a cable machine with a D-handle attachment at a low position. 2. Grab the D-handle with your right hand, and step back to create tension on the cable. 3. Position your feet shoulder-width apart and slightly bend your knees. 4. Lean forward at the hips, keeping your back straight and your core engaged. 5. Begin the movement by extending your right arm straight out in front of you, maintaining a slight bend in your elbow. 6. Initiate the rear delt fly by pulling your right arm out to the side in an arc motion, away from your body. 7. Keep your shoulder blade retracted and focus on squeezing the rear deltoid muscle at the end of the movement. 8. Slowly return to the starting position by reversing the motion and bringing your arm back in front of you. 9. Complete the desired number of repetitions with your right arm, then switch sides and perform the exercise with your left arm. ## Variations - Seated Cable Rear Delt Fly: Perform the exercise while sitting on a bench or stability ball, maintaining the same form and movement. - Bent-Over Dumbbell Rear Delt Fly: Instead of using a cable machine, you can use dumbbells and perform the exercise in a bent-over position, with your torso parallel to the ground. ## Muscles Worked - Rear deltoids (posterior deltoids) - Upper back muscles (rhomboids, trapezius) ## Common Mistakes - Using too much weight: Start with a light weight and focus on proper form and control. The rear deltoids are relatively small muscles, so using excessive weight can lead to poor technique and decreased effectiveness. - Rounding the back: Maintain a straight and neutral spine throughout the exercise. Avoid rounding or hunching your back. - Using momentum: Avoid using momentum or swinging your body to complete the movement. Control the weight and focus on the targeted muscles. - Not fully extending the arm: Extend your arm fully to the side to engage the rear deltoids. Avoid stopping the movement prematurely. ## Safety Precautions - Choose an appropriate weight that allows you to maintain proper form and control. - Keep your core engaged and maintain a stable stance throughout the exercise. - If you have any pre-existing shoulder or back conditions, consult with a healthcare professional before attempting this exercise. - Start with lighter weights and gradually increase the resistance as you become more comfortable and confident with the movement. - If you experience any pain or discomfort during the exercise, stop immediately and seek guidance from a qualified fitness instructor or healthcare professional.
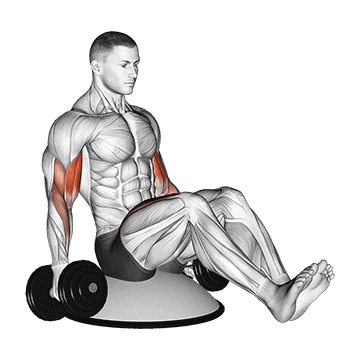
The dumbbell biceps curl V-sit on a Bosu ball is a challenging exercise that targets the biceps muscles, as well as the core muscles for stability. This exercise combines a biceps curl with a V-sit on an unstable surface, adding an extra challenge to the workout. It helps strengthen and define the biceps while also engaging the abdominal muscles for improved core strength and balance. ## Instructions 1. Start by placing a Bosu ball on the ground with the rounded side up. 2. Sit on the Bosu ball, positioning yourself at the center with your feet lifted off the ground, creating a V-sit position. 3. Hold a dumbbell in each hand, with your palms facing forward and arms fully extended downward. 4. Keep your back straight, engage your core, and maintain balance on the Bosu ball. 5. Initiate the movement by bending your elbows and curling the dumbbells toward your shoulders, keeping your upper arms stationary. 6. Squeeze your biceps at the top of the movement and hold for a brief moment. 7. Slowly lower the dumbbells back down to the starting position while maintaining control. 8. Repeat the exercise for the desired number of repetitions. ## Variations - Alternating Dumbbell Biceps Curl V-Sit: Instead of curling both dumbbells simultaneously, alternate between the left and right arm curls while maintaining the V-sit position on the Bosu ball. - Hammer Curl V-Sit on Bosu Ball: Instead of using a supinated grip (palms facing forward), use a neutral grip (palms facing each other) during the dumbbell curls. ## Muscles Worked - Biceps brachii (front of upper arm) - Brachialis (deep muscle beneath the biceps) - Core muscles (abdominals, obliques) ## Common Mistakes - Using excessive momentum: Avoid swinging the dumbbells or using momentum to lift the weights. Focus on controlled movements to engage the biceps effectively. - Hunching the back: Keep your back straight and avoid rounding or hunching your shoulders during the exercise. Maintain proper posture throughout. - Not engaging the core: Engage your core muscles to maintain stability and balance on the Bosu ball throughout the exercise. - Allowing the elbows to flare out: Keep your upper arms stationary and avoid allowing the elbows to flare out to the sides. Keep them close to your body during the biceps curl. ## Safety Precautions - Start with lighter dumbbells to ensure proper form and stability on the Bosu ball. - Use a spotter or have someone nearby for assistance and support, especially if you are new to balancing exercises or using a Bosu ball. - Pay attention to your balance and be cautious to avoid falling off the Bosu ball. - If you have any pre-existing wrist, shoulder, or back conditions, consult with a healthcare professional before attempting this exercise. - If you experience any pain or discomfort during the exercise, stop immediately and seek guidance from a qualified fitness instructor or healthcare professional.