
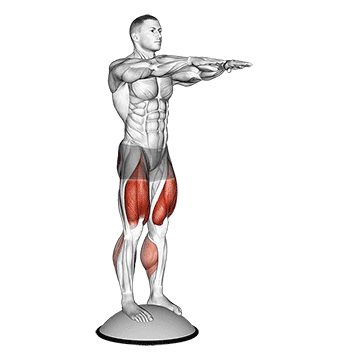
The squat on Bosu Ball is a challenging variation of the traditional squat exercise that targets the lower body muscles while also engaging the core and improving balance. By performing squats on an unstable surface like a Bosu Ball, you increase the demand on your muscles and enhance overall stability and coordination. ## Instructions 1. Place a Bosu Ball on the floor with the dome side up. 2. Stand in front of the Bosu Ball with your feet slightly wider than shoulder-width apart. 3. Engage your core, maintain an upright posture, and keep your gaze forward. 4. Step onto the Bosu Ball, ensuring that both feet are centered and stable on the dome. 5. Position your feet with toes pointing slightly outward. 6. Extend your arms forward for balance or place your hands on your hips. 7. Inhale and initiate the squat by pushing your hips back and bending your knees. 8. Lower your body into a squatting position, keeping your weight on your heels. 9. Descend until your thighs are parallel to the ground or slightly below, maintaining proper form and control. 10. Exhale and push through your heels to extend your legs and return to the starting position. 11. Repeat the movement for the desired number of repetitions. ## Variations - Bodyweight Squats on Bosu Ball: Perform the squat on the Bosu Ball without additional weight. Focus on maintaining balance and stability throughout the movement. - Weighted Squats on Bosu Ball: Hold a dumbbell or a kettlebell in each hand or place a barbell across your upper back to add resistance and increase the difficulty of the exercise. ## Muscles Worked - Quadriceps (front thigh muscles) - Hamstrings (back of the thighs) - Glutes (buttocks) - Calves (gastrocnemius and soleus) - Core muscles (abdominals, lower back, and stabilizers) ## Common Mistakes - Rounding the back: Keep your back straight and maintain a neutral spine throughout the exercise. Avoid rounding or arching your back, as it may lead to injury. - Allowing the knees to cave inward: Maintain proper knee alignment by tracking them over your toes throughout the movement. Avoid letting your knees collapse inward, as it puts stress on the knee joint. - Leaning too far forward: Keep your torso upright and avoid leaning too far forward. This ensures proper activation of the leg muscles and minimizes strain on the lower back. - Using excessive momentum: Control the movement and avoid bouncing or using momentum to push yourself back up. Perform the squat in a controlled manner to maximize muscle engagement. ## Safety Precautions - Ensure that the Bosu Ball is properly inflated and stable before use. - Start with a lighter Bosu Ball or no additional weight until you feel comfortable with the exercise. - Use a spotter or have a stable object nearby for support until you become more confident with your balance. - Focus on maintaining proper form and stability throughout the exercise rather than attempting to lift heavy weights. - If you have any pre-existing knee, ankle, or balance-related issues, consult with a healthcare professional or a qualified fitness trainer before attempting this exercise. - If you experience any pain or discomfort during the exercise, stop immediately and seek medical advice if necessary.
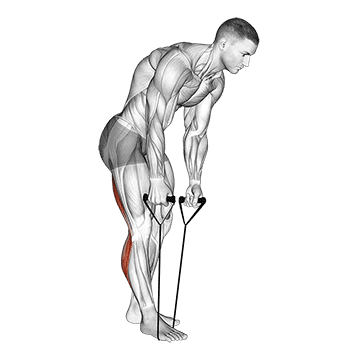
The standing hamstring and calf stretch with a strap is an effective exercise for stretching and improving flexibility in the hamstrings (back of the thighs) and calves. It helps to alleviate muscle tightness, improve range of motion, and enhance overall lower body flexibility. ## Instructions 1. Stand tall with your feet hip-width apart and place the strap around the ball of one foot. 2. Hold the strap with both hands, keeping your arms straight and relaxed. 3. Engage your core and maintain an upright posture throughout the exercise. 4. Inhale and extend your leg forward, keeping it straight. The heel of your foot should be pointing upward. 5. Exhale and gently pull the strap towards you, bringing your leg closer to your torso. You should feel a stretch in the back of your leg. 6. Hold the stretch for 20 to 30 seconds, breathing deeply and maintaining a comfortable level of tension. 7. Release the tension in the strap and slowly lower your leg back to the starting position. 8. Repeat the stretch on the same leg for the desired number of repetitions, then switch to the other leg. ## Variations - Seated Hamstring and Calf Stretch with Strap: Perform the same stretch while seated on the ground. Extend one leg forward, loop the strap around the ball of your foot, and gently pull the strap to stretch your hamstring and calf. - Single-Leg Standing Calf Stretch with Strap: Instead of placing the strap around the foot, place it around the ball of one foot and hold onto a stable object for support. Keeping your leg straight, lean forward, and feel the stretch in your calf muscle. ## Muscles Worked - Hamstrings (back of the thighs) - Calves (gastrocnemius and soleus) ## Common Mistakes - Rounding the back: Maintain an upright posture and avoid rounding your back during the stretch. This ensures proper alignment and prevents strain on the lower back. - Holding the breath: Remember to breathe deeply and relax during the stretch. Avoid holding your breath, as it can lead to muscle tension. - Pulling too hard: Use gentle and controlled tension on the strap. Avoid pulling too forcefully, as it may cause discomfort or injury. - Not warming up: It's important to warm up your muscles before performing static stretches. Engage in light aerobic activity or dynamic stretches to increase blood flow and prepare the muscles for stretching. ## Safety Precautions - Start with a strap of appropriate length to ensure a comfortable stretch without straining. - If you have any pre-existing injuries or conditions, consult with a healthcare professional or a qualified fitness trainer before attempting this exercise. - Listen to your body and avoid pushing beyond your comfortable range of motion. Stretching should be a gentle and relaxing activity. - Do not bounce or jerk while stretching. Maintain a smooth and controlled movement throughout the exercise. - If you feel any sharp pain or discomfort, stop the stretch immediately and seek medical advice if necessary.
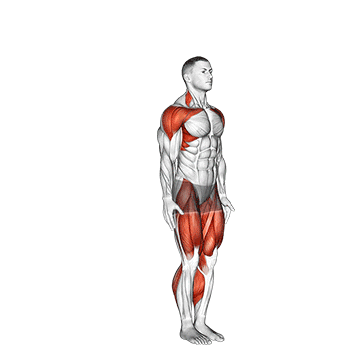
The star jump is a dynamic plyometric exercise that targets multiple muscle groups and increases cardiovascular endurance. It involves a jumping motion that resembles the shape of a star, hence the name. The exercise primarily focuses on the lower body, including the quadriceps, hamstrings, glutes, and calves, while also engaging the core and shoulder muscles. ## Instructions 1. Start by standing upright with your feet together and arms resting at your sides. 2. Take a deep breath in and prepare for the jump. 3. Simultaneously jump up explosively while spreading your legs out to the sides. 4. As you jump, extend your arms out to the sides and overhead, creating a star shape with your body. 5. Keep your core engaged and maintain good posture throughout the movement. 6. Land softly on the balls of your feet with your legs spread wide apart and arms extended. 7. From the landing position, quickly reverse the motion by jumping back up explosively and bringing your legs together while lowering your arms. 8. Repeat the exercise for the desired number of repetitions or within a specific time interval. ## Variations - Modified Star Jump: If you're new to the exercise or have joint issues, you can perform a modified version by stepping out to the sides instead of jumping. Step out to the side with one foot, raise your arms overhead, and then step the foot back in while lowering your arms. Alternate the stepping motion with each repetition. - High-Intensity Star Jump: To increase the intensity, you can perform the star jump at a faster pace or add a tuck jump at the peak of the jump. During the tuck jump, bring your knees up toward your chest while in the air before extending your legs back out. ## Muscles Worked - Quadriceps (thigh muscles) - Hamstrings (back of the thighs) - Glutes (buttocks) - Calves - Core muscles - Shoulder muscles ## Common Mistakes - Landing with locked knees: It's essential to land softly with slightly bent knees to absorb the impact and protect your joints. Avoid landing with locked knees, as it can lead to excessive stress on the joints. - Collapsing the upper body: Maintain an upright posture throughout the exercise and avoid hunching forward or rounding your shoulders. Keep your chest lifted and shoulder blades slightly squeezed together. - Lack of control: Maintain control over your movements and avoid rushing through the exercise. Focus on landing softly and smoothly transitioning between each jump. ## Safety Precautions - Warm up properly before attempting star jumps to prepare your muscles and joints for the exercise. - Choose a suitable surface for performing the exercise, preferably one with good shock absorption to reduce the impact on your joints. - If you have any existing injuries or conditions, consult with a healthcare professional or fitness trainer before incorporating star jumps into your routine. - Listen to your body and start with a manageable number of repetitions or time duration. Gradually increase the intensity and volume as your fitness level improves. - If you experience any pain, discomfort, or dizziness during the exercise, stop immediately and seek medical advice if necessary.
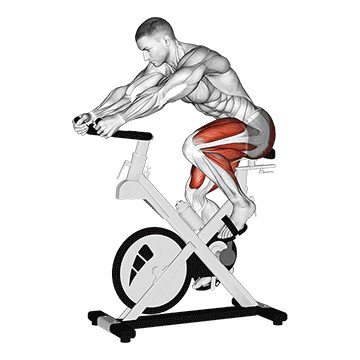
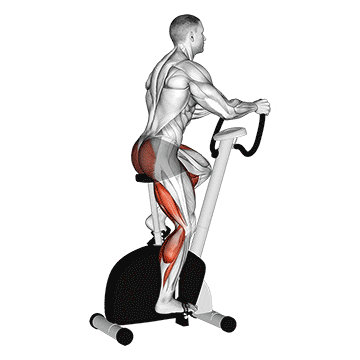
The stationary bike run v.3 is a cardiovascular exercise performed on a stationary bike. It simulates the motion of running or sprinting while seated, providing a low-impact workout that targets the lower body muscles and improves cardiovascular fitness. ## Instructions 1. Adjust the stationary bike seat height to ensure proper leg extension. Your legs should have a slight bend at the knees when the pedals are at the lowest position. 2. Adjust the resistance or difficulty level of the bike according to your fitness level and goals. 3. Place your feet on the bike pedals and secure them properly. 4. Sit upright on the bike with a relaxed grip on the handlebars. 5. Begin pedaling by pushing down with one foot while pulling up with the other, simulating a running motion. 6. Maintain a smooth and controlled pedal stroke throughout the exercise. 7. Increase your pedaling speed gradually to reach your desired intensity. 8. Continue pedaling for the desired duration or distance. ## Variations - Interval Training: Incorporate intervals of higher intensity by increasing the resistance or pedaling speed for a set period, followed by a recovery phase at a lower intensity. - Hill Climbs: Increase the resistance level on the stationary bike to simulate uphill climbs. Pedal at a slower pace with higher resistance to engage the muscles differently. - Single-Leg Pedaling: Alternate between pedaling with one leg at a time to isolate and strengthen individual leg muscles. Use caution and maintain balance while attempting this variation. ## Muscles Worked - Quadriceps (front of the thighs) - Hamstrings (back of the thighs) - Glutes (buttocks) - Calves - Hip flexors - Core muscles (abdominals and lower back) ## Common Mistakes - Poor Posture: Avoid leaning too far forward or slouching during the exercise. Maintain an upright posture with your shoulders relaxed and core engaged. - Relying on Momentum: Focus on using your leg muscles to drive the pedals rather than relying solely on momentum. This ensures proper muscle engagement and maximizes the effectiveness of the exercise. - Overstraining the Knees: Ensure that your knees are properly aligned with the pedals throughout the movement. Avoid excessive inward or outward movement of the knees, which can strain the knee joints. - Neglecting Resistance: Adjust the resistance level on the stationary bike to provide enough challenge and prevent coasting. Without adequate resistance, you may not be effectively engaging your muscles. ## Safety Precautions - Check the bike's stability and ensure that it is in good working condition before starting the exercise. - Adjust the seat and handlebars properly to maintain a comfortable and safe position. - Warm up before the exercise to prepare your muscles and joints. - Start with a lower resistance and gradually increase it as your fitness level improves. - Stay hydrated and maintain proper breathing throughout the exercise. - If you experience any pain, discomfort, or dizziness, stop the exercise and seek medical advice if necessary.
The stationary bike walk is a low-impact cardiovascular exercise performed on a stationary bike. Unlike the traditional biking motion, this exercise focuses on a walking or marching movement pattern. It provides a gentle workout that targets the lower body muscles and promotes cardiovascular fitness. ## Instructions 1. Adjust the seat height of the stationary bike to ensure proper leg extension. Your legs should have a slight bend at the knees when the pedals are at the lowest position. 2. Adjust the resistance or difficulty level of the bike according to your fitness level and goals. 3. Place your feet on the bike pedals and secure them properly. 4. Sit upright on the bike with a relaxed grip on the handlebars. 5. Start pedaling by pushing down with one foot while pulling up with the other, as if you are walking or marching in place. 6. Maintain a smooth and controlled pedal stroke throughout the exercise, keeping a consistent rhythm. 7. Continue pedaling in a walking motion for the desired duration or distance. ## Variations - Resistance Variation: Adjust the resistance level on the stationary bike to make the exercise easier or more challenging. Increase the resistance for a more intense workout or decrease it for a lighter workout. - Interval Training: Incorporate intervals of higher intensity by increasing the resistance or pedaling speed for a set period, followed by a recovery phase at a lower intensity. - Reverse Pedaling: Change the direction of your pedal stroke, pedaling backward instead of forward. This variation engages different muscles and adds variety to the exercise. ## Muscles Worked - Quadriceps (front of the thighs) - Hamstrings (back of the thighs) - Glutes (buttocks) - Calves - Hip flexors ## Common Mistakes - Poor Posture: Maintain an upright posture throughout the exercise, avoiding slouching or leaning too far forward. Keep your shoulders relaxed and core engaged. - Neglecting Resistance: Adjust the resistance level on the stationary bike to provide enough challenge. Without sufficient resistance, you may not engage the muscles effectively or experience the desired cardiovascular benefits. - Overstraining the Knees: Ensure that your knees are properly aligned with the pedals throughout the movement. Avoid excessive inward or outward movement of the knees, which can strain the knee joints. - Lack of Variation: While the stationary bike walk is a beneficial exercise, it is essential to incorporate other forms of exercise to promote overall fitness and prevent boredom. ## Safety Precautions - Check the bike's stability and ensure that it is in good working condition before starting the exercise. - Adjust the seat and handlebars properly to maintain a comfortable and safe position. - Warm up before the exercise to prepare your muscles and joints. - Start with a lower resistance and gradually increase it as your fitness level improves. - Listen to your body and modify the intensity or duration of the exercise as needed. - If you experience any pain, discomfort, or dizziness, stop the exercise and seek medical advice if necessary. - Stay hydrated and maintain proper breathing throughout the exercise.
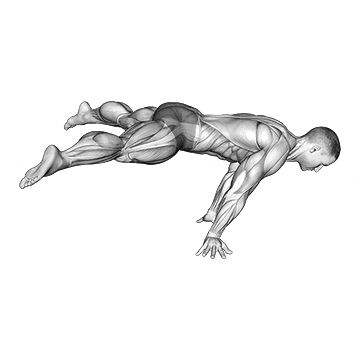
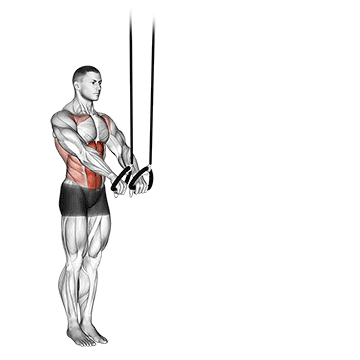
The straddle maltese is an advanced gymnastic exercise that primarily targets the upper body, specifically the shoulder, chest, and core muscles. It is commonly performed on the rings and requires a high level of strength, stability, and body control. The straddle maltese is a challenging skill often seen in gymnastics and bodyweight training routines. ## Instructions 1. Begin by gripping the rings with an overhand grip, palms facing down. 2. Hang from the rings with your arms fully extended and your body in a straight position. 3. Gradually separate your legs into a wide straddle position while maintaining control and stability. 4. Lean your torso forward and downward, allowing your upper body to tilt parallel to the ground. 5. Engage your shoulder, chest, and core muscles to hold the parallel position. 6. Aim to keep your arms and torso aligned horizontally throughout the exercise. 7. Hold the straddle maltese position for the desired duration, focusing on maintaining stability and proper body alignment. 8. Slowly release the position and return to the starting position. ## Variations - Tuck Maltese: If the straddle maltese is too challenging, you can start with a tuck maltese. Instead of extending your legs into a straddle position, bring your knees toward your chest, tucking your legs. - Supported Maltese: If you are still developing the necessary strength for a full maltese, you can use resistance bands or a spotter to provide assistance and support to help maintain the position. - Straddle Planche: The straddle planche is a similar exercise that focuses on holding a horizontal position with the body extended forward, rather than in a parallel position. It targets similar muscles but requires slightly different body positioning. ## Muscles Worked - Deltoids (shoulder muscles) - Pectoralis major (chest muscles) - Core muscles (abdominals and lower back) - Upper back muscles - Triceps ## Common Mistakes - Lack of Shoulder Strength: The straddle maltese requires significant shoulder strength. Ensure that you have developed sufficient strength and stability in the shoulders before attempting this exercise. - Insufficient Body Alignment: It's crucial to maintain a straight and aligned body position throughout the exercise. Avoid sagging or arching the back, and aim to keep the arms and torso horizontal. - Overexertion: As this is an advanced exercise, it's important to progress gradually and avoid pushing beyond your capabilities. Start with easier variations and gradually work your way up to the full straddle maltese. - Neglecting Warm-Up: Perform a thorough warm-up before attempting the straddle maltese to prepare your muscles and joints for the demands of the exercise. ## Safety Precautions - This exercise is advanced and requires a high level of strength and stability. Ensure that you have built a solid foundation of strength before attempting the straddle maltese. - Perform the exercise on appropriate gymnastics rings that are properly secured and can support your body weight. - Work with a qualified coach or trainer who can provide guidance and spot you during the exercise to ensure safety and proper form. - Listen to your body and do not force yourself into the full straddle maltese position if you experience pain or discomfort. Start with easier variations and progress gradually. - Incorporate appropriate rest and recovery days to allow your muscles and joints to recover from the demands of the exercise.
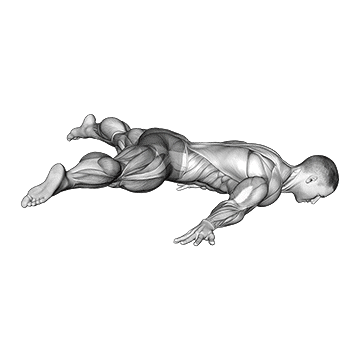
The straddle planche is an advanced gymnastic exercise that involves holding a horizontal body position with the arms extended and the legs separated in a wide straddle position. It primarily targets the upper body muscles, particularly the shoulders, chest, and core. The straddle planche requires exceptional upper body strength, stability, and body control. It is a challenging skill often seen in gymnastics and bodyweight training routines. ## Instructions 1. Start by assuming a squatting position with your feet together and your hands placed on the ground shoulder-width apart in front of you. 2. Lean forward and lift your hips while simultaneously extending your legs backward until your body is in a straight line, supported only by your hands. 3. As your legs extend backward, separate them into a wide straddle position, keeping your toes pointed. 4. Engage your core, squeeze your glutes, and activate your shoulder and chest muscles to hold the horizontal position. 5. Maintain a straight body alignment, avoiding sagging or arching of the back. 6. Focus on distributing your weight evenly between your hands and keeping your wrists aligned with your shoulders. 7. Hold the straddle planche position for the desired duration, aiming to build strength and stability over time. 8. Gradually release the position by lowering your hips and returning to the starting position. ## Variations - Tuck Planche: If the straddle planche is too challenging, you can start with a tuck planche. Instead of extending your legs into a straddle position, bring your knees toward your chest, tucking your legs. - Straddle Planche Lean: If holding the full straddle planche is difficult, you can practice the planche lean. Start with your feet together and hands on the ground, lean forward while keeping your feet on the ground, and focus on maintaining a horizontal body position as much as possible. - Single-Leg Straddle Planche: Once you have developed sufficient strength and stability, you can attempt the single-leg straddle planche by extending one leg while keeping the other in a straddle position. ## Muscles Worked - Deltoids (shoulder muscles) - Pectoralis major (chest muscles) - Core muscles (abdominals and lower back) - Triceps - Forearm muscles - Hip flexors ## Common Mistakes - Lack of Shoulder Strength: The straddle planche requires significant shoulder strength. Ensure that you have developed sufficient strength and stability in the shoulders before attempting this exercise. - Insufficient Core Activation: Engage your core muscles to maintain a straight body alignment and prevent sagging or arching of the back. - Overexertion: This is an advanced exercise that requires gradual progress. Start with easier variations and gradually work your way up to the full straddle planche to avoid overexertion and potential injuries. - Neglecting Proper Hand Placement: Ensure that your hands are positioned correctly, with your wrists aligned with your shoulders, to distribute the weight evenly and maintain stability. ## Safety Precautions - The straddle planche is an advanced exercise that places significant demands on the upper body. Ensure that you have built a solid foundation of strength and stability before attempting this exercise. - Practice on appropriate training surfaces, such as gymnastics mats, to reduce the risk of injury. - Warm up thoroughly before attempting the straddle planche to prepare your muscles and joints for the demands of the exercise. - Work with a qualified coach or trainer who can provide guidance and spot you during the exercise to ensure safety and proper form. - Listen to your body and do not force yourself into the full straddle planche position if you experience pain or discomfort. Start with easier variations and progress gradually
The straight leg outer hip abductor exercise targets the muscles of the outer hip, specifically the gluteus medius and gluteus minimus. It helps strengthen and stabilize the hips, improve balance, and enhance overall lower body strength. This exercise is particularly beneficial for individuals who want to develop stronger hip muscles and improve hip stability for activities like running, jumping, and lateral movements. ## Instructions 1. Start by lying on your side on a mat or a comfortable surface. Align your body in a straight line with your legs extended and stacked on top of each other. 2. Rest your head on your lower arm and place your upper hand in front of your chest or on the ground for support. 3. Engage your core muscles by gently pulling your belly button towards your spine. 4. Keeping your leg straight, lift your top leg upward, leading with your heel. Lift it as high as comfortably possible, aiming to feel the contraction in your outer hip. 5. Pause briefly at the top of the movement, then slowly lower your leg back down to the starting position. 6. Repeat the movement for the desired number of repetitions, then switch sides and perform the exercise with the opposite leg. ## Variations - Resistance Band: Place a resistance band around your ankles or just above the knees to add resistance and increase the challenge of the exercise. - Side Plank Variation: Perform the straight leg outer hip abductor exercise while in a side plank position. Lift the top leg while maintaining a straight line from head to toe, engaging both the core and outer hip muscles simultaneously. ## Muscles Worked - Gluteus medius - Gluteus minimus - Tensor fasciae latae (TFL) ## Common Mistakes - Using Momentum: Avoid swinging the leg or using momentum to lift it. Focus on controlled and deliberate movements, engaging the targeted muscles throughout the exercise. - Raising the Leg Too High: Lift your leg to a height that allows you to maintain proper form and feel the activation in your outer hip muscles. Lifting too high may involve compensatory movements and decrease the effectiveness of the exercise. - Collapsed Core: Keep your core muscles engaged throughout the movement to stabilize your body and maintain proper alignment. - Poor Hip Alignment: Ensure that your hips stay stacked vertically, one on top of the other, without rolling forward or backward. This helps target the outer hip muscles effectively. ## Safety Precautions - Start with a gentle warm-up to prepare your hips and surrounding muscles for the exercise. - Avoid excessive strain on your neck by keeping it in a comfortable and neutral position throughout the exercise. - Perform the exercise on a stable surface to maintain balance and stability. - If you experience any pain or discomfort, especially in the hip or lower back, discontinue the exercise and consult a healthcare professional. - Progress gradually by increasing repetitions, sets, or adding resistance as your strength improves.
The suspended abdominal fallout is an advanced core exercise that targets the abdominal muscles, particularly the rectus abdominis and the obliques. It also engages the stabilizer muscles of the shoulders, chest, and upper back. This exercise involves maintaining a stable body position while extending and retracting the arms, challenging the core muscles to resist spinal extension. The suspended abdominal fallout helps improve core strength, stability, and overall body control. ## Instructions 1. Begin by attaching suspension straps, such as TRX straps, to a secure anchor point above you. 2. Stand facing the anchor point with your feet hip-width apart and your arms extended in front of you, holding onto the suspension straps. 3. Lean your body forward, keeping your arms extended and maintaining a straight line from your head to your heels. 4. Engage your core muscles by drawing your belly button in toward your spine. 5. Slowly lower your upper body by allowing your shoulder blades to retract and your arms to move overhead while maintaining control and stability. 6. Keep your core tight and resist the urge to arch your lower back or let your hips sag. 7. Pause briefly in the extended position, then return to the starting position by retracting your shoulder blades and bringing your arms back down in front of you. 8. Repeat the movement for the desired number of repetitions, focusing on maintaining proper form and control throughout. ## Variations - Bent-Knee Fallout: If the straight leg position is too challenging, you can perform the exercise with bent knees. This reduces the leverage and intensity of the movement. - Single-Arm Fallout: To increase the difficulty and engage the oblique muscles further, perform the exercise with one arm while keeping the other arm extended beside you or holding onto the strap for stability. ## Muscles Worked - Rectus abdominis (six-pack muscles) - Obliques (side abdominal muscles) - Transverse abdominis (deep core muscles) - Stabilizer muscles of the shoulders, chest, and upper back ## Common Mistakes - Arching the Lower Back: Maintain a neutral spine throughout the exercise and avoid excessive arching or rounding of the lower back. - Allowing the Hips to Sag: Keep your core muscles engaged to prevent your hips from dropping or sagging. Maintain a straight line from your head to your heels. - Overextending the Arms: Avoid fully extending your arms overhead, as this can strain the shoulders and limit the activation of the core muscles. Stop the movement before reaching a fully extended position. - Lack of Control: Focus on maintaining control and stability throughout the exercise. Avoid using momentum or swinging motions. ## Safety Precautions - Ensure that the suspension straps are properly anchored and securely fastened before starting the exercise. - Perform the exercise on a stable surface with adequate space around you to prevent collisions or injuries. - Start with a shorter range of motion and gradually increase as you develop strength and stability. - If you have any pre-existing shoulder, back, or core injuries, consult with a healthcare professional before attempting this exercise. - Listen to your body and modify or stop the exercise if you experience pain or discomfort.