
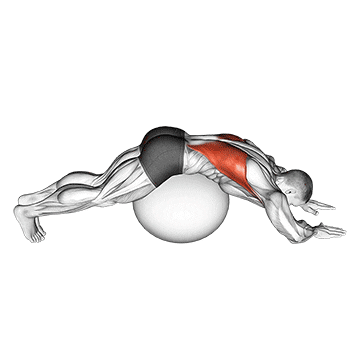
The exercise ball lower back stretch (pyramid) is a stretching exercise that targets the muscles of the lower back. It helps to improve flexibility, relieve tension, and reduce lower back pain. ## Instructions 1. Start by placing an exercise ball on the floor and kneeling in front of it. 2. Slowly roll forward onto the exercise ball, allowing your body to rest on the ball with your chest and forearms supported. Your feet should be slightly wider than hip-width apart for stability. 3. Walk your hands forward on the exercise ball, extending your body until your hips are raised high and your torso forms a downward-facing triangle shape with the ball. 4. Take a deep breath in and as you exhale, allow your upper body to relax and hang down, feeling a gentle stretch in your lower back. 5. Hold the stretch for 20-30 seconds, breathing deeply and focusing on releasing any tension in your lower back. 6. To come out of the stretch, slowly walk your hands back towards the exercise ball, bringing your body back to a kneeling position. ## Variations - If you find it difficult to balance on the exercise ball, you can place a yoga block or cushion under your knees for added support. - For a deeper stretch, you can experiment with different arm positions. For example, you can extend your arms overhead or place your hands behind your head. ## Muscles Worked The exercise primarily targets the muscles of the lower back, including the erector spinae muscles. ## Common Mistakes - Arching the lower back excessively: Avoid overextending your lower back during the stretch. Maintain a neutral spine position and focus on lengthening the muscles. - Holding tension in the neck and shoulders: Keep your shoulders relaxed and allow your upper body to hang freely, avoiding any unnecessary tension in the neck and shoulders. - Rushing the movement: Take your time and perform the stretch slowly and mindfully. Rushing the exercise can limit its effectiveness and increase the risk of injury. ## Safety Precautions - If you have a history of lower back injuries or chronic pain, it is advisable to consult with a healthcare professional or a qualified trainer before attempting this stretch. - Listen to your body and avoid pushing beyond your comfort zone. You should feel a gentle stretch in your lower back, but if you experience any sharp or intense pain, stop immediately. - Ensure that the exercise ball is properly inflated and stable before using it for the stretch. - Maintain proper form and balance throughout the exercise to minimize the risk of falling or losing control on the exercise ball.
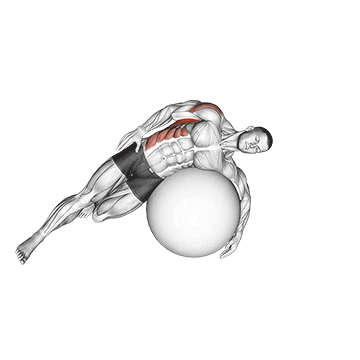
The exercise ball lying side lat stretch is a stretching exercise that targets the latissimus dorsi muscles, commonly known as the "lats." It helps to improve flexibility, release tension in the back and shoulders, and enhance overall posture. ## Instructions 1. Start by placing an exercise ball on the floor and lying on your side next to it. Your bottom arm should be extended straight overhead, resting on the floor. 2. Place the top arm on top of the exercise ball, with your hand grasping the ball for stability. 3. Engage your core muscles and gently roll your body onto the exercise ball, allowing your torso to drape over the ball. Your top leg should be positioned slightly in front of the bottom leg for support. 4. Let your top arm and shoulder relax, allowing gravity to stretch the lats. You should feel a gentle stretch along the side of your torso. 5. Hold the stretch for 20-30 seconds, breathing deeply and focusing on relaxing the muscles. 6. To come out of the stretch, slowly roll your body back onto your side, and then switch sides to stretch the other lat muscle. ## Variations - If you find it challenging to balance on the exercise ball, you can perform the stretch on the floor. Lie on your side with your bottom arm extended overhead, and use your top arm to pull your upper body gently towards the floor, stretching the lats. - To increase the stretch intensity, you can experiment with different arm positions. For example, you can bring your top arm across your chest and use your other arm to gently pull and deepen the stretch. ## Muscles Worked The exercise primarily targets the latissimus dorsi muscles, commonly known as the lats. It also engages the muscles of the upper back, shoulders, and core. ## Common Mistakes - Allowing the bottom shoulder to hunch: Keep your bottom shoulder relaxed and avoid hunching it towards your ear. Maintain a neutral spine and focus on stretching the lats without compromising shoulder alignment. - Overarching or collapsing the lower back: Maintain a stable and aligned spine throughout the stretch. Avoid excessive arching or collapsing of the lower back to target the lats effectively. - Holding tension in the neck and upper traps: Keep your neck relaxed and avoid tensing the muscles of the upper traps. Focus on releasing tension in the targeted muscles. ## Safety Precautions - If you have any shoulder or back injuries or conditions, it is advisable to consult with a healthcare professional or a qualified trainer before attempting this stretch. - Start with a gentle stretch and gradually increase the intensity as tolerated. Avoid pushing into pain or discomfort. - Use slow and controlled movements when rolling onto the exercise ball to maintain balance and stability. - Ensure that the exercise ball is properly inflated and stable before using it for the stretch. - Listen to your body and modify the stretch as needed to suit your comfort and fitness level.
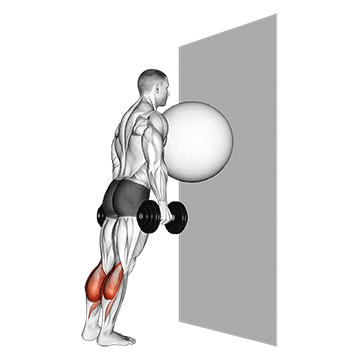
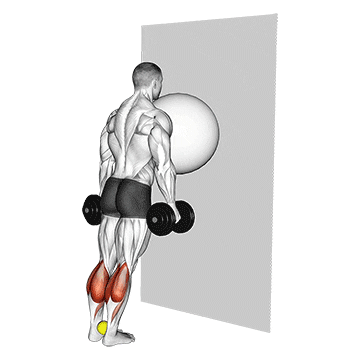
The exercise ball on the wall calf raise is a strength-building exercise that targets the calf muscles. By using an exercise ball and a wall for support, it provides a challenging workout for the calves and helps improve lower leg strength and stability. ## Instructions 1. Start by standing facing a wall with an exercise ball positioned between your lower back and the wall. Place your feet hip-width apart, toes pointing forward. 2. Lean gently into the exercise ball, using it as support for your lower back. Keep your hands on your hips or extend them out in front of you for balance. 3. Engage your core muscles and press through the balls of your feet to lift your heels off the ground. Rise up onto the balls of your feet as high as you can comfortably go. 4. Pause briefly at the top of the movement, feeling the contraction in your calf muscles. 5. Slowly lower your heels back down to the starting position, maintaining control and balance throughout the movement. 6. Repeat the exercise for the desired number of repetitions. ## Variations - To increase the intensity of the exercise, you can perform the calf raises with one leg at a time. Lift one foot off the ground and perform the calf raise on the opposite leg. - If you find it challenging to balance on the exercise ball against the wall, you can perform the exercise without the ball, standing on a stable surface and performing the calf raises with or without weights. ## Muscles Worked The exercise primarily targets the calf muscles, specifically the gastrocnemius and soleus muscles of the lower leg. ## Common Mistakes - Using excessive momentum: Avoid bouncing or using momentum to lift your heels. Focus on controlled movements, emphasizing the contraction and stretch of the calf muscles. - Allowing the knees to collapse inward: Keep your knees aligned with your toes throughout the exercise. Avoid allowing them to collapse inward, which can put stress on the knee joints. - Not fully extending or flexing the ankles: Ensure that you fully extend your ankles at the top of the movement and flex them to achieve a full range of motion. This will maximize the effectiveness of the exercise. ## Safety Precautions - If you have any existing ankle or calf injuries or conditions, it is advisable to consult with a healthcare professional or a qualified trainer before attempting this exercise. - Start with a comfortable range of motion and gradually increase the intensity as your calf muscles strengthen. - Maintain proper posture throughout the exercise, keeping your back straight and core engaged. - Use the support of the exercise ball against the wall to maintain balance and stability. - If you experience any pain or discomfort during the exercise, stop immediately and seek professional guidance.
The exercise ball on the wall calf raise with a tennis ball between the ankles is a variation of the calf raise exercise that adds an extra challenge and targets the calf muscles. By placing a tennis ball between the ankles, it engages the muscles of the inner thighs and improves balance and stability. ## Instructions 1. Start by standing facing a wall with an exercise ball positioned between your lower back and the wall. Place your feet hip-width apart, toes pointing forward. 2. Hold a tennis ball between your ankles, squeezing it to maintain its position throughout the exercise. 3. Lean gently into the exercise ball, using it as support for your lower back. Keep your hands on your hips or extend them out in front of you for balance. 4. Engage your core muscles and press through the balls of your feet to lift your heels off the ground. Rise up onto the balls of your feet as high as you can comfortably go. 5. Pause briefly at the top of the movement, feeling the contraction in your calf muscles. 6. Slowly lower your heels back down to the starting position, maintaining control and balance throughout the movement. 7. Repeat the exercise for the desired number of repetitions. ## Variations - If using a tennis ball is too challenging, you can start with a softer ball or cushion between your ankles and gradually progress to using a tennis ball. - To increase the intensity further, you can perform the calf raises with one leg at a time while keeping the tennis ball squeezed between the ankles. ## Muscles Worked The exercise primarily targets the calf muscles (gastrocnemius and soleus) and engages the muscles of the inner thighs (adductors). ## Common Mistakes - Allowing the tennis ball to drop: Maintain a firm grip on the tennis ball throughout the exercise to keep it in place. This helps engage the inner thigh muscles. - Using excessive momentum or bouncing: Avoid using momentum or bouncing to lift your heels. Focus on controlled movements and a slow, controlled tempo. - Allowing the knees to collapse inward: Keep your knees aligned with your toes throughout the exercise. Avoid allowing them to collapse inward, which can put stress on the knee joints. ## Safety Precautions - If you have any ankle or calf injuries or conditions, consult with a healthcare professional or a qualified trainer before attempting this exercise. - Start with a comfortable range of motion and gradually increase the intensity as your calf muscles strengthen. - Maintain proper posture throughout the exercise, keeping your back straight and core engaged. - Use the support of the exercise ball against the wall to maintain balance and stability. - If you experience pain or discomfort during the exercise, stop immediately and seek professional guidance.
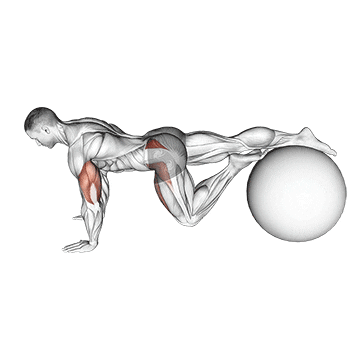
The exercise ball one leg prone lower body rotation is a challenging exercise that targets the muscles of the core, hips, and glutes. It involves rotating the lower body while balancing on one leg on an exercise ball, which helps improve stability, balance, and overall core strength. ## Instructions 1. Start by placing an exercise ball on the floor and position yourself on top of it in a prone position (facing down). Place your hands on the ground in front of the ball for support. 2. Lift one leg off the ground and extend it straight back, keeping it in line with your body. This will be your balancing leg throughout the exercise. 3. Engage your core muscles and stabilize your body by pressing your hands firmly into the ground. 4. Begin rotating your lower body to the side by pivoting on the exercise ball, using your balancing leg as the axis of rotation. 5. Rotate as far as you comfortably can while maintaining balance and control. Keep your upper body and shoulders stable. 6. Slowly return to the starting position by rotating your lower body back to the center. 7. Repeat the rotation on the same leg for the desired number of repetitions, then switch to the other leg. ## Variations - If balancing on one leg is too challenging, you can place your toes or the top of your foot on the ground for added stability. - To increase the difficulty, you can add ankle weights or hold a light dumbbell in your hands while performing the exercise. ## Muscles Worked The exercise primarily targets the muscles of the core, including the obliques and transverse abdominis. It also engages the glutes, hips, and lower back muscles. ## Common Mistakes - Losing balance and stability: Focus on engaging your core and maintaining a stable base throughout the exercise. Start with small rotations and gradually increase the range of motion as you build strength and stability. - Twisting the upper body: Keep your upper body and shoulders stable throughout the exercise. Avoid excessive twisting or rotating of the upper body, as the movement should mainly come from the lower body. - Rushing the movement: Perform the exercise in a slow and controlled manner to maximize the benefits and maintain proper form. ## Safety Precautions - If you have any balance issues, ankle or lower back injuries, or any other medical conditions, consult with a healthcare professional or a qualified trainer before attempting this exercise. - Start with a comfortable range of motion and gradually increase the intensity and range as you become more comfortable and stable. - Use a well-inflated exercise ball that is appropriate for your height and weight. - Ensure that the exercise area is clear of any obstacles or hazards that may interfere with your balance or movement. - If you experience pain or discomfort during the exercise, stop immediately and seek professional guidance.
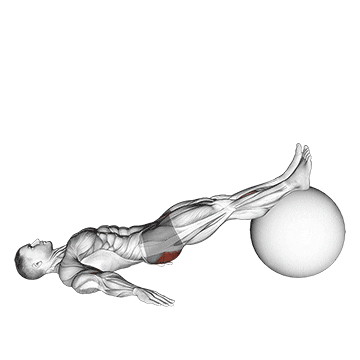
The exercise ball one-legged diagonal kick hamstring curl is a challenging exercise that targets the hamstrings, glutes, and core muscles. It combines the movements of a hamstring curl and a diagonal kick to engage multiple muscle groups and enhance lower body strength and stability. ## Instructions 1. Start by lying on your back on the floor with your hands by your sides and your feet resting on top of an exercise ball. Extend one leg straight up towards the ceiling, while the other leg remains bent with the foot flat on the floor. 2. Engage your core muscles and lift your hips off the ground, creating a straight line from your shoulders to your bent knee. 3. While maintaining this bridge position, slowly pull the exercise ball towards your glutes by bending your knee and curling the ball with your foot. Keep your hips lifted and your body in a stable position. 4. Once you have fully curled the ball towards your glutes, extend your leg back out straight, but instead of returning to the starting position, continue the movement by kicking the exercise ball diagonally across your body towards the opposite shoulder. 5. Reverse the movement and bring the exercise ball back to the starting position, and then perform another hamstring curl. 6. Repeat the sequence for the desired number of repetitions, then switch legs and repeat the exercise. ## Variations - To modify the exercise, you can perform the hamstring curl without the diagonal kick. Focus on the curling motion and concentrate on engaging the hamstrings and glutes. - If balancing on the exercise ball is challenging, you can perform the exercise with both feet on the ball instead of one leg at a time. This provides more stability and support. ## Muscles Worked The exercise primarily targets the hamstrings, glutes, and core muscles. It also engages the muscles of the lower back and hips. ## Common Mistakes - Allowing the hips to drop: Maintain a straight line from your shoulders to your bent knee throughout the exercise. Avoid letting your hips sag or drop, as this reduces the effectiveness of the movement. - Relying on momentum: Perform the exercise with control, focusing on engaging the hamstrings and glutes. Avoid using excessive momentum or swinging motions to lift the ball. - Not fully extending or flexing the leg: Make sure to fully extend your leg at the top of the curl and fully flex it during the kick. This maximizes the range of motion and engagement of the target muscles. ## Safety Precautions - If you have any knee, hip, or lower back injuries or conditions, it is advisable to consult with a healthcare professional or a qualified trainer before attempting this exercise. - Start with a comfortable range of motion and gradually increase the intensity as your strength and stability improve. - Use slow and controlled movements throughout the exercise to maintain proper form and prevent injury. - Ensure that the exercise ball is properly inflated and stable before using it for the exercise. - If you experience pain or discomfort during the exercise, stop immediately and seek professional guidance.
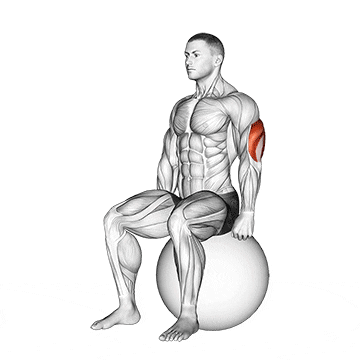
The exercise ball seated triceps stretch is a stretching exercise that targets the triceps muscles, located at the back of the upper arms. This stretch helps to increase flexibility and mobility in the triceps while relieving tension in the muscles. It is particularly beneficial for individuals involved in activities that require upper body strength and flexibility, such as weightlifting, sports, and everyday activities. ## Instructions 1. Begin by sitting on an exercise ball with your feet flat on the floor, hip-width apart, and your back straight. 2. Hold the exercise ball with both hands, positioning it behind your head. 3. Extend your arms upward, keeping them close to your ears, and bend your elbows to bring the exercise ball down toward your upper back. 4. Maintain a slight inward curve in your lower back and engage your core muscles for stability. 5. Feel the stretch in the triceps as you bring the exercise ball closer to your upper back. 6. Hold the stretched position for 20 to 30 seconds, focusing on deep breathing and relaxing into the stretch. 7. Slowly release the stretch by straightening your arms and returning to the starting position. 8. Repeat the stretch for 2 to 3 sets, depending on your preference and flexibility goals. ## Variations - If you have limited flexibility, you can perform the stretch with your arms slightly bent and gradually work towards straightening them over time. - For a deeper stretch, you can gently tilt your head forward while maintaining a straight back, allowing the exercise ball to move closer to the back of your neck. ## Muscles Worked The exercise ball seated triceps stretch primarily targets the triceps brachii muscles, which are responsible for extending the elbow joint. It also engages the muscles of the shoulder and upper back to stabilize the posture during the stretch. ## Common Mistakes - Arching the lower back excessively: Maintain a slight inward curve in the lower back and engage your core muscles to avoid overarching, which can strain the lower back. - Allowing the elbows to flare out: Keep your elbows close to your ears throughout the movement to effectively target the triceps muscles. - Holding the breath: Remember to breathe deeply and regularly during the stretch to promote relaxation and enhance the effectiveness of the stretch. ## Safety Precautions - Choose an exercise ball that is appropriately sized for your body height to ensure stability and proper form. - If you have any pre-existing shoulder or elbow injuries, consult with a healthcare professional before performing this exercise to determine if it is suitable for you. - Start with a gentle stretch and gradually increase the intensity as your flexibility improves. - If you experience any pain or discomfort during the stretch, stop immediately and consult a qualified fitness professional or healthcare provider.
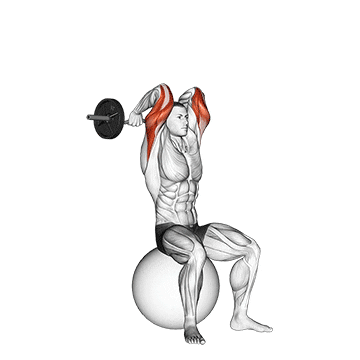
The EZ bar French press on an exercise ball is a compound exercise that primarily targets the triceps muscles. It involves using an EZ bar (a curved barbell) while seated on an exercise ball, which adds an element of instability, requiring additional core engagement. This exercise helps strengthen and tone the triceps while also challenging the stability of the core muscles. ## Instructions 1. Place an exercise ball on the floor and sit on it with your feet flat on the ground, hip-width apart, and your back straight. 2. Hold an EZ bar with an overhand grip, hands slightly wider than shoulder-width apart. 3. Lift the EZ bar overhead, fully extending your arms. This is your starting position. 4. Slowly lower the EZ bar behind your head by bending your elbows, keeping your upper arms close to your ears. 5. As you lower the bar, maintain a stable and controlled motion, feeling the stretch in your triceps. 6. Pause for a moment in the stretched position. 7. Extend your arms and raise the EZ bar back to the starting position, fully contracting your triceps. 8. Repeat the movement for the desired number of repetitions. ## Variations - If an EZ bar is not available, you can use dumbbells or a straight barbell with an overhand grip. - If you prefer a seated position with back support, you can perform the exercise on a weight bench or sturdy chair instead of an exercise ball. - To increase the intensity, you can perform the exercise with one arm at a time, using a single dumbbell or a unilateral EZ bar grip. ## Muscles Worked The EZ bar French press primarily targets the triceps brachii muscles, particularly the long head of the triceps. Additionally, it engages the muscles of the shoulders, chest, and core to maintain stability during the exercise. ## Common Mistakes - Flaring the elbows outward: Keep your elbows close to your head and avoid letting them flare out to ensure proper activation of the triceps muscles. - Using excessive weight: Start with a manageable weight that allows you to maintain proper form and control throughout the exercise. Gradually increase the weight as your strength and technique improve. - Allowing the lower back to arch: Engage your core muscles and maintain a stable and neutral spine throughout the movement. Avoid overarching or hyperextending the lower back. ## Safety Precautions - Choose an exercise ball that is properly inflated and stable. Make sure it can support your body weight. - Use a spotter or workout partner, especially if you're new to the exercise or working with heavy weights. - If you have any shoulder or elbow injuries or conditions, consult with a healthcare professional or qualified fitness trainer to determine if this exercise is suitable for you. - Start with a light warm-up set to prepare your muscles and joints before increasing the weight. - If you experience any pain or discomfort, especially in the shoulders or elbows, stop the exercise and seek guidance from a professional.
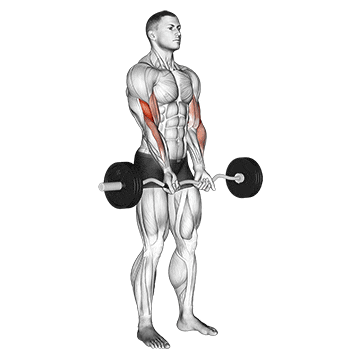
The EZ barbell close-grip curl is an exercise that primarily targets the biceps brachii muscle, located in the upper arm. This exercise is a variation of the traditional bicep curl, where the hands are placed closer together on the EZ barbell, allowing for greater emphasis on the inner portion of the biceps. It also engages the brachialis and brachioradialis muscles to a lesser extent. ## Instructions 1. Stand up straight with your feet shoulder-width apart, and grab the EZ barbell with an underhand grip (palms facing upward) at a closer distance than shoulder-width apart. Your hands should be positioned about 6-8 inches apart on the barbell. 2. Hold the barbell at arm's length, allowing it to hang down in front of your thighs, with your elbows close to your torso. 3. Keeping your upper arms stationary, exhale and curl the barbell upward by contracting your biceps. Continue the movement until your forearms are fully contracted and the barbell is at shoulder level. 4. Hold the contracted position for a brief pause, squeezing your biceps. 5. Inhale and slowly lower the barbell back to the starting position in a controlled manner, fully extending your arms. 6. Repeat for the desired number of repetitions. ## Variations - Dumbbell Close-Grip Curl: Perform the same movement using dumbbells instead of an EZ barbell. This allows for greater freedom of movement and can provide a slightly different stimulus to the muscles. - Resistance Band Close-Grip Curl: Attach a resistance band to a stable anchor point and hold the handles with an underhand grip. Perform the curling motion while maintaining tension on the band throughout the exercise. - Preacher Curl with EZ Barbell: Use an EZ barbell on a preacher curl bench to perform close-grip curls. This variation provides additional stability and isolates the biceps effectively. ## Muscles Worked The EZ barbell close-grip curl primarily targets the following muscles: - Biceps brachii (inner portion) - Brachialis (located underneath the biceps) - Brachioradialis (forearm muscle) ## Common Mistakes - Using momentum: Avoid swinging your body or using excessive momentum to lift the weight. Keep the movement controlled and focus on contracting the biceps throughout the exercise. - Flaring the elbows: Keep your elbows close to your torso and avoid letting them move forward or outward. This helps to maintain the emphasis on the biceps and prevents excessive strain on the shoulders. - Poor grip: Ensure that your grip on the barbell is secure and comfortable. Avoid gripping the barbell too tightly, as it can lead to unnecessary tension in the forearms and wrists. ## Safety Precautions - Start with an appropriate weight that allows you to maintain proper form throughout the exercise. Gradually increase the weight as you become more comfortable and stronger. - Warm up your arms with some light stretching or a few sets of lighter weight curls to prepare the muscles for the exercise. - If you have any pre-existing conditions or injuries, consult with a fitness professional or healthcare provider before attempting this exercise. - If you experience any pain or discomfort during the exercise, stop immediately and seek guidance from a qualified professional.