

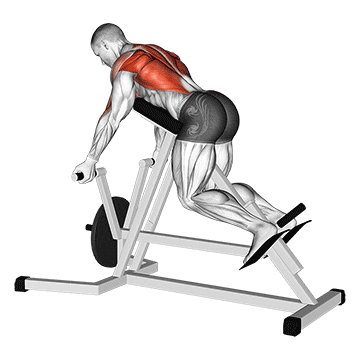
The lever reverse hyperextension is an exercise that primarily targets the muscles of the lower back, glutes, and hamstrings. It involves extending the hips while lying face down on a lever machine, which helps strengthen the posterior chain and improve overall core stability. ## Instructions 1. Set up on a lever machine by adjusting the height of the footpad to your comfort level. 2. Lie face down on the machine, positioning your upper body on the padded support and aligning your hips with the edge of the platform. 3. Secure your feet under the footpad, allowing your upper body to hang freely off the platform. 4. Engage your core and glutes to stabilize your body. 5. Initiate the movement by slowly raising your legs and hips until your body forms a straight line from your head to your heels. Keep your legs extended throughout the movement. 6. At the top of the movement, squeeze your glutes and focus on contracting your lower back muscles. 7. Lower your legs and hips back down to the starting position in a controlled manner. 8. Repeat for the desired number of repetitions. ## Variations - Bodyweight Reverse Hyperextension: If you don't have access to a lever machine, you can perform reverse hyperextensions on a hyperextension bench. Lie face down on the bench with your hips resting on the edge and your legs hanging freely. Perform the same movement of raising your legs and hips until your body forms a straight line. - Weighted Reverse Hyperextension: Once you have mastered the bodyweight version, you can add resistance by holding a weight plate or dumbbell between your feet or by using ankle weights. - Single-Leg Reverse Hyperextension: For an added challenge and to target each side individually, you can perform the exercise with one leg at a time. Lift one leg off the footpad and perform the movement with the other leg before switching sides. ## Muscles Worked The lever reverse hyperextension primarily targets the following muscles: - Erector Spinae: The muscles along the length of the spine that help extend the back. - Gluteus Maximus: The largest muscle of the buttocks, responsible for hip extension. - Hamstrings: The muscles at the back of the thighs that assist in hip extension. ## Common Mistakes - Using momentum: Avoid swinging or jerking your legs to lift them. Focus on controlled and deliberate movements. - Arching the lower back excessively: Maintain a neutral spine throughout the exercise. Avoid excessive arching of the lower back or hyperextension of the spine. - Lifting the legs too high: Lift your legs and hips until your body forms a straight line. Avoid overextending or hyperextending the hips. - Allowing the feet to come off the footpad: Keep your feet securely placed under the footpad throughout the movement. Avoid letting them lift or detach. ## Safety Precautions - Start with a lighter weight or resistance, or perform the exercise without added weight, and gradually increase the load as your strength and technique improve. - Maintain proper form and control throughout the exercise to prevent strain on the lower back. - If you have any existing lower back or hip issues, consult with a healthcare professional before attempting this exercise. - Avoid hyperextending or overstretching the lower back. Focus on controlled and smooth movements. - If you experience any pain or discomfort, especially in the lower back, stop the exercise and seek medical advice.
The lever reverse T-bar row is an exercise that targets the muscles of the upper back, including the rhomboids, trapezius, and rear deltoids. It involves pulling a lever or bar towards your torso while maintaining a reverse grip (palms facing up). This exercise helps to strengthen the back muscles, improve posture, and enhance pulling movements. ## Instructions 1. Set up a T-bar row machine by placing one end of a barbell into a corner or using a specialized T-bar row machine. 2. Load the other end of the barbell with the desired weight plates. 3. Stand with your feet shoulder-width apart and position yourself in front of the barbell. 4. Bend your knees slightly and hinge forward at the hips, keeping your back flat and your chest up. 5. Grasp the barbell with an underhand grip (palms facing up) and your hands positioned slightly wider than shoulder-width apart. 6. Engage your core and maintain a stable stance throughout the exercise. 7. Initiate the movement by pulling the barbell towards your lower chest while keeping your elbows close to your sides. 8. Squeeze your shoulder blades together at the top of the movement, focusing on the contraction in your back muscles. 9. Slowly lower the barbell back to the starting position with control, fully extending your arms. 10. Repeat for the desired number of repetitions. ## Variations - Lever Reverse T-Bar Row with Handle Attachment: If your T-bar row machine allows for handle attachments, you can use a V-handle or other grip variations to target the muscles from different angles. - Dumbbell Reverse Row: If you don't have access to a T-bar row machine, you can perform a similar movement using dumbbells. Stand with your feet shoulder-width apart, hinge forward at the hips, and hold a dumbbell in each hand with an underhand grip. Pull the dumbbells towards your lower chest while keeping your elbows close to your sides. - Resistance Band Reverse Row: Attach a resistance band to a stable anchor point, grasp the handles with an underhand grip, and step back to create tension. Perform the rowing motion as described, focusing on squeezing your back muscles at the top of the movement. ## Muscles Worked The lever reverse T-bar row primarily targets the following muscles: - Rhomboids: Muscles located between the shoulder blades that retract and stabilize the scapulae. - Trapezius (Upper and Middle Fibers): The upper and middle portions of the trapezius muscles responsible for shoulder blade retraction and elevation. - Rear Deltoids: The posterior portion of the deltoid muscles located at the back of the shoulders. ## Common Mistakes - Using momentum: Avoid using momentum or swinging your body to pull the weight. Focus on controlled and deliberate movements. - Rounded back: Maintain a neutral spine and avoid rounding your upper back. Keep your chest up and shoulder blades down and back. - Shrugging the shoulders: Avoid shrugging your shoulders or elevating them towards your ears. Keep your shoulders relaxed and pulled down throughout the movement. - Pulling with the arms only: Initiate the movement by engaging your back muscles rather than relying solely on your arms. Focus on squeezing your shoulder blades together. ## Safety Precautions - Start with a lighter weight or resistance and gradually increase the load as your strength and technique improve. - Keep your core muscles engaged to stabilize your torso and avoid excessive strain on your lower back. - If you have any existing back or shoulder issues, consult with a healthcare professional before attempting this exercise. - Use proper form and control throughout the exercise to prevent injury. - If you experience any pain or discomfort,
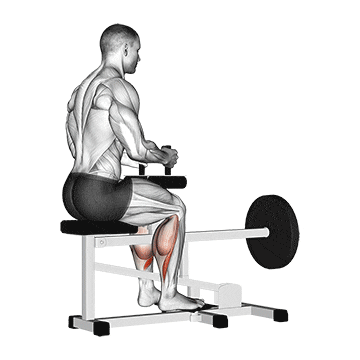
The lever rotary calf exercise is a targeted calf exercise that focuses on the muscles of the calves, primarily the gastrocnemius and soleus. It involves performing a rotary or twisting motion with the lower leg against resistance to strengthen and develop the calf muscles. ## Instructions 1. Start by sitting on a lever rotary calf machine, adjusting the seat height to allow your shoulders to comfortably fit under the padded lever. 2. Place the balls of your feet on the footrest, with your toes pointing forward and the balls of your feet positioned slightly wider than shoulder-width apart. 3. Grasp the handles or side supports of the machine for stability. 4. Release the lever lock and allow the weight or resistance to be applied to the machine. 5. Begin the exercise by pressing the balls of your feet downward, extending your ankles and raising your heels as high as possible. 6. Once at the top of the movement, rotate your feet and legs outward (externally rotate) to the sides. 7. Slowly lower your heels back to the starting position while maintaining the external rotation of the feet. 8. Repeat the movement for the desired number of repetitions. ## Variations - Single-Leg Lever Rotary Calf: Perform the exercise using only one leg at a time, focusing on each calf individually. This variation can help improve balance and address any muscle imbalances between the calves. - Seated Calf Raise Machine: If a lever rotary calf machine is not available, you can use a seated calf raise machine that allows for a rotary or twisting motion. The movement is similar, but instead of rotating the feet, you perform the exercise in a standard seated calf raise position. - Bodyweight Calf Raises: If you don't have access to any machines, you can perform standing or seated bodyweight calf raises. Stand with your feet hip-width apart or sit on a chair with your feet flat on the ground. Rise up onto the balls of your feet, lifting your heels as high as possible, and then lower them back down. ## Muscles Worked The lever rotary calf exercise primarily targets the following muscles: - Gastrocnemius: The larger, more visible muscle of the calf that contributes to ankle plantar flexion and knee flexion. - Soleus: Located underneath the gastrocnemius, the soleus is responsible for ankle plantar flexion and is engaged more when the knees are bent. ## Common Mistakes - Using excessive momentum: Avoid using momentum or bouncing to lift the weight. Focus on controlled and deliberate movements. - Rounding the back: Maintain proper posture throughout the exercise. Keep your back straight and avoid excessive rounding or arching. - Letting the knees collapse inward: Keep your knees aligned with your toes throughout the exercise. Avoid allowing them to cave inward. - Not fully extending the ankles: Make sure to lift your heels as high as possible, fully extending the ankles at the top of the movement. ## Safety Precautions - Start with a lighter weight or resistance and gradually increase the load as your strength and technique improve. - Maintain a stable seated position and proper form throughout the exercise. - If you have any existing calf or ankle issues, consult with a healthcare professional before attempting this exercise. - Use slow and controlled movements to prevent any sudden strain on the calves. - If you experience any pain or discomfort, especially in the calf muscles or ankles, stop the exercise and seek medical advice.
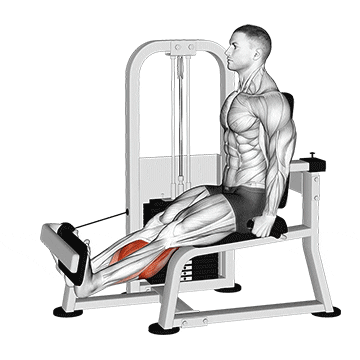
The lever seated calf press is an exercise that targets and strengthens the muscles of the calves, specifically the gastrocnemius and soleus. It involves pressing the balls of the feet against a foot platform while seated and using a lever or weight stack for resistance. This exercise helps develop calf size, strength, and stability. ## Instructions 1. Adjust the seat height of the lever seated calf press machine so that your knees are positioned at approximately 90 degrees. 2. Place the balls of your feet on the foot platform, with your heels extending off the edge and your toes pointing forward. 3. Position your thighs under the padded lever or knee pad and ensure that your knees are aligned with the pivot point of the machine. 4. Grasp the handles or side supports of the machine for stability. 5. Release the lever lock or engage the weight stack, allowing the resistance to be applied. 6. Start the movement by pressing through the balls of your feet and extending your ankles to raise your heels as high as possible. 7. Pause briefly at the top of the movement, focusing on squeezing your calf muscles. 8. Slowly lower your heels back down, allowing your calves to stretch. 9. Repeat the exercise for the desired number of repetitions. ## Variations - Single-Leg Seated Calf Press: Perform the exercise using only one leg at a time. This variation helps improve balance and can address any muscle imbalances between the calves. - Standing Calf Raise Machine: If a seated calf press machine is not available, you can use a standing calf raise machine or a calf raise block. The movement is similar, but you perform the exercise in a standing position instead of being seated. - Bodyweight Calf Raises: If you don't have access to any machines, you can perform standing or seated bodyweight calf raises. Stand with your feet hip-width apart or sit on a chair with your feet flat on the ground. Rise up onto the balls of your feet, lifting your heels as high as possible, and then lower them back down. ## Muscles Worked The lever seated calf press primarily targets the following muscles: - Gastrocnemius: The larger, more visible muscle of the calf that contributes to ankle plantar flexion and knee flexion. - Soleus: Located underneath the gastrocnemius, the soleus is responsible for ankle plantar flexion and is engaged more when the knees are bent. ## Common Mistakes - Using excessive momentum: Avoid using momentum or bouncing to lift the weight. Focus on controlled and deliberate movements. - Rounding the back: Maintain proper posture throughout the exercise. Keep your back straight and avoid excessive rounding or arching. - Not fully extending the ankles: Make sure to lift your heels as high as possible, fully extending the ankles at the top of the movement. - Using too much weight: Start with a manageable weight and gradually increase the resistance as your strength improves. Using too much weight can compromise form and increase the risk of injury. ## Safety Precautions - Start with a lighter weight or resistance and gradually increase the load as your strength and technique improve. - Keep your core engaged and maintain proper posture throughout the exercise. - If you have any existing calf or ankle issues, consult with a healthcare professional before attempting this exercise. - Use slow and controlled movements to prevent any sudden strain on the calves. - If you experience any pain or discomfort, especially in the calf muscles or ankles, stop the exercise and seek medical advice.
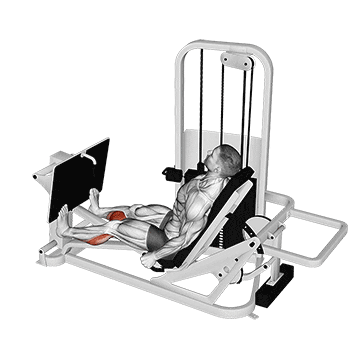
The lever seated calf raise is an exercise that primarily targets the calf muscles, specifically the gastrocnemius and soleus. It involves using a lever or machine to provide resistance as you raise your heels, working to strengthen and develop the muscles of the lower leg. This exercise is commonly performed in gyms and is suitable for individuals of various fitness levels. ## Instructions 1. Start by sitting on a lever calf raise machine with your feet resting on the foot platform and your knees positioned under the lever pad. 2. Adjust the machine settings according to your height and comfort. Ensure that the balls of your feet are resting on the foot platform and your heels are hanging off the edge. 3. Place your hands on the handles provided on the machine for stability. 4. Keep your core engaged and maintain an upright posture throughout the exercise. 5. Slowly lower your heels as far as you can without straining, allowing the calf muscles to stretch. 6. From the stretched position, push through the balls of your feet and raise your heels as high as possible. 7. Pause for a moment at the top of the movement and squeeze your calf muscles. 8. Slowly lower your heels back down to the starting position to complete one repetition. 9. Repeat the movement for the desired number of repetitions. ## Variations - **One-Leg Lever Seated Calf Raise:** Perform the exercise using only one leg at a time, alternating between legs. This variation increases the intensity and challenges balance. - **Weighted Lever Seated Calf Raise:** Add additional weight by using a weighted vest or holding dumbbells for a more advanced workout. ## Muscles Worked The lever seated calf raise primarily targets the following muscles: - Gastrocnemius (calf muscle) - Soleus (calf muscle) ## Common Mistakes - **Using Too Much Weight:** Avoid using excessive weight that compromises your form and range of motion. Start with a manageable weight and gradually increase as your strength improves. - **Rounding the Back:** Maintain an upright posture throughout the exercise. Avoid rounding your back or hunching over the machine. - **Bouncing or Jerking:** Perform the exercise in a controlled manner, avoiding any bouncing or jerking movements. This ensures that the targeted muscles are properly engaged. ## Safety Precautions - Consult with a healthcare professional before starting any new exercise program, especially if you have any pre-existing medical conditions or injuries. - Adjust the machine settings and foot placement according to your comfort and biomechanics. - Start with lighter weights and gradually increase as you become more comfortable and confident with the exercise. - If you experience any pain or discomfort during the exercise, stop immediately and seek guidance from a qualified fitness professional. - Maintain proper form and control throughout the movement to minimize the risk of injury.
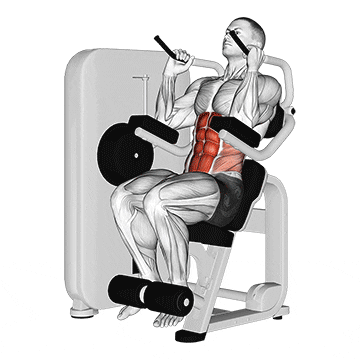
The lever seated crunch is an exercise that targets the abdominal muscles, specifically the rectus abdominis and the obliques. It involves using a lever or machine to provide resistance as you perform a crunch motion, helping to strengthen and tone the core muscles. This exercise is commonly performed in gyms and can be beneficial for improving core stability and enhancing overall abdominal strength. ## Instructions 1. Start by sitting on a lever seated crunch machine with your back against the backrest and your feet secured under the footpads. 2. Adjust the machine settings according to your height and comfort. Your knees should be bent at a 90-degree angle and your hands can be placed on the handles provided for support. 3. Engage your abdominal muscles by drawing your belly button towards your spine. 4. Slowly lean back, allowing the lever to move with you, while keeping your back in contact with the backrest. 5. Continue leaning back until you feel a gentle stretch in your abdominal muscles, being careful not to strain your lower back. 6. From the stretched position, contract your abdominal muscles and return to an upright seated position. 7. Pause for a moment at the top of the movement, squeezing your abdominal muscles. 8. Slowly lean back again to repeat the crunch motion, maintaining control throughout the exercise. 9. Repeat the movement for the desired number of repetitions. ## Variations - **Weighted Lever Seated Crunch:** Increase the resistance by holding a weight plate or dumbbell against your chest as you perform the exercise. - **Twisting Lever Seated Crunch:** Add a twisting motion to the exercise by rotating your torso to one side as you crunch, alternating sides with each repetition. This variation targets the oblique muscles to a greater extent. ## Muscles Worked The lever seated crunch primarily targets the following muscles: - Rectus abdominis (six-pack muscles) - Obliques (side abdominal muscles) ## Common Mistakes - **Using Momentum:** Avoid using momentum to swing your body during the exercise. Focus on controlled movements and engage the abdominal muscles throughout the entire range of motion. - **Pulling on the Neck:** Do not pull or strain your neck during the crunch. Keep your hands lightly touching the sides of your head or use the handles provided for support. - **Arching the Lower Back:** Maintain proper form by keeping your lower back in contact with the backrest throughout the exercise. Avoid excessive arching or rounding of the spine. ## Safety Precautions - If you have any pre-existing medical conditions or injuries, consult with a healthcare professional before attempting this exercise. - Adjust the machine settings according to your comfort and biomechanics. - Start with a manageable resistance and gradually increase as you become stronger and more comfortable with the exercise. - If you experience any pain or discomfort, particularly in the lower back, stop immediately and consult a qualified fitness professional. - Focus on proper form and control to minimize the risk of injury.
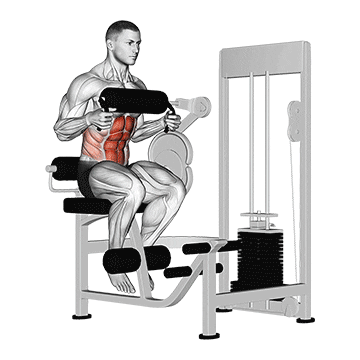
The lever seated crunch with a chest pad is an exercise that targets the abdominal muscles, particularly the rectus abdominis, while providing additional support for the upper body. It involves using a lever or machine with a chest pad to provide resistance as you perform a crunch motion. This exercise helps to strengthen and tone the core muscles while minimizing strain on the neck and upper back. It is commonly performed in gyms and can be beneficial for improving core stability and developing abdominal strength. ## Instructions 1. Start by sitting on a lever seated crunch machine with your back against the backrest and your feet secured under the footpads. 2. Adjust the machine settings according to your height and comfort. Ensure that the chest pad is positioned comfortably against your upper chest, just below the collarbone. 3. Place your hands on the side handles provided for support. 4. Engage your abdominal muscles by drawing your belly button towards your spine. 5. Slowly lean back, allowing the chest pad to move with you, while keeping your back in contact with the backrest. 6. Continue leaning back until you feel a gentle stretch in your abdominal muscles, being careful not to strain your lower back. 7. From the stretched position, contract your abdominal muscles and return to an upright seated position. 8. Pause for a moment at the top of the movement, squeezing your abdominal muscles. 9. Slowly lean back again to repeat the crunch motion, maintaining control throughout the exercise. 10. Repeat the movement for the desired number of repetitions. ## Variations - **Weighted Lever Seated Crunch:** Increase the resistance by holding a weight plate or dumbbell against your chest as you perform the exercise. - **Twisting Lever Seated Crunch:** Add a twisting motion to the exercise by rotating your torso to one side as you crunch, alternating sides with each repetition. This variation targets the oblique muscles to a greater extent. ## Muscles Worked The lever seated crunch with a chest pad primarily targets the following muscles: - Rectus abdominis (six-pack muscles) - Obliques (side abdominal muscles) ## Common Mistakes - **Using Momentum:** Avoid using momentum to swing your body during the exercise. Focus on controlled movements and engage the abdominal muscles throughout the entire range of motion. - **Pulling on the Neck:** Do not pull or strain your neck during the crunch. Keep your hands lightly touching the sides of your head or use the side handles provided for support. - **Arching the Lower Back:** Maintain proper form by keeping your lower back in contact with the backrest throughout the exercise. Avoid excessive arching or rounding of the spine. ## Safety Precautions - If you have any pre-existing medical conditions or injuries, consult with a healthcare professional before attempting this exercise. - Adjust the machine settings according to your comfort and biomechanics. - Start with a manageable resistance and gradually increase as you become stronger and more comfortable with the exercise. - If you experience any pain or discomfort, particularly in the lower back, stop immediately and consult a qualified fitness professional. - Focus on proper form and control to minimize the risk of injury.
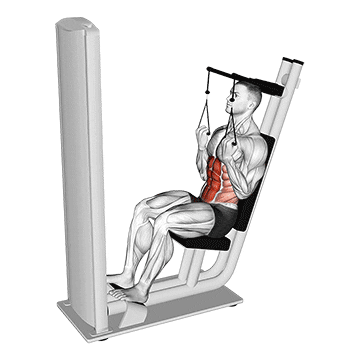
The lever seated crunch v.2 is an exercise that primarily targets the abdominal muscles, including the rectus abdominis, obliques, and deep core muscles. It involves using a lever or machine with a chest pad to provide resistance as you perform a crunch motion. This exercise helps to strengthen and tone the core muscles, improve core stability, and enhance overall abdominal strength. ## Instructions 1. Start by sitting on a lever seated crunch machine with your back against the backrest and your feet secured under the footpads. 2. Adjust the machine settings according to your height and comfort. Ensure that the chest pad is positioned comfortably against your upper chest, just below the collarbone. 3. Place your hands on the side handles provided for support. 4. Engage your abdominal muscles by drawing your belly button towards your spine. 5. Slowly lean back, allowing the chest pad to move with you, while keeping your back in contact with the backrest. 6. Continue leaning back until you feel a gentle stretch in your abdominal muscles, being careful not to strain your lower back. 7. From the stretched position, contract your abdominal muscles and return to an upright seated position. 8. As you crunch, focus on bringing your ribcage closer to your pelvis, rather than simply pulling your chest forward. 9. Pause for a moment at the top of the movement, squeezing your abdominal muscles. 10. Slowly lean back again to repeat the crunch motion, maintaining control throughout the exercise. 11. Repeat the movement for the desired number of repetitions. ## Variations - **Weighted Lever Seated Crunch:** Increase the resistance by holding a weight plate or dumbbell against your chest as you perform the exercise. - **Twisting Lever Seated Crunch:** Add a twisting motion to the exercise by rotating your torso to one side as you crunch, alternating sides with each repetition. This variation targets the oblique muscles to a greater extent. - **Leg Variation:** For an additional challenge, you can elevate your feet slightly off the footpads during the crunch motion. This engages the hip flexors and increases the difficulty of the exercise. ## Muscles Worked The lever seated crunch v.2 primarily targets the following muscles: - Rectus abdominis (six-pack muscles) - Obliques (side abdominal muscles) - Deep core muscles ## Common Mistakes - **Using Momentum:** Avoid relying on momentum to perform the crunch. Focus on controlled movements and engage the abdominal muscles throughout the entire range of motion. - **Pulling on the Neck:** Do not pull or strain your neck during the exercise. Keep your hands lightly touching the sides of your head or use the side handles provided for support. - **Arching the Lower Back:** Maintain proper form by keeping your lower back in contact with the backrest throughout the exercise. Avoid excessive arching or rounding of the spine. - **Not Fully Contracting the Abs:** Make sure to fully contract your abdominal muscles at the top of the movement to maximize the engagement and effectiveness of the exercise. ## Safety Precautions - If you have any pre-existing medical conditions or injuries, consult with a healthcare professional before attempting this exercise. - Adjust the machine settings according to your comfort and biomechanics. - Start with a manageable resistance and gradually increase as you become stronger and more comfortable with the exercise. - If you experience any pain or discomfort, particularly in the lower back, stop immediately and consult a qualified fitness professional. - Focus on proper form and control to minimize the risk of injury.
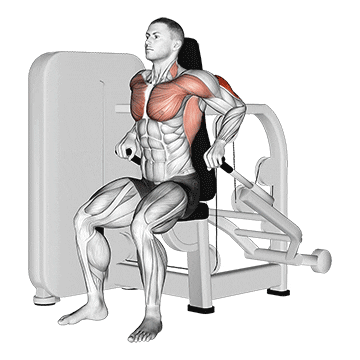
The lever seated dip is an exercise that targets the muscles of the upper body, specifically the triceps, chest, and shoulders. It involves using a lever or machine to perform a dipping motion, simulating the movement of traditional parallel bar dips. This exercise helps to strengthen and tone the triceps, improve upper body pushing strength, and enhance overall upper body muscular development. ## Instructions 1. Start by sitting on a lever seated dip machine with your back against the backrest and your feet secured on the footpads. 2. Adjust the machine settings according to your height and comfort. Your hands should be positioned on the handles provided, slightly wider than shoulder-width apart. 3. Engage your core and stabilize your shoulder blades by pulling them down and back. 4. Begin the exercise by lowering your body, allowing your elbows to bend and your chest to move forward. 5. Lower yourself until your upper arms are parallel to the floor or until you feel a stretch in your chest and shoulders. Keep your forearms vertical throughout the movement. 6. From the bottom position, push through your hands and extend your elbows to raise your body back up to the starting position. 7. Pause briefly at the top, maintaining control and tension in your muscles. 8. Repeat the movement for the desired number of repetitions. ## Variations - **Assisted Lever Seated Dip:** If you find the exercise challenging, you can use a lever seated dip machine that offers assistance by counterbalancing a portion of your body weight. - **Weighted Lever Seated Dip:** Increase the resistance by attaching weight plates or wearing a weighted vest during the exercise. - **Narrow Grip Lever Seated Dip:** Place your hands closer together on the handles to emphasize the triceps muscles to a greater extent. - **Forward Leaning Dip:** Leaning your torso forward slightly during the movement places more emphasis on the chest muscles. ## Muscles Worked The lever seated dip primarily targets the following muscles: - Triceps brachii (back of the upper arm) - Pectoralis major (chest muscles) - Anterior deltoids (front of the shoulders) ## Common Mistakes - **Lifting the Hips:** Avoid lifting or swinging your hips during the exercise. Keep your body in a stable position, engaging your core muscles throughout the movement. - **Bending at the Waist:** Maintain an upright position and avoid leaning forward excessively or bending at the waist. This ensures proper engagement of the target muscles. - **Partial Range of Motion:** Perform the exercise through a full range of motion, lowering yourself until your upper arms are parallel to the floor. Avoid shortening the movement by only partially bending your elbows. - **Rounding the Shoulders:** Keep your shoulder blades pulled down and back throughout the exercise to maintain proper shoulder alignment and prevent unnecessary stress on the shoulders. ## Safety Precautions - If you have any pre-existing medical conditions or injuries, consult with a healthcare professional before attempting this exercise. - Adjust the machine settings according to your comfort and biomechanics. - Start with a manageable resistance and gradually increase as you become stronger and more comfortable with the exercise. - Use controlled movements and avoid sudden or jerky motions. - If you experience any pain or discomfort, particularly in the shoulders, stop immediately and consult a qualified fitness professional. - Focus on proper form and technique to minimize the risk of injury.