
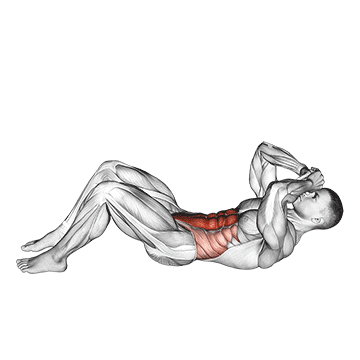
The 3/4 sit-up is an abdominal exercise that targets the rectus abdominis, commonly known as the "six-pack" muscles. It also engages the hip flexors and the muscles of the lower back. This exercise aims to strengthen the core muscles and improve overall abdominal stability. ## Instructions 1. Start by lying on your back on a mat or a flat surface with your knees bent and feet flat on the ground. Keep your feet hip-width apart. 2. Place your hands lightly behind your head, supporting your neck with your fingertips. Avoid pulling on your neck during the exercise. 3. Engage your abdominal muscles by drawing your belly button in towards your spine. 4. Slowly lift your upper body off the ground, curling your shoulders towards your knees. Keep your lower back in contact with the ground throughout the movement. 5. Stop when your torso is at a 45-degree angle from the ground, or when you feel a strong contraction in your abdominal muscles. This position is often referred to as the "three-quarter" point. 6. Hold this position briefly, then slowly lower your upper body back down to the starting position, maintaining control and engaging your core. 7. Repeat the movement for the desired number of repetitions. ## Variations - Beginner Variation: If you are a beginner or have difficulty performing the full 3/4 sit-up, you can start by lifting your upper body only a few inches off the ground and gradually increase the range of motion as your core strength improves. - Advanced Variation: To make the exercise more challenging, you can hold a weight plate or a medicine ball against your chest while performing the 3/4 sit-up. ## Muscles Worked - Rectus abdominis (six-pack muscles) - Hip flexors - Lower back muscles ## Common Mistakes - Using momentum: Avoid using momentum to lift your upper body. Focus on controlled movements and use your abdominal muscles to initiate the movement. - Neck strain: Do not pull on your neck with your hands during the exercise. Use your fingertips for light support only. - Arching the lower back: Keep your lower back in contact with the ground throughout the movement to maintain proper form and prevent strain on the lower back. ## Safety Precautions - Consult with a healthcare professional before starting any new exercise program, especially if you have a history of back or neck problems. - If you experience any pain or discomfort during the exercise, stop immediately and seek medical advice. - Engage your core muscles and maintain proper form throughout the exercise to minimize the risk of injury. - If you have difficulty maintaining stability or if you have a weak core, it is recommended to perform this exercise under the supervision of a qualified fitness professional.
The 45° side bend is an exercise that targets the oblique muscles, which are located on the sides of the abdomen. It helps strengthen and tone the obliques, improving core stability and enhancing overall posture. ## Instructions 1. Stand with your feet shoulder-width apart and keep your knees slightly bent. 2. Place one hand on your hip and extend the other hand overhead, keeping your arm straight. 3. Begin by slowly bending your torso sideways towards the hand placed on your hip. Keep your core engaged and maintain a straight posture throughout the movement. 4. Lower your torso until you feel a stretch along the side of your body. 5. Pause briefly at the bottom position, then return to the starting position by raising your torso back to an upright position. 6. Repeat the movement on the other side, switching the hand positions and bending towards the opposite side. 7. Perform the exercise for the desired number of repetitions on each side. ## Variations - Beginner Variation: If you are new to this exercise or have limited flexibility, you can perform the side bend movement with a smaller range of motion. Instead of bending all the way to the side, focus on a comfortable range that allows you to feel the muscles working without straining. - Advanced Variation: To increase the difficulty, you can hold a dumbbell or a kettlebell in the hand that is extended overhead while performing the 45° side bend. ## Muscles Worked - Obliques (internal and external) - Quadratus lumborum (lower back muscles) - Erector spinae (muscles along the spine) ## Common Mistakes - Leaning forward or backward: Maintain an upright posture and avoid leaning the upper body forward or backward during the exercise. - Bending too far: Avoid excessive bending or leaning to the side, as this can strain the muscles and compromise proper form. Focus on controlled and precise movements within a comfortable range. - Neglecting core engagement: Keep your core muscles activated throughout the exercise to provide stability and support for your spine. ## Safety Precautions - Perform this exercise on a stable surface to ensure balance and minimize the risk of falling or losing control. - If you have any existing back or spine conditions, it is advisable to consult with a healthcare professional before attempting this exercise. - Start with a light weight or no weight at all, especially if you are new to the exercise, and gradually increase the resistance as you become more comfortable and stronger. - If you experience any pain or discomfort during the exercise, stop immediately and consult a qualified fitness professional or healthcare provider.
The air bike, also known as the assault bike or fan bike, is a cardiovascular exercise that targets multiple muscle groups while providing an intense full-body workout. It is a stationary bike equipped with a fan that creates resistance as you pedal, making it an effective tool for burning calories, improving cardiovascular endurance, and strengthening the lower body and core muscles. ## Instructions 1. Adjust the seat height of the air bike so that when seated, your feet can comfortably reach the pedals with a slight bend in the knees. 2. Place your feet on the pedals and grasp the handlebars with an overhand grip, keeping your hands shoulder-width apart. 3. Engage your core muscles and maintain an upright posture throughout the exercise. 4. Start pedaling by pushing one foot down while pulling the opposite handlebar towards your chest. 5. As you pedal, coordinate your movements by continuously alternating between pulling and pushing motions. For example, as your right foot pushes down, pull the left handlebar towards your chest, and vice versa. 6. Keep a steady and controlled pace, maintaining a smooth and continuous motion. 7. You can adjust the resistance level on the air bike to increase or decrease the intensity of the workout. 8. Continue pedaling for the desired duration of your workout. ## Variations - Interval Training: Incorporate high-intensity interval training (HIIT) into your air bike workout by alternating between short bursts of maximum effort and periods of active recovery at a lower intensity. - Tabata Protocol: Follow the Tabata protocol, which consists of 20 seconds of all-out effort followed by 10 seconds of rest, repeated for a total of four minutes. - Upper Body Focus: To target the upper body more, you can perform the exercise with a higher emphasis on pulling the handlebars towards your chest, engaging the muscles of the back and arms. ## Muscles Worked - Quadriceps (front thigh muscles) - Hamstrings (back thigh muscles) - Glutes (buttocks muscles) - Calves - Core muscles (including rectus abdominis and obliques) - Upper body muscles (depending on the emphasis on pulling the handlebars) ## Common Mistakes - Slouching or rounding the back: Maintain an upright posture and avoid rounding your back throughout the exercise to prevent strain or injury. - Pedaling with only the legs: Engage your core muscles and actively involve your upper body by pulling and pushing the handlebars with each pedal stroke. - Using momentum: Focus on a controlled and deliberate pedaling motion, rather than relying on momentum to power through the exercise. ## Safety Precautions - Start with a warm-up and gradually increase the intensity of your air bike workout to avoid muscle strains or cardiovascular stress. - Maintain proper form and alignment throughout the exercise to prevent injury. - If you have any pre-existing medical conditions or injuries, consult with a healthcare professional before attempting the air bike exercise. - Stay hydrated during your workout and listen to your body's signals. If you experience any pain, dizziness, or shortness of breath, stop exercising and seek medical attention if necessary.
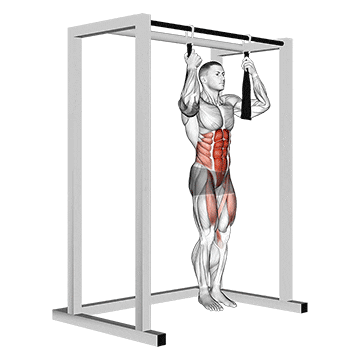
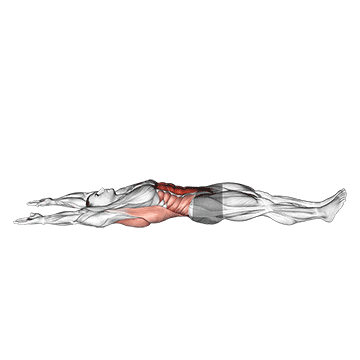
Arm Slingers Hanging Straight Legs is an exercise that targets the abdominal muscles, particularly the lower abdominals. It also engages the hip flexors and the muscles of the upper body, including the arms and shoulders. This exercise helps to improve core strength, stability, and overall body control. ## Instructions 1. Find a sturdy pull-up bar or secure a suspension trainer (such as TRX) to a stable anchor point. 2. Stand facing the pull-up bar or suspension trainer. Place your hands on the bar/suspension trainer and lean back slightly, keeping your arms fully extended. 3. Engage your core muscles to lift your legs off the ground, bringing them up in front of you until they are parallel to the floor. Keep your legs straight throughout the movement. 4. Hold this position for a brief moment, focusing on maintaining stability and keeping your body aligned. 5. Slowly lower your legs back down to the starting position with control, avoiding any swinging or jerking motions. 6. Repeat the exercise for the desired number of repetitions. ## Variations - To make the exercise easier, you can perform knee tucks instead of straight leg raises. Bend your knees and bring them towards your chest, focusing on engaging your core. - If you want to increase the difficulty, you can add ankle weights or wear a weighted vest while performing the exercise. ## Muscles Worked - Lower abdominals (rectus abdominis) - Hip flexors - Upper body muscles (arms and shoulders) ## Common Mistakes - Swinging or using momentum to lift the legs: This reduces the effectiveness of the exercise. Focus on controlled movements and avoid swinging or jerking motions. - Allowing the lower back to arch excessively: Maintain a neutral spine position throughout the exercise. Engage your core and avoid overarching the lower back. - Not fully extending the legs: Make sure to raise your legs until they are parallel to the floor, keeping them straight throughout the movement. ## Safety Precautions - Ensure that the pull-up bar or suspension trainer is securely anchored and can support your body weight. - Start with a suitable level of difficulty and gradually progress as your strength and control improve. - If you experience any discomfort or pain in your shoulders or lower back, discontinue the exercise and consult a fitness professional or healthcare provider.
The Arms Apart Circular Toe Touch is an exercise that targets the core muscles, particularly the obliques, while also engaging the hip flexors, hamstrings, and lower back. This exercise helps to improve flexibility, mobility, and core strength. ## Instructions 1. Stand with your feet slightly wider than shoulder-width apart and toes pointed slightly outward. 2. Extend your arms out to the sides, parallel to the floor, with palms facing down. 3. Engage your core and keep your back straight throughout the exercise. 4. Slowly bend forward at the waist, reaching your right hand toward your left foot, while simultaneously rotating your torso to the left. 5. Keep your left arm extended out to the side as you perform the movement. 6. Return to the starting position and repeat the movement on the other side, reaching your left hand toward your right foot while rotating your torso to the right. 7. Continue alternating sides in a smooth and controlled manner for the desired number of repetitions. ## Variations - If you have limited flexibility, you can perform a modified version by bending your knees slightly while reaching toward your feet. - To increase the intensity of the exercise, you can hold a light dumbbell or kettlebell in each hand during the movement. ## Muscles Worked - Obliques (side abdominal muscles) - Hip flexors - Hamstrings - Lower back ## Common Mistakes - Rounding the back: Maintain a straight back throughout the exercise and avoid rounding the shoulders or hunching over. - Using momentum: Perform the movement in a slow and controlled manner, focusing on engaging the core muscles and avoiding any swinging or jerking motions. - Not fully rotating the torso: Ensure that you rotate your torso to the side while reaching toward your foot to engage the oblique muscles effectively. ## Safety Precautions - If you have any pre-existing back or hip injuries, consult with a healthcare professional before attempting this exercise. - Start with a comfortable range of motion and gradually increase it as your flexibility improves. - If you experience any pain or discomfort during the exercise, stop immediately and seek guidance from a qualified fitness professional.
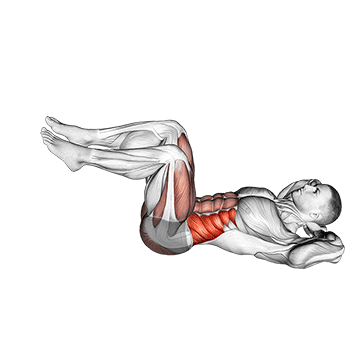
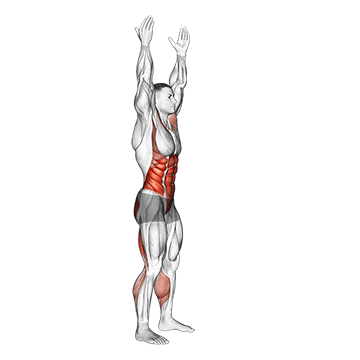
The Arms Overhead Full Sit-Up is an exercise that targets the abdominal muscles, specifically the rectus abdominis, while also engaging the hip flexors and the muscles of the upper body. This exercise helps to strengthen the core, improve abdominal definition, and enhance overall core stability. ## Instructions 1. Lie flat on your back on an exercise mat or a comfortable surface with your legs extended and your arms fully extended overhead, perpendicular to the floor. 2. Engage your core muscles and press your lower back into the mat. 3. Slowly lift your upper body off the mat, initiating the movement from your core muscles. 4. Continue to roll up through your spine until your torso is upright, with your arms reaching toward your toes. 5. At the top of the movement, briefly pause and squeeze your abdominal muscles. 6. Reverse the movement and slowly lower your back down to the starting position, segment by segment, while maintaining control. 7. Repeat the exercise for the desired number of repetitions. ## Variations - To make the exercise easier, you can bend your knees and place your feet flat on the floor, performing a modified sit-up. - If you want to increase the challenge, you can hold a weight plate or a dumbbell against your chest while performing the sit-up. ## Muscles Worked - Rectus abdominis (six-pack muscles) - Hip flexors - Upper body muscles (shoulders, chest, and arms) ## Common Mistakes - Using momentum: Avoid using momentum to lift your body up. Focus on a controlled movement, relying on your core strength to initiate the sit-up. - Pulling on the neck: Avoid placing your hands behind your head and pulling on your neck during the sit-up. This can strain the neck muscles. Keep your arms extended overhead throughout the movement. - Not engaging the core fully: Make sure to engage your core muscles throughout the exercise. This helps to stabilize your spine and maximize the effectiveness of the sit-up. ## Safety Precautions - If you have any pre-existing back or neck conditions, consult with a healthcare professional before attempting this exercise. - Perform the exercise on a stable surface to ensure proper support and avoid slipping. - If you experience any pain or discomfort in your back, neck, or other areas during the exercise, stop immediately and seek guidance from a qualified fitness professional.
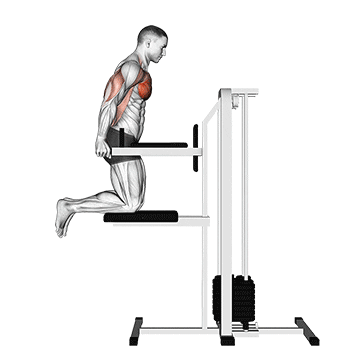
The Assisted Chest Dip (Kneeling) is an exercise that targets the chest muscles, specifically the pectoralis major, while also engaging the triceps and the muscles of the shoulders and core. This exercise helps to develop upper body strength and muscular endurance. ## Instructions 1. Set up a dip station or use parallel bars at a height that allows you to comfortably kneel and reach the bars with your hands. 2. Kneel down on a mat or a padded surface in front of the dip station or parallel bars. 3. Place your hands on the bars, slightly wider than shoulder-width apart, with palms facing down. 4. Engage your core and keep your chest up as you lower yourself down by bending your elbows, maintaining control throughout the movement. 5. Lower yourself until your chest is level with the bars or until you feel a stretch in your chest muscles. 6. Push through your hands and engage your chest and triceps to raise yourself back up to the starting position. 7. Repeat the exercise for the desired number of repetitions. ## Variations - If you find the exercise too challenging, you can use resistance bands or a partner to assist you by holding your legs or providing support. - To increase the difficulty, you can add weight by wearing a weighted vest or holding a dumbbell between your feet. ## Muscles Worked - Pectoralis major (chest muscles) - Triceps - Anterior deltoids (front shoulders) - Core muscles (stabilization) ## Common Mistakes - Allowing the shoulders to shrug: Keep your shoulders down and away from your ears throughout the exercise. This helps to maintain proper form and prevent unnecessary strain on the shoulder joints. - Leaning too far forward or backward: Maintain an upright posture and avoid excessive leaning in any direction. This ensures proper engagement of the chest muscles and prevents excessive stress on other areas. - Not fully extending the arms: Make sure to fully extend your elbows at the top of the movement, locking out your arms. This ensures full range of motion and maximizes muscle activation. ## Safety Precautions - Ensure that the dip station or parallel bars are stable and can support your body weight. - If you have any shoulder or elbow issues, consult with a healthcare professional before attempting this exercise. - Start with a suitable level of difficulty and gradually progress as your strength and stability improve. - If you experience any pain or discomfort during the exercise, stop immediately and seek guidance from a qualified fitness professional.
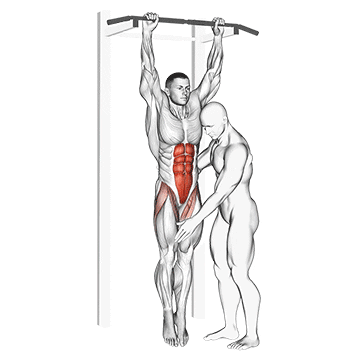
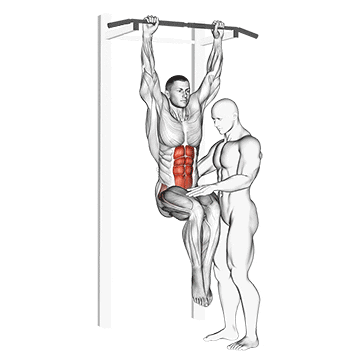
The Assisted Hanging Knee Raise is an exercise that targets the abdominal muscles, specifically the lower abdominals, while also engaging the hip flexors and the muscles of the upper body. This exercise helps to strengthen the core, improve hip flexibility, and enhance overall body control. ## Instructions 1. Find a sturdy pull-up bar or secure a suspension trainer (such as TRX) to a stable anchor point. 2. Stand facing the pull-up bar or suspension trainer. Place your hands on the bar/suspension trainer and lean back slightly, keeping your arms fully extended. 3. Engage your core muscles and lift your knees towards your chest, bending them at a 90-degree angle. Your thighs should be parallel to the floor. 4. Hold this position for a brief moment, focusing on maintaining stability and keeping your body aligned. 5. Slowly lower your legs back down to the starting position with control, avoiding any swinging or jerking motions. 6. Repeat the exercise for the desired number of repetitions. ## Variations - To make the exercise easier, you can perform knee tucks instead of raising your knees to a 90-degree angle. Bend your knees and bring them towards your chest, focusing on engaging your core. - If you want to increase the difficulty, you can perform straight leg raises instead of knee raises. Keep your legs straight throughout the movement and raise them towards the ceiling. ## Muscles Worked - Lower abdominals (rectus abdominis) - Hip flexors - Upper body muscles (arms and shoulders) ## Common Mistakes - Swinging or using momentum: This reduces the effectiveness of the exercise. Focus on controlled movements and avoid swinging or jerking motions. - Allowing the lower back to arch excessively: Maintain a neutral spine position throughout the exercise. Engage your core and avoid overarching the lower back. - Not fully raising the knees or legs: Make sure to lift your knees or legs to the desired position, engaging your abdominal muscles fully. ## Safety Precautions - Ensure that the pull-up bar or suspension trainer is securely anchored and can support your body weight. - Start with a suitable level of difficulty and gradually progress as your strength and control improve. - If you experience any discomfort or pain in your shoulders or lower back, discontinue the exercise and consult a fitness professional or healthcare provider.
The Assisted Hanging Knee Raise with Throw Down is an advanced variation of the hanging knee raise exercise. It targets the abdominal muscles, particularly the lower abdominals, while also engaging the hip flexors and upper body muscles. This exercise challenges core stability, coordination, and explosive power. ## Instructions 1. Find a sturdy pull-up bar or secure a suspension trainer (such as TRX) to a stable anchor point. 2. Stand facing away from the pull-up bar or suspension trainer, with your back towards it. Hold onto the bar or handles with an overhand grip, shoulder-width apart. 3. Lean back slightly and engage your core muscles. Your arms should be fully extended. 4. Lift your knees towards your chest, bending them at a 90-degree angle, just like in the hanging knee raise exercise. 5. From this knee tuck position, explosively extend your legs and kick them straight out in front of you, simultaneously releasing your grip on the bar or handles. 6. Allow your body to swing forward as your legs extend. Your body will move in an arched trajectory. 7. As you swing back, quickly re-grab the bar or handles and prepare for the next repetition. 8. Repeat the exercise for the desired number of repetitions. ## Variations - If you find this exercise too challenging, you can perform regular assisted hanging knee raises without the throw down. Focus on mastering the basic exercise before progressing to the throw down variation. - For an added challenge, you can perform the throw down exercise with straight legs instead of knees bent. This requires more core strength and control. ## Muscles Worked - Lower abdominals (rectus abdominis) - Hip flexors - Upper body muscles (arms and shoulders) - Core muscles for stability and control ## Common Mistakes - Using excessive momentum: Maintain control throughout the exercise. Avoid relying on momentum to swing your body, and instead, focus on controlled movements. - Allowing the lower back to arch excessively: Keep your core engaged and maintain a neutral spine position to avoid overarching the lower back. - Not fully extending the legs: Aim to fully extend your legs in the throw down portion of the movement, engaging your core and hip flexors. ## Safety Precautions - Ensure that the pull-up bar or suspension trainer is securely anchored and can support your body weight. - Prioritize proper form and technique over speed or explosiveness. Focus on control and gradually increase the intensity of the exercise as you progress. - If you experience any discomfort or pain in your shoulders, lower back, or other areas, discontinue the exercise and consult a fitness professional or healthcare provider.