

The cable incline fly is an exercise that targets the muscles of the chest, particularly the upper chest (clavicular portion of the pectoralis major) and the front shoulders (anterior deltoids). It involves performing a fly motion while seated on an incline bench and using cables for resistance. This exercise helps to develop chest strength, improve chest definition, and enhance overall upper body aesthetics. ##Instructions 1. Set up an incline bench at a 30-45 degree angle and position it in front of a cable machine. 2. Attach D-handles or cables to the low pulleys of the cable machine. 3. Sit on the incline bench and position yourself with your feet firmly on the ground, back against the bench, and a natural arch in your lower back. 4. Grasp the D-handles or cables with an overhand grip (palms facing down) at shoulder width or slightly wider. 5. Retract your shoulder blades and depress them down, creating a stable and supported position. 6. Take a deep breath, brace your core, and bring your arms up to shoulder level with a slight bend in your elbows. Your palms should be facing forward. 7. Open your arms in a sweeping motion, bringing them away from each other and towards the sides of your body. 8. Focus on squeezing your chest muscles and feeling a stretch in the targeted area. 9. Pause briefly at the end of the movement, feeling the contraction in your chest muscles. 10. Slowly and under control, return your arms back to the starting position, resisting the tension of the cables. 11. Repeat for the desired number of repetitions. ##Variations - Single-Arm Cable Incline Fly: Perform the exercise one arm at a time, using a single D-handle or cable attachment. - Dumbbell Incline Fly: Instead of using cables, use dumbbells and perform the fly motion while lying on an incline bench. ##Muscles Worked The cable incline fly primarily targets the upper chest (clavicular portion of the pectoralis major) and the front shoulders (anterior deltoids). It also engages the biceps and stabilizer muscles of the core and upper back to support the fly motion. ##Common Mistakes - Using excessive weight: Start with a weight that allows you to maintain proper form and control throughout the exercise. Using too much weight can compromise your form and increase the risk of injury. - Allowing the elbows to bend too much: Maintain a slight bend in your elbows throughout the exercise. Avoid excessive elbow flexion, as it may shift the focus away from the chest muscles. - Bringing the arms too far back: Control the range of motion and avoid bringing your arms too far back behind your body. This can place stress on the shoulder joint and reduce the engagement of the chest muscles. - Not maintaining proper form: Keep your core engaged, shoulders retracted and depressed, and back against the bench throughout the exercise. Avoid arching your lower back or shrugging your shoulders. ##Safety Precautions - Use a weight that allows you to maintain proper form and control throughout the exercise. - If you have any pre-existing shoulder or chest injuries, consult with a healthcare professional before attempting this exercise. - Maintain proper form throughout the movement and avoid using excessive weight that may compromise your form or strain your joints. - If you experience any pain or discomfort, stop the exercise and consult a fitness professional or healthcare provider.
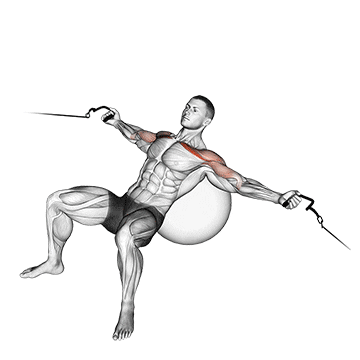
The cable incline fly on a stability ball is an advanced variation of the traditional cable incline fly exercise. It targets the muscles of the chest, particularly the upper chest (clavicular portion of the pectoralis major), and the front shoulders (anterior deltoids). Performing this exercise on a stability ball adds an element of instability, engaging the core muscles and requiring greater balance and control. It helps to develop chest strength, improve chest definition, and enhance overall upper body stability and coordination. ##Instructions 1. Set up an incline bench at a 30-45 degree angle and position it in front of a cable machine. 2. Place a stability ball on the floor in front of the bench and carefully position yourself in a prone position with your midsection resting on the ball. 3. Walk your feet forward and roll your body onto the ball until your shins are resting on the ball and your body forms a straight line from head to heels. 4. Grab the D-handles or cables attached to the low pulleys of the cable machine with an overhand grip (palms facing down) at shoulder width or slightly wider. 5. Allow your arms to hang straight down towards the floor, maintaining a slight bend in your elbows. 6. Retract your shoulder blades, depress them down, and engage your core for stability. 7. Take a deep breath, brace your core, and simultaneously lift your arms out to the sides in a sweeping motion. 8. Focus on squeezing your chest muscles and feeling a stretch in the targeted area. 9. Pause briefly at the end of the movement, feeling the contraction in your chest muscles. 10. Slowly and under control, return your arms back to the starting position, resisting the tension of the cables. 11. Repeat for the desired number of repetitions. ##Variations - Dumbbell Incline Fly on Stability Ball: Instead of using cables, use dumbbells and perform the fly motion while lying on an incline bench with your midsection resting on a stability ball. - Resistance Band Incline Fly on Stability Ball: Attach resistance bands to an anchor point and perform the fly motion while lying on an incline bench with your midsection resting on a stability ball. ##Muscles Worked The cable incline fly on a stability ball primarily targets the upper chest (clavicular portion of the pectoralis major) and the front shoulders (anterior deltoids). It also engages the core muscles, including the abdominals and lower back, to stabilize the body on the stability ball. ##Common Mistakes - Not maintaining proper balance and stability: Focus on engaging your core muscles and maintaining a stable position on the stability ball throughout the exercise. Avoid excessive rocking or shifting of the ball. - Using excessive weight: Start with a weight that allows you to maintain proper form and control while balancing on the stability ball. Using too much weight can compromise your form and increase the risk of injury. - Allowing the elbows to bend too much: Maintain a slight bend in your elbows throughout the exercise. Avoid excessive elbow flexion, as it may shift the focus away from the chest muscles. - Bringing the arms too far back: Control the range of motion and avoid bringing your arms too far back behind your body. This can place stress on the shoulder joint and reduce the engagement of the chest muscles. - Not maintaining proper form: Keep your core engaged, shoulders retracted and depressed, and body in a straight line from head to heels while balancing on the stability ball. Avoid arching your lower back or shrugging your shoulders. ##Safety Precautions - Ensure that the stability ball is properly inflated and able to support your body weight before attempting the exercise. -
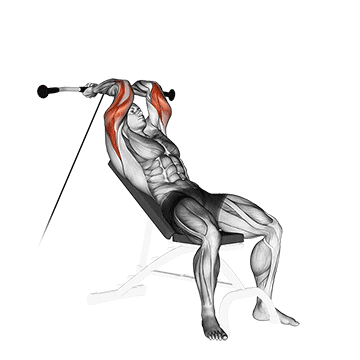
The cable incline triceps extension is an exercise that primarily targets the triceps muscles, located on the back of the upper arm. This exercise is performed using a cable machine with an incline bench. It involves extending the arms against the resistance provided by the cable, effectively working the triceps and promoting strength and muscle development in that area. ##Instructions Here are the step-by-step instructions for performing the cable incline triceps extension: 1. Set up the cable machine by attaching a straight bar or a rope handle to the high pulley. Adjust the incline bench to a comfortable angle, usually around 30-45 degrees. 2. Stand facing away from the cable machine and position yourself on the incline bench. Grab the straight bar or rope handle with an overhand grip, keeping your hands shoulder-width apart. 3. Extend your arms straight overhead, fully stretching your triceps. This is your starting position. 4. While keeping your upper arms stationary and close to your head, lower the bar or handle by bending your elbows. Your forearms should move only at the elbows, maintaining a vertical position. 5. Continue lowering the resistance until your forearms are parallel to the ground or slightly below, feeling a stretch in your triceps. 6. Pause for a moment, then exhale and extend your arms back to the starting position by contracting your triceps. Keep your upper arms stationary throughout the movement. 7. Repeat the exercise for the desired number of repetitions. ##Variations Here are some variations of the cable incline triceps extension: 1. One-Arm Cable Incline Triceps Extension: Perform the exercise using one arm at a time. This variation helps improve muscle balance and allows for better focus on each arm individually. 2. Reverse Grip Cable Incline Triceps Extension: Instead of an overhand grip, use an underhand grip on the bar or handle. This variation places more emphasis on the medial and long heads of the triceps. ##Muscles Worked The cable incline triceps extension primarily targets the triceps muscles, specifically the lateral head. It also engages the long and medial heads of the triceps to a lesser extent. Additionally, this exercise recruits the muscles of the shoulders and forearms as stabilizers. ##Common Mistakes Here are some common mistakes to avoid while performing the cable incline triceps extension: 1. Flaring Elbows: Avoid letting your elbows drift out to the sides during the exercise. Keep your upper arms stationary and close to your head to maintain proper form and target the triceps effectively. 2. Using Excessive Momentum: Resist the temptation to swing or use momentum to lift the weight. Focus on controlled movements and maintain tension in the triceps throughout the exercise. 3. Insufficient Range of Motion: Ensure that you lower the bar or handle until your forearms are parallel to the ground or slightly below. Going too high or too low may limit the effectiveness of the exercise. ##Safety Precautions To perform the cable incline triceps extension safely: 1. Choose an appropriate weight that allows you to maintain proper form throughout the exercise. 2. Warm up your triceps and shoulders with dynamic stretches or light resistance exercises before starting the exercise. 3. Keep your core engaged and maintain a stable position on the incline bench throughout the movement. 4. If you have any pre-existing shoulder or elbow injuries, consult with a healthcare professional or fitness trainer before attempting this exercise to ensure it is suitable for your condition. Remember to listen to your body, start with lighter weights if you're a beginner, and gradually increase the intensity as your strength improves.
The cable judo flip is a dynamic exercise that targets the core muscles, particularly the obliques, while also engaging the upper body and lower body. It mimics the flipping motion used in judo throws, hence the name. This exercise helps improve core stability, rotational power, and overall functional strength. ##Instructions Here are the step-by-step instructions for performing the cable judo flip: 1. Start by setting up a cable machine with a handle attachment at a mid to high level. Stand sideways to the machine with your feet shoulder-width apart and your knees slightly bent. 2. Reach across your body with the hand closest to the cable machine and grab the handle with an overhand grip. 3. Position your other hand across your body, resting on the opposite shoulder or chest area. This hand will act as a guide and provide stability during the exercise. 4. Engage your core and initiate the movement by explosively rotating your hips and torso away from the cable machine. Simultaneously, extend your arm and flip the handle across your body, as if performing a judo throw. 5. Allow your feet to pivot naturally, allowing for full rotation. Keep your eyes focused on the cable handle throughout the movement. 6. Once you've reached the end of the rotation, quickly and forcefully reverse the movement by pulling the handle back towards the cable machine while rotating back to the starting position. 7. Repeat the exercise for the desired number of repetitions, then switch sides and perform the same movement in the opposite direction. ##Variations Here are some variations of the cable judo flip: 1. One-Arm Cable Judo Flip: Perform the exercise using only one arm at a time. This variation adds an extra challenge to core stability and rotational strength. 2. Resistance Band Judo Flip: Instead of using a cable machine, you can attach a resistance band to a sturdy anchor point and perform the same flipping motion. This variation provides a different type of resistance and can be done anywhere. ##Muscles Worked The cable judo flip primarily targets the core muscles, including the obliques, rectus abdominis, and transverse abdominis. It also engages the muscles of the shoulders, back, and hips, as they are involved in generating the rotational power. ##Common Mistakes Here are some common mistakes to avoid while performing the cable judo flip: 1. Poor Core Engagement: Ensure that your core is fully engaged throughout the movement. Keep your abdominal muscles tight and maintain good posture to maximize the effectiveness of the exercise and protect your lower back. 2. Over-rotation: Avoid excessive rotation during the movement, as it may strain your spine or lead to loss of balance. Focus on controlled and explosive rotations within a comfortable range of motion. 3. Using Excessive Momentum: Do not rely solely on momentum to perform the exercise. It's important to initiate the movement from your core and actively engage the muscles throughout the flipping motion. ##Safety Precautions To perform the cable judo flip safely: 1. Choose an appropriate resistance level on the cable machine or resistance band that challenges you without compromising your form. 2. Maintain a stable base by keeping your feet grounded and your knees slightly bent throughout the exercise. 3. Start with lighter resistance or lower intensity if you're a beginner and gradually progress as your strength and stability improve. 4. If you have any pre-existing back or shoulder injuries, it's advisable to consult with a healthcare professional or fitness trainer before attempting this exercise to ensure it is suitable for your condition. Remember to always prioritize proper form and technique, and listen to your body. If you experience any pain or discomfort, stop the exercise and seek guidance from a qualified professional.
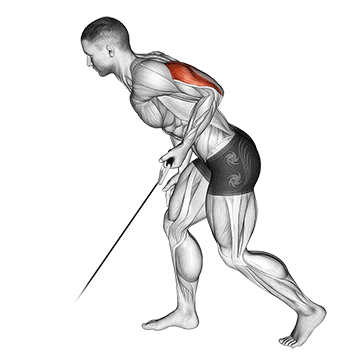
The cable kickback is an exercise that primarily targets the triceps muscles, located on the back of the upper arm. It involves extending the arm backward against the resistance provided by the cable, effectively isolating and strengthening the triceps. This exercise also engages the muscles of the shoulders and core for stability and control. ##Instructions Here are the step-by-step instructions for performing the cable kickback: 1. Set up a cable machine with a handle attachment at a low position. Stand facing the machine with your feet shoulder-width apart and your knees slightly bent. 2. Grab the handle with an overhand grip and step back, creating tension on the cable. Position your upper body at a slight forward lean, keeping your back straight and core engaged. 3. Start with your arm bent at a 90-degree angle, with your upper arm parallel to the ground and your forearm pointing straight down. This is your starting position. 4. While keeping your upper arm stationary and close to your side, exhale and extend your forearm backward by contracting your triceps. Focus on using the triceps to move the weight. 5. Continue extending the arm until it is fully straightened, feeling a contraction in the triceps. 6. Pause for a moment at the top of the movement, then inhale and slowly return your forearm to the starting position by bending your elbow. 7. Repeat the exercise for the desired number of repetitions, then switch arms and perform the same movement on the opposite side. ##Variations Here are some variations of the cable kickback: 1. Single-Arm Cable Kickback: Perform the exercise one arm at a time, allowing for a more focused and controlled movement. This variation helps improve muscle balance and symmetry. 2. Resistance Band Kickback: If you don't have access to a cable machine, you can use a resistance band instead. Attach the band to a sturdy anchor point and perform the same kicking motion with your arm. ##Muscles Worked The cable kickback primarily targets the triceps muscles, specifically the lateral head. It also engages the long and medial heads of the triceps to a lesser extent. Additionally, the exercise recruits the muscles of the shoulders and core for stability and control. ##Common Mistakes Here are some common mistakes to avoid while performing the cable kickback: 1. Using Excessive Momentum: Avoid swinging or using momentum to lift the weight. Focus on controlled movements and maintain tension in the triceps throughout the exercise. 2. Elbow Positioning: Ensure that your upper arm remains stationary and close to your side throughout the movement. Avoid letting your elbow flare out to the side, as it can diminish the effectiveness of the exercise. 3. Insufficient Range of Motion: Aim to fully extend your forearm backward until it is straight, while maintaining control. Avoid stopping short or hyperextending the arm, as it can put unnecessary stress on the elbow joint. ##Safety Precautions To perform the cable kickback safely: 1. Select an appropriate weight that challenges your triceps without compromising your form. Start with lighter resistance if you're a beginner and gradually increase as your strength improves. 2. Maintain proper posture throughout the exercise by keeping your back straight and your core engaged. Avoid rounding your shoulders or arching your lower back. 3. If you have any pre-existing elbow or shoulder injuries, it's advisable to consult with a healthcare professional or fitness trainer before attempting this exercise to ensure it is suitable for your condition. 4. Start with a thorough warm-up to prepare the muscles and joints for the exercise. Incorporate dynamic stretches and movements for the triceps and shoulders. Remember to listen to your body and perform the exercise with control and proper form. If you experience any pain or discomfort, stop the
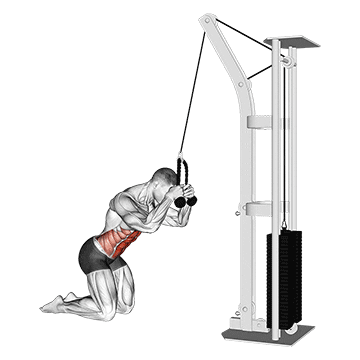
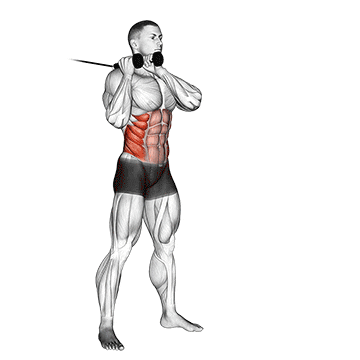
The cable kneeling crunch is an exercise that targets the abdominal muscles, specifically the rectus abdominis, commonly known as the "six-pack" muscles. This exercise involves using a cable machine to provide resistance while performing a crunching motion, effectively strengthening and sculpting the core. ##Instructions Here are the step-by-step instructions for performing the cable kneeling crunch: 1. Set up a cable machine with a rope attachment at a high position. Kneel down facing the machine, with your knees hip-width apart and your feet anchored securely. 2. Grab the rope handles with an overhand grip, positioning your hands at the sides of your head. Your elbows should be bent and pointing out to the sides. 3. Keeping your hips stationary, exhale and engage your core muscles. This will involve contracting your abdominal muscles and pulling your belly button toward your spine. 4. While maintaining the contraction in your core, initiate the movement by flexing your spine and curling your torso forward. Focus on bringing your ribcage closer to your pelvis. 5. Continue the crunching motion until your upper body is at a 45-degree angle or until you feel a strong contraction in your abdominal muscles. 6. Pause briefly at the top of the movement, then inhale and slowly return to the starting position by extending your spine and lowering your torso back down. 7. Repeat the exercise for the desired number of repetitions, ensuring that you maintain control and engage your core throughout each repetition. ##Variations Here are some variations of the cable kneeling crunch: 1. Single-Arm Cable Kneeling Crunch: Perform the exercise using only one arm at a time. This variation adds an extra challenge to core stability and allows for better focus on each side of the abdominal muscles. 2. Cable Standing Crunch: Instead of kneeling, perform the exercise in a standing position. Adjust the cable machine to a low position and grab the handles with your hands positioned at your sides. Bend at the waist and crunch your torso forward, engaging your core muscles. ##Muscles Worked The cable kneeling crunch primarily targets the rectus abdominis, which is responsible for flexing the spine and creating the "six-pack" appearance. Additionally, it engages the internal and external obliques, which assist in rotating and stabilizing the torso. ##Common Mistakes Here are some common mistakes to avoid while performing the cable kneeling crunch: 1. Using Momentum: Avoid using momentum or swinging your upper body to perform the crunch. Focus on controlled and deliberate movements to engage the core muscles effectively. 2. Neck Strain: Do not pull on your neck or use your hands to forcefully lift your head during the exercise. Instead, keep your hands at the sides of your head for support, but rely on your abdominal muscles to lift your torso. 3. Insufficient Range of Motion: Aim to bring your ribcage close to your pelvis by fully flexing your spine during the crunch. Avoid performing shallow movements that limit the engagement of the abdominal muscles. ##Safety Precautions To perform the cable kneeling crunch safely: 1. Choose an appropriate weight on the cable machine that challenges your abdominal muscles without compromising your form. Start with lighter resistance if you're a beginner and gradually increase the intensity. 2. Maintain proper alignment throughout the exercise by keeping your spine neutral and your head in line with your torso. Avoid excessive rounding or arching of the back. 3. If you have any pre-existing back or neck injuries, it's advisable to consult with a healthcare professional or fitness trainer before attempting this exercise to ensure it is suitable for your condition. 4. Start with a thorough warm-up to prepare the muscles and joints for the exercise. Incorporate dynamic stretches and movements for the core muscles. Remember to
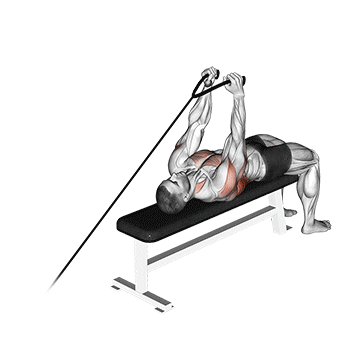
The cable lying extension pullover is an exercise that targets the muscles of the upper body, including the latissimus dorsi, triceps, and chest. By using a rope attachment and performing a combination of extension and pullover movements, this exercise helps to strengthen and tone the muscles of the back and arms while engaging the core for stability. ##Instructions 1. Start by lying face-up on a flat bench with your head positioned close to the cable machine. 2. Attach a rope handle to the high pulley of the cable machine. 3. Grab the rope handle with an overhand grip, palms facing down. 4. Extend your arms fully overhead, keeping a slight bend in the elbows. 5. Engage your core muscles and keep your feet firmly planted on the ground for stability. 6. Begin the movement by pulling the rope handle down towards your hips while maintaining the extension of your arms. 7. As you pull the rope handle down, allow your upper arms to move slightly behind your head, simulating a pullover motion. 8. Focus on squeezing your shoulder blades together and engaging your back muscles. 9. Continue the movement until your hands are near your hips, feeling a stretch in your chest and shoulders. 10. Slowly reverse the movement by extending your arms back overhead, returning to the starting position. 11. Repeat for the desired number of repetitions. ##Variations - Single-arm cable lying extension pullover: Instead of using both arms simultaneously, you can perform the exercise one arm at a time. This variation allows for better focus on each side individually and helps address any muscle imbalances. - Dumbbell lying extension pullover: If a cable machine is not available, you can perform a similar movement using a dumbbell. Lie face-up on a bench and hold a dumbbell with both hands extended overhead. Lower the dumbbell behind your head while keeping your arms extended, then bring it back up overhead. ##Muscles Worked - Primary muscles: Latissimus dorsi (lats), triceps, chest - Secondary muscles: Rhomboids, deltoids, core muscles ##Common Mistakes - Using excessive weight: Avoid using too much weight, as it can compromise your form and lead to injury. Start with a weight that allows you to maintain proper technique and gradually increase the resistance as your strength improves. - Allowing the lower back to arch: Keep your lower back pressed against the bench throughout the exercise. Avoid excessive arching, which can strain the lower back. Engage your core muscles to maintain stability. - Using momentum: Perform the movement in a controlled manner, avoiding any jerking or swinging motions. Focus on using the targeted muscles to initiate and control the movement. - Holding the breath: Remember to breathe naturally throughout the exercise. Inhale during the initial extension and pullover, and exhale as you return to the starting position. ##Safety Precautions - Ensure that the cable machine and rope handle are properly set up and secure before starting the exercise. - Choose a weight that challenges your muscles but still allows you to maintain proper form and control. - If you have any existing shoulder or lower back injuries, consult with a healthcare professional before attempting this exercise. - Engage your core muscles to maintain stability and protect your lower back. - If you experience any pain or discomfort during the exercise, stop immediately and seek guidance from a fitness professional.
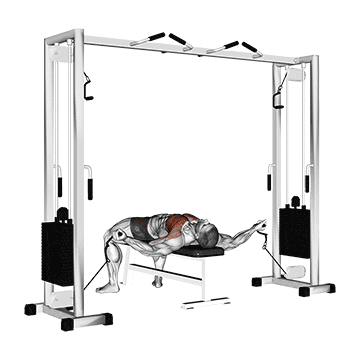
The cable lying fly is an exercise that targets the muscles of the chest, specifically the pectoralis major and minor. By performing a fly motion while lying on a bench and using cables, this exercise helps to strengthen and tone the chest muscles, enhancing upper body aesthetics and improving functional upper body strength. ##Instructions 1. Start by lying face-up on a flat bench positioned between two cable pulleys. 2. Adjust the bench so that your feet are flat on the ground and your knees are bent at a comfortable angle. 3. Grasp the cable handles with a neutral grip (palms facing each other) and let your arms fully extend toward the pulleys. 4. Keep a slight bend in your elbows throughout the exercise to avoid locking them. 5. Begin the movement by opening your arms out to the sides in a wide arc, like you're hugging a large tree. 6. Focus on engaging your chest muscles and feeling a stretch in the pecs as your arms move outwards. 7. Maintain control and avoid using excessive momentum or swinging of the body. 8. Once you reach a comfortable stretch point, squeeze your chest muscles and slowly bring your arms back together in front of your chest. 9. Pause for a moment in the contracted position, feeling the tension in your chest. 10. Repeat for the desired number of repetitions. ##Variations - Single-arm cable lying fly: Instead of using both arms simultaneously, you can perform the exercise one arm at a time by grasping a single handle attachment. This variation allows for better focus on each side individually and helps address any muscle imbalances. - Incline cable lying fly: Adjust the bench to an incline position (around 30-45 degrees) and perform the lying fly exercise. This variation targets the upper chest muscles to a greater extent. ##Muscles Worked - Primary muscles: Pectoralis major, pectoralis minor (chest muscles) - Secondary muscles: Anterior deltoids, triceps, biceps, serratus anterior ##Common Mistakes - Using excessive weight: Choose a weight that allows you to maintain proper form and control throughout the exercise. Using too much weight can compromise your technique and lead to injury. - Allowing the elbows to lock: Keep a slight bend in your elbows throughout the movement to maintain tension on the chest muscles and avoid unnecessary stress on the joints. - Bringing the hands too close together: Avoid crossing your hands or allowing them to touch at the top of the movement. Keep a slight distance between the cable handles to maintain tension on the chest muscles. - Using excessive momentum: Focus on using a controlled and deliberate motion, rather than swinging the arms. This ensures that the chest muscles are properly engaged and targeted. ##Safety Precautions - Ensure that the cables and handles are properly attached and secure before starting the exercise. - Choose a weight that challenges your muscles but still allows you to maintain proper form and control. - If you have any existing shoulder or chest injuries, consult with a healthcare professional before attempting this exercise. - Engage your core muscles and keep your back flat against the bench throughout the exercise to avoid straining your lower back. - If you experience any pain or discomfort during the exercise, stop immediately and seek guidance from a fitness professional.
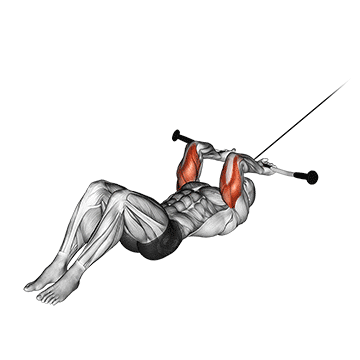
The cable lying triceps extension, also known as the cable skull crusher, is an exercise that targets the triceps muscles of the upper arms. By performing the movement while lying on a bench and using a cable machine, this exercise helps to strengthen and tone the triceps, improving overall arm strength and definition. ##Instructions 1. Start by lying face-up on a flat bench with your head positioned away from the cable machine. 2. Position yourself in such a way that the cable pulley is located at your head level. 3. Grasp a straight bar attachment with an overhand grip (palms facing down) and hold it above your chest, with your arms fully extended. 4. Keep your elbows close to your head throughout the exercise and maintain a slight bend in your elbows. 5. Engage your core muscles and keep your feet firmly planted on the ground for stability. 6. Begin the movement by bending your elbows and lowering the bar toward your forehead, maintaining control and feeling a stretch in your triceps. 7. Keep your upper arms stationary and avoid moving your shoulders or flaring your elbows out to the sides. 8. Continue the movement until the bar is near or just above your forehead, maintaining tension on the triceps. 9. Slowly reverse the movement by extending your elbows and raising the bar back to the starting position above your chest. 10. Repeat for the desired number of repetitions. ##Variations - Rope attachment triceps extension: Instead of using a straight bar attachment, you can use a rope attachment to perform the exercise. The rope allows for a different hand grip, which can provide a slightly different feel to the exercise and engage the triceps from a slightly different angle. - Dumbbell lying triceps extension: If a cable machine is not available, you can perform a similar movement using dumbbells. Lie face-up on a bench and hold a dumbbell in each hand above your chest. Lower the dumbbells toward your shoulders, keeping your elbows stationary, and then extend your arms back up. ##Muscles Worked - Primary muscles: Triceps brachii (long head, lateral head, medial head) - Secondary muscles: Deltoids, pectoralis major, forearms ##Common Mistakes - Using excessive weight: Choose a weight that allows you to maintain proper form and control throughout the exercise. Using too much weight can lead to compromised technique and increased risk of injury. - Allowing the elbows to flare out: Keep your elbows close to your head and avoid flaring them out to the sides. This helps to isolate the triceps and prevents excessive stress on the shoulder joints. - Lowering the bar too far: Be mindful not to lower the bar too far down to the point where it excessively strains your elbows or shoulders. Lower the bar until you feel a good stretch in your triceps without discomfort or pain. - Using momentum: Focus on using a controlled and deliberate motion, rather than relying on momentum to lift the weight. This ensures that the triceps are properly engaged and targeted. ##Safety Precautions - Ensure that the cable machine and attachments are properly set up and secure before starting the exercise. - Choose a weight that challenges your muscles but still allows you to maintain proper form and control. - If you have any existing elbow or shoulder injuries, consult with a healthcare professional before attempting this exercise. - Engage your core muscles to maintain stability and protect your lower back. - If you experience any pain or discomfort during the exercise, stop immediately and seek guidance from a fitness professional.